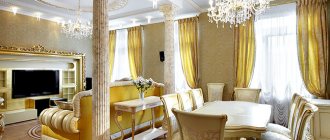
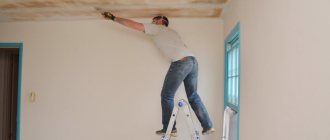
Arched designs in the interior have been at the peak of fashion for many years. With their help, you can beautifully design a doorway in places where for some reason it is not possible to install a door. Plasterboard semi-arches are widely used indoors in residential premises. Semi-arches made of plasterboard will be an ideal decoration for a doorway, an element of an interior partition in the hallway, living room or kitchen. Such designs will add charm to any place.
Semi-arches made of plasterboard are attractive and fairly simple designs that can be done with your own hands even by novice craftsmen.
Preparatory work
In the process of deciding how to make a semi-arch with your own hands, special attention is paid to the preparatory work. First of all, it is worth noting that a semi-arch is a design that looks like a quarter of a circle. The material that can be used to make a semi-arch should have an average thickness of 6.5 mm. This makes it possible to bend it quite easily when creating various curved parts.
Quite often, this design option is made in two types - a product with one rounded corner and a straight second corner. The second option is a semi-arch, which was created based on a circle with a larger diameter than the doorway. In this case, a relatively small opening is obtained.
Criteria for choosing the shape of a semi-arch
There are at least five conditions that influence the choice of configuration for a future design.
Selection conditions:
- Footage of the room;
- Ceiling height;
- Interior style;
- Functionality of the premises;
- Purpose of the semi-arch.
For example, interior semi-arches cannot be made very wide, and there is no point in doing so. The modest size looks more convincing in the conditions of not the most spacious standard apartments.
Form selection criteria
But a semi-arch that zones one room (for example, a kitchen/dining room) can be wider. This needs to be done at least for ease of movement in a single space, divided into zones with your own hands.
Required materials and tools
To equip a structure such as an external arch or flying buttress, you should select only the highest quality and modern materials. This will ensure the possibility of building the most practical and reliable design.
To create a semi-arch with your own hands, you will need to prepare the following materials and tools:
- Drywall sheets.
- Profiles for mounting the material – ceiling 60x27mm and guide 27x28mm.
- Putty for finishing drywall.
- Reinforcement tape or serpyanka.
- Acrylic primer.
- Putty for interior finishing.
- Protective arched corner - made of aluminum or plastic.
- Self-tapping screws for drywall 25-30 mm.
- Dowels for installing guides measuring 6x40 or 6x60.
- Special seal for profiles.
The total amount of materials must be calculated depending on the shape and size of the semi-arch. At the same time, you will need to prepare the following tools - a knife for cutting drywall, a tape measure, a laser or water level, metal scissors, a hammer, a hammer drill, a screwdriver, spatulas.
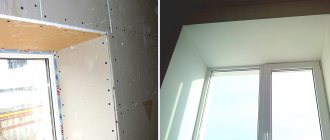
Design features for door installation
If you plan to install a door (hinged or sliding) in an arched opening, it is necessary to use a more powerful profile or selectively strengthen the installation sites of door hinges (sliding mechanism. Since standard door leaves have a rectangular shape, a square arch is usually used for their installation; build such a structure with your own hands simpler than arched.
The illustration shows the reinforcement of a future square arch with timber.
Taking measurements
Before making arches, you should first take the dimensions. This is a fairly simple process; the most important thing is to be careful so that all measurements are taken as accurately as possible.
Before you begin installing a plasterboard arch, it is worth measuring the following manipulations:
- Measurements are taken from the doorway;
- The shape of the semi-arch and the calculation of the total amount of required material are planned;
- A pattern or template is made for cutting out the main curved parts;
- The opening is cleared of remnants of previously used finishing;
- Using a tape measure and a level, you need to mark the places where the arch profile guides will be attached.
After preparing all the necessary tools and taking measurements, you can begin cutting drywall and creating the profile frame itself.
Installation of a wooden frame for a plasterboard arch
Making a wooden frame for your plasterboard arch is also easy. True, for this you will still need plywood and wooden blocks. Measure the width of the doorway, subtract the thickness of the drywall and plywood, and you will get the thickness of the wood pieces you need. Draw the arc of the arch on the plywood and cut it out using a jigsaw.
A frame for a plasterboard arch made of plywood and bars screwed to it.
Using 5-centimeter self-tapping screws, attach wooden blocks to the plywood to serve as the frame of the arch. Then fix the arch in the doorway using long self-tapping screws screwed in every 15 cm.
Drywall attached to a wood frame.
The last step is to attach the second plywood wall and cover the plywood with drywall. The latter must be secured using drywall screws.
Manufacturing and installation of semi-arches
When making a semi-arch from plasterboard with your own hands, you should follow the following sequence of actions:
- Fastening guide profiles. They are installed on the sides of the doorway at a distance from edge to edge. This will help the edges of the semi-arch not stand out against the background of the wall.
- Fastening the guides with dowel nails, the pitch between which is 40 cm.
- The sealing tape is being secured.
- The arc of the future semi-arch is measured using a tape measure.
- A guide profile of similar length is cut and notches are made on its sides every 5-6 cm, along the entire length. It is he who will perform the functions of the lower guide arch.
Making an arch yourself is not at all difficult; the most important thing is to correctly install and secure the drywall sheets and profile.
After this, you will need to draw an arc of the required size and measured diameter on a sheet of drywall. Using the first template, the second part is made in its exact mirror image. The elements will be attached to both sides of the doorway.
At the end of the work, all that remains is to fasten the drywall and the lower guide profile into the opening.
This can be done in two different ways:
- First, the drywall sheets are fastened using self-tapping screws with pre-mounted profiles. After this, bending a little, the lower profile is attached to them.
- You can first attach the guide profiles to the lower arc part of the drywall, and then the entire assembled structure is attached to the side profiles in the doorway.
Both of these methods will require some skill, but will ensure that the plasterboard structure is neatly and firmly secured in the doorway.
In the process of arranging a plasterboard semi-arch, the sheet will need to be bent in a certain way. The bottom strip of the sheet is fixed in the semi-arch. The end strip is cut from prepared plasterboard of a length equal to the length of the semi-arch itself, the width should be equal to the depth of the opening. To firmly attach a sheet of material to a surface that is characterized as curved, it will need to be slightly bent.
Which drywall to choose and how to bend it
There is a special arched plasterboard 6 mm thick. It is quite possible and even necessary to use it to create arches. However, there are several points that may prompt the use of conventional wall gypsum board 12.5 mm thick. Although arched material is twice as thin as wall material, it is twice as expensive. If only one or two arches are made, then very little wall gypsum board will be required, and you will have to buy a whole sheet.
Arched drywall is easy to bend with your own hands
At the same time, wall plasterboard is probably already used in apartment renovations, since the question of making an arch has arisen. Therefore, this material is at hand. But it is too thick to bend properly. There is a way to bend drywall for an arch.
If, while bending a sheet of arched gypsum plasterboard, it begins to crack slightly, then this is a signal that it is time to stop. A little more effort and it will simply crack.
The dry method involves bending the plasterboard with your own hands to the desired radius. If this is an arched gypsum plaster, then it easily gives in and bends. The wall sheet does not lend itself to this procedure at all, so it is bent using a wet method.
| Table of bending radii of drywall | ||
| Sheet thickness | Minimum dry bend radius | Minimum wet bend radius |
| 6.5 mm | 100 cm | 30 cm |
| 8 mm | 155 cm | 38 cm |
| 9.5 mm | 200 cm | 50 cm |
| 12.5 mm | 275 cm | 100 cm |
To create beautiful arches from plasterboard, you need to bend it correctly. To do this, a frame is created for the entire sheet. It should be a curved frame with the same radius as the arch. A sheet of wall plasterboard is placed on the floor and many holes are made on its back side with a needle roller. Then it is moistened for ten minutes with a wet roller. Then the sheet is transferred to the frame and carefully bent on both sides. You need to moisten it carefully so that the sheet does not become completely soaked.
A wet sheet gives in easily, but there is no need to rush. When the gypsum board completely rests on the frame, you will need to fix it in this position overnight. During this time it will dry and take a new shape. More details about this process and other subtleties of bending gypsum boards can be seen in the video.
You don't have to bother with the whole sheet. If there are one or two arches, then you just need to cut the gypsum board strips to the specified size and bend only them. This is much simpler, and the frame for bending will then be used for work on the same sheet.
Finishing work
After installing the profile structure, the interior arch must be finished using special materials. Finishing is carried out in different ways. In an area of slight bending, you can use a special “dry” method, that is, install the strip on special supports, and you can also slightly load the structure in the middle with insignificant weight. This must be done until the material takes the required shape.
Many craftsmen apply notches on the inside every 10 cm and bend the strip with their hands. When carrying out this process, the strip must be immediately secured to the profile using self-tapping screws. You can use the wet finishing method. To do this, you will need to moisten the inner surface of the strip with water and install it at a certain angle so that it bends under its own weight. After completing the finishing work, it is worth moving on to the final processing of the structure.
Procedure for fixing drywall
At this stage you will have to fix the drywall. Prepare sheets of the desired shape and size. They can be mounted in several ways. The most commonly used method is that the parts are secured to guides in the doorway, and then a curved part is mounted underneath. In accordance with the second method, you first need to attach the curved guides to the sheets, and then insert and securely fix the structure in the opening. You can use the method that is more convenient for you. The result under any circumstances is equally good.
Scheme for attaching drywall to the arch frame.
As a rule, the bottom strip of the structure is made curved. To do this, you need to first bend the straight part. Can be done using different methods. The most convenient, fastest and most cost-effective one is used most often. In accordance with it, the strip must be installed on special supports and bent, applying mechanical forces to it. There is no need to act too roughly and forcefully; under high pressure the material may simply break. The problem is that drywall is a rather fragile material and requires the most careful handling.
Related article: Polyurethane floors: self-leveling coating, cement and polymer, two-component photo, plates and technology
Another method involves first creating notches on the inside of the sheet. Such notches make the bending process even easier. Another method can be used. In accordance with it, the material must be moistened with a certain amount of water, using a brush to apply it. Once saturated with water, the sheet will begin to bend under its own weight. Another method involves using a needle roller. It allows you to create elements with almost any shape, parameters and bend.
Final processing
At the beginning of this work, all joints of the material should be covered with a special reinforcing tape. It is laid on a primer, and everything on top is carefully sealed with putty on drywall. All edges of the arch and the finished opening must be trimmed with special protective corners. All straight lines are processed with plastic corners, and the arc can be finished with aluminum parts. The top of the arch can be decorated with wallpaper or putty to give it an aesthetic appearance.
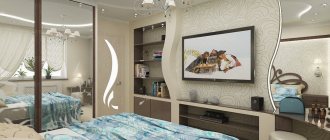
A semi-arch made of plasterboard is very convenient and beautiful. It is able to add lightness to the interior of the room, at a visual level it makes the ceiling higher and fills the overall space with style and beauty. It is easy to install and requires little money. It is enough to simply observe the accuracy of the measurements taken, a certain sequence of actions during the installation process, firmly fasten all the elements, and the fully finished semi-arch will please the eye and decorate the interior for as long as possible.
How to mount an arch yourself
The design is simple, but it will require attention and perseverance from you. To get a positive result, you should follow the instructions described below.
Sequence of work
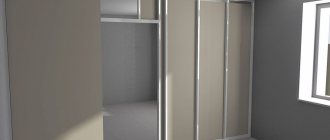
- The first thing to do is decide where the structure will be located and what function it will serve. It will be a simple arch for beauty, for example, dividing a room into zones. Or it will be a special partition with shelves for the living room or hallway. Or maybe you want to build a niche, framed by an arched curved structure. Why do you need to decide on this before starting work? It's simple, so you won't make unwanted mistakes and waste of material.
- Next, the design should be drawn on paper, defining all dimensions. This does not have to be a professional drawing; it is enough to make a schematic sketch that you will use as a reference during installation.
- The next step will be to assemble the partition frame from plasterboard. If the structure is curved, then it is assembled from a metal profile, which can be bent in any direction by making cuts on the side walls.
- As soon as the frame is ready, a gypsum board cut according to the pattern is screwed onto it: first straight strips, then curved ones.
- The last stage will be the finishing of the finished plasterboard structure: plastering, puttying the plasterboard, painting the wall, or finishing with another finishing material.
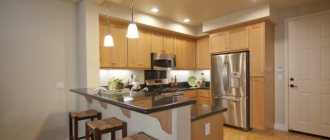
Finishing
At this stage, you can go into more detail, since there are many options for cladding arched structures, depending on the design of the room. Let's consider several options:
- Classic arched structures are in most cases finished with natural wood. The material is natural, has a beautiful appearance, a natural pattern, and you can also use stains of different colors. If you can’t afford the use of wood, you can use MDF panels with imitation of expensive wood species;
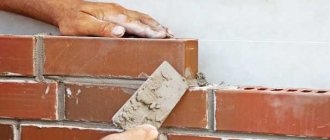
- Natural or artificial stone - often used in rooms decorated in the loft style. Thanks to this decoration, the room has a brutal look, it simply reeks of the Middle Ages;
- PVC panels will be relevant in a minimalist style. The pattern and color must match the overall interior of the apartment;
- Decorative brick is an excellent solution for any interior. If the apartment has a partition with an arch that zones the room, then by laying decorative bricks on it, you will make the interior unusual and stylish.
In other words, there are no specific rules in the design of arched structures; it all depends on your preferences. In the video you can see photos of apartment interiors with arches, all the variety of room design, design solutions and design styles for plasterboard arches.
https://youtube.com/watch?v=tfgFw5dFMKk
When to choose a semi-arch
If you want to make a semi-arch, you should first understand the reasons for choosing such a design for installation indoors. Firstly, such an interior element is necessary when, for technical reasons, it is impossible to equip another structure with a low opening. Sometimes an arch is used to visually change the space.
Secondly, this part of interior design is sometimes used if homeowners want to add originality and modernity to the interior, as well as coziness and comfort. Thirdly, the semi-arch is used to decorate door and interior openings, as well as niches in the walls, when there is a need to hide utility lines and protrusions. A semi-arch can also be installed for household needs, for example, to arrange a flower stand.
Do-it-yourself wooden classic interior arch
An ordinary plasterboard ceiling with simple DIY lighting
A tree, properly decorated, can fit into any interior - there are no restrictions in this regard, but there are difficulties of a different nature. In terms of self-production, this is not a very suitable option, since it requires special equipment - these are not only woodworking machines, but also tools for painting. You shouldn’t think that you can get away with it with a brush or roller - if you want to get a really beautiful interior wooden arch, you will have to take care of the availability of the appropriate equipment. At a minimum, you will need a high-quality spray gun and compressor. Tools are perhaps the only point that stops many people from making a wooden arch themselves.
Wooden interior arch photo
If we consider the technology for making a wooden interior arch with our own hands and study its possibilities for self-production, then in general we can come to the conclusion that if you have all the necessary equipment and the ability to use it, this is not a difficult task. If these two conditions are absent, then it is better not to take on the work - in such a situation, it is better to order the production of an interior arch made of wood and, in order to save some money, just install it yourself. This is quite a simple matter and is practically no different from installing interior doors - you only need to wedge the product in the prepared opening and secure it with polyurethane foam.
In the same way, an interior arch made from wood-derived materials is installed - MDF, chipboard or plywood. Naturally, there will be some differences in nuances - they are determined by the characteristics of the material, which will have to be taken into account. For example, an MDF arch is very flexible, which is why regular polyurethane foam is not suitable for its installation. Here you need a polyurethane sealant with low expansion pressure.
Interior arch made of wood photo
Decorative semi-arch
If there is a holiday planned in your home, then you may be faced with the question of how to make a semi-arch from balloons. To do this, you can use helium balloons, which are inflated in twos and tied by the tails. This skill can be useful to you if you plan to further improve your aerodesign.
The inflated balloons must be the same size, otherwise the arch will turn out ugly and crooked. Two pairs of balls are connected to each other. You need to take the connected balls in each hand and spin them together, which will allow you to get something like a flower with four petals. The same procedure must be repeated with all pairs of prepared balls. They will become a decoration of the arch.
One of these flowers is picked up and tied to a fishing line. Each ball is wrapped with it, then you need to make several knots and secure the flower at the base of the frame. Now you can start decorating. Ribbons made of organza, satin, paper and artificial flowers are suitable for this. They are hung to taste on arches of balloons. The semi-arch may not have a frame; for this, the “pearls on a string” technique is used.
There is no need for a base; the balloons themselves filled with helium will act as it. They are tied to one fishing line, and weights are strengthened at the ends. Balls filled with water can be used as them. Thanks to the properties of helium, the balloons will take off, and the structure will be fixed at the ends, which will allow you to get an arch without wasting effort on making a frame.
If you are thinking about the question of how and what to make a semi-arch at home, you can consider the option of making a structure on a frame. This option is suitable if the decor needs to be moved. The basis can be metal-plastic. This design can be disassembled if necessary, simplifying the process of storage and transportation. The frame can be purchased at a store specializing in garden tools.
What types of arches are there? photo
Corridor, or interior, arches can differ in very different shapes. They differ mainly in the upper part and in some cases in the way they are connected to the vertical parts. Their main types are presented in our photos.
This group does not include one of the most popular in recent years - the semi-arch. It is distinguished by a rounded angle on one side, which remains straight on the other. Actually, this is where the name came from – semi-arch. It looks great in modern interiors: hi-tech, minimalism, art deco.
Classic is characterized by the correct shape of the top. This is a semicircle whose radius corresponds to half the width of the door opening. This type looks great at an opening height of at least 2.5 m. It fits perfectly into any interior, but it looks most impressive in a long corridor or instead of a door to the kitchen.
An arch in the Art Nouveau style has a sharp transition at the junction with the vertical component openings and has a small radius. It looks especially good if the ceiling and walls have a simple design. Looks good at the entrance to the office, looks great in place of the balcony door.
An arch in the “romance” style has simple rounded corners (masters often call it that). Looks beautiful even if the height is not very high and if the width is large.
Very close to “romance” is the “ellipse” shape. In the middle part it is characterized by greater curvature. Suitable for wide and low openings. Looks a little softer.
Trapezoid is an original design that consists of broken lines. It is difficult to play in the interior, so it is rarely used (usually for non-standard interior designs).
It resembles an ordinary opening (this is what it is, only the door leaf is missing). For greater originality, it can be accompanied by wooden carved elements made in the form of columns on the sides. In this form, it is perfect for classical interiors and ethno-style - Roman or Greek, depending on the type of columns used.
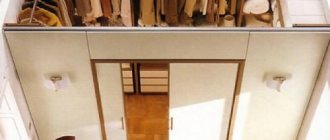
For decoration in modern styles, a different opening is used - not far from the main arch there are smaller portals. With this opening you can “play up” a simple shape.
Before you start making an arch, you need to choose its type, decide on the parameters: radius of curvature, where it will start. This may be a sharp bend or just a slight rounding of the corners.
To understand how the chosen shape will look, you can cut out a cardboard template and attach it to the door. Evaluate the effect. If you are satisfied with everything, you can make the preparation. However, only one - for one side of the opening. The other part must be done in place, otherwise it will turn out crooked.