Slopes are the internal walls of a window opening. In most cases, these surfaces are arranged with a slight slope towards the room. When replacing double-glazed windows, the slopes are usually damaged. Restoring damaged surfaces with plaster is not convenient in all situations, so more and more often owners are choosing slopes made of plasterboard. This material allows you to avoid all the difficulties and inconveniences characteristic of plastering work.
DIY plasterboard slopes
Construction of slopes using plasterboard can be done using adhesive and frame methods. Study the basic information about the work to be done, familiarize yourself with the features of both methods, choose the option that is convenient for you and start finishing the slopes.
| Designation | Cardboard color (front/back) | Marking color |
| GKL | grey/grey | blue |
| GKLO | grey/pink | red |
| GKLV | green/green | blue |
| GKLVO | green/green | red |
What do you need for work?
First of all, you need to prepare sheets of drywall suitable for such work. The best option is moisture-resistant material with a thickness of 12.5 mm.
| Thickness | Size | Square | Weight |
| 12.5 mm | 1200x2500 mm | 3 sq.m | 28.9 kg |
| 12.5 mm | 1200x2700 mm | 3.24 sq.m | 31.2 kg |
| 12.5 mm | 1200x3000 mm | 3.6 sq.m | 34.7 kg |
If you choose the method of attaching drywall to the frame, buy the appropriate UD and CD profiles. Fix the profiles using screws and dowels. If you use the gluing method, buy special adhesive for drywall. On average, about 5 kg of adhesive composition is used for 1 m2 of drywall. The specific value is determined individually in accordance with the brand of adhesive used and the condition of the surface to be finished.
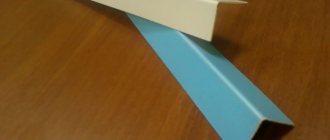
UD and CD profiles
Drywall adhesive Perlfix 30kg
Additionally, you will need sealing tape.
The set of tools is standard. Prepare the following equipment:
- Bulgarian Needed for cutting metal profiles. If you don’t have a grinder, you can get by with scissors for cutting metal;
- perforator;
- knife for cutting drywall sheets;
- metal square;
- measuring tape;
- building level.
Find out how to decorate windows with siding yourself from our new article.
Preparation for finishing
Before starting work on finishing the door slopes, all communications that must pass through the doors are laid. For example, if the doorway of the front door is decorated, this could be a wire for a bell, lighting above the door, etc. If the slopes of interior doors are designed, it can be a telephone cable or twisted pair cable for connecting the Internet.
Having passed the necessary communications into the gap between the door frame, securing them, the cracks are sealed with polyurethane foam. Foam is applied no more than 1/3 of the volume of the cracks: it expands greatly and can even bend the wooden door frame. Therefore, if the box is wooden, while the reaction takes place, it is recommended to install spacers that guarantee an unchanged geometry.
Making door slopes with your own hands begins with sealing the gaps between the door frame and the wall
The time required for the foam to harden depends on the temperature and humidity, but on average it takes 8-12 hours (for some types it may take a day). Excess hardened foam is cut off with a knife, plaster that does not adhere well is removed, and dust and dirt are swept away. You can begin work on finishing the doorways.
Preparatory activities
First of all, take all your measurements. When preparing sheets of material for decorating slopes, leave slight allowances.
Measurements
It is extremely difficult to ensure an absolutely level base in the places where the finishing is installed, so it is better to take the material with a reserve and then cut off the excess, rather than discover that part of the sheet is not enough to cover the entire surface of the slope.
Regardless of the chosen method of finishing slopes with plasterboard, perform preliminary preparation of the surface to be decorated. Be sure to remove the existing layer of plaster coating.
Remove old plaster
If the gluing method is used, the surface must be carefully leveled. For this you can use ordinary putty.
Leveling the slope surface
When using the frame method, preliminary alignment can be abandoned in most cases. It is enough just to get rid of the crumbling areas of the plaster coating.
Treat the base with an antifungal agent.
Antifungal primer
After completing all the preliminary steps, you can proceed directly to attaching the plasterboard sheets using the chosen method.
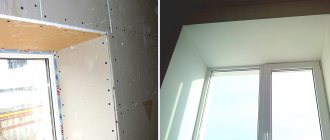
Drywall slopes
They can be installed by almost anyone who has at least basic skills in such work. The disadvantages inherent in plaster and plastic are not inherent to them.
But there are many positive qualities:
- drywall is an environmentally friendly material that does not emit any harmful substances during operation;
- installation of such slopes takes little time;
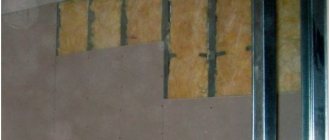
- such slopes can be insulated by placing a layer of insulation between them and the wall - polystyrene foam, polyurethane foam or mineral wool;
- drywall does not crack (unless you hit it hard);
- slopes are finished by puttying and can be easily restored if damaged;
- the material is lightweight, has good vapor and air permeability, and does not change its shape when moistened and dried;
- the surface of such slopes can be finished with various materials - wallpaper, tiles, polymer materials.
Frame method of finishing slopes
Slope diagram
When using this finishing method, work should begin with the arrangement of vertical decorative elements.
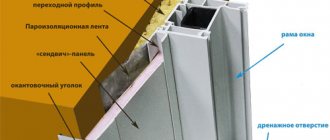
Scheme for finishing a slope using the frame method
First step
Attach guides along the edges of the window opening perpendicular to the floor. At this stage, use the UD profile. Fix with self-tapping screws in increments of 40-50 cm.
If the guide is attached to the frame of a plastic window, be sure to place a sealing tape between the profile and the surface of the glass unit. It will prevent the profile from freezing in cold weather.
Drilling the guides
Second step
Install CD guides perpendicular to the UD profiles.
Third step
Sew up the frame with sheets of plasterboard.
Attaching drywall sheets to the guides
Attaching drywall sheets to the guides
Finishing window slopes with plasterboard
Fourth step
Proceed to finishing the top of the opening. The work is performed in a similar order.
If the window slope has a shallow depth, it is best to attach the guide profile on three sides - on the finished finishing elements and on the frame of the double-glazed window.
After completion of the work, there will be approximately a centimeter gap between the trim sheet and the outer part of the lintel. Fill it with special glue for working with drywall.
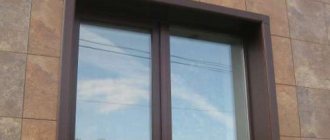
Window slope
Finish the slopes at your discretion. Usually they are puttied or painted.
Plaster slopes
Plaster slopes, which for many years were the only option for finishing a window opening, are now rarely used due to their shortcomings.
The disadvantages are the following:
- installation work is dirty and wet;
- the process of forming vertical and horizontal planes of slopes is quite complex and not accessible to everyone;
- The drying time for layers of plaster is at least 3 days;
- Cracks often form at the junction of the slope and the window frame;
- plaster conducts sound and heat well, which causes hypothermia of the window profile and often leads to the formation of condensation and fungus.
Plastic slopes, along with a lot of positive qualities, also have such a significant drawback as high cost. In addition, it is not so easy to install them correctly yourself without the appropriate skill.
Glue method for finishing slopes
Slopes made of plasterboard
The adhesive method of finishing slopes with plasterboard is more difficult to implement compared to the previously discussed method. To perform such work efficiently, you need to have some skills to accurately ensure the slope of surfaces.
Applying glue
We apply the sheet by inserting pre-drilled metal strips between the window frame and the wall
Therefore, it is recommended to use this method only in situations where, for some reason, it is not possible to change the existing dimensions of the window opening.
Finishing should begin with fixing the upper slope. In this case, it will take on the functions of a “guide” for the correct installation of the side elements.
Gluing drywall to slopes
Gluing drywall to slopes
Cut out parts from a single sheet of plasterboard according to the dimensions of each side of the slope and glue them to a previously leveled and dried surface.
Finishing window slopes with plasterboard
In most situations, the adhesive must be applied in a continuous layer. If the surface of the base is flat and you need to reduce the drying time of the glue, apply the adhesive composition in wide strips. Level the finishing sheets. While the glue dries, install pre-prepared supports. The specific drying time for the mixture is indicated on the packaging. Be sure to clarify this point separately.
Photos of slope finishing
Foam mounting
Even a person who is far from repair work can fix slopes on plasterboard windows using this method.
Installation of drywall on slopes can be carried out in parallel with insulation
How to properly carry out work using this method:
- when the surface of the wall is cleaned and ready for further work, a thin layer of polyurethane foam is applied to the slopes, cut in accordance with the required parameters, using zigzag movements;
- Glue the part to the wall and press it for a while, fixing it in the required position. The foam sets quickly, but it is important to take into account its ability to expand, so the element is removed from the wall;
- after 5 minutes, the process of secondary expansion of the foam will occur, which partially remains on the wall and on the slope;
- after the foam has reached its final volumes, the parts are fastened into place and left for a day. During this time, the foam will completely harden. All fragments should be glued in this way;
- at the final stage, the joints between the slopes and the wall are sealed with plaster.
Installing slopes on foam is the easiest to perform.
Despite the fact that this installation method does not require any complex manipulations, it has some tangible disadvantages:
- the surface must be leveled, otherwise it will not be possible to install the product accurately;
- deformation of fragments is possible;
- Possible formation of voids and, as a result, not very reliable fastening.
Finishing work
Drywall slopes need to be given a more attractive and aesthetic appearance.
First of all, smooth out all the bulges that appear at the points where the adhesive mixture was laid, using a special trowel for working with drywall. Level the recesses with putty.
It is also recommended to use putty to fill the joints between the side panels of drywall and the top finishing element of the opening.
Cover the leveled and dry surface with primer. If necessary, apply a double coat of primer.
Puttying slopes
If desired, the slopes can be painted. Painting compounds are best applied using a brush or a special roller that can give the surface a beautiful rough structure.
The best paint option for finishing drywall is water-based compositions. Select the required number of paint layers to achieve the desired shade individually.
Painting slopes
Painting slopes
At this point you can finish working with the slopes. Additionally, you only need to finish the external elements of the window slope and plaster the space under the window sill.
By qualitatively decorating window slopes using plasterboard, you will receive a decorative finish that is excellent in its external characteristics, and will also save time and budget. The finished finish will fit perfectly into any interior and will serve for many years without losing its original quality.
| Composition of Ceresit CT 42: | aqueous dispersion of acrylic copolymer with mineral fillers and pigments |
| Density: | OK. 1.47 kg/dm3 |
| Application temperature: | from +5 to +35°С |
| Rain resistance: | in 3 hours |
| Water absorption of painted surface: | no more than 0.5 kg/m2 h0.5 |
| Abrasion resistance: | at least 5000 cycles |
| Ready to coat: | in ~6 months |
| Consumption of Ceresit CT 42: | 0.2 – 0.5 l/m2 (depending on the nature and color of the base) |
Prices for drywall and sheet materials
Drywall and sheet materials
What to use for finishing: options
There are a wide variety of ways to make door slopes. Each of them has its own advantages and, of course, certain disadvantages. When choosing, you should start from their favorable ratio in the direction of the predominance of advantages.
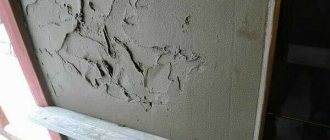
- The classic of the genre is plastering. Cement-sand mixtures are durable, not destroyed by moisture, and cheap. Among the negative qualities are the need for certain plastering skills, a large amount of dirt and a rather long wait for drying before finishing.
- One of the most popular options today for sealing the slopes of the front door is plasterboard sheathing. The good advantages of the material are the speed, simplicity and cleanliness of finishing. Even a person who has never encountered such work, but knows how to hold tools in his hands, can handle it. A significant objection may be the low moisture resistance of gypsum plasterboard. It is used to cover door jambs in apartment buildings, where the formation of condensation is prevented by the entrance. And it is still advisable to use a moisture-resistant type of drywall.
- Laminate flooring is quite good as a cladding material for making slopes on the front door. An opening made in this way looks quite noble. However, the frame “eats up” the space, and the laminate itself is also not very friendly with moisture.
- MDF looks very beautiful, but has almost the same disadvantages as laminate, plus it is very unstable to physical influences - it can even be scratched by a plastic button. In addition, it absorbs all odors, and it is almost impossible to remove stains that appear. But it is placed on polyurethane foam, which even an inexperienced installer can handle.
- An attractive way to make slopes on doors is tiling. You just need to choose it from unglazed floor options, otherwise the doorway will look too shiny. The advantages are resistance to moisture and strength, the disadvantages are that the work is dirty, it requires experience, time to set and sew up seams.
- PVC panels can be considered a disposable option. They are cheap, look budget, but can be pierced even with a finger, which is not very good for an external doorway.
How to finish slopes - materials to choose from
Want a stylish result? Choose Profil Doors! And in order to beautifully sheathe the opening after installation or during the renovation of the hallway, you can use the following materials:
- traditional plaster, painted in the desired color;
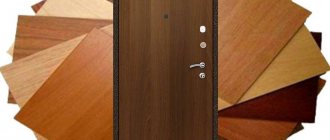
- wood and its derivatives - laminated chipboard, MDF or laminate;
- plasterboard sheets;
- PVC lining and various plastic panels;
- decorative stone and tiles.
It looks more beautiful when the colors of the skirting boards and slopes match the platbands
Advice. Whatever building material you choose, it is important to choose the right color. From the inside, the jambs must be decorated in such a way that they match the color as closely as possible with the baseboards and frames of the interior doors, as shown in the photo. It is easier to finish the slopes from the outside or from the entrance - buy platbands or extensions to match the appearance of the door leaf.
If we compare different types of cladding by price, the most affordable option is plastic panels, and the most expensive are products made from natural or artificial stone. In addition to its low cost, PVC lining is distinguished by a wide range of colors and patterns and ease of installation, since it does not require finishing. The weak point of the material is the fear of mechanical damage and deep scratches, which can only be removed by replacing damaged lamellas.
The stone decoration of the slopes of the front door looks beautiful and respectable, but is quite complex in execution. How to make a hallway cladding from various types of decorative stone is described in detail in a separate article.
Plastering is also an inexpensive way to install any slopes, although to implement it you need to have basic finishing skills. You can plaster and paint a doorway from both the inside and outside. This option is relevant when the door is installed in a narrow niche and there is simply not enough space for installing drywall and any panels.
As for gypsum plasterboard sheets, their use allows you to level out the curvature of walls, artificially increase their thickness, or make slopes at the desired angles. Plasterboard products provide good heat and sound insulation, but require final finishing - putty, wallpapering or painting. In addition, ceramic tiles can be successfully laid on drywall.
Wooden and wood-shaving materials are a compromise solution in terms of price and convenient from the point of view of installation on slopes with your own hands. How nice they look in the entrance doorway is shown in the photo.
Various installation options
Finishing slopes with plasterboard is carried out in three main options:
- Installation using polyurethane foam.
- Pasting on putty.
- Frame mounting.
Various options for installing plasterboard slopes
Each of these methods is suitable for independent use and gives a complete understanding of how to make slopes in different situations. These methods are used for finishing all types of surfaces.
Using polyurethane foam
It is believed that the use of polyurethane foam is one of the fastest and easiest procedures for installing slopes. Indeed, this option is quite convenient. But it must be taken into account that an error with the amount of material is a guarantee that the coating will be deformed.
Applying polyurethane foam to a plasterboard slope
Window and door slopes made of plasterboard on foam are laid in the following order:
- All preparatory activities are being carried out.
- The foam container shakes well. Of course, it is much more efficient to work with professional materials that are applied with a special gun. But for small volumes of work, it makes no sense to purchase them.
- The substance is applied in a thin layer (snake) to the underside of the cut parts.
- The element is applied to the desired area. But they do not leave it in place, but immediately tear it off.
- The fragment is left for ten minutes. After which, it is finally installed on the selected area. First, the first vertical part is placed, then the horizontal and again the vertical.
- After 24 hours, finishing work begins.
This method will be an ideal solution if you need to refine interior openings or make window slopes from plasterboard in a short period of time.
Landing on putty
But how can you make plasterboard slopes more reliable so that no problems arise? The option with putty is perfect for this.
The procedure is as follows:
- Careful preparations are being made. The dry mixture is diluted.
- The solution is applied to the reverse sides of the parts. It is placed along the entire perimeter of the panel, and also dotted areas are made in the center.
- The workpiece is placed in the selected location and pressed. It is necessary to ensure that the fragment adheres well.
On a note! To achieve better adhesion, the surface is sprayed with water. Needs a little moisture. To increase the fixation force and its reliability, spacers are installed.
Thus, a reliable surface is obtained. This option is great for making slopes on the front door made of plasterboard.
Cladding on the sheathing
This solution allows you to obtain a practical coating. But it is important to consider that the material will be attached using self-tapping screws. Therefore, it is necessary to follow the rules of fixation, which are that the screws are tightened flush with the surface, without excessive deepening.
Installation of plasterboard slopes on a frame
The sheathing is created quite simply:
- Wooden bars or metal profiles are used for installation.
- The guides are cut into segments, which are determined by measurements. It is important to install elements along the entire perimeter at the inner and outer corners. We must not forget about the crossbars.
- If required, the made frame can be insulated. For this purpose, mineral wool is used, which is driven into the resulting cells.
- Next, the gypsum board parts are installed. But it is necessary to take into account that they are measured and cut only after the sheathing has been created.
- All fragments are fixed with self-tapping screws.
This option is most often used when the finishing of window slopes with plasterboard is carried out together with the cladding of adjacent walls. Working with a doorway can be difficult because its size will be reduced.
Installation of slopes on the frame is most often done when finishing adjacent walls with plasterboard
Required tools and materials
The installation of plasterboard slopes begins with the fact that you need to select the right material. The most common mistake is that many people purchase the cheapest and thinnest type of gypsum board slabs. But you shouldn't do this. For work, it is advisable to use moisture-resistant sheets with a thickness of 12.5 mm. Especially when openings (doors and windows) that are located on the “street wall” are affected.
You will need a minimum set of tools and materials, which consists of the following:
- A construction knife or a good stationery knife.
- Putty knife.
- Ruler.
- Hammer and chisel.
- Container for putty.
- Corners with perforation.
- Polyurethane foam.
- Sealant.
- Metal hacksaw or jigsaw.
- Dry putty.
Tools and materials for making plasterboard slopes
On a note! Using ready-made putty options is an unjustified expense. Indeed, it can be used for finishing work, but for preparatory and starting activities it will be completely inappropriate.
Replacing the front door and plastering the slopes
Hello dear OBI Club members!
Many of us are replacing the old entrance door to our apartment with a new metal one. So, after replacement, the question always arises: what to do with the slopes and how to improve them?
In this short article I want to tell you how to plaster slopes after replacing a door.
To do this, we will need the dry mixture Rotband, Betonokontakt primer and 2-3 pieces of perforated corners from the material.
The tools you will need are: a wallpaper knife with replaceable blades, a tape measure, a level, a basin for the mortar, a couple of spatulas for working with the mixture, a mixer for mixing the mortar, a hacksaw and a small piece of laminate to make a plaster “pattern” from.
I’ll tell you about all this using my own example. The walls in the apartment are plastered like a lighthouse with the same Rotband mortar, and the door is already installed. First of all, we must prime the surface with Betonokontakt primer and, diluting a small amount of the mixture, level the perforated corner of the upper slope. To ensure that it does not stick out from the plane of our flat wall, the plaster needs to be cut with a knife to a depth of 3 mm.
We apply a level to the wall and draw a horizontal line with a knife, then simply remove the layer of plaster from the end. Thereby obtaining a recess for installing the corner.
In the same way, after this we install the side perforated corners on the Rotband, applying a level when gluing them and checking the vertical installation.
These corners well protect the outer corners of our slopes, and also serve as beacons for their further plastering.
Now we need to cut a “pattern” from a piece of laminate as shown in the photo:
This is done very simply: we cut out a corner from the extreme corner of the board, taking into account that the layer of plaster extends onto the door frame by about 5 mm. The level door frame and our installed perforated corners serve as beacons for the plane of the plaster layer. Using this “pattern” prepared to the size of the door frame, we will simply cut off the excess mortar that we put between the corner and the frame.
After we plaster the slope, we need to wait about 1 hour and clean the inner upper corners of the slope filled with gypsum mixture. They can be perfectly trimmed and leveled with a spatula while the solution has not yet dried, but only set on the surface.
Next, you need to putty them and smooth them with a thinly diluted solution, thereby smoothing out all the holes that we formed during plastering with a “pattern”.
At the end of the story, watch a short video and understand how easy it is to do it all!
And the next day, after the solution has completely set and dried, we wash our metal door frame. After the solution has completely dried, you can begin applying putty for painting or wallpaper.
It’s better not to cover a metal door with masking tape, because Rotband won’t do anything to it, and it will take a lot of time to wipe off well-adhered tape. It is enough to rest a wide spatula in the corner between the plaster layer and the box, and wash off the gypsum plaster from the metal with a sponge soaked in water.
Common misconceptions about drywall
One of the main misconceptions is the high risk of fungus appearing in the void that appears under the slopes.
All kinds of fungi and bacteria often appear in places with high humidity and not treated with an antiseptic. A door slope made in compliance with all standards does not pose a threat as a possible breeding ground for fungus.
Advice for everyone! When performing repair or finishing work indoors, it would be useful to treat the walls with a primer with an antiseptic or a special antiseptic composition.
Also, some people do not believe in the strength of drywall. In fact, drywall is a fairly durable material. Of course, with some effort, you can break a metal sheet, not to mention drywall, which is inferior in strength.
Fears about its low resistance to moisture are also wrong - there are special moisture-resistant models from which it is recommended to make plasterboard door slopes. Additional protection from moisture is also provided by putty and decorative finishing of the material.
But the simplicity of working with sheets of drywall and the ease of performing subsequent decorative finishing can significantly reduce repair time. The main thing is to know how to work with this material correctly and strictly follow the instructions.
Final step: decorative finishing
When finishing the doorway from plasterboard sheets has been completed, you should proceed to the final phase of work: decorative finishing.
At the same time, you should not limit your imagination - drywall can be decorated with almost any materials used for finishing.
The most popular option is regular painting of drywall. The paint color should be chosen based on the overall design. Quite often, white water-based paint with a matte effect is used. The paint is applied using a roller, the corners are painted over with a brush.
The next, not so popular method is wallpapering. It is used to obtain a single ensemble with the walls, if, of course, it is possible to purchase wallpaper with a similar texture and pattern. Otherwise, you should opt for coloring. Or use leftover wallpaper from a previous renovation, if there is enough of it.
In addition, decorating the opening after installing the door is often done using plastic or MDF panels, artificial stone, tiles or textured plaster - the choice depends entirely on the imagination of the master.