What determines drying time?
The information that mixture manufacturers place on the packaging is an average value calculated for standard conditions. In reality, the drying time of the self-leveling floor depends on various external circumstances. The following reasons have the greatest impact:
- Type of composition. One group includes screeds (rough levelers, cement-based). The second group is self-leveling (self-leveling) mixtures, what is usually called self-leveling floors. These include epoxy, polyurethane and other polymer floors.
- Quality of the dry mixture (brand, proportions of additives and polymers included).
- Layer thickness and number of layers applied. Obviously, the thicker the layer, the longer it will take to harden. The pouring time for multi-layer floors also increases.
- Working conditions: air temperature and humidity.
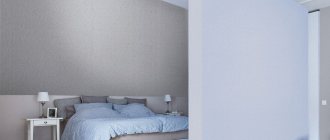
Classic interior with self-leveling floor Source wp.com
What affects drying time?
There are a large number of factors and conditions on which the drying time of self-leveling coatings depends.
These include:
- type of mixture used;
- fill thickness;
- the number of layers and the drying time of each poured layer;
- additives and powders that will be used during work;
- the finishing coating used (linoleum, parquet, laminate and ceramic tile);
- air humidity and temperature in the room being filled with self-leveling floor.
As for the thickness and number of layers to be poured, the rationale is simple: the thicker the layer, the longer it will take to dry. As a rule, surface setting occurs relatively quickly and can be walked on, but curing of the internal composition requires more time. If you cover such a floor with finishing materials (linoleum, tiles, laminate, etc.), then there is a high risk of further cracking and swelling of the material during the final drying of the floor.
If the liquid floor is used as a rough covering, then after it has completely dried it can be decorated with a variety of floor coverings.
Most self-leveling floors intended for internal pouring can be decorated with any type of finishing coating. For street work, certain versions of the compositions are manufactured. The average drying time is about 12 hours, but complete drying depends on weather conditions. It should also be noted that they are much more expensive, but can be used at fairly low or high temperatures.
Most often, liquid floors require about an hour to harden, but for the floor to dry completely it will take at least five hours, and sometimes several days. These indicators are not mandatory, since each coating has a certain surface drying time.
Features of hardening of bulk compositions
The mixture contains a base mineral filler (cement or gypsum) or a polymer, and modifying additives. After adding water, physicochemical reactions are started, which proceed in the following order:
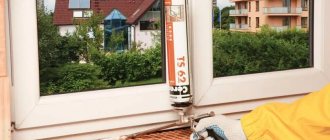
- Setting (drying). The first signs appear 30-40 minutes after adding water and last 2-12 hours. The solution increases viscosity, but upon mechanical action it returns to a liquefied state. Therefore, the instructions indicate when the screed is so ready that you can walk on it and begin installing the finishing coating.
- Hardening. The plastic mass begins to gain strength (ripen). Ordered structures form in the layer, the coating becomes denser and more durable. The floor is ready for constant use; furniture can be brought into the room.
The patterns of processes are precisely known for cement, and they are determined for normal (average) air values: humidity 60% and temperature +20°C. Depending on the brand, cement gains strength:
- From 60-80% – in 7-14 days.
- Complete 100% drying - after 28 days.
Furniture is placed only after complete drying Source pinimg.com
There are no strict rules for gypsum; much depends on the chosen brand (grinding fineness), as well as retarding components (glue, lime). On average, setting is noticeable after half an hour, and final strength is achieved after 14-20 days.
Pouring self-leveling coating
Every beginner who has started a renovation should have knowledge about the drying time of the floor after pouring, be it a private house or an apartment.
Recommendations:
- If a gypsum screed is poured in a bathroom, the hardening time will be about 3 days or more. Everything largely depends on the operation of ventilation.
- If you plan to lay parquet boards, laminate, linoleum on a gypsum coating, then installation is allowed only after 7 days.
- It is cheaper and better to use cement-based mortars for tiles rather than pouring gypsum. But unfortunately, in this case they dry out the longest. If the layer is not thick, then you will need to wait from 8-14 days, but if the layer exceeds 10 mm, then the drying time increases significantly to a month.
In general, the curing time largely depends on how well the filling work was carried out. If the solution was distributed unevenly over the base, local areas can harden quite quickly, but to dry other areas you will need to wait longer for 10-12 hours.
Remember! If for some reason you plan to pour a very thick layer, it is recommended in this case to pay attention to lightweight solutions, due to which the load on the base will be significantly reduced. But such a screed will take a little longer to dry.
How to speed up drying
Manufacturers have already taken care of a lot. In order for a self-leveling floor under tiles or on a concrete screed to gain strength faster, additives with modifying properties are introduced into the mixture. They increase the price of the product, but provide results that justify the investment:
- They influence the speed of setting of the solution (accelerate or slow down depending on needs).
- They improve the strength of the finished floor (fracture resistance) and its elasticity (resistance to tearing under loads).
- They increase the density and hydrophobicity of the hardening mixture.
Modifiers simplify working with bulk mixtures Source pixpa.com
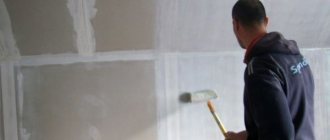
One of the important factors that determines how long a layer will take to dry is its thickness. Therefore, if you are going to make a self-leveling floor on a concrete screed, you should spend a little time preparing the surface. To do this, you need to level it as much as possible, get rid of irregularities and cracks (for example, putty). This way you not only reduce the hardening time, but also save money - you reduce the thickness of the layer and, consequently, the consumption of the polymer mixture.
The drying process can be accelerated on your own if you create suitable conditions. It is optimal if you can control the following factors:
- Stable room temperature, 22-25°C. This is especially important if the mixture contains polymer additives.
- Air humidity is within 60%. The higher the humidity, the longer it will take for the self-leveling floor to dry.
- No direct sunlight. Uneven lighting interferes with quick and high-quality drying, so windows are screened (for example, with foil).
- Drafts should be avoided, this is especially important for glossy surfaces.
The thinner the layer, the faster it will dry Source navseruki.by
See also: Catalog of companies that specialize in finishing materials and related work
Drying conditions
There are many factors that affect how quickly a self-leveling floor dries. The main ones are the following:
- Type of dry mixture;
- Number and thickness of layers;
- Additives used during installation;
- Type of finishing material (laminate, linoleum, tile);
- Humidity and temperature in the room.
After complete drying, the liquid floor, if it was used as a rough coating, can be decorated with various finishing materials.
In order to speed up the polymerization of self-leveling floors, certain conditions must be met:
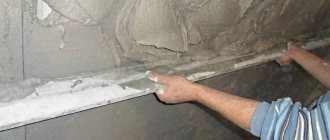
- The mixture should be evenly distributed over the base. Although the floor is called “self-leveling,” it still needs help. To ensure that the level of the solution is the same, use a short or long (as necessary) spatula. To remove air bubbles from the solution, use a needle roller.
- The optimal room temperature should range from 22° C to 25° C. Temperature jumps are unacceptable, otherwise hardening will take more than 14 days.
Compliance with pouring technology is the key and guarantee of the quality of the future surface. Distributing the mixture with a spatula is one of the installation stages. This operation allows you to align the layer and set its thickness
- For quick drying, the humidity level should be 60-65%.
- The surface must be protected from direct ultraviolet rays. To do this, an hour after pouring, the floor is covered with a special film.
- Six hours after pouring, a protective varnish is applied to the floor.
- After 12-14 hours it will be possible to walk on the surface, and after a week it will be subject to maximum load.
If these conditions are met, the self-leveling floor will dry evenly and in accordance with the time limits specified by the manufacturer on the packaging. Here's a video to help you on the technology of preparing and pouring the floor:
How long does it take for different types of self-leveling floors to dry?
The main factor that determines how long a particular mixture dries is the binder component; according to it, mixtures are divided into the following groups:
- On a gypsum basis. Gypsum surfaces are afraid of water, which is why they are not suitable for wet rooms. Otherwise, they are positioned as high-speed ones: after 3-5 hours they can withstand pedestrian traffic. Laying tiles can begin after 3 days; to install laminate or linoleum coverings you will have to wait 7 days.
- Cement based. Self-leveling concrete floor is a universal option, suitable for wet rooms. The coating will dry and completely harden in 14-21 days. But in order to install, for example, massive porcelain stoneware, you need to wait until it reaches 100% strength (28 days). Tiles can be laid after 7 days, linoleum - after 14, laminate - after 14-21 days. If the mixture contains plasticizers, polymerization will take 7-14 days.
- Cement-gypsum mixtures. The trains are ready for foot traffic in 4-8 hours. Laying of ceramics begins after 5-7 days, linoleum - after 7-14, laminate - after 14-21 days.
Solid parquet is laid on a self-leveling floor after complete drying Source waysi.ru
- Made from polyurethane. The polymer coating is highly wear-resistant and heat-resistant. After pouring, you can walk on the polyurethane surface in 10-15 hours; complete hardening will take three days. The thickness of the layer has a big influence.
- Epoxy floors. Resistant to moisture, mechanical stress, and chemicals. They are often poured in several layers, so the time for complete hardening ranges from 2 to 5 days.
Factors affecting drying time
The liquid coating begins to harden within an hour after its application. The time required for the materials to completely dry is determined by a large number of circumstances. The main ones include:
- type of dry mixture used;
- number of layers applied;
- additives that were used during laying of the liquid composition;
- layer thickness;
- type of protective finishing coating.
Note: As a rule, the liquid coating begins to harden within an hour after its application, but final drying takes from 5 hours to several days. These indicators are averaged, since the spread of time for complete hardening of the surface depends on the type of coating.
Polymerization times for various coatings
Manufacturers write on the packaging the approximate polymerization time of the compositions.
To understand how long it takes for a liquid floor to dry, you should consider the main types of mixtures and their polymerization time:
- Polymer surfaces. Industrial coatings can cure within 2 to 6 days. In this case, the curing time depends on many factors: the presence of additives and special pigments, the thickness of the layer and their quantity;
- Cement based coatings. This type of flooring takes a long time to completely cure. Typically, this solution is used in private construction. It contains various plasticizers and additives, so on average, polymerization takes from 7 to 14 days;
- Anhydride (gypsum) mixtures. Such surfaces are afraid of water, so you should not install them in bathrooms and bathrooms. The hardening period for pedestrian load begins on the 2nd day. But to install equipment and furniture you will have to wait at least another 10 days;
- Quick-drying surface. Today, so-called quick-drying solutions are often used. They have good technical characteristics along with a short drying time. This takes no more than 2-5 hours;
- Polyurethane surface. Such surfaces are very strong and durable. After laying them, you can walk on the floor within 10-15 hours; complete hardening occurs on the third day. It should also be taken into account that the thicker the layer, the longer the solution will dry;
- Epoxy compounds. They are distinguished by good wear resistance, depending on the number of layers applied, complete hardening occurs in 2-5 days.
How long should a self-leveling floor dry? If you want to ensure that the coating does not deteriorate or become deformed, pay attention to the information indicated on the packaging.
How much does a self-leveling floor cost and the cost of work?
Important! As a rule, manufacturers write the approximate polymerization time of the compositions. To avoid causing trouble, add another 10-12 hours to this period, after which you can safely use the floor covering.
How quickly do 3D surfaces harden?
The drying time of 3D surfaces is significantly longer than for other types.
Drying of a self-leveling floor with a 3D effect may depend on several circumstances:
- Hardening time of the leveling layer;
- Drawing parameters. If film or vinyl paper is used as decorative elements, the topcoat is applied immediately. But if the ornament is made with paints, it will take some time to dry. In this case, the drying period will be determined by the characteristics of the components included in the paint;
- Curing period of the finishing coating;
- You also need to take into account the polymerization time of the glossy protective layer.
You should know: The drying time for 3D surfaces is significantly longer than for other types. This period can be 7-8 days. But if you use quick-drying compounds, the period will be halved.
Conditions for rapid drying of surfaces
Humidity in the room should be moderate, up to 60% for uniform hardening.
After drying, the self-leveling floor can be subjected to additional processing if mixtures are used for rough work for laying tiles, laminate or linoleum. To speed up the polymerization process, they often resort to the following tricks:
- In order for the composition to dry quickly enough, it is necessary to distribute it evenly over the base;
- The humidity in the room should be moderate (up to 60%), otherwise the coating will harden for at least two weeks;
- Someone might think that drafts will speed up the drying process, but the effect is the opposite. Therefore, do not allow drafts in the room;
- The temperature in the room should also be constant, ranging from 20 to 30 degrees;
- The surface must be protected from ultraviolet radiation. To do this, an hour after laying the solution, it is covered with a special film;
- Approximately 6 hours after applying the composition, you should open the floor with protective varnish;
- After 14 hours, the surface will become strong enough and you can safely move on it. But it will be possible to subject the coating to maximum load only after 6-7 days.
How does the finish affect drying time?
The type of materials also affects the polymerization period of
the compositions. The type of materials that will be used as finishing also affects the polymerization period of the compositions. How long does it take for a linoleum floor to dry? The curing period depends only on what type of mixture you choose. As a rule, for private apartments and houses the best option is a polyurethane solution, which can be used after just 3 days.
How long does it take for a self-leveling floor under tiles to dry? Cement-based solutions are suitable as the basis for this coating. Unfortunately, they take the longest to harden. As a rule, this takes at least 8-14 days. But the curing time is also affected by the quality of the pour itself. If the composition was unevenly distributed over the surface, local areas may harden quite quickly, while others will take 10-12 hours longer to dry.
How long does it take for tile adhesive to dry?
To understand how long it takes for a self-leveling floor under a laminate to dry, you should find out what kind of base you plan to pour under it. The following coatings are suitable for this material:
- anhydrite;
- polymer;
- quick-drying;
- polyurethane.
The polymerization period of each of them was discussed above.
How to tell if the floor is dry
An indicator of the readiness of the coating for further work is the residual moisture. Its value (usually no more than 4%) is important for laying finishing materials made of wood, as well as carpet and linoleum. For ceramic, stone, and vinyl tiles, the value may be higher.
For wood coverings, the residual moisture of the base is important Source stroy-domka.ru
Dependence of drying time on topcoat
Self-leveling flooring can be used under linoleum, laminate or tiles. The polymerization time of self-leveling compounds depends on the type of finishing material. In apartments and private houses where it is planned to lay linoleum, polyurethane solutions are most often used, which can be used within three days after pouring.
Quick-drying, gypsum, polyurethane and polymer self-leveling floors are used under the laminate. Their drying time was discussed above.
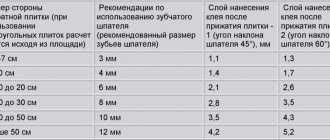
Table on the hardening times of various self-leveling compounds that can be purchased in Russia. The source of information is the technical documentation of the manufacturers. Layer thickness - in mm, walking time - in hours, coating time - in days
Briefly about the main thing
The drying of the self-leveling floor is a parameter that determines when you can begin laying the finishing floor covering. The parameter consists of two parts: drying itself and strength gain; they allow you to determine when you can walk on the screed and when you should start laying tiles or parquet.
Manufacturers indicate approximate terms, since the process depends on external factors. To speed up drying, it is important to ensure optimal conditions in the room and protect the screed from the sun and drafts.
Ratings 0
Drying times from different manufacturers
You need to specify the drying time of the fill before it is permissible to move on it and subsequently lay the decorated coating from the manufacturer or sales consultant (information on the packaging). But on average, the most common mixtures guarantee the drying times indicated in the table below.
Hardening time of mineral mixtures
Information on how long it takes for a self-leveling floor to dry is indicated by the manufacturer in the technical documentation of the product. It is calculated based on the recommended layer thickness and determined in laboratory conditions. Foot traffic is allowed within a few hours, but for the upcoming finishing you need to wait from 3 to 21 days. Time frames vary significantly. This depends on the composition of the material, the residual moisture of the coating and the type of finishing cladding.
Hardening of solutions with mineral binders occurs at different times. The fastest setting ones are gypsum mixtures. Walking on the surface is allowed after 2-3 hours, installation of tiles - on the 4th day. Complete drying under normal conditions occurs after 7 days.
Making a self-leveling floor under tiles in the bathroom - a guide
We have decided on the type and basis of the mixture; now it’s time to get acquainted with the technology of the device. You will need the following materials and tools:
Paint shoes are special soles with spikes that are worn over shoes - they will allow you to move on a surface with a poured solution without particularly disturbing the poured layer;
- Needle roller with long handle;
- Container for the required volume of the mixture;
- Mixer attachment for drill;
- Primer;
- Regular roller or paint brush;
- Notched or regular spatula;
- The mixture itself.
In order to make a self-leveling floor under tiles in the bathroom, you must first dismantle the old coating.
After this, it’s time to get rid of the debris that appears during the dismantling process. Final cleaning can be done using a vacuum cleaner, which will almost completely get rid of fine dust.
After this, treat the surface with a primer using a regular roller or paint brush. During the process of priming the surface, you can see all the holes and cracks through which the solution can flow into the cavities under the floor - you definitely need to get rid of them - for this you can use a regular cement-sand mortar.
Please note that it is necessary to fill the floor only if the temperature in the room is from 5 to 25°C.
Let's start diluting the mixture - the manufacturer always prints the proportion on the packaging, which must be strictly adhered to.
Pour the required amount of water into the container and then pour the dry mixture into it. To mix, use a drill switched to medium speed with a mixer attachment. It is necessary to achieve a uniform consistency of the mixture before starting work.
From practice we can say that if the poured layer is about 6-7 mm, then the average mixture consumption per square meter will be about 9 kg.
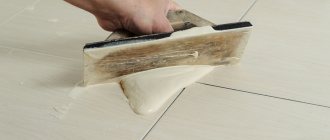
Now put on the paint shoes and pour the mixture over the pre-primed surface of the room. To distribute the solution more evenly, use a spatula (regular or notched). When pouring, air bubbles form and to get rid of them we use a needle roller, rolling the entire surface, this will also completely and evenly distribute the solution.
Please note that self-leveling mixtures for self-leveling floors set quite quickly, so in order to use the entire mixture and level it you will have about 15 - 20 minutes.
The self-leveling or self-leveling floor under the tiles is ready, now all that remains is to wait until it dries completely.
Reasons for slow drying
If you do not avoid most of the typical mistakes when choosing a mixture for pouring, during the pouring process itself, and do not follow basic rules, then the drying process can take a long time.
Carefully read the manufacturer's instructions for the mixture you will use to fill the floor surface. Do not neglect standard ingredient ratio schemes.
Don't rush to use the floor ahead of time. This could end up being a very expensive mistake, to the point where you have to do everything all over again. Observe temperature conditions, this is very important. Check to see if there is any moisture remaining in the self-leveling floor.
How to choose liquid floors
Liquid flooring was developed primarily for industrial use. Epoxy flooring is used in production where it is necessary to provide high resistance to chemical influences, in conditions of high humidity and high traffic, that is, the liquid floor must be resistant to abrasion.
Polyurethane flooring has increased resistance to vibration and mechanical shock loads. Therefore, when choosing liquid floors for your home, it is better to use them in the bathroom and kitchen - there is high humidity, in the hallway - there is increased traffic and abrasion of the floor from shoes with sand. It is advisable to use epoxy floors in these areas. Well, as for living rooms, it is better to use polyurethane coatings there.
It is also important to take into account that polyurethane floors, when applied, emit a pungent odor that disappears within 2 hours. And epoxy liquid floors do not smell at all even during installation