Curing speed
In conclusion, it is worth paying attention to the question of how quickly the epoxy adhesive hardens. Some, in order to speed up this process, think that more hardener can be added
Thanks to this, the composition will quickly harden. However, this is a misconception. If you want to achieve rapid hardening of two surfaces, then you need to artificially increase the temperature.
Conclusion So, now we have looked at all the features of epoxy glue. Decide for yourself which one is better to choose. You can purchase a proven domestic manufacturer
When choosing, be sure to pay attention to the expiration date of the composition on the packaging.
Choose the glue that will fulfill its main purpose. We hope this material was useful to you. You have learned about the main properties of epoxy glue. Additionally, we suggest watching the video: How to properly mix epoxy resin.
What is epoxy?
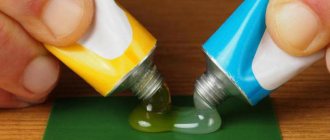
Two-component epoxy or epoxy compound is an adhesive that is prepared from two components. When purchasing a package, you will find in it:
- a large bottle with a viscous transparent or yellowish liquid - the epoxy resin itself;
- a small bottle of liquid - hardener.
If the proportions of epoxy glue are selected correctly (and we will learn how to do this a little later), then the output (after mixing the two components) is a viscous mass, which after 12 - 48 hours becomes hard as a stone. And it’s also transparent, which from the point of view of the aesthetics of the decoration is a big bonus!
The answer to the question of where to buy epoxy is also good news: miracle glue is sold in all construction stores. In total, there are about 50 of its varieties (formulations), but, despite the chemical composition of the components, the principle of working with epoxy is the same. In addition, each manufacturer provides detailed instructions.
To attach the floral decoration to the fittings, the most common construction epoxy adhesive will do. It costs about 1 - 2 USD, and a pack is enough for many times. I won’t lie, but it’s definitely enough for 10 hairpins!
To make jewelry from epoxy or red currant, it is appropriate to use a jewelry compound. This resin is perfectly transparent, there are fewer bubbles and cloudiness. We will consider the cheapest glue “EDP epoxy compound universal”.
Solidification stages
The mixture of epoxy and hardener does not stand up all at once; the formation of continuous and ultra-long (on a molecular scale) polymer chains does not occur in the entire mass of the epoxy composition. Polymerization occurs in separate fragments, which only then, over time, merge into a single polymer mass.
Useful to know > What varnish can be used to coat epoxy resin
The process of hardening, thickening and drying a product made of epoxy resin mixed with a hardener goes through several stages:
- Liquid fluid consistency, which allows, due to this fluidity, to fill the slightest irregularities in the cavity of the material being poured.
- Thicken the mixture to the state of cold buckwheat honey. In this form, the mixture is no longer able to completely fill surfaces with complex and pronounced relief.
- The density is already such that it slides out of an overturned vessel at a speed of no more than a centimeter per second. Suitable only for gluing large parts.
- It is so thick that when you try to separate at least part of the total mass, a long trail of resin stretches behind this part, freezing before your eyes.
- “Rubber stage”, it no longer sticks to your hands, you can bend, stretch, twist the casting from the composition.
- To the touch the product is made of plexiglass or plastic. Solid, durable, little susceptible to external influences.
How long does it take for epoxy resin to dry? Is it possible to speed up this process?
The curing or drying time of an epoxy compound, whether it be jewelry epoxy, flooring pour-over, or epoxy adhesive, depends on many factors. The key role is played by the age of the composition or how many years have passed since the release of the epoxy material by the manufacturer, the shelf life correlated with the date of production. Among the factors influencing the polymerization rate, significant quantities will be:
- Composition of the hardener reagent.
- The amount of hardener when added to epoxy resin or adhesive.
- The temperature at which the components are mixed and the finished composition hardens.
- The area of the surface being poured or its volume.
Expert opinion Oleg Vasiliev Master in the manufacture of furniture and interior items from epoxy resin. She creates unique items to order in her own production. to the master We cannot resist saying that the terms “dries” or “hardens” are practically not correct and are used only for everyday conversation. The mixture of epoxy resin and hardener goes through the curing stage.
How to store?
In the instructions on the packaging, the manufacturer indicates that the components of the epoxy adhesive should be stored in their original packaging at room temperature 20-25 degrees. The packaging should be placed in a dry place in a vertical position so as not to damage its integrity. Damage to the container and contact with air leads to deterioration in the quality of the material. Do not store glue in an open sunny place so that children have access to it. Packaging with epoxy is placed separately from food products and utensils.
The shelf life of the epoxy mixture ranges from 12 to 36 months, depending on the manufacturer. The main components retain their properties even after the expiration date, slightly reducing the quality characteristics.
The fresher the epoxy resin and hardener, the better the polymerization process, the adhesion improves, and the adhesive seam is of better quality. The prepared composition cannot be stored; it must be used immediately for its intended purpose. Residues of the finished epoxy mixture cannot be stored; they must be disposed of.
How to properly dilute epoxy resin with hardener?
It is necessary to prepare everything that will be needed during the work on connecting the components. To dilute the epoxy resin, use containers and a tool for mixing additives. It must be taken into account that the materials are toxic, so safety precautions should be observed. When mixing the composition during the development of a chemical reaction, a homogeneous mass is obtained.
Preparation of epoxy resin in small volumes
In this case, the technology of cold connection of components is used. Air temperature - no more than +25°C. In addition, the mixing process begins with a test reaction. First, a small amount of materials is used. If the finished sample meets the requirements and is characterized by the necessary properties, the mass production process continues.
Producing resin in large volumes
The main feature of the process of mixing materials in this case is the intense release of heat during the reaction. Epoxy resin solvent used in large quantities increases the temperature of the material, causing it to boil. This is a consequence of a thermal reaction. It proceeds more intensively due to the use of a significant number of components.
As a result of boiling, the composition becomes white and foams, then becomes cloudy. This material is not suitable for construction, finishing work, or waterproofing. In addition, if a large amount of toxic additives (for example, hardener) is used, it is necessary to organize effective supply and exhaust ventilation. At home, this work can be done using the heating method in a water bath.
How to mix components correctly?
If work is carried out in conditions of higher air temperature (above +25°C), the rate of hardening of the composition increases. As a result, the duration of work with such material is reduced. For this reason, it must be applied to the surface within half an hour. The ratio of hardener to resin may vary. It depends on the technology for preparing the material. The standard ratio is 10:1, with less resin being used. The hardener is added in larger quantities. The composition also includes a plasticizer. This component makes the material elastic.
You need to make sure that no drops of water get into the resulting mass. This will cause the resin to lose its adhesive ability. The recommended amount of plasticizer is no more than 10% of the total mass. First, this component and the resin are combined. Then the hardener is added in a thin stream. If you need to get a denser mass, the amount of the component is adjusted. Add the hardener to the mixture slowly over 10 minutes. If you quickly introduce this component, the material will boil and become unsuitable for use.
Resin curing time
The parameter depends on environmental conditions. At extreme temperatures, the material hardens quickly. If you mix the main components at room temperature, and the ratio of additives is 1:10, the duration of hardening of the material varies between 30-60 minutes. As the hardener is reduced, the composition retains its viscous structure for up to 2 hours.
Specifications
Epoxy adhesive mixture is a synthetic mass in which an irreversible chemical reaction occurs to form a durable material. The composition of resin-based adhesive may include a modifier, hardener, solvent, fillers, and plasticizers.
The main component in the adhesive composition is epoxy resin. It also consists of epichlorohydrin with phenol or bisphenol. The resin can be modified. Rubber modified epoxy resin improves toughness properties. Organophosphorus modifiers reduce the flammability of the product. The addition of the Laproxiv modifier increases elasticity.
Compounds of aminoamides, polyamines, and organic acid anhydrides can act as hardeners. Mixing epoxy resin with a hardener allows a thermosetting reaction to occur. The share of hardeners is 5-15% of the resin.
Solvents can be xylene, alcohols, acetone. The solvent content does not exceed 3% of the total volume of the solution. Plasticizers are added to increase the reliability of fastened parts. For this purpose, ester compounds of phthalic and phosphoric acid are used.
Fillers are used to add mass and additional physical characteristics to the finished product. Dust of various metals, mineral powders, fibers, cement, sawdust, and micropolymers are used as fillers. The amount of additional fillers can vary from 1 to 300% of the total weight of the epoxy resin.
Work with epoxy glue is carried out starting from +10 degrees. After the mixture hardens, increasing the temperature increases the rate of complete curing. Depending on the composition, curing time can vary from 3 hours to 3 days.
Temperature range during operation is from -20 to +120 degrees. The particularly durable adhesive composition can withstand temperatures up to +250 degrees.
Epoxy adhesive has hazard class 3 according to GOST 12.1.007-76 classification and is a low-hazard irritant, but can cause an allergic reaction on the skin. It is environmentally hazardous and toxic when released into water bodies.
The lifetime of the prepared mixture ranges from 5 minutes to two hours, depending on different manufacturers. Different glue compositions show strength from 100 to 400 kgf per 1 cm2. The average density per m3 is 1.37 tons. Elasticity upon impact and displacement of the seam is in the range of 1000-2000 MPa. The hardened epoxy layer shows resistance to gasoline, alkalis, acids, salts, oils, and kerosene. Destructible in toluene and acetone.
Epoxy compounds vary in release volume and weight. Components of 6 and 25 ml are poured into syringes. Double syringes are convenient to use at home for gluing small surfaces. Universal epoxy adhesive mixtures are characterized by a long pot life of up to two hours and are available in containers of 140, 280 and 1000 g. Fast-curing epoxy approaches the hardening speed of cold welding, is produced in tubes of 45 and 70 ml and in buckets and bottles of 250 and 500 g . For industrial use, epoxy components are supplied in barrels of 15, 19 kg.
In universal liquid epoxy compounds, the main color is white, yellowish and transparent. Adhesive for metals in silver, gray, brown shades. You can find pink epoxy produced.
Instructions for preparation and use
It is better to work in a ventilated area so as not to irritate the respiratory system with fumes from the epoxy. You need to wear protective gloves and clothing that you don’t mind getting dirty. The work area can be covered with newspaper or cloth so as not to contaminate the surface. Prepare the application tool and a container for mixing the ingredients in advance. You can use disposable tableware.
The product is processed before mixing the adhesive, since the solution must be applied immediately after production.
Before you start preparing the epoxy mixture with your own hands, you need to study the manufacturer's instructions included with the package. It indicates the proportions of the components of the resin and hardener. Different manufacturers have different ratios of substances. In universal liquid adhesive compositions, you usually need to mix 1 part hardener and 10 parts epoxy resin.
If the epoxy resin is viscous, it will be difficult to mix the components. To easily dilute the resin, it must be heated in a water bath or radiator to 50-60 degrees. Using a syringe without a needle, you need to measure out a small volume of resin and pour it into a container. Then take the required portion of the hardener and dissolve it in the resin, stirring vigorously to obtain a homogeneous mass.
After mixing the components, begin gluing the surfaces. Apply ready-made glue to one side and press both halves firmly, fixing for 10 minutes without moving. If a small amount of solution is squeezed out of the seam, it must be removed immediately with a napkin. Until the epoxy mixture has completely cured, the product must not be used or subjected to stress.
Sawdust and other fillers can be added to the prepared epoxy solution, which add additional volume, improve the quality of the finished compound and give the desired color. If you add sawdust to the epoxy, then you need to fill the mold with the finished mixture. You can use a spacer to make a product element. The frozen part can be sanded, painted and drilled.
Properties and scope
The popularity of epoxy is determined by its positive qualities.
The epoxy adhesive mixture exhibits the following properties:
- forms a non-shrinking seam without cracks;
- high adhesion to various materials;
- resistance to chemical solvents, alkalis and oils;
- heat resistance up to +250 degrees;
- frost resistance up to -20 degrees;
- resistance to mechanical stress;
- elasticity allows you to drill and grind the seam without chipping;
- cured glue can be painted and varnished;
- does not conduct electric current;
- the curing speed does not depend on the thickness of the adhesive layer;
- the ability to add additional components to the composition;
- moisture resistance;
- weather resistance;
- wear resistance.
Fillers can be added to the epoxy mixture to enhance the properties of the original product or change the color. The addition of aluminum in powder form increases the thermal conductivity and strength of the product.
Adding asbestos increases heat resistance and hardness. Titanium dioxide gives a white color to the entire solution. Iron oxide will help achieve red color and fire resistance. Iron powder will increase the coefficient of thermal conductivity and heat resistance. Silicon dioxide will reduce the viscosity and strengthen the epoxy mixture. The soot will give the glue a black color. Aluminum oxide will increase the strength and dielectric properties. Glass fibers and sawdust will add significant volume when filling large voids.
The downside to using epoxy glue is the setting speed. In a short period of time, you need to apply and fix the adhesive seam, remove excess glue and clean the work area and hands. After the adhesive composition has hardened, removal is carried out only with strong mechanical force. The sooner you start cleaning up adhesive epoxy, the easier it is to clean the stain with minimal effort.
The epoxy mixture should not be used to glue objects that come into contact with food. Nickel, tin, Teflon, chrome, zinc, polyethylene, silicone cannot be glued. Soft materials are destroyed when in contact with a resin-based composition.
Due to the large number of unique properties, the adhesive epoxy mixture is widely used in various sectors of the national economy. Epoxy grout is used in a variety of applications.
- In the construction industry. The adhesive composition is used to fill cracks in concrete, cement screeds, reinforced concrete beams and slabs, further strengthening the entire structure. Used to connect iron and concrete elements in bridge construction. Sections of building panels are glued with epoxy. It imparts waterproofing properties to insulation and chipboard, reduces heat loss, creating a seal in the sandwich panel. During finishing work with tiles and mosaics, an epoxy mixture is used as an adhesive solution, which hardens quickly and has moisture-repellent properties.
- In the automotive industry. In production, brake pads are secured with epoxy glue, plastic and metal surfaces are held together, and used in automotive repair work for metal and plastic. It helps to repair defects in the body and gas tank, and restore the trim.
- In the production of ships and aircraft. During the construction of water vessels, the hull is treated with an epoxy compound to impart water-repellent properties to the material; it is used to connect fiberglass parts and fasten technological units. When assembling aircraft, heat-shielding elements are attached with epoxy glue. Epoxy is used to produce and fix solar panels.
- At home. Using epoxy glue you can repair furniture, shoes, plastic, metal and wooden decorative parts and equipment. You can repair the crack in the aquarium and collect the fragments of a glass vase or lampshade. Epoxy will glue chips of porcelain tiles and seal gaps in ceramic tiles, securely attaching hooks and holders to the wall. The epoxy composition is suitable for sealing sewer and water pipes, heating elements. Epoxy is widely used in handicrafts to create crafts and souvenirs. It is used for attaching decorative elements in the manufacture of jewelry and hair accessories. Sequins, half beads, satin ribbons, lace, polymer clay and other materials are glued.
How to glue with epoxy?
Now step by step. We already have a lid with ready-made glue.
We prepare flowers and accessories.
We prepare accessories and flowers. We degrease the surfaces that we will glue with alcohol or acetone. Cold porcelain reacts normally to both substances.
We wipe the gluing areas with acetone or alcohol.
In order to fix the flowers on the fittings, we use Moment super glue. Glue them together to form a composition. Super glue is needed as a preliminary fixative.
We first fix the flowers using Moment glue.
It is important to leave plenty of gaps between the fittings and the flowers/leaves so that the epoxy can penetrate - it should cover as many surfaces as possible. Therefore, when performing preliminary gluing with “Moment”, you should not apply strong pressure
It is enough to simply “bait” the flowers, leaving room for a magic compound that will fix this beauty firmly.
We leave gaps into which the epoxy should penetrate.
When the product is assembled and the epoxy glue has reached the stage at which it is convenient to attach it with a match/toothpick, we begin pouring.
We pick up a drop of epoxy and use a toothpick to transfer it into all the gaps remaining between the flowers and the fittings. So we fill all the cracks drop by drop. If the glue has already started to flow out, wipe it off with a dry (and only dry!) cloth. We try not to drip epoxy onto the flowers themselves. If it gets dirty, again a napkin will help, you can then wipe it with Johnson’s oil or vegetable oil so that there is no trace left.
Pour epoxy glue a little at a time into all the cracks.
After all the cracks are filled, we leave the product to dry in a stationary position, making sure that the glue does not leak out (after half an hour or an hour it will stop doing this, but at first the filling may “float”).
After 12 hours we will see that the glue has hardened.
Cured epoxy
Epoxy doesn't dry - why?
If 12 and 24 hours have passed and the glue remains viscous, there are several reasons:
- the room was cold, the ambient temperature was lower than the temperature at which the glue hardens (indicated on the package);
- the proportions were chosen incorrectly - less hardener was added than needed; in this case, the glue may partially harden, but a sticky film (resin that has not entered into the reaction) will remain on it, which, however, may dry out after a couple of weeks;
- added dye (if you put something other than the two main components) interfered with the reaction;
- The epoxy does not harden even if the hardener is spoiled or expired.
So we figured out how to properly glue flowers to fittings and other items for the home and creativity with epoxy glue. And here is the finished rose brooch.
Inspiration and more flowers to everyone!
Main features of epoxy resin
When figuring out how long epoxy glue takes to dry, you should take into account the main technical features of such substances. Epoxy, regardless of product modification, is an oligomeric thermoactive compound. For a resinous substance, the transition from a liquid to a solid state occurs only when the mass is exposed to a special hardener.
The resin hardens only when using a special compositionThe hardeners used are various diliamines and amines, rubber, organosilicon resinous substances, etc. According to experts, for household repair work it is better to give preference to epoxies containing polymer and oligomeric plasticizers, oligosulfides and oligoamides. The presence of these substances increases gluing performance and improves the quality of the final work.
How long does it take for the composition to harden?
When specifying how long it takes for epoxy to dry, it is necessary to take into account a number of additional factors. The polymerization time is affected by the following indicators:
- age of the glue (period of use at the current expiration date), the “fresh” the resin, the faster the drying time will come;
- composition and type of hardener used;
- proportions of mixing the catalyst with the resinous substance;
- volume of treated surface;
- thickness of the poured layer;
- temperature at which polymerization occurs.
In the vast majority of cases, epoxy hardens within 1–1.5 days. If the volume of its use is too large, the final hardening time can extend to 6–7 days (at room temperature). The polymerization time can change dramatically if the dosage of the added hardener is not followed correctly.
For high-quality work, the proportions of resin and hardener must be observed.
The complete curing time is usually indicated in the attached instructions. Polymerization usually takes place in several phases:
- Liquid consistency. Observed immediately after adding the hardener. At this stage, the resin easily flows into all cavities and quickly fills the cavities.
- Thickening to the state of honey. The mass is no longer easy to pour and is not suitable for use on surfaces with complex terrain.
- Increase in density. At this stage, the resinous substance, when the vessel is tipped over, slides down at a speed of about 2 cm/second. This resin can also be used for gluing large and even parts.
- Rubber stage. The substance no longer sticks to your hands and has a “rubber” shape; it can be stretched, bent and twisted.
- Complete polymerization. Or hardening. At the final stage of the process, the epoxy becomes similar to strong plastic or plexiglass.
Are there quick-setting resins?
All epoxies existing in modern industry are divided into two large categories. Depending on the number of components included in the composition, resins are:
- Single-component. When used, they are completely ready for use. The polymerization process occurs at room temperature or with a slight increase in temperature.
- Two-component. The kit consists of resin and the hardener supplied with it. Such compositions are more popular. Polymerization begins only when the two components are mixed.
Many craftsmen are interested in the accelerated curing process and wonder if there is a quick-drying epoxy resin. Such compositions are produced under the brand name “jewelry” resins (or “decorative”). These are two-component masses used for creativity and design. The features of such substances include their complete transparency after hardening and increased cost.
Cured resin is a very durable material
How long does it take for resin to harden?
Although we explained above why exact calculations are impossible, to work adequately with epoxy resin you need to have at least a rough idea of how much time will be spent on polymerization. Since a lot depends both on the proportions of hardeners and plasticizers in the mass, and on the shape of the future product, experts advise making several experimental “formulations” with different proportions in order to clearly understand what relationship of the various components will give the required result. Make test samples of the mass small - polymerization does not “reverse”, and it will not be possible to obtain the original components from a frozen figure, so all damaged workpieces will be completely damaged.
Understanding how quickly epoxy hardens is necessary, at least for a clear planning of your own actions, so that the material does not have time to harden before the master gives it the desired shape. On average, 100 grams of epoxy resin with the addition of PEPA hardens in shape for at least half an hour and an hour at most at room temperature of 20-25 degrees.
Reduce this temperature to +15 - and the minimum setting time will sharply increase to 80 minutes. But this is all in compact silicone forms, but if you spread the same 100 grams of mass at the room temperature mentioned above over a surface area of a square meter, then be prepared that the expected result will appear only tomorrow.
An interesting life hack follows from the pattern described above, which helps preserve the fluid state of the working mass longer. If the work requires a lot of material, with strictly identical properties, and you simply do not have time to process it all, then divide the prepared mass into several small portions.
When working with the material, pay attention to how it hardens. Whatever the starting temperature, whatever type of hardener, the stages of hardening are always the same, their sequence is stable, the proportions of the speed of passing the stages are also maintained
Actually, the fastest way is for the resin to transform from a full-fledged fluid liquid into a viscous gel - in its new state it can still fill molds, but its consistency already resembles thick May honey and will not convey the thin topography of the container for pouring. Therefore, when working on crafts with the smallest relief patterns, do not chase the speed of hardening - it is better to have a one hundred percent guarantee that the mass will completely repeat all the features of the silicone mold.
If this is not so important, remember that later the resin from a viscous gel will turn into a dough-like mass that strongly sticks to your hands - it can still be molded somehow, but it is more likely to be glue than a material for full-fledged modeling. If the mass gradually begins to lose even its stickiness, it means that it is close to hardening - but only in terms of stages, and not in time, because each subsequent stage takes much more hours than the previous one
If you are making a full-fledged large-sized craft with fiberglass filler, it is better not to expect results faster than in a day - at least at room temperature. Even when frozen, such a craft will in many cases be relatively fragile. To make the material stronger and harder, you can even use “cold” PEPA, but heat it to 60 or even 100 degrees. Not having a high tendency to self-heating, this hardener will not boil, but it will harden faster and more reliably - within 1-12 hours, depending on the size of the craft.
There are areas of optical distortion in the resin
Possible reasons and tips
There are foreign inclusions in the coating or on the surface. The wrong abrasive was used
- The container and mixing tool must be clean. Avoid using containers with traces of fat.
- The surface must be carefully prepared. To sand epoxy resin, use #80 grit sandpaper.
- The surface must be clean from all types of contaminants, oils, fats and water. To remove dust from the surface, you can use a clean cloth soaked in isopropyl alcohol or clean water. Do not use acetone or dirty rags for these purposes.
- The coating must be applied within a few hours. After wet sanding and rinsing with water, it should not roll into beads - this indicates contamination of the surface. Wipe with a suitable solvent and rinse again with water until they disappear.
Purpose of epoxy glue
Every craftsman, builder, installer, and technical worker knows what epoxy glue is. This is an adhesive containing epoxy resin (epoxy), a polymer material that has excellent adhesion to different surfaces. Even with the advent of more modern adhesives on the construction market, epoxy does not lose popularity.
The adhesive composition is most often used in construction. It is ideal for concrete and for metal, wood and glass. Like cold welding, epoxy-based material is needed for bonding plastics (polypropylene, polycarbonate and many other types of plastic). The versatility of the glue makes it suitable for working with rubber, ceramics, and it is intended for stone (granite, marble, artificial materials). Epoxy resin is used to fill floors; it is part of primers, putties, tile mixtures, and mosaics.
Composition and properties
Epoxy adhesives from different manufacturers may contain different components, but the basic composition is always the same, it complies with GOST and the attached certificates. Two main substances in the composition are strictly required:
- epoxy resin itself;
- liquid or paste hardener.
Polyamines, carboxylic acids, and aminoamides are used as a curing composition. One-component adhesives always contain solvents (acetone, xylene, alcohols), which prevent the mass from hardening before contact with air and evaporation. The following can act as modifying additives and fillers for glue:
- synthetic rubber;
- formaldehyde resin;
- fiberglass;
- clay, chalk;
- aluminium oxide;
- vanadium, nickel, zinc powders;
- organosilicon resins.
All of the above binding components provide the epoxy adhesive with the desired properties:
- optimal density;
- seam strength;
- high curing speed;
- resistance to oils, gasoline, water, atmospheric factors;
- resistance to cracks and shrinkage.
It is also worth noting that glue does not conduct current - it is a dielectric, so it is often used to insulate electricity.
The main rules for working with e-discount
- Surfaces that will stick together must be cleaned, sanded, and degreased.
- The components of epoxy adhesive must be measured with maximum precision.
- The ambient temperature should not be lower than that indicated on the packaging as the “curing temperature” (but not the “operating temperature”).
- You can add third-party substances (dyes, etc.) to the resin and hardener if you do not expect high strength of the product. "Left" components can greatly influence the course of the reaction and the final characteristics. If you add oil paint, the glue will become less hard and flexible (and colored).
- It is better to add a little more hardener rather than be greedy (too much is also not allowed). Although there is always less of it in the package than needed. Therefore, when it runs out, the resin still remains (a bitter experience!).
- Do not allow water to get into the epoxy adhesive!
- If you are gluing two surfaces, the layer of glue between them should be thin. After applying the epoxy, the surfaces should be pressed firmly against each other for the next 12 hours.
How long does PVA glue dry on threads - maximum and minimum time
To find out the exact drying time of PVA glue, you must immediately note that this product has many varieties that behave in a variety of ways.
First you need to understand what PVA glue is. This is an emulsion of polyvinyl acetate with water, a plasticizer and additional additives, which has a characteristic odor and is used for gluing materials.
There are several main types of PVA glue:
- Domestic. Used for gluing paper products.
- Stationery (PVA-K). Used for gluing paper or cardboard. Susceptible to water and low temperatures.
- Universal (PVA-MB). Suitable for wood, paper, fabric, etc. Frost-resistant.
- PVA is a universal adhesive that provides gluing of fabric, wood, cardboard and paper.
PVA-M is suitable for gluing threads and crafts. In order for the product that has been glued to dry completely, it needs at least 24 hours. Waiting for 24 hours is guaranteed to ensure complete drying of the glue. Depending on the conditions of the material, the glue may dry faster or slower.
Factors affecting drying speed
There are many factors. Which affect the drying speed, here are the main ones:
- Temperature. This parameter greatly influences the drying time. The lower the temperature, the longer the process will take.
- Area of glued surfaces. The larger it is, the longer you will have to wait.
- Load on joints. It's no secret that when you physically impact the joints, the glue between them dries faster. However, not all products have the ability to provide such an effect.
- Composition of the adhesive substance. Different brands have different chemical structures. Which also affects the drying speed. In order to find out the composition and the exact rate of hardening, you should use the instructions. It is usually located on the back of the package.
- Clean surfaces. The presence of dust or greasy areas may increase the drying time of the material.
This is a list of the main factors that affect the speed at which glue hardens on different surfaces. However, there is an opportunity to speed up this process.
When working with glue, you should follow safety precautions, as the glue can harm your health if it gets into your eyes.
Types and characteristics of glue
For practical use, several easy-to-use modifications are produced. There are no special differences between ED-5, ED-6, ED-20 and EDP. By agreement back in the USSR, different designations were introduced in order to know the manufacturer. Currently, there are only two types on the Russian market: ED-20 and EDP. Everything else is just variations of the original samples.
Common brands
Glue Moment The industry also produces special types that are used in very special areas. The characteristics of the glue depend on the purpose and form of release.
- Many people know the epoxy-based Moment glue. It is sold in tubes of 50 g. Bonding occurs within a few minutes, the strength is high. In this way glass is glued to metal.
- “Contact” mass is sold in the form of plasticine. It is used to repair and connect pipes and plumbing products. You can glue small shelves, for example, in the bathroom. The drying time of the epoxy glue in this plasticine is 2...4 minutes. Adhesive Cold welding
- “Cold welding” is an adhesive designed to join metal fragments. The strength of such a connection is at the level of welding. Used in the repair of aluminum parts that really cannot be welded. Fast-drying, effective adhesive.
- EDP is the most widely used. It is always present among car enthusiasts. Helps in solving any problems that may arise along the way. Glue Epoxylin
Kinds
Epoxy adhesive mixtures are divided into groups according to three criteria: by the number of components, by the density of the mass, and by the polymerization method. The composition of the glue can be one-component or two-component.
The one-component adhesive contains one package and does not require preliminary preparation. One-component mixtures can cure at room temperature or with increased heat. The strength characteristics of such compositions are lower than those of a two-component solution. Products in two separate packages are more in demand on the market. The two components are mixed before gluing. Universal epoxy two-component adhesive forms a flexible monolithic layer of high strength.
Ready-made compositions vary in thickness - liquid and clay-like.
The viscosity of liquid solutions depends on the consistency of the epoxy resin. To increase the fluidity of the resin, it must be heated. Liquid glue is easy to apply; it fills all the pores of the material. When cured, it forms an elastic, moisture-resistant seam.
The clay-like composition is similar in structure to plasticine. Available in the form of bars of different sizes. To work, knead the mixture with your hands and carefully distribute it onto the surface to be glued. Often the plastic mass has a dark metallic color because it is used as a cold weld. It is applied to seal holes and irregularities in metal.
The polymerization method depends on the hardener used. Liquid mixtures with anhydrite and polyamine hardeners begin to harden under normal conditions. In order for the finished seam to be waterproof with increased protective qualities against solvents, acids and oils, it is necessary to carry out high-temperature heating. Exposure to a temperature of +70-120 degrees is sufficient. A super-strong layer is formed when heated to +150-300 degrees. Hot curing produces a heat-resistant layer with electrical protective properties.
Why does epoxy resin not harden?
Epoxy is a resinous, viscous substance. Epoxy resin exhibits all its declared qualities only when it interacts with a special hardener additive. Thanks to the hardener, the process of polymerization and further strong adhesion of the bonded surfaces occurs, and the creation of exclusive products.
It is necessary to know and understand the polymerization processes in order to simplify the work with such material. If you don’t find out why the epoxy doesn’t harden and what to do in this case, your creative ideas will not be realized, and the resulting products will be of poor quality.
Epoxy resin is used to create various products
Error when mixing components
The most common problem is that epoxy resin does not cure and may not cure at all. If the proportions of the substances were violated when introducing the hardener into the resin, the epoxy will remain in a liquid state. If the sticky layer remains only on the surface and lasts for more than 1.5–2 days, it must be carefully removed and wait until the remaining mass has completely cooled.
To ensure the final result is perfect, carefully approach the process of mixing the resin with the hardener. In the classic version, 1 part hardener is taken for 10 parts of epoxy. If the ratio was correct and the proportions were maintained, this happens due to the poor quality of the hardener itself. The only way out is to carry out the work again, with fresh composition and strictly according to the instructions attached to it.
Incorrect pour point
Typically, epoxy resin hardens at normal room temperature. If the epoxy does not dry for a long time, the temperature conditions can also tell you what to do in this case. When the environment is heated, the polymerization procedure of the mass occurs faster. But when the air temperature drops, the resin will harden much longer.
One of the reasons for uncured resin is a violation of temperature conditions
What to do in such a situation? Try the following tips in practice:
- leave the product to harden at constant room temperature;
- if there is a decrease in temperature, provide air heating with portable heaters;
- if it is not possible to maintain a stable temperature, use special hardeners designed for low temperatures when working.
Experienced craftsmen recommend using a hardener of proven brands. And if you need a product for working at low temperatures, choose a hardener of the AF-2 and DTB-2 brands.
Poor stirring
One of the most common mistakes that beginners make. The reason for the poor curing of the epoxy lies in its insufficient stirring. In this situation, the hardener simply cannot fully combine with the resin and activate the polymerization procedure. To achieve the desired effect, you should not only use a high-quality hardener, but also mix it well with the resin.
Experienced masters advise stirring the ingredients carefully, slowly, thoroughly and deeply mixing the layers of substances. Too active actions are not necessary, otherwise air may get into the composition, which will then remain in the resin as unsightly bubbles and make the product weak and fragile. Stirring is done with a long stick, preferably wooden or plastic.
The resin requires proper and careful mixingIlliterate selection of components used
The question is the correct choice of the required hardener. Usually a suitable product is already included with the epoxy resin. But sometimes the catalyst runs out too quickly. It is worth purchasing it additionally, taking into account the brand and type of epoxy used. When choosing a hardener, it is better to get advice from a store, indicating the brand of resin you are working with.
Conventional stages of epoxy resin hardening, and what is convenient to do at each of them
1. Initial liquid stage
After you have mixed the resin with the hardener and let it sit for a while to release the bubbles, you can start using the resin. If we talk about Crystal 6 and 7, then at the beginning they are quite liquid, and they can be used for pouring into silicone molds. If you have a complex shape, then Crystal 6 is a great choice, which, being the thinnest of our resins, fills all the corners well.
In the initial stage, Crystal 9 resin can be used to coat workpieces and fill surfaces, but be careful as it can flow down from the workpiece.
2. Liquid honey
The polymerization process of the epoxy resin is ongoing, and it gradually thickens, after some time after mixing the components, it begins to resemble liquid honey. At this stage it is well suited for creating a tall lens. If you want to pour resin in the state of liquid honey into a mold, then you should choose the simplest forms.
3. Thick honey
The resin at this stage is no longer suitable for pouring, as it has become too thick, but it can be used for gluing, gluing parts to each other (which, for example, is used in modeling), and correcting defects in workpieces. Be careful if you do not want to form bubbles - at this stage of the resin they no longer come out on their own, and it is very difficult to get them out.
4. Even thicker stage
The resin enters this stage when it becomes difficult to separate from the main mass, but it is still sticky. You can still use it for gluing, but it is not very convenient due to its thickness. At this stage, you can try to create some kind of relief, but keep in mind that the resin will still shrink and will no longer lay down with a smooth, glossy surface.
5. Rubber resin
After some time, the next stage begins: the resin stops sticking and its properties resemble rubber - it bends, wrinkles and recovers if you don’t put too much pressure on it. If you want to experiment and create something with resin in this state, then secure your product so that the rubber resin does not straighten back.
6. Solid, last stage
When the resin finally hardens, it becomes hard, like plastic, and does not press or bend. If the resin never achieved this, and after several days it remained in the rubber stage, then here we need to talk about a violation of the proportions, if you did not think about it. When it has completely hardened, the product can be sanded, polished and brought to its final form.
How to speed up the drying process: useful tips
What needs to be done to make the polymerization process faster? There are several tips that answer the question of how to quickly dry epoxy resin. These are the following recommendations:
- increase the temperature to +25–30⁰С;
- when working, install a miniature heater next to the surfaces being treated;
- maintain elevated temperature conditions during the first 24 hours after completion of work.
A separate point worth highlighting are several common mistakes that novice craftsmen make when wanting to speed up polymerization. Remember that you cannot increase the recommended proportions of hardener. Violation of the recommended proportions will lead to a reverse reaction - the resinous substance will remain sticky for a long time or will not harden at all.
The coating of the epoxy surface with unsightly yellow spots is the result of additional exposure to high temperatures. Keep in mind that the resin itself generates heat when the hardener is mixed in it. Therefore, you should not additionally try to speed up the polymerization, but calmly wait for the natural end of the process.
What can you do to dry epoxy resin quickly?
- Increase the room temperature to 24-30°C. Cure time is dependent on temperature, with higher temperatures making it easier to cure and colder temperatures slowing it down.
- Place a heater or heat lamp near the work to help the resin harden faster.
Expert advice
Maintain a constant temperature during the first 24 hours of curing. As the temperature drops, the cured epoxy may develop defects such as dimples or an orange peel effect.