Long gone are the days when ceilings were covered with whitewash, wallpapered or painted. Currently, unique modern design technologies have been created to improve ceilings, taking into account innovative materials. Recently, suspended ceilings have become very popular, which are installed not only in bedrooms, corridors, halls, but also in the kitchen, bathroom, and loggia. The presence of such ceilings requires the installation of a ceiling plinth. We will talk about this topic in our article.
- Method No. 1
Characteristics of ceiling skirting boards
Fillets (the professional name for ceiling plinths) are light in weight, so there is no need to carefully fix them. For their manufacture it is customary to use the following material:
- gypsum;
- plastic;
- tree;
- expanded polystyrene;
- Styrofoam;
- polyurethane.
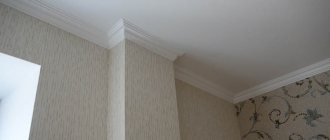
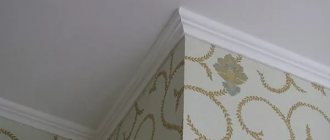
Ceiling plinth
Important information! Skirting boards are not glued directly to suspended ceilings, but are attached to the wall, so it is best to give preference to lighter fillets, for example, gypsum or polyurethane. It is worth keeping in mind that inexpensive foam plastic can dry out over time, which will lead to the formation of cracks in the joint area, which will subsequently have to be repaired.
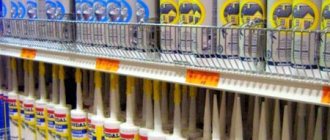
Construction supermarkets offer their customers ceiling plinths of various widths and lengths, with a textured or smooth surface. The choice is huge. But it is worth keeping in mind that you need to purchase fillets for one room from one batch of goods. When purchasing, you must pay attention to the integrity of the product, the absence of dents, damage, or defects.
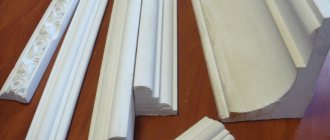
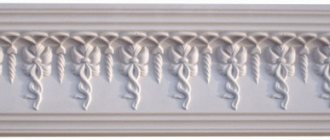
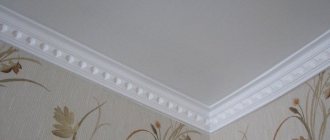
Ceiling skirting boards have many shapes and varieties
For suspended ceilings, it is best to choose skirting boards with a significant wall surface. As for the length of the product, it is necessary to choose in such a way as to minimize the number of joints and trims. To do this, you first need to measure the length and width of all the walls in the room. For large rooms, skirting boards 2 meters long are chosen, while 1.3-meter products are suitable for a small bathroom.
Recommendations from experts! It is worth purchasing plinths with a large margin, since it may not be possible to immediately fit them to the corners. This is especially true for people starting this type of work for the first time. Most product manufacturers try to make life easier for repairmen by producing special corners in addition to baseboards. They help eliminate errors when joining friezes in corners.
Choice of skirting boards
The most popular material for moldings is polymers. MDF, wood or plaster cannot be used - the skirting boards are too heavy, their installation is difficult and requires additional fixation.
It is best to use expanded polystyrene (foam) baguettes for a suspended ceiling.
Foam
They can have a smooth or embossed surface, the pattern of which most often imitates stucco. A white baguette goes on sale, but after gluing it can be painted any color. Foam skirting boards are easy to attach, and if they accidentally come off due to their low weight, they will not harm anyone, even if they fall on their head. Due to their low ability to absorb moisture and steam, they are glued in bathrooms.
They serve from 15 to 20 years. During operation, cleaning with a vacuum cleaner or liquid detergents is allowed. They cost from 13 to 20 rubles. a piece.
Pattern options
The skirting boards are very brittle, do not bend, and form an unreliable grip on a crooked wall. Unresistant to solvents and materials based on them. It should not be placed near lighting, since the material has low heat resistance, and when burned it begins to release styrene. When exposed to sunlight, the foam baseboard begins to turn yellow.
Polyurethane
Stronger than foam. Made from polymers that do not contain toxic styrene. They can be smooth, with patterns or relief. Visually, stucco models resemble plaster, but cost less. The plinth is resistant to mechanical stress, easy to clean and painted with acrylic-based dyes.
Polyurethane bends easily, so it can be used to form curved structures and design uneven surfaces. They decorate columns and bay windows. Polyurethane baguette is reliable, durable, and resistant to temperature changes. Does not absorb odors, making it ideal for the kitchen. Thanks to the dense structure of the material, it is easy to care for.
Negative sides:
- cost 2 times more than foam plastic ones;
- they have a lot of weight, so they need to be “planted” with special glue, and large structures must be additionally fixed with self-tapping screws;
- due to high rigidity, a miter saw is used for cutting;
- high glue consumption.
Plastic
They have a design feature in the form of a groove-lock. Designed for stretch ceilings attached using the harpoon method. No glue is used during installation, since the molding can be easily inserted into the recess of the profile. Additional elements are used to decorate the corners, so there is no need to file down the material to join it.
The advantages include quick installation:
- no glue needed, parts are fixed with latches;
- no painting or filling of gaps required.
The downside is that it is only available in a white version, requires preliminary leveling of the walls and is only suitable for the harpoon fastening system.
Types of baguettes for ceilings and their features
Ceiling plinths, also called baguettes, fillets or friezes, are installed inside both residential and non-residential premises. They harmonize perfectly with a variety of wallpapers, paints, and tiles. Before purchasing friezes, you need to take into account the volume of the room and its height. The larger the room, the more significant the parameters of the baguette should be.
Why are fillets installed? There are several reasons:
- to decorate rooms;
- hide defects when wallpapering;
- emphasize the outline of the premises;
- give a finished look to the finish.
There are many types of baguettes. Let us dwell on the main ones and give a description of both their positive and negative qualities.
Pros and cons of foam skirting boards
| Positive traits | Negative qualities |
| Small price | Too fragile |
| Insignificant weight | May ignite |
| Easy to mount | The graininess makes it impossible to make neat joints |
| Nice appearance | |
| Do not rot | |
| Easy to cut with a regular knife | |
| Have sufficient moisture resistance |
Pros and cons of gypsum skirting boards
| Positive qualities | Negative qualities |
| Affordable cost | Attached only to flat walls and ceilings due to lack of flexibility |
| Fireproof | Absorbs moisture |
| Attractiveness | Significant weight |
| Many options | Difficult to install |
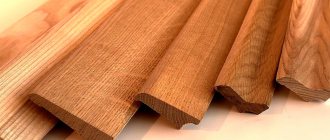
Pros and cons of natural wood skirting boards
| Advantages | Flaws |
| Classic style | Significant cost |
| Rich Appearance | Afraid of moisture |
| Possibility of deformation | |
| Mold may appear |
Skirting calculation process
In order to calculate how many planks you will need, you need to calculate the perimeter of the room. To do this, you need to add up the length of the walls. If you plan to break the outline, you should subtract the amount of the break. Later we will find out the number of parts we need. We calculate the number of profiles that can fit on the sides of the room, as well as the length of the trim.
For example, the perimeter of the room is 30 cm. In total, you can add another 15 cm to each of the corners. If there are four corners in the room, then multiply 15 by 4 and the result is 60 cm. We convert the value into meters - 0.6. The total length will be 30 + 0.6 = 30.6 meters. For example, the length of one bar is 3 meters. Then we can easily calculate how many three-meter bars are needed: 30.6/3 = 10.2 pieces, that is, 11 whole bars.
You should also take a few extra slats, as in an unforeseen situation they can save you. We add the number 2 to 11 and get 13 - the required number of bars.
Technology for installing ceiling plinths
Due to their low weight, fillets do not need to be attached to a suspended ceiling. They are fixed to the walls. There are several reasons for this:
- After the glue dries, uneven tension may occur, which will lead to unsightly folds in the ceiling area.
- In case of repair work, the baguette can be detached from the wall, but not from the ceiling without disturbing its appearance.
- Stretch ceilings do not have a rigid fixation, and therefore it is almost impossible to attach a baguette to it.
- Stretch ceilings are made of PVC film, which is quite thin. Glue can negatively affect its structure, even causing damage that cannot be repaired.
Manufacturers produce special baguettes that have protrusions for fastening in the mounting profiles where the suspended ceiling is mounted. But such goods are limited, so the bulk of baguettes are attached using glue. For high-quality fastening of skirting boards to the wall, it is advisable to choose a product with a wide surface so that it does not become detached from the base.
The volume of goods purchased must be calculated in advance. This is quite easy to do. You need to measure the perimeter of the room and add 20 centimeters to each corner. The data obtained is divided by the length of the baguette and the required number of skirting boards is obtained.
Installation instructions for skirting boards
The instructions on how to glue ceiling plinths to a suspended ceiling have several sections:
- preparation of the base;
- materials and tools;
- installation technology.
Preparatory work
To ensure good adhesion of the glue to the wall surface, the wallpaper is cleaned of dust, and the painted surface must be primed. If possible, it is better to glue the wallpaper after installing the fillets. But it is advisable to paint it in advance and let it dry thoroughly.
Materials and tools
In order to attach the plinth under the suspended ceiling, you must take care of the following materials and tools in advance:
- fillets;
- adhesive (how to choose it correctly can be found in the material “How to choose adhesive for baseboards”);
- stepladder;
- sandpaper;
- cutting tool (construction knife, metal saw or wood saw with fine teeth);
- miter box;
- roulette;
- construction pencil or marker;
- spatula;
- ruler;
- a rag or sponge to wipe away any excess glue that has protruded from under the baseboard.
Tools for installing ceiling skirting boards
For such work, special and expensive tools are not needed. However, the main list still exists:
- tape measure or ruler;
- plastic or rubber spatula;
- construction or stationery knife;
- tassels;
- pencil;
- napkins for removing excess glue;
- ladder;
- miter box.
In addition to the above, you need to purchase the following materials:
- sealant;
- special glue for baguettes;
- cling film;
- directly to the baseboard;
- special corners (preferably, but not required).
Before proceeding with the installation of ceiling plinths, it is necessary to carry out preparatory work aimed at protecting the suspended ceiling from possible damage. It consists of attaching cling film around the entire perimeter of the ceiling.
Of all the tools, the family may not have a miter box. There is no particular need to buy it for one action. You can make the device yourself, using three boards and a protractor for these purposes.
Miter box
As for glue, it is advisable to choose high-quality and colorless one. You can also use white. The main thing is that it does not darken over time. The glues “Titanium”, “Super-resistant”, “Montazh” are often used.
Required Tools
If you decide to decorate a suspended ceiling with a plinth with your own hands, you cannot do without the following equipment and fittings:
- Polyethylene sheet or cling film.
- Roulette, square.
- Glue.
- Corners.
- Putty knife.
- Blade for cutting to length.
- Installation pencil.
- A clean napkin (to remove excess mounting mixture from surfaces).
- Fillet.
- Masking tape.
- Ladder.
- Gloves.
Comparison of ceiling moldings
Baguettes differ not only in the material they are made of, but also in their parameters. There are several varieties:
| Flat plinth | Attached directly under the suspended ceiling to the wall |
| Narrow plinth | Used in modest spaces, without frills. Glues at smooth joints between stretch ceilings and walls |
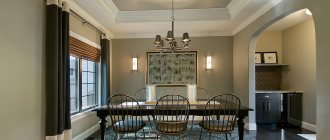
| Wide plinth | They look great in large rooms, hide unevenness in wallpaper trim, emphasize the richness of the stretch ceiling, and complement the composition |
| "Curtain niche" | It performs not so much a decorative function as it covers the fastenings of curtains to the ceiling. It turns out to be a curtain niche. For its production, plasterboard is mainly used. However, applying the baguette is faster and more economical |
| Exclusive plinth | Frames exposed ceiling panels |
| Eaves plinth | Attached to the wall under a suspended ceiling, used for mounting lighting |
How to properly glue light weight skirting boards
The technology for installing such baguettes is simple and does not take much free time. It is worth performing the following steps sequentially:
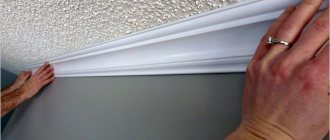
- Carry out markings. Do not be upset that there may be a gap between the stretch ceiling and the fillets. It will not be visible from below. The main thing is that the lower edges of the ceiling plinths are in the same horizontal line. If curvature appears, the appearance of the room will lose its attractiveness. Horizontal lines are drawn with a simple pencil. In this case, a fishing line, level or other available means are used to draw horizontal lines.
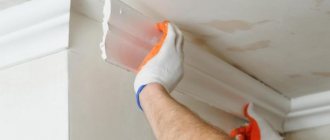
- Fix the baguettes. Only the part of the fillets that directly lies on the wall is covered with glue. Then the baguette is applied to the wall, gently pressed and fixed in this way for a couple of minutes until the glue has completely set. Before using the glue, you should read its application instructions and take into account all the nuances.
Useful video on the topic:
Appearance and dimensions of fillets
Fillers are mainly made of polystyrene foam and polyurethane, as well as plastic. You can find fillets made of fairly heavy materials, such as wood and plaster. But due to the fact that ceiling plinths are not recommended to be glued to the ceiling, it is necessary to use a lighter material.
Ceiling skirting boards have different lengths and widths; the surface can be smooth or textured. The appearance must match the style of the finished room.
The length of the fillets is selected such that there will be fewer joints and fewer scraps. Therefore, before purchasing, measure the length of all walls.
It is necessary to buy fillets with a significant margin, because they cannot always be immediately adjusted to the corners. For such cases, many manufacturers offer special corners that can be glued between skirting boards that meet at right angles. This makes the job much easier.
How to properly glue heavy skirting boards
We will mainly talk about baguettes made of natural wood (oak, ash, alder, mahogany). They will not differ in the principle of fastening. It is worth taking into account some individualities in the work, mainly the weight of the material. There are several installation options. Let's look at each of them.
Method No. 1
Such baguettes are mounted directly to the base. Therefore, if there is wallpaper on the walls, then you should clean it off in the place where the baguettes will be located. For this work, a construction knife is used, which is used to carefully trim the wallpaper. The “bare” area is primed to increase adhesion. The glue is applied not only to the “wall” section of the baguette, but also to the wall itself. Applying glue to both surfaces promotes high-quality adhesion of materials.
Method No. 2
After drawing a strictly horizontal line with a pencil, wooden corners are installed along it at certain distances, which serve as a place for attaching the baguettes.
Installation Tools
During the installation of skirting boards, you may need:
- pencil;
- stationery knife;
- ladder;
- small metal spatulas or guns for applying liquid nails;
- thin rubber or plastic spatulas;
- brush for painting the material;
- miter box for cutting baguettes;
- roulette.
How to glue ceiling skirting boards to stretch ceilings
The work of attaching ceiling skirting boards involves the following steps:
- Preliminary actions - horizontal marking and cutting of skirting boards. We calculate the number of required planks in order to determine “on the shore” their number and correct trimming, in order to avoid missing or unnecessary parts. It is necessary to take into account the following nuances: the number of planks should be 3–4 more than the calculated value. Defects and damage may be detected. You need to leave extra centimeters for trimming the corners. It is necessary to follow the basic rule: in visible areas you should use only high-quality and solid skirting boards so as not to spoil the appearance of the room. The presence of a large number of joints will make the room unattractive.
- Let's proceed to the main steps - installation of baguettes. We apply a plinth for the ceiling to the corner on the left hand.
- We take a pencil and draw a line along the ceiling along the baseboard, about 12 centimeters long.
- Using the same principle, we draw a line of 10 centimeters from the corner to the right hand.
- The intersection of the lines is considered the beginning of the cut.
- On the right and left plinths we make marks of intersection lines.
- From the mark made to the opposite corners of the right and left slats, an angle of 45 degrees is cut using a knife.
- Cut skirting boards are installed at the corner to check the accuracy and evenness of the joints.
- Let's move on to gluing the baguettes. You can use special glue or finishing putty.
- From the varieties of glue, choose polymer options or liquid nails. These compositions do not have a very pleasant odor and do not belong to the category of moisture resistant. The glued baguettes are pressed against the wall for several minutes. Skirting boards will last for a long time. But if there are irregularities and cracks, it will not be possible to hide them in this way.
- The finishing putty is first prepared. Take a container, pour clean water into it, pour out the amount of putty and mix everything using a mixer. To make the composition more durable, you can add a small amount of PVA glue.
- The mixture is applied to the edges of the baseboard, after which it is applied to the wall and pressed for two to three minutes. Excess putty is removed with a sponge and spatula. The same composition can be used to cover joints, irregularities, and cracks.
Useful video instructions on how to glue ceiling skirting boards to a suspended ceiling:
Installation
Installation and fastening of the plinth begins from the corner of the room, and for this, you need to prepare the corner elements. First, the planks are applied to the wall without glue, this will allow you to check that they are trimmed correctly.
The glue is applied to the side adjacent to the wallpaper, and the plank is pressed against the wall, according to the markings made in advance.
If there are uneven spots on the wall , then in these places the fillets are pressed harder and you can fix them with tape while the glue dries, after which it is removed. After you have made all the corners in the room, you need to glue the straight sections of the baseboards.
You can perform installation in another way: work starts from one corner and gradually moves in one direction along the perimeter of the room. Exposed glue must be removed immediately with a rag. After the glue has dried, the fillets can be painted.
If the length of the corner element is less than 7 cm, then it is lengthened by shortening the straight section.
You can glue baguettes to walls without wallpaper. In this case, they are leveled using putty or sealant. Adjusted to the required dimensions, the elements are wetted from the inside and also wet the wall.
Putty is applied to the baseboard using a spatula, after which it is pressed well against the wall, the remaining putty is removed with a spatula and a rag.
Features of gluing ceiling skirting boards to stretch wallpaper
Working with baguettes in the presence of ordinary ceilings does not cause any difficulties. Another thing is suspended ceilings. In this case, there are certain features that should be taken into account when performing installation work:
- To avoid damage to the thin film of the ceiling covering, baguettes are cut not under the ceiling, but on the floor.
- The gluing of baguettes is carried out exclusively to the walls, so the adhesive is applied to the part that will come into contact with the wall.
- Before painting the ceiling skirting boards, you need to take clean paper and insert it into the gap between the molding and the ceiling. This way, the appearance of the stretch ceiling will not be spoiled.
What adhesive materials to use
Before gluing the plinth to the suspended ceiling, you need to think about all kinds of adhesive materials that can help in the installation process. It can be:
- Liquid Nails. In most cases, they use “Glue Moment” or compositions for polystyrene foam - “Montazh Express Decor”. The glue is white, resistant to high humidity, harmless, and does not damage the foam. Apply using a gun or dispenser.
- Polymer based adhesive. This glue is water-based, so it takes longer to dry. It is necessary to press the material against the wall for ten minutes, this makes the installation process longer. The glue is low cost.
- PVA. The glue contains only safe substances. The drying process takes at least three minutes.
- Acrylic putty. The adhesive does not contain a solvent, is resistant to moisture and dries in a short time.
Advice from experienced builders
To avoid any “shortcomings” when gluing skirting boards to the ceiling, you must follow the advice of experts. This will save not only free time, but also money.
- To make the correct joining of the skirting boards in the corners, you need to cut them accurately. You can do this yourself using a miter box or purchase ready-made corner strips.
The principle of working with a miter box - To prevent ceiling plinths from harming stretch ceilings, you must use a polyethylene gasket, which is installed between the narrow part of the molding and the stretch ceiling itself. Once the work of installing the skirting boards has come to an end, the gasket is removed.
- Maintaining 45 degrees when designing corners is a prerequisite. Otherwise, the corners will look sloppy.
- Along with the ceiling skirting boards, it is worth purchasing adhesives for their installation. Using old expired products is strictly prohibited. This will not only not save money, but will also involve additional costs associated with redoing the amount of work already completed.
- When a gap appears between the wall and the molding, it is sealed using acrylic putty.
- Heavy polyurethane structures should not be glued to wallpaper, as they can tear it off.
- Using a wooden ceiling plinth involves attaching it to the wall using special elements rather than glue. This way the structure will last for quite a long time.
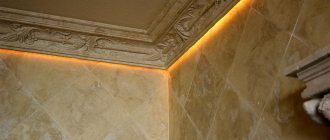
- You can leave a small distance between the suspended ceiling and the baguette where you can extend the LED strip. This way you can illuminate the room in an original way.
- Methods of attaching baguettes are chosen based on their type and characteristics of the walls.
- Skirting boards are purchased with a reserve and from one batch.
Alternative option
Ceiling plinths for suspended ceilings can be successfully replaced by plugs and decorative cords.
Stub
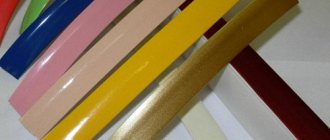
The plug is an elastic tape made of rubber, PVC or polymer materials 1-2 cm wide with a different profile, which is installed in special grooves in the stretch ceiling baguette along the entire perimeter of the room to mask the technological gap. It has several names: elastic band, masking tape, decorative rubber insert, etc. Available in several dozen colors and shades, which makes it possible to always match the color of the stretch ceiling fabric.
How to insert a plinth into a suspended ceiling? To fix the elastic, you do not need glue, any tools or experience. Installation is done by hand into a special slot connector, into which the protruding part of the profile is inserted. For complete fixation, it is enough to press lightly on the inserted sections so that the “spike” completely fits into the connector. The ends are joined at an angle of 90o along the entire perimeter.
It is held in the groove by teeth on its profile and on the back wall of the baguette, thanks to which it is mounted and removed easily and quickly.
The plug can be ordered together with the suspended ceiling. They are matched to the color of the canvas, as a result of which the technological gap becomes almost invisible. Easily fits into corners. Cuts with a construction knife.
This method is more popular among consumers than installing skirting boards due to the low price of the material, simple installation and speed of installation. However, the plug in many cases leaves the impression of unfinished walls and ceilings.
Decorative cord
The term decorative cord does not accurately reflect the essence of this type of decoration. It is rather a thick rope made of durable lavsan threads, although on sale you can actually find a cord for very small gaps. Available in plain or contrasting colors. Often metal threads imitation gold and silver are woven into the cord.
Fixed with glue. Thanks to its flexibility, it can be mounted on both straight and rounded sections of the wall. Looks good with satin and matte fabric.
Among the disadvantages, consumers note the ability of the cord to collect dust, which must be carefully removed regularly.