Repairs do not always bring the desired results. Especially when it comes to walls and ceilings. Most often, defects are visible in houses of old construction, appearing when wallpapering at the joints of the ceiling and walls. To remedy the situation, they came up with special products that form the basis of the finishing. One of them is polyurethane ceiling plinth. In addition to the fact that such elements hide defects, they also perform a decorative function, highlighting the stylistic direction of the interior, giving attractiveness and originality to the room.
Getting ready for installation
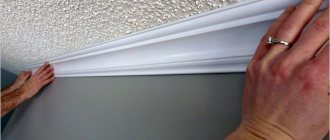
To ensure that the glued profile does not stand out from the overall finishing concept, but exclusively complements the design of the room, before gluing the ceiling plinth, you need to make the right choice of fillet.
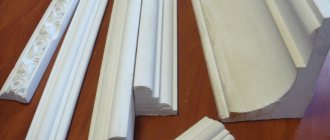
Now the market is overflowing with different offers, ranging from simple foam planks to exclusive carved wooden models. But as practice shows, polystyrene foam, polyurethane and plastic profiles are in greatest demand for installation, both in standard apartments and in private houses. When the choice is determined, it is necessary to calculate how many rods will be needed for installation. To do this, you should calculate the perimeter of the room, do not forget about the ledges and niches. Divide the result by the length of the molding, round the uneven value up and add, to be on the safe side, another profile.
Tools for gluing skirting boards
What comes first
When the material is selected and calculated, the question inevitably arises: when to glue the baseboard, before covering the walls or after wallpapering? With the installation of plastic skirting boards, everything is logical; first they are attached to the wall, and only then PVC panels are inserted into the grooves of the profile.
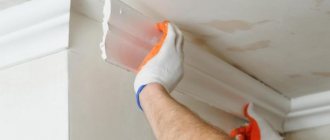
Many people prefer to install ceiling plinths when the walls are already covered with wallpaper, this way they can cover unevenly cut edges. But if the surfaces have curvatures, then such installation of the plinth will highlight all the shortcomings of the room, cracks will be visible, and if, in addition, a flexible profile is glued, then it will fall in waves, spoiling the entire aesthetics of the interior.
Experienced craftsmen advise gluing the baseboard before finishing the walls, but trimming glued wallpaper evenly can be very difficult, so this installation method is the most difficult. If the surfaces are very curved, then you first need to level them, and only then stick the wallpaper, then install the baseboard. If the flaws are minor, then you should first install fillets, leveling the surfaces with putty, and only then finish the walls and stick wallpaper.
Watch the instructions on how to glue the ceiling plinth; the video explains in great detail how to cut the corner correctly.
https://youtube.com/watch?v=ygxDrxmA4kw
Glue
Adhesive for ceiling fillets is divided into polymer and acrylic according to its chemical composition. The choice of adhesive composition depends on the functional specifics of the room, for example, if the baseboard is installed in a nursery, then it is better to give preference to environmentally friendly acrylic, but for installation in a bathroom or on a loggia you will have to use polymer-based glue.
The basis of acrylic glue is water, so they are practically odorless, but they are completely unsuitable for installing skirting boards in rooms where humidity is high. Polymer samples are very durable and moisture-resistant, but they contain caustic solvents, so after installing the fillet, the specific smell of the glue will last about another month. For installing fillets with your own hands, instant-installation adhesive for ceiling plinths has proven itself well.
Also on the market for installing fillets are types of glue that sets quickly and even glues wet surfaces, which is extremely convenient, because working under the ceiling is a huge physical activity.
Advice: If you are going to stick wooden skirting boards, then glue alone will not do; you will additionally need nails or dowel-nails with self-tapping screws.
But craftsmen who decide to do the repairs themselves, by definition, are not looking for easy ways. Do this and it’s easy to mix the glue for installing skirting boards yourself. The fillet can be glued to the putty, and the cracks formed during installation can also be sealed with this solution.
To prepare the adhesive composition, you will need: 1 part water, a quarter part PVA glue, 1 part finishing putty. The glue components are thoroughly mixed until smooth, the mixture should stand for about an hour. Before attaching the ceiling plinth, the mixture must be mixed again.
https://youtube.com/watch?v=VxAUb3h4u08
How to glue skirting boards to a two-level stretch ceiling
Installation of decorative cornices to the lower level of a two-tier structure is carried out in a similar way - the baguette is attached only to the wall. To mask the technological gap between the levels, a special decorative PVC insert is used, which comes in different shapes:
- a tube;
- fungus;
- oval.
A flexible cap is best suited for creating a discreet transition between tension surfaces, which are often curved in shape. The masking tape is easily inserted into the profile groove using a wooden or plastic spatula without the use of glue.
Interesting information! To create various visual effects, a decorative twisted cord is used as a plug. It is attached with glue and is used to mask the gap not only between levels, but also at the junction of the wall and ceiling.
Types of ceiling plinths
How to attach a suspended ceiling
Along with the question of choosing a decorative element, the question of what to glue the ceiling plinths to is no less pressing. The glue is selected depending on the type of baguette. The most common offers include:
- foam;
- expanded polystyrene;
- wooden;
- plaster.
A budget-friendly and easy-to-handle foam baseboard is chosen by most consumers. With all its advantages, few people think about the disadvantages at the time of purchase. The main one is fire hazard. When ignited, the baguette emits caustic smoke that is hazardous to health. Polystyrene foam is a short-lived and fragile material that requires careful handling to avoid breaks and dents.
In second place in cost is polystyrene foam plinth. With a slightly increased price comes increased strength. When cutting, the integrity of the canvas is not compromised. It is convenient to use, as it does not require additional painting and is easy to clean with water. When a fire occurs, it lights up as quickly as foam, but goes out after a short time.
Wood edging can be described as expensive, solid and luxurious. This is a plinth not for a year or two, but for decades. Installation of a wooden plinth is more difficult than the options listed above. If the wood is not varnished, it is difficult for the plinth to avoid deformation, rotting, and insect infestation, which significantly reduces its service life.
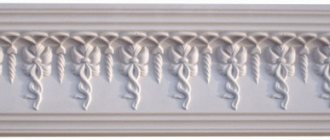
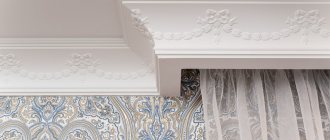
Gypsum stucco is chosen by wealthy people who try to emphasize the individuality of their home. Unique designer borders are created from environmentally friendly gypsum, distinguished by their durability in use.
Types of ceiling moldings
Baguettes can be decorative and fastening. The latter are used for attaching suspended ceilings to walls or ceilings. But in this article we will dwell in detail only on how decorative ceiling moldings for curtains differ from each other.
Material of manufacture
Today there are a variety of types of baguettes, and this variety is pleasing: because it allows you to choose what best suits your interior.
The most popular types of baguettes are made from the following materials:
- Plastic (polyvinyl chloride). It is used to make both baguettes for suspended ceilings and special skirting boards for ceilings made of plastic panels. The latter serve not only to frame the surface of the suspended ceiling, but also for its installation. The fact is that the plastic baguette is a special profile into the groove of which the edge of the panel is inserted. It usually comes in white, but many manufacturers produce baguettes to match the panels.
Plastic baguette
- Polystyrene foam and polystyrene foam. Foam baguettes are the cheapest, but this does not mean that they look according to the price. They can decorate any ceiling – plastered and painted, covered with wallpaper, suspended from plasterboard. It is easy to install and can be painted in the desired color.
Foam baseboard
- Polyurethane. This is the most popular material for making ceiling moldings. It is very durable and flexible, which allows you to finish curved surfaces. And very light, which is important if you have to glue the baguette only to the wall, as is the case with stretch ceilings.
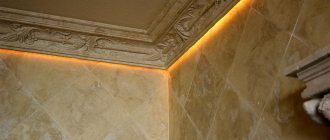
For reference. Polyurethane baguettes are best suited for concealed curtain lighting . There are even special baguettes with a wider bottom surface and a groove for laying cables or LED strips.
Polyurethane baguette with backlight
- Tree. The classic wooden baseboard remains very popular, especially among admirers of natural materials. But it does not always look appropriate in combination with modern materials for finishing the ceiling. But if the ceiling is decorated with wooden paneling, plastic or MDF panels “like wood”, you won’t find a better decor for them.
It will also be appropriate in rooms with wooden wall panels, furniture, doors and window blocks made of natural wood, perfectly emphasizing their beauty. However, wooden baguettes can be painted , hiding the structure of the wood and bringing it into external conformity with the decoration of the walls and ceiling. But in this case, it is much easier and cheaper to install foam decor.
Wooden baguette
- Gypsum. Today, not everyone knows what a real gypsum ceiling molding is. Although this particular material was one of the first with the help of which they began to produce decorative elements for interior decoration - stucco. It can be found in museums and ancient estates. If desired, gypsum baseboards, rosettes and other decorations can still be used today, but this is rather a matter of prestige and status.
Gypsum is a heavy and fragile material , products made from it require special handling and are quite difficult to install. While polyurethane moldings look no different from plaster, they are more practical and no less durable.
Read also about gypsum ceilings.
Ceiling plinths and other plaster decor
Sizes and color
Material is not the only parameter by which a molding for ceilings is selected. Its external data : color, width, relief. And if the relief is a matter of taste and consistency with other interior details, then color and width directly affect the perception of space.
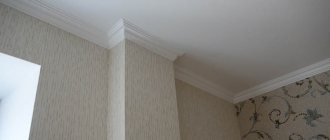
A wide baguette is chosen for large rooms with high ceilings. Visually, it will bring the ceiling a little closer, giving the room more comfort and intimacy. In addition, at a high altitude, a narrow plinth will be difficult to see, and the room itself with such decor will seem too formal and cold.
But in a small room with a low ceiling height, it will look better just a narrow baguette , which will visually move the ceiling away from you.
In typical apartments it is better to glue a narrow baguette
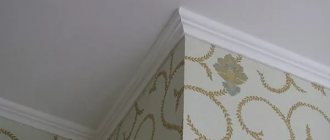
Color is also very important. It is chosen depending on whether you want to draw attention to the ceiling or not. In the first case, the molding for the ceiling is selected or painted to match the color of the walls or ceiling.
Advice. To make the ceiling appear higher, the baseboard should be the same color as it.
If you need contrast and clear graphic lines, then baguettes whose color does not match the color of the delimited surfaces will help to create them.
A wide white plinth perfectly decorates plain walls and ceilings
However, in this case, you should use shades that combine with each other.
Read also about decorative ceiling plinth.
Adhesive for polyurethane ceiling plinths
Corners for foam ceiling plinths
The advantage of polyurethane skirting boards is that this material itself is flexible, so it can be easily glued to ceilings with uneven surfaces, without fear of breakage or deformation of the product.
With the advent of polyurethane skirting boards, it became much easier to carry out repair work, because until that moment they used gypsum stucco molding, the installation of which was complex and time-consuming.
The best glue for this type of product is “Moment”.
Other polymer-based varieties are also suitable, and even liquid nails with various silicone-based sealants.
But their use is not so effective, because “Moment” dries quickly. and due to its excellent properties, the adhesion to the surface is more dense.
It is recommended to use it with a special sealant gun.
If you choose glue that dries less quickly, you will have to stand with your hands raised high, holding the baseboard for a long time, since polyurethane is heavy and can fall off.
This is not very convenient, because your hands will quickly get tired, and you won’t be able to press the product tightly to the surface.
Advantages and disadvantages of polyurethane skirting boards
The main advantage of this decor is its flexibility. It can be simply an ideal option for decorating apartments whose walls have a complex configuration - they have rounded corners, niches and arches. Of course, it will look good on flat surfaces as well. How apartments decorated using such planks might look like, look at the photo:
Pros and cons of polyurethane ceiling skirting boards
Polyurethane ceiling plinth has a number of undeniable advantages:
- A wealth of colors and textures. In addition, you can use both wide and narrow decor options to decorate the room;
- Easy to care for. In case of contamination, such strips, unlike foam ones, can simply be washed with a solution of any household detergent;
- Ecological cleanliness. If desired, such a ceiling plinth can be glued even in children's rooms. Polyurethane foam is a foamed plastic material. Essentially, this is the same foam rubber, only hard and flexible;
- Resistant to deformation. You can use this decor, unlike the same wood, even in bathrooms.
Polyurethane strips can imitate stucco.
Ceiling plinth made of polyurethane has only one, but quite significant drawback - heavy weight. Foam planks, for example, are much easier to install.
Floor plinth
Floor plinth made of polyurethane has all the advantages of a ceiling plinth. In addition, one can also note its advantage such as mechanical strength. In case of an accidental impact, it does not form scratches, like a wooden one, or holes, like a plastic one.
Polyurethane floor plinth looks very neat and at the same time is characterized by mechanical strength
Being used for both floors and ceilings, due to their elasticity and flexibility, polyurethane strips perfectly hide all the imperfections of the wall surface.
In addition to the heavy weight, the disadvantage of this type of decor, both floor and ceiling, is also considered to be quite high cost. Its price is comparable to the price of wood. However, this floor framing looks no worse:
Advantages and disadvantages of polyurethane skirting boards
Installation of ceiling plinth, photo and video instructions
As already mentioned, polyurethane plinth is the most durable and wear-resistant type of baguettes. In addition, let’s consider other positive features of the material:
- Flexibility. This ensures that the baguette can be attached to any surface, including uneven ones. At the same time, the quality of adhesion to the surface of the wall or ceiling remains the same.
- Polyurethane products are durable, while foam products simply break in places of slight pressure and deflection.
- Wear resistance. Manufacturers offer a 30-year warranty. During its entire service life, the baguette does not lose its visual appeal.
- Easy to use. It is free to process. It can be cut with an ordinary stationery knife.
The advantages always balance the disadvantages. If the seller didn’t tell you these, it means he’s being disingenuous:
- Unlike analogs made from other materials, this type of baguettes is heavier. Accordingly, in order to glue it to the wall, it is necessary to use special glue.
- The second, main disadvantage is the cost. The price of a polyurethane ceiling plinth is several times higher than that of a foam plinth.
If we compare the pros and cons of such material, then, without a doubt, the latter will pale in comparison with the positive characteristics of such baguettes
So why not pay closer attention to them?
PPU plinth in the interior
Using polymer stucco, which includes polyurethane baseboards, you can decorate not only walls, but also frame panels, furniture facades, niches - that is, create an original, memorable interior.
What are the advantages of polyurethane products
In addition to the elastic structure, which allows the material to work well in bending, polyurethane curtain rods also have a lot of other advantages.
- They are the most durable, as they are not afraid of humidity, cold, elevated temperatures, or ultraviolet radiation.
- They do not even require any additional protection in the form of hydrophobic or antiseptic impregnation, and painting is done only for reasons of interior aesthetics.
- Thanks to the above qualities, polyurethane ceiling plinth is often used as furniture decor, including in the kitchen, around a gas stove, and near the fireplace.
- Compared to a similar material made of expanded polystyrene (read more here), which does not bend at all and is therefore installed only in a straight line, PPU plinth is the main element of curved suspended ceilings.
The baseboard painted with matte paint is indistinguishable from gypsum stucco molding.
- It is simply impossible to decorate the boundaries of the suspended ceiling levels so beautifully, as was done in the photo above, without flexible material.
- Polyurethane plinth not only allows you to frame the ceiling, but can also play a major role in the design of the entire room.
- It is worth saying that today manufacturers offer a wide range of polyurethane stucco moldings of various shapes and purposes. So, you can always choose the option that is most suitable for a specific idea.
- For example, using a polyurethane cornice, you can create coffers on the ceiling: one large one, or many small ones. In the first case, a wide two-stage baguette is used for this, which we see in the picture above.
- It is mounted to the surface of the ceiling, forming a recess along its perimeter, framed by a kind of border. A special protrusion along the border of the cornice adjacent to the wall can hide the LED strip used to illuminate the perimeter.
- The internal cavity of such a plinth is usually used as a cable channel.
- By the way, for the installation of eaves ceiling lighting, there are specially shaped skirting boards.
- They are mounted to the wall surface with only one edge. The other forms a niche in which the LED strip or neon cord is located.
Please note: In order to create many square coffers on the ceiling, narrow polyurethane skirting boards with a beautiful relief are used, which are mounted lengthwise and crosswise over the entire area.
Polyurethane plinth
- Using a plinth you can not only decorate the ceiling, but also adjust its shape and even height. If the height of the room is small, a massive molding along the upper perimeter of the wall will not look good.
- Therefore, it is better to use a narrow option that covers the joints of the walls and ceiling. You can also use for this purpose a flat wide plinth mounted on the ceiling, which you saw in one of the examples above.
- In private homes, the problem may not be a low, but, on the contrary, too high ceiling. To visually get rid of the feeling of excessive space, take a massive baguette and mount it to the wall, with a large distance from the ceiling, as shown below.
Ceiling cornices that adjust the height of the room
In this case, the wall is divided into parts horizontally, and its height visually becomes smaller. The photo above shows an excellent example of such an adjustment to the volume of a room.
Here, by the way, the fireplace is also framed with a polyurethane plinth, which proves the fact that this material is not afraid of elevated temperatures.
Modern stucco molding: not only moldings and baseboards are made for ceiling design
Installation nuances
Preparation of materials
Before you begin installing ceiling plinths with your own hands, you need to do some preparatory work:
- first of all, you need to measure the walls, including areas with protrusions and recesses;
- then, in accordance with the obtained parameters, you need to apply markings to the planks;
- Next, the most difficult stage of work is performed - the planks are adjusted to the outer and inner corners. If the corners are right, they are cut at 45 degrees.
If there are deviations, the angle should be measured and the resulting value divided by two. The result will be the angle at which the fillets should be cut;
- if the profile is heavy, you should remove the wallpaper from the wall in the area where it will be adjacent. To do this, you need to attach the bar and draw a line along the lower border. After this, the wallpaper can be cut with a stationery knife.
This completes the preparatory work.
Gluing
The installation instructions for the ceiling profile are as follows:
- before applying glue to the ceiling plinth, you should treat the junction of the fillet with the wall and ceiling with a primer, which will improve adhesion;
- then an adhesive is applied to the back of the plank. If the fillets are narrow, then drops of glue should be left on the strip in increments of 5-10 cm. If the fillets are wide, then the composition is applied in a zigzag manner;
the processed plank is pressed against the wall and ceiling. It is best to start installation from the corners. The profile must be held in this position for some time until the composition sets;
- after pasting all the skirting boards, the joints need to be puttied, which will allow you to get one continuous decorative contour;
- At the end of the work, as a rule, paint is applied to the fillets, for example, acrylic water-dispersion. Before painting them, you should apply masking tape so as not to stain the walls.
Note! If the fillets are glued with Liquid Nails or other similar glue, after applying them to the wall it will not be possible to tear them off and re-glue them. Therefore, the work must be done carefully, since the price, for example, of polyurethane skirting boards is quite high
This completes the process of gluing the fillets.
Polymer adhesives are usually used to glue ceiling plinths, although sometimes it is better to replace them with putty. But, in any case, it is necessary to follow a certain gluing technology, which is given above.
Installation of baguettes
Installing a baguette on the ceiling depends on its type: some products can only be mounted on putty or alabaster, others can be glued, and others can be mounted on nails or screws.
Installation of foam or polyurethane baguettes
Baguettes made from these materials can be attached with glue, silicone sealant or finishing putty.
The choice depends on your desire and the finishing stage at which installation takes place.
- Before gluing baguettes to the ceiling, evaluate the evenness of the walls . The slightest curvature will lead to gaps remaining between the wall and the baguette, or the baguette itself will follow the shape of the wall. To avoid this, it is better to install skirting boards before finishing the walls - painting or wallpapering. To do this, you should use putty, which will fill all the cracks.
Excess putty is removed with a spatula
- If the walls are already finished, gluing the baguettes to the ceiling is carried out using glue such as Titan, Moment Installation or liquid nails.
Installation of gypsum moldings
Installation of ceiling moldings is carried out on putty or alabaster . The same solution is used to seal joints in corners and straight sections, as well as gaps between the cornice and the wall.
Advice. Massive and heavy plaster moldings can collapse under their own weight. Therefore, after gluing, it is advisable to secure them with white steel screws.
Installation of wooden baguettes
If you have chosen wood products , you can either glue a molding for the ceilings or secure it with nails or self-tapping screws. But in the latter case, there will be holes on the baseboards that will need to be puttied.
Before fastening, you need to drill a hole in the baseboard and make a recess for the screw head
When using self-tapping screws, small triangular wooden mortgages are installed in the corner between the wall and the ceiling, to which the baguettes will subsequently be screwed.
You can learn how to join baguettes in internal and external corners by watching a training video , as well as by studying the relevant materials on our website.
Why this material
Polyurethane has long earned the recognition of the inhabitants of our country.
It has a number of advantages compared to alternative options. Let's list the main ones: ease
Polyurethane skirting boards are characterized by minimal weight, which is especially important for installation on the ceiling; long service life. It is believed that products made from this material can reliably serve the owner of the premises for up to 30 years.
At the same time, they remain aesthetic and beautiful; resistance to external influences. Polyurethane structures are not afraid of high humidity and do not absorb aromas, so they can be used not only in bedrooms, but also in the kitchen; elementary installation. Polyurethane is distinguished by its softness and flexibility, which means it will not break or crack. In addition, minimal weight and adhesive fixation are also the most important advantages of this material; simplest care. For polyurethane there are no uncleanable contaminants. It does not require additional pest control treatment, unlike its wooden counterparts. You just have to pass a cloth over it from time to time, and your baseboard will look like new again and again; health safety. A ceiling plinth made of this material does not pose any threat to you and your family, unlike products made from the same plastic; variety of stylistic solutions. Products made from polyurethane will optimally fit into any interior. Using them, you don’t have to worry about them “falling out” from the overall style of the room.
As you can see, there are many obvious advantages of such a solution, and they could be listed for a very long time. But how are polyurethane products installed correctly? Next, we will analyze step-by-step instructions for quick but reliable fastening, and we will analyze all the main nuances of the procedure.
Choosing glue for ceiling plinth
Planning indoor renovation work is a complex process that requires special attention to detail. Ceiling plinth is a decorative element of the interior. Why do decorators and construction companies recommend gluing it?
In addition to its decorative function, the baguette masks repair defects. It is convenient to hide communications such as wires and cables behind it, which will reduce the time and costs of laying cable channels. Correctly selected edging can not only transform a room, but also visually enlarge or reduce it. Hiding the joints of the wallpaper and ceiling, the border gives the room a finished look.
Mounting process
It is necessary to understand that polyurethane ceiling plinth includes two subtypes: flexible and rigid. That is, it is a mistake to assume that any fillet option can be bent. Therefore, when finishing is carried out on different surfaces (curved, straight), it is necessary to consider the use of different skirting boards that will be combined with each other. This will save some of the budget for repair work.
When finishing surfaces of different curvature, it is better to combine an expensive flexible plinth with a cheaper straight version
To calculate the required number of parts, proceed from the general perimeter of the areas that need such finishing. That is, the resulting length is divided by the size of the elements.
The situation is a little more complicated with curved surfaces. But there is a simple way that allows you to take correct measurements. It is as follows:
- A cord is used for the process.
- The end of the rope is pressed against the beginning of the curved section.
- The cord is pulled so that it completely goes around the entire surface.
- The resulting segment is measured on a tape measure.
- + 10% is added to the result.
In this way, the flexible ceiling plinth is calculated most accurately.
Tools and Supplies
The following set of tools and materials is prepared for the work:
Simple pencil
It is important to keep in mind that if a felt-tip pen is used, all marks are made only on the reverse side. A stationery or construction knife - for cutting flexible fillets. A hacksaw and a miter box – for cutting hard baguettes. Glue for fixing elements. Construction gun and sealant in tubes to eliminate possible joints. If there is a subsequent decorative finishing, then you will need tools for such a process - paint, a brush... Tools and consumables necessary for installing polyurethane skirting boards
Tools and supplies needed to install polyurethane skirting boards
Installation steps
The first stage is preliminary preparation. It is necessary to perform a number of sequential actions:
- All areas are cleaned of dirt and dust. You should wipe the baguette, because it could have been stored for a long time, which led to its contamination.
- The walls and ceiling are treated with a primer. This rule applies only to those surfaces to which parts will be attached.
Primer treatment of areas to which the plinth will be attached
It is believed that it is best to install a polyurethane baseboard when wallpapering has not yet been done.
The second stage is that the markup is performed:
- One of the parts is pressed to the surface. Small marks are made on the sides - the step is ten to fifteen centimeters.
- All joints are marked separately.
Correct markings will help you trim the corners before installing the fragments. At the same time, in order to cut the polyurethane ceiling plinth of a rigid structure, a hacksaw is used
The element is installed in the miter box (it is important to correctly determine the cutting side) and is sawn according to the existing lines
Trimming fillet corners using a miter box
Now comes the third stage:
A tube of glue is prepared and installed in a construction gun. The composition is distributed evenly over the entire seamy side of the flexible element and pointwise over the surface of the rigid fillets. Installation begins from the selected angle. It's best to move in both directions
It is important to consider that the adhesive mixture is also applied to existing joints. Any excess that appears is immediately removed. After complete installation, the seams are coated with sealant and puttied.
Filling joints with sealant
Indeed, ceiling plinths made of polyurethane have a lot of positive properties and are not particularly difficult to fix. The main thing is to choose the right material, as well as follow the installation steps.
Is it possible to glue skirting boards to a suspended ceiling?
As a rule, craftsmen offer a decorative insert to mask a technological gap. This solution is simpler, faster and included in the cost of the work. A more beautiful way to eliminate the gap is to glue a foam or polyurethane border to the stretch ceiling. This task is easy to handle on your own, but you can only attach the plinth to the walls.
It is unacceptable to glue fillets directly onto a suspended ceiling for the following reasons:
- The design consists of a fabric or thin PVC film stretched over the ceiling, which quickly sag under the influence of the weight of the plinth.
- Adhesives can damage or dissolve the fabric.
- As the glue dries, wrinkles may form on the ceiling.
- It will not be possible to replace the decorative cornice - the PVC film will be deformed and traces of glue will remain.
Interesting information! You can install an LED strip in the gap between the ceiling and the baguette. This will create original lighting, visually increase the height of the room and make it brighter.
Installation of polyurethane floor plinths
Next, we’ll look at how to attach a polyurethane floor plinth. It is also usually mounted with special glue. Gluing decorative skirting boards should begin from the corner of the room. The work is carried out in several stages:
- The surface of the walls and floor is being prepared for the baseboard. They must be thoroughly cleaned and degreased;
- The plank is coated with glue on the reverse side. There are special grooves (shelves) here. The composition must be applied specifically to them, as well as to the ends;
Glue is applied from the back side
- The floor plinth is pressed tightly against the wall and held there for several minutes. You can press it against the wall with something heavy;
- The joints between the planks are treated with acrylic sealant.
Tip: In places where the walls are uneven, the polyurethane floor plinth may come off slightly. In order for it to stick evenly over the entire surface, you just need to nail it down not all the way. After the glue sets, they can be pulled out. It is worth nailing the strips at the corners as well.
The wide polyurethane floor plinth looks very impressive in the interior. They glue it using the same technology. However, since it can shrink quite significantly, the joints between such high planks sometimes diverge after some time. In this case, you should wait until the gap stops growing, that is, the baseboard shrinks completely. After this, the old glue will need to be removed. Next, the split seam is filled with joint glue using a syringe. Since it forms a foam, care should be taken that it does not reach the surface by approximately 2mm when applying.
Wide floor polyurethane plinth looks very impressive, but is somewhat difficult to install
Polyurethane plinth can also be mounted mechanically using self-tapping screws. The video below shows this process step by step:
Mounting features
Installing baguettes on the ceiling is a responsible undertaking, regardless of whether you do it yourself or entrust the work to a professional. The appearance largely depends on the installation, since during operation you can damage the wallpaper (if it is attached after gluing), or the suspended ceiling, and in general, sloppy installation will be visible in bright light.
The installation method depends primarily on the material of manufacture, additionally influenced by the shape of the mounting base and the size of the baguette.
The method of fastening depends on the material from which the baguette is made
It is easiest to work with polystyrene (foam and extruded), polyurethane and polystyrene. These materials are lightweight and do not require additional fasteners. Mostly glue is used to install them. Sometimes they are attached before wallpapering, then they are placed on damp putty.
Things are more complicated with wooden and plaster ceiling plinths. They are heavy, so they require special fastening. Dowels (additional fastening elements) are often used for installation.
Dowels are used for plaster and wooden baguettes
In general, polymer glue is used for fastening. You need to work with it carefully so as not to stain the wallpaper or stretch ceiling.
Particular attention should be paid to the corners. Installing a baguette in this place is quite complicated. First you need to cut the products according to measurements, then process the cut area, and then fasten it. You need to be careful with external corners, because in this case, when measuring, you should add two widths of the plinth, while the required baguette length for the internal corner is measured along the length of the wall, without adding centimeters.
It should be noted that before installing the plinth, the base is processed. It is necessary to carefully level the walls and ceiling. Minor flaws can be hidden with baguettes, but not big flaws.
Pay special attention to the corners, they should be smooth
Choosing the optimal ceiling plinth
Even before you start choosing what you can use to glue the ceiling plinth, you should understand what types of plinths are used most often and why. Often, the materials for making ceiling skirting boards are polyurethane and foam.
Despite the similarity of these samples and the presence of polymers in both materials, they have some differences:
- Polyurethane construction is more durable and flexible than foam construction. Of course, its cost is higher. Polyurethane tolerates conditions of high humidity well, so it can be installed in the kitchen or bathroom. The surface is less porous and more glossy.
To determine how much material needs to be used, you need to divide the size of the perimeter of the room being equipped by two (the length of one plinth element). As a result, you will get the required number of pieces.
Calculation of quantity and selection of ceiling plinths
Calculating the required amount of material is very simple:
- measure the perimeter of the room:
- divide the resulting value by the standard length of one baguette (2 m);
- round the result up;
- add two or three more elements for an unforeseen event (damage during installation or transportation).
The variety of shapes and types of ceiling fillets often poses difficulties for buyers; then they need to choose the right product. After all, your own preferences do not always correspond to the chosen direction in the interior. To avoid mistakes, pay attention to the following tips:
- for narrow and long rooms, choose wider fillets;
- in a low room, a thin plinth under the ceiling will look better;
- minimalism will be emphasized by a modest white plinth; for lush interiors, you should choose pompous baguettes that imitate stucco;
- if the color of the baseboard matches the shade of the walls, it will visually lengthen the room, it matches the color of the ceiling - the walls will become noticeably higher;
- As for the material, it all depends on your financial capabilities. The cheapest are foam and polyurethane baseboards, the most expensive are wooden and aluminum baguettes. In any case, you can always paint the product in the desired color.
Correctly gluing a baguette to the ceiling is not difficult. The main thing is that before installation, study the features of the products and choose a reliable adhesive.
How to properly glue ceiling plinths
To work you will need:
- good miter box,
- tracer,
- two spatulas - large and small,
- flat spatulas,
- glue gun,
- roulette,
- drywall knife,
- pencil,
- assembly adhesive,
- warm water.
The gluing of baseboards is carried out strictly after the completion of puttying of walls and ceilings.
EXCELLENT VIDEO INSTRUCTIONS
Let's get to work.
1. Cut a small piece from the baguette and apply it to the wall and ceiling, first stepping back slightly to the left of the corner, then to the right. Place marks with a pencil above and below the baguette. We carry out the procedure in all corners of the room. We connect these marks along all the walls using a tracer. This will help us glue the baguettes evenly.
2. Let's start trimming - you need to trim the baseboards into the inner corner at an angle of 45 degrees. To do this, turn the plinth upside down, place it on a miter box and saw off a piece at the desired angle. Then we take the second plinth, also turn it over and file it with a miter box in the other direction.
If you have to cut skirting boards into outer corners, proceed as follows:
- place the baguette against the corner, make a mark under the baguette using a drywall knife
- apply the second baguette to the other side of the corner and put a mark again,
- cut the plinths on the miter box according to the marks (don’t forget to turn them over).
It is also recommended to cut the next baguette, which will be adjacent to the first one, at an angle of 45 degrees. This way you will get a larger area for applying glue, and the parts will be connected more firmly.
We apply the baguettes to each other, making sure that the joint does not require modification.
3. We begin gluing. If the renovation is carried out in a bathroom with ceramic tiles, we apply special installation adhesive to the upper part of the baseboard and joints. We treat the lower part adjacent to the tile with silicone sealant (there should not be too much sealant, otherwise the excess will come out on the tile). We apply polystyrene foam glue to the back side of the baseboard.
4.Apply the plinth to the installation site. We remove excess glue with a spatula, and then carefully wipe it with a damp cloth until the composition dries.
If the resulting joint is not satisfactory, you can adjust the baseboards or cut them with a drywall knife.
5.The next day, apply gypsum putty with a spatula to the junction of the baseboards. This procedure must be repeated twice more after the composition has dried. The last time it is recommended to apply not gypsum, but acrylic putty.
We cut and glue the skirting boards on the ceiling
How to glue the corners of ceiling plinths
When work begins, the first question that arises is how to glue the skirting boards in the corners. Indeed, this is the most difficult moment; each element must be attached strictly at an angle of forty-five degrees.
To solve the problem, use a miter box. It has several slots, each of which has its own angle of inclination.
Place the plinth in the desired position, then carefully cut off part of it with a knife. Sand the cut area. Remember that the corner is cut out first and only then is it adjusted to fit the footage.
We glue the baseboards in the corners
VIDEO ON THE TOPIC
How to glue polyurethane skirting boards
Such fillets are made of durable and lightweight material. One of its main advantages of polyurethane is durability.
The polyurethane option can mask all joint defects. This material tolerates temperature changes, exposure to moisture and sunlight.
In addition, there is a wide range of colors and designs to choose from.
- Installation of polyurethane skirting boards is possible only on a clean and level surface, that is, the finishing of the ceiling and walls must be completely completed.
- To begin, prepare pieces of the required sizes and cut all the corners.
- Then proceed with installation. Polyurethane skirting boards are glued starting from the corner.
- On their reverse side there are grooves for glue. They need to be filled, and then press the baguette tightly against the wall.
- To complete the work, you can buy liquid glue or putty. There are no problems with polyurethane. Installation of other products may be difficult.
- It is better to make glue for foam baseboards yourself. To do this, you need to stir the finishing gypsum putty in water and add PVA glue.
- The finished composition is applied pointwise, after which the product is applied to the corner formed by the wall and ceiling.
VIDEO
How to properly attach a baguette for suspended ceilings
Baguette is a special profile made of polyvinyl chloride, with which a film or fabric sheet is fixed. It should be quite strong, since the film is strongly stretched during installation. This is possible thanks to the profile design.
There are 4 types of fastening of canvases and, accordingly, 4 types of products:
- harpoon - the simplest type of profile, since fastening is carried out using harpoons welded to the canvas;
- cam - includes two clamps between which the film is pulled; due to the spring, the mechanism firmly holds the film;
- wedge - the material is pulled into the groove of the product, where it is then wedged, after installation, a decorative plinth is fixed to the bar;
- clip - or “clothespin”, holds the film due to an elastic clamp - a clip.
When attaching a baguette for suspended ceilings, you should take into account its structure and location of attachment. For example, the cam model can be installed on both the ceiling and the wall.
Profile types
There are many options for such devices. For example, based on the nature of the material used in manufacturing, there are:
- Aluminum profile - used only when installing film ceilings. This durable, reliable model is indispensable for holding heavy, large canvas. When constructing multi-tiered tension structures, it is also recommended to use an aluminum product.
- Plastic is lightweight, very easy to install and flexible, which is important for uneven walls. However, if the ceiling area is large, it is better not to use it: plastic can deform under pressure.
You can install the profile on different surfaces:
- wall - fixed on the wall at a distance of 5 to 20 cm from the ceiling;
- ceiling - it is mounted on the ceiling surface with loose walls, and if you need to cover the entire area, then the product is mounted directly next to the wall itself;
- universal – installed on any horizontal or vertical surface.
The latter option is used in rooms with a complex configuration - with niches, projections, boxes, columns.
Preparation before installing a baguette for suspended ceilings
Before installing the baguette, you need to drill the required number of holes in it. Drilling through the plank and the wall at the same time is prohibited.
- In a plastic profile for a stretch ceiling, holes are made in the stiffening rib, which is available on any model. Aluminum is drilled through the shelf.
- The distance between the holes reaches no more than 10–15 cm. From the edge of the profile to the first hole, at least 2 cm should be maintained. It is recommended to grind the edges of the hole so that burrs cannot cut the fabric.
- Before installation, the ends of the baguettes are cut at an angle of 45 degrees.
Important! In certain cases, it is possible to install the product under a suspended ceiling using glue. However, experts consider this method unreliable.
Markings for fastening baguettes for suspended ceilings
The level of profile fixation determines the location of the future ceiling structure. The minimum distance to the base ceiling is 5 cm, the maximum is determined arbitrarily. For proper installation, you should mark the wall before installing the baguette.
The most convenient way to do this is to use a laser level. The device is placed approximately in the center of the room so that the beam from here reaches any corner. The level is fixed, and marks are made using a laser at each corner.
The same can be done using a regular cord and tape measure. To do this, set aside the required distance from the floor in each corner, since the plane of the canvas must be parallel to the floor and not the base ceiling. Then the marks in the corners are connected with a cord, and marks are made on the wall.
Which side to attach the baguette for suspended ceilings
The profile is fastened in one way: back wall to wall. In this case, the groove for the blade or harpoon should be located at the bottom.
How to fix a baguette for a stretch ceiling
There are several ways to install a molding for suspended ceilings. Moreover, each method involves both direct fastening to the surface and the formation of external and internal corners.
The procedure is as follows.
- They carry out all the preliminary work: mark the walls, drill holes. Sometimes, for simplicity, dowels are immediately inserted into the baguette.
- Installation begins from the inner corner. The back wall of the product is slightly filed so as not to affect the front wall, and bent to 90 degrees. Then the product is fastened along the mark with screws and dowels.
- On straight sections, the baguette is mounted according to the marks without filing. The fragments are joined to each other as tightly as possible: the gap should be no more than 5 mm.
- For an external corner, if there is one, the back wall of the baguette is also filed down, the profile is bent at a right angle, but in a different direction. Then fasten in the usual way.
- To make an outer corner, you can use this method. The next fragment is placed against the end of the already fixed profile, and in the place where it reaches the corner, a mark is made for the undercut. The second mark is placed at a distance of 2 cm. The baguette is filed down, and then part of the back wall between them is broken out with pliers. Then it is bent and a right angle is obtained.
- It is recommended to seal all joints with tape. For an aluminum baguette you need to use metallized tape.
Important! If you need to install a suspended ceiling in areas with a large number of wires, it is preferable to choose an aluminum baguette. On uneven walls it is better to install plastic: it is more flexible and adheres better to the surface.
How to restore a damaged area of polyurethane baseboard
Despite the high level of strength, this material can be damaged. For example, when rearranging furniture, you snag an element. The most common damage is a crack. It can be restored in two ways.
- Method 1. Cut out the damaged area or element entirely. We glue a new one in its place. But buying a new polyurethane baseboard can cost you money and ruin the overall appearance of your space, especially if the crack is small and only in one place. In this regard, we recommend using the second one.
- Method 2. Take a knife and widen the crack. Now remove the old glue. This can be done using a stationery knife or a metal file (hand only!). Fill the space with glue. That's it, now let it dry. After 24 hours, cut off the remaining glue. Sand the joint with fine sandpaper. We recommend taking zero or one. The voids can be filled with ordinary sealant, and the residues can be removed in the same way.
Installation of foam baseboard
Before installing skirting boards made of any material, it is necessary to thoroughly clean the surfaces of dust, dirt and oil stains. It is advisable to additionally treat them with an adhesive compound, which will increase adhesion.
Foam plinth for the ceiling is the most affordable and budget option to improve the joint between the walls and the ceiling, it is easy to maintain and easy to glue. If the walls are perfectly smooth, then such a fillet can be glued to acrylic sealant, squeezing out the glue pointwise every 150 mm. But our premises cannot boast of the correct geometry, therefore, in order for the installation of the ceiling plinth to be of high quality, without gaps, it is better to use a mixture of putty and PVA glue for fastening.
Laying skirting boards in a miter box for proper cutting of corners
You should start gluing the skirting boards from the corner. The question immediately arises: how to join and fasten the ceiling plinth? If you are sure that the corners are 90°, then it is recommended to use a miter box to cut the corners. But if the camber of the surfaces is plus or minus an elbow according to the map, then you will have to make markings on the ceiling. To do this, attach one plank to the installation site, make marks on the wall and ceiling, then, using a construction angle and a straight strip, draw 2 parallel lines along the entire perimeter of the room: one on the wall, the other on the ceiling.
How to properly glue ceiling plinths, photo of markings for cutting corners in uneven rooms
When the lines are drawn, first attach one profile to the installation site, mark the cutting points, markings are made in the same way on the perpendicular side. The points are connected by a straight line, along which the corner is cut with a knife or hacksaw.
The underside of the plinth is smeared with an adhesive solution; if it is putty, then the composition is applied with a spatula along the entire length, in a thin layer. The plinth is installed in place and carefully pressed. Once the baseboard is firmly attached, excess adhesive should be removed with a rubber spatula. The perpendicular strip is installed in a similar way.
How to attach skirting boards in corners
After gluing the corner elements, the plinth is installed along straight sections. Next, the joints and gaps are puttied. After the putty has dried, all irregularities are treated with fine sandpaper, and you can begin the final painting.
Idea: The product line of polyurethane skirting boards includes special decorative corner and joining elements for installation, which not only make joining the baguette easier, but also decorate the interior.
Work on installing polyurethane skirting boards
Polyurethane ceiling plinth has a wide range of applications. Finished products go well with ceramic tiles on walls and are used together with plastic panels. For plasterboard suspended systems, especially for multi-level ceilings, such fillets are a real “lifesaver”, allowing you to create ceiling surfaces of any curvature.
The methods for installing consumables have some differences from traditional technologies for installing ceiling plinths. As a rule, polymer-based adhesive is used for installation, which is applied to the edge of the profile adjacent to the wall and ceiling surface.
Important! The main requirement for glue is that the substance must dry quickly so that the installed part of the cornice is quickly fixed in the desired position. Use Moment glue or liquid nails for these purposes. Silicone sealants can be a good alternative to adhesive in this case.
According to experts in the field of apartment design, the best means for installing polyurethane ceiling fillets is putty. In this situation, the ceiling, the cornice and the walls will be a solid structure, hiding all the defects and irregularities made during the installation process. When re-pasting wallpaper in a room, you will not have to dismantle the cornices.
Selection of materials
Before starting work on the ceiling with finishing, you need to decide on the amount of consumables, what kind of ceiling molding you choose and what shape.
The consumption is taken from the calculation: the perimeter of the room is divided by the length of one plank. For example: P/L, where:
P – Room perimeter;
L – Length of one baguette.
As a result, we get: 20 / 2 = 10 pcs. To equip ceilings in a room with a perimeter of 20 m, you will need 10 skirting boards 2 meters long. However, do not forget that spare parts may always be required. This means that you can add one more plinth to the result obtained, as a spare part. This will be the ideal amount of consumables needed for work.
Why do you need a supply of consumables? The thing is that when cutting corners, approximately 10 cm of product is consumed from each edge.
In addition to the above, care should be taken to handle materials. When transporting, try to avoid impacts on the material and intense bending. Before starting work, polyurethane consumables ready for installation must be left for a day in the room where the polyurethane ceiling plinth will be assembled and installed. This precaution is due to the fact that the material will restore its natural shape and adapt to the internal temperature conditions.
There is one note: in finishing work, when working with polyurethane skirting boards, you should separate products according to the type of corners that are formed during the installation of the cornice. As a rule, finished products with angles of 30.45 and 60 degrees are available for sale. This gradation at the corners makes it possible to more accurately select finished products for installation at the junction of the walls and the ceiling surface. In addition, in addition to finished products, you can always purchase separate corner segments, thanks to which it is possible to obtain an ideal connection of baguettes at the joints.
Direct installation of baguettes on ceilings
After all the used fragments of the future cornice have been prepared and laid out on the floor around the perimeter of the room, it is time to begin installing them. To understand how to glue polyurethane ceiling plinths marked into fragments, follow traditional proven technology.
Laying of baguettes for finishing the ceiling is carried out only on dry and clean panels. Prepare the necessary tools and equipment in advance. You cannot do without a mounting knife, a hacksaw, a miter box, two types of glue, a spatula and fine-grained sandpaper.
Having special glue for installation, do not forget to purchase also glue for joints. With the help of such a device, you can achieve the ideal state of the joints during the installation process. At the ends where the glue is applied, the effect of dissolving the material occurs, which leads to the soldering of two separate fragments of the cornice into a single web. This technology allows you to avoid breaks in a single contour after shrinkage of the cornice.
Installation begins from the wall and from the corner located opposite the entrance to the room. On the reverse side of the products there are special grooves - shelves, for placing glue there. After applying the glue, the skirting boards are pressed to the installation site. Due to the quick drying of the glue, the adhesion of the mounted fragment to the walls occurs instantly. Having coated the end part of the installed element, we proceed to applying adhesives to a new piece of plinth. In this way, polyurethane ceiling plinths are laid around the entire perimeter of the room.
Note: if there are large gaps between the cornice and the wall, you should not additionally try to push a new portion of glue into the gaps. Leave it for later! After completing the work, treat the cracks with putty.
Particular attention should be paid to the installation of corners. When working with a miter box, be careful and do not apply too much force to the material. The hacksaw cuts polyurethane baguette quite well and cleanly. Treat the cut at the sawing points with a mounting knife and fine sandpaper. In case you don't have a miter box on hand, use a template made according to the shape of the corners in your room.
Why is the material popular?
This is largely due to:
- Resistance to external factors and long service life: if you treat this type of skirting boards with care, it will retain its original appearance for at least 25-30 years. In addition, during its entire service life you will not see that the baseboard is susceptible to water/steam, and also does not absorb odor and is very convenient to clean. Such skirting boards are used in the bathroom, as they can withstand high humidity very well.
- Because it is not sensitive to temperature changes, which means it is perfect for rooms with many heating devices. Thanks to heating, it does not deform, retains its original shape and does not dry out.
- Convenience and ease of installation. The material is flexible and flexible, so installation does not require much effort, and you can do it even without outside help. You can also create protrusions and uneven planes, which complicate the work when it comes to simple baguettes. Fitting and cutting is easy and doesn't take much time.
- Installation does not require complex and expensive tools. A sharp knife will do just fine, and when you have secured everything, you can paint the baseboard with any paint - be it acrylic or water-based.
- Easy to care for. Cleaning in this case will be limited to washing only. Since this material is resistant to chemicals, polyurethane will not react with any detergents and will be cleaned without the risk of damaging color or texture.
- A huge selection is another plus. The market is rich in offers to fulfill any whim. These skirting boards differ from each other in texture, color, width and can complement any interior.
What are flexible fillets made of?
As we have already noted, for decorating the junction of the ceiling and wall in curved areas, a regular baseboard made of foamed polystyrene will not work - the material will crack or break even with the slightest attempt to bend it.
There are other ways to solve this problem, for example:
- the use of floor and ceiling PVC skirting boards, which become flexible when heated, which makes it possible to install them on curved areas;
- the use of “liquid plinth” - an innovative technology, the essence of which is the use of wood modified at the molecular level, placed in vacuum packaging;
- installation of veneered plinth made from cork chips, which gives it some plasticity.
It is worth noting that all of these options are most often used as an alternative, and the most popular material from which flexible ceiling skirting boards are made is polyurethane. It is thanks to its flexibility that it is possible to decorate curved areas with an arc of even a small radius.
Plastic polyurethane fillets are easy to install on any curves
Advantages of polyurethane skirting boards
It is worth noting that polyurethane includes a large group of polymers, and therefore can have different mechanical properties. In other words, the material may have the flexibility of soft rubber or, conversely, practically no different from hard plastic.
In any case, the advantages of polyurethane plinth include:
a wide color palette and assortment of textures - in addition to the fact that the material can be easily repainted in the desired color, there are products on sale that visually imitate various coatings, such as wood, stone, plaster, etc.;
Polyurethane fillets can be painted in any color
- long service life - polyurethane does not crack, break, or change its characteristics and properties;
- easy care - the material easily tolerates contact with water and various chemicals, so it can be washed with any cleaning agents;
- resistance to deformation - even under the influence of humidity, high or low temperatures, polyurethane retains its original shape;
- simple and quick installation - you can install flexible ceiling skirting boards yourself, even without any specialized knowledge in the field of repair.
Flexible decorative fillets – wood imitation
Skirting boards, cornices, baguettes and borders made of polyurethane - what are they?
Ceiling plinths, despite the fact that they are not the main elements of the ceiling structure, deserve some attention. This is especially true at the finishing stage, when the question is of giving the finished ceiling a certain look. At this stage, the fact of what material the baseboards are made of plays a role, and whether they are able to solve the issue of ceiling design in the manner required by the interior. In this regard, polyurethane plinth for the ceiling provides a wide field for activity. Excellent and varied design, ease of installation and affordable cost put these consumables on a par with products such as foam finishing products.
Information: the material has high wear resistance. The performance characteristics allow skirting boards to be used in rooms where the temperature range varies widely from -600 to 80 degrees.
Before choosing products of this type, it is necessary to understand what source materials we will have to deal with. Polyurethane is the main material from which a wide variety of parts and finishing elements are made. Such consumables are also commonly called “foamed plastic”. Due to the technical and physical properties of the base material, polyurethane baguettes have a number of features:
- finished products have high strength, which ensures the integrity of the skirting boards and protects them from deformation;
- environmentally friendly material, which allows it to be actively used in residential premises (this is especially true for installing ceilings in children's rooms);
- polyurethane skirting boards, ceiling structures made from them, are resistant to changes in temperature conditions (use of products for equipping bathrooms, restrooms and kitchens);
- installation of baguettes on ceilings is simple and easy to install;
- the high manufacturability of the material allows you to work with it with ordinary household tools;
- due to the plasticity of polyurethane, finishing materials have an excellent technological property - flexibility, which significantly expands the scope of application of skirting boards of this type;
- finished factory products have a wide color palette;
- polyurethane moldings are ideal for painting, which allows them to be repeatedly repainted to match the changed interior;
- durability of products installed on the ceiling.
Note: the flexibility of polyurethane cornices allows finishing of spherical surfaces of any curvature. Flexible polyurethane ceiling plinth allows you to work with figured ceilings, columns, arches, thereby creating a beautiful and original frame for structures. With the help of baguettes of this type, it was possible to completely displace gypsum modeling from the front of finishing work.
How to choose a polyurethane baseboard, recommendations from the editors of Homius.ru
When choosing, you need to consider what type of room the plinth is selected for. For example, for a bathroom you should choose an option with a high moisture resistance threshold. Only environmentally friendly types are suitable for the kitchen and nursery. To do this, you should ask the seller for a certificate indicating the level of security.
In addition, you should rely on design. Here you may need baguettes with various ornaments. In some cases, smooth types can be used. There are painted and processed. That is, 100% ready for use.
We especially recommend taking into account the height of the ceiling. As stated above, baseboards can steal inches from your space. At the same time, with the right choice, you will gain additional centimeters.
Width
If you take the wide option for a room with a ceiling of 2.5 meters, then you will visually lose at least 10 centimeters. We recommend:
- for ceilings up to 2.5 meters, give preference to products no more than 4 cm wide;
- up to 3 meters, take a baguette, the width of which in the corridor is from 5 to 10 centimeters;
- For ceilings higher than 3 meters, moldings with a width exceeding 10 centimeters are used.
Form
Here the flight of imagination is unlimited. You can use both simple options and with a variety of ornaments. Including imitation stucco. In this case, we recommend following the basic law of the modern designer.
Same in style, but different in width
If the design of your room is too pretentious or you decided to combine several design ideas, then you should give preference to the classic version of baguettes. For a simple, no-frills design, we use fillets with ornaments. Try to give preference to types that will emphasize the exclusivity of the interior.
Color design
Manufacturers offer their clients various color solutions. On sale you can find baguettes with different shades. We recommend choosing a color that matches the decor style of your room.
Colored baguettes
There are some features to consider here. If the baguette matches the color scheme of the ceiling, then this will visually enlarge the space. If the shade matches the color of the wall, then you can easily raise the ceiling a few centimeters.
Color and size
We've sorted out the technical part. Now let's talk about the aesthetic role of the baguette. Besides the fact that it hides some imperfections and makes a smooth transition from the ceiling to the walls, such a detail can completely change the mood of the room. A correctly selected baguette can complement the idea, add rigor, elegance, and make the room playful, bright, and colorful. And on the other hand, an unsuccessful solution can completely ruin the design, and even more so, incorrect fastening. Therefore, the choice of color and size of the ceiling plinth must be approached with complete seriousness.
Baguette plays an important role in the interior of the room
Everything must be appropriate. The baguette is a minor detail in the design, so it needs to be selected according to the main flow of the design. In a wooden room, a foam baseboard will look out of place, and the same must be said in the opposite situation.
In the modern world there is a wide variety of ceiling moldings. They vary in shape, decor, material and color. You can choose a product in the color you already need or paint it yourself. It's even easier with texture. You can choose the one you need from the catalog, or order production according to your wishes.
The size of the product depends on the height of the ceiling and the area of the room. The higher the ceiling, the wider the baguettes should be. This correspondence also works in the opposite case.
If the ceilings are high, you should use wide baguettes