The main advantage of polyurethane skirting boards is ease of installation.
Don’t know how to fix a polyurethane skirting board on the floor and ceiling in an apartment? Let's find out whether this is a difficult task and whether it is worth paying a hired master for it. I myself quickly figured out all the nuances and am ready to tell and show everything in detail. I share my experience and give step-by-step instructions.
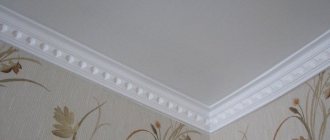
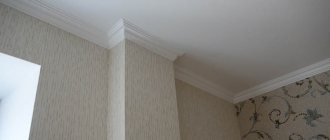
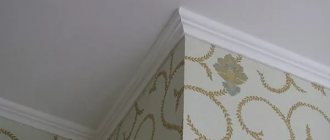
If the installation is done correctly, the baseboard will look perfect after installation.
Composition and properties
The basis for the production of polyurethane ceiling plinths is rubber. Synthesis technology makes it possible to obtain a material that does not change consumer qualities when exposed to aqueous, benzene and acidic environments. Elements made from this material withstand mechanical loads well. A comparison of the main characteristics of rubber and polyurethane, where the rubber/polyurethane indicators are displayed, is presented as follows:
- Shore strength – 65-75/40-98;
- elasticity,% - 30/40;
- tensile strength, kg/cm2 – 115/312;
- increase in length under breaking load, % - 300/523;
- temperature limit for changing properties, 0C – from + 50 to – 30 / from +120 to – 30;
- elasticity for recovery at -500C – 0.2/0.45;
- abrasive resistance – 2/10.
Attention! The technological advantages of using products made of foam plastic are complemented by a wide range of textures and the possibility of painting with water-based paints in any color.
Advantages and disadvantages
Ceiling plinth made of polyurethane is used in the construction of many interiors due to the following consumer properties:
- Heat resistance. The product does not lose its properties in rooms with critical temperature differences. Recommended for use in open areas in cold climates.
- Moisture resistance. When using high-quality glue, products tolerate high humidity conditions without changing technical qualities. Recommended for finishing bathrooms, toilets, swimming pools, baths.
- Long service life. Finishing elements made from this material do not change their appearance after many years of use. During this period, it is enough to periodically clean it from dust and dirt.
- Elasticity. The unique indicator of fracture resistance and flexibility allow the elements to be used for finishing the joints of walls and ceilings when forming complex structures.
- Easy installation. A home craftsman who does not have special training can fix the plinth. No special tools are used to carry out the work.
- Ecology and hygiene. The products are classified as safe materials. Its properties do not create conditions for the formation of mold and the development of fungal accumulations.
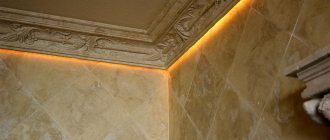
- The ability to organize hidden room lighting and hide electrical wiring.
- The cost is affordable for the vast majority of the population. Products are presented in a wide range in many construction stores and markets.
Ceiling plinth
Disadvantages include greater weight than foam models, as well as the inability to hide significant deficiencies during preliminary finishing of the junction of the ceiling and walls.
Installation nuances
Preparation of materials
Before you begin installing ceiling plinths with your own hands, you need to do some preparatory work:
- first of all, you need to measure the walls, including areas with protrusions and recesses;
- then, in accordance with the obtained parameters, you need to apply markings to the planks;
- Next, the most difficult stage of work is performed - the planks are adjusted to the outer and inner corners. If the corners are right, they are cut at 45 degrees.
If there are deviations, the angle should be measured and the resulting value divided by two. The result will be the angle at which the fillets should be cut;
- if the profile is heavy, you should remove the wallpaper from the wall in the area where it will be adjacent. To do this, you need to attach the bar and draw a line along the lower border. After this, the wallpaper can be cut with a stationery knife.
This completes the preparatory work.
Gluing
The installation instructions for the ceiling profile are as follows:
- before applying glue to the ceiling plinth, you should treat the junction of the fillet with the wall and ceiling with a primer, which will improve adhesion;
- then an adhesive is applied to the back of the plank. If the fillets are narrow, then drops of glue should be left on the strip in increments of 5-10 cm. If the fillets are wide, then the composition is applied in a zigzag manner;
the processed plank is pressed against the wall and ceiling. It is best to start installation from the corners. The profile must be held in this position for some time until the composition sets;
- after pasting all the skirting boards, the joints need to be puttied, which will allow you to get one continuous decorative contour;
- At the end of the work, as a rule, paint is applied to the fillets, for example, acrylic water-dispersion. Before painting them, you should apply masking tape so as not to stain the walls.
Note! If the fillets are glued with Liquid Nails or other similar glue, after applying them to the wall it will not be possible to tear them off and re-glue them. Therefore, the work must be done carefully, since the price, for example, of polyurethane skirting boards is quite high
This completes the process of gluing the fillets.
Polymer adhesives are usually used to glue ceiling plinths, although sometimes it is better to replace them with putty. But, in any case, it is necessary to follow a certain gluing technology, which is given above.
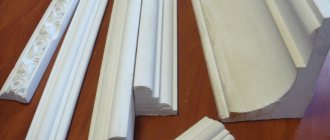
Types of fillets
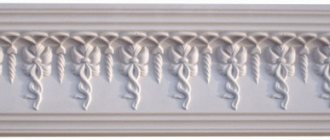
Manufacturers produce polyurethane plinths in the following versions:
- with a smooth or textured plane, where the latest specimens emit stucco, with a clearly defined pattern;
- painted, and manufacturers use a wide range of colors;
- pre-treated for self-dying - they allow the home craftsman to choose any shade that suits the decor;
- laminated products, both in white color, replicating the natural cuts of wood, stone and other natural materials.
Attention! Fillets are distinguished not only by their appearance, but also by the width and technological design of the products. Separate specimens are designed for hidden wiring and placement of lighting elements.
Polyurethane ceiling plinth: types
Finishing skirting boards are divided into two types: smooth and with images. The latter looks like gypsum stucco, so it is often used in interior design for styles such as Baroque, Empire, and Art Nouveau.
A clearly defined relief and noticeable pattern make polyurethane skirting boards more popular than their gypsum and foam counterparts.
Depending on the degree of processing, products are divided into:
- Unprocessed.
- Treated with primer solutions, they can be painted.
- Painted.
This division makes it possible to choose the appropriate option.
It is best to purchase skirting boards that are ready to be painted. Then you can independently choose the shade you need.
Laminated products can be classified as a separate category. A film is glued on top of the base material, clearly indicating the surface relief. These skirting boards can also be painted.
Interior use
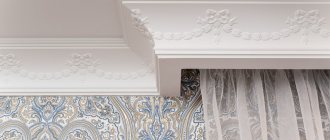
A variety of shapes and textures allow you to use a polyurethane dumbbell to complete the design of any interior:
- By combining several baguettes of different widths, a unique transition of the horizontal and vertical planes is achieved.
- Lighting elements built into the baguette will create the effect of lightness of the ceiling; when zoning the area of the room, they will allow you to divide it into light sectors.
- Varying the width of the baguette allows you to visually change the height of the room. If the ceilings are high, then a wide massive element will steal away the “extra” space. If the height of the room is low, a narrow plinth will only hide defects in the joined finishing sheets without changing the overall parameters of the room.
- If the ceiling height is sufficient, in certain finishing styles, the walls of the rooms can be divided into different types of finishing by 1/3 or 2/3. For example, when decorating an office, the lower part of the wall is painted, and the upper part, separated by a baguette, is decorated with fabric wallpaper.
- If a suspended or suspended ceiling is installed in a room, especially if it is multi-level, it is always recommended to use polyurethane fillets. Complex structures and the use of columns also make them irreplaceable.
Attention! Options for using baguettes made from this material during renovation are limited only by the imagination and aesthetic tastes of the owners of the premises. Some even use them to add decorative frames to furniture.
How to choose a polyurethane baseboard, recommendations from the editors of Homius.ru
When choosing, you need to consider what type of room the plinth is selected for. For example, for a bathroom you should choose an option with a high moisture resistance threshold. Only environmentally friendly types are suitable for the kitchen and nursery. To do this, you should ask the seller for a certificate indicating the level of security.
In addition, you should rely on design. Here you may need baguettes with various ornaments. In some cases, smooth types can be used. There are painted and processed. That is, 100% ready for use.
We especially recommend taking into account the height of the ceiling. As stated above, baseboards can steal inches from your space. At the same time, with the right choice, you will gain additional centimeters.
Width
If you take the wide option for a room with a ceiling of 2.5 meters, then you will visually lose at least 10 centimeters. We recommend:
- for ceilings up to 2.5 meters, give preference to products no more than 4 cm wide;
- up to 3 meters, take a baguette, the width of which in the corridor is from 5 to 10 centimeters;
- For ceilings higher than 3 meters, moldings with a width exceeding 10 centimeters are used.
Form
Here the flight of imagination is unlimited. You can use both simple options and with a variety of ornaments. Including imitation stucco. In this case, we recommend following the basic law of the modern designer.
Same in style, but different in width
If the design of your room is too pretentious or you decided to combine several design ideas, then you should give preference to the classic version of baguettes. For a simple, no-frills design, we use fillets with ornaments. Try to give preference to types that will emphasize the exclusivity of the interior.
Color design
Manufacturers offer their clients various color solutions. On sale you can find baguettes with different shades. We recommend choosing a color that matches the decor style of your room.
Colored baguettes
There are some features to consider here. If the baguette matches the color scheme of the ceiling, then this will visually enlarge the space. If the shade matches the color of the wall, then you can easily raise the ceiling a few centimeters.
Adhesive composition
The quality of installation of polyurethane molding largely depends on the adhesive used to attach it. It must meet the following requirements:
- tear strength;
- extreme adhesion;
- minimum setting time;
- elasticity, prevention of deformation.
Examples of glue for ceiling plinths
Types of recommended adhesives:
- Polymer based. Used for attaching moldings to any base, including wood, plasterboard, chipboard, fiberboard, concrete and brick. “Setting” the composition takes minimal time, so they work with it carefully and quickly. Excess is eliminated immediately after its formation. Their elimination when completely hardened involves the use of sandpaper and solvents. Adhesive compositions are elastic and are most suitable for attaching borders in complex structures. The factory packaging is presented in a tube, and application involves the use of a mounting gun.
- Acrylic based. Such compositions are used not only for fastening moldings, but also for sealing joints and defects in the preparation of the base surface. It should be noted that such an adhesive composition after drying has a neutral color and lends itself well to painting with water-based paints. They are applied to the products using a spatula, and for tube packaging – with a mounting gun. Not recommended for use in rooms with high humidity.
- Assembly adhesive. A universal solution for fastening polyurethane products to concrete, shot and wooden bases, and ceramic tiles. It is thick, therefore the highest consumption per linear meter is noted, compared to previous compositions.
Attention! If a putty-based mixture is used as an adhesive, then simultaneously with the removal of seams, individual minor imperfections in the junction of the molding with the finishing surfaces can be removed.
Why is the material popular?
This is largely due to:
- Resistance to external factors and long service life: if you treat this type of skirting boards with care, it will retain its original appearance for at least 25-30 years. In addition, during its entire service life you will not see that the baseboard is susceptible to water/steam, and also does not absorb odor and is very convenient to clean. Such skirting boards are used in the bathroom, as they can withstand high humidity very well.
- Because it is not sensitive to temperature changes, which means it is perfect for rooms with many heating devices. Thanks to heating, it does not deform, retains its original shape and does not dry out.
Important: if you need to decorate a place located next to the fireplace with a plinth, you should use a polyurethane plinth.
Convenience and ease of installation. The material is flexible and flexible, so installation does not require much effort, and you can do it even without outside help. You can also create protrusions and uneven planes, which complicate the work when it comes to simple baguettes. Fitting and cutting is easy and doesn't take much time.- Installation does not require complex and expensive tools. A sharp knife will do just fine, and when you have secured everything, you can paint the baseboard with any paint - be it acrylic or water-based.
- Easy to care for. Cleaning in this case will be limited to washing only. Since this material is resistant to chemicals, polyurethane will not react with any detergents and will be cleaned without the risk of damaging color or texture.
- A huge selection is another plus. The market is rich in offers to fulfill any whim. These skirting boards differ from each other in texture, color, width and can complement any interior.
DIY installation
Ceiling plinths made of polyurethane can be attached to a well-prepared wall before gluing the wallpaper or to their surface after they have completely dried. When used as a frame for a stretch ceiling - after installation.
Preparatory activities
Before the actual installation activities, attention should be paid to preparing the premises for work, purchasing consumables and tools.
Preparing the premises
The room is cleared of construction debris and unused construction supplies, the floors are washed and allowed to dry. The fact is that dust and other things getting on the fastening elements will leave dirt, which will not be easy to remove with excess glue upon completion of the work.
For work it is necessary to prepare the following accessories, tools and consumables:
- stepladder or small scaffolding to provide convenient access to the ceiling surface;
- a container for preparing an adhesive composition or a construction mounting gun;
- rubber and metal spatulas;
- accessories for measuring and drawing - graphite pencil, metal construction ruler, tape measure, construction corner;
- tool for cutting plinths - miter box, fine-tooth hacksaw, stationery knife;
- estimated number of dumbbells;
- adhesive composition.
Advice! If, when purchasing skirting boards, the seller offers additional connecting corners and connecting extensions, they are worth purchasing. The use of additional fittings will simplify the process of joining individual elements into a single perimeter of the room.
Calculation of fillets
You can calculate the amount of polyurethane plinth using a simple mathematical method:
- Using a construction tape measure the length and width of the room. Measurements must be made in the plane of the junction of the ceiling and walls around the perimeter.
- Summarize the results obtained. The method of measuring only one of the sides, multiplied by 2, is not recommended - parallel walls, in many cases, differ by significant values.
- The perimeter value is divided by the length of one element. The factory size of the plinth is two meters.
Advice! Two or three elements are added to the resulting quantity, since there is a high probability of errors in fitting the corner joints, especially if such work is carried out for the first time. Training cuts will also not be superfluous.
Marking
During the actual installation process, when trimming has been done and the adhesive has been applied to the surface, it is not always possible to accurately position the border at the installation site on the first try. The consequences of repeated application of the element entail contamination of the adjacent surface of the wall and ceiling. This task is facilitated by preliminary marking of the reference planes.
Marking before gluing
The perimeter is marked using a construction tape and direct fitting of the plinth. To obtain an even “horizon” when placing fillets at the joint, perform the following sequence of actions for each wall:
- apply the cutting part of the element to the corner, mark the location on the horizontal and vertical plane;
- repeat the operation for the second corner;
- connect the marks with a tape measure, a metal carpenter's ruler or directly with a border, and draw the position.
Advice! It is necessary to pay attention to defective places where a tight fit of the cornice cannot be ensured due to poor quality plastering work. Significant defects must be corrected before installation.
Adjusting corners
Well done plastering work to level the ceiling and wall planes allows you to adjust the corners of the polyurethane plinth for the ceiling using a miter box.
A miter box is a simple carpentry device for cutting opposing elements at certain pre-calculated angles. It can be plastic, wood or metal. Professional models of the device are complemented by a rotating mechanism for setting any cutting angle. If it is necessary to join the curb at an angle of 45 degrees, the use of a miter box is presented as follows:
- counter elements are laid on different sides of the device, exactly as they will be located when the planes are joined;
- one of the elements is placed in the device, pressed against the near wall, and cut with a hacksaw;
- repeat the operation with the opposite counter curb on the reverse side;
- check the accuracy of the joining by fitting at the place where the corner is installed.
Using a miter box to trim corners is shown in the following video:
Fitting defects are eliminated by leveling the joints. Small flaws can be eliminated by rubbing with putty after attaching the dumbbells around the perimeter of the room.
If a preliminary inspection reveals large deviations from the 900 angle when plastering walls, the “after-the-fact” fitting method is used. To do this you need:
- when determining the cutting line for the internal corner, counter-baguettes are placed alternately at the joint, marking the mirror lines where the elements are located on the ceiling and wall;
- next, project the intersection of the joint lines onto the elements and perform trimming;
- when cutting the measuring part of a baguette at the marked angle, observe the vertical plane of the actual placement;
- The marking of elements when forming external corners is carried out directly at the place where they are coordinated, by alternately placing them in place and drawing a line from the corner point of the wall to the end of the product.
Attention! It is recommended to start work by forming the corners. “Straight” joints and solid pieces of curb are attached last. If there are factory joining elements, the ends are cut at an angle of 90 degrees.
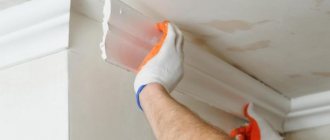
Fastening
To avoid contamination of the fastened elements, work is carried out with gloves. Polyurethane ceiling skirting boards are mounted in the following sequence:
- Mark the wall and ceiling space where the curb is located.
- Prepare the adhesive composition.
- Begin pasting by joining the corners. To form them, use one of the previously described methods. It is recommended to practice joining small sections before “finishing” pruning.
- A thin, uniform layer of adhesive is applied to the prepared workpiece on both planes adjacent to the attachment point.
- Accurately apply the element according to the markings, simultaneously, to the wall and ceiling. Hold with your hands in a pressed position for 1-2 minutes. This will ensure tight adhesion of the surfaces with the adhesive.
- Remove excess glue from surfaces immediately with a rag or slightly damp household sponge. The opposite will lead to the need for significant time spent scrubbing contaminated surfaces.
- After pasting the corners, fill the straight areas. If possible, the number of joints should be reduced by using whole elements.
- The installation is completed after the adhesive has completely dried by puttingtying the joints. It must be carried out carefully, with minimal spillage of material onto clean surfaces.
Advice! After sealing the joints, they should be leveled with fine-grained sandpaper or mesh grout.
One of the options for installing polyurethane molding is presented in the following video:
How is the plinth cut?
Stages of installation of polyurethane ceiling plinth.
Some rooms have not only internal, but also external corners. They are the ones who cause the main inconveniences and difficulties during the installation of the plinth. You can buy special corners that are attached to the corners of the room. This installation method is the simplest, because... it will save you the hassle of sawing corners.
If you are not looking for easy solutions, you can use one of the existing methods for cutting ceiling plinths. To do this, it is recommended to use a miter saw to get an even and beautiful cut. If you don’t have such a saw, use a miter box with a set of stencils.
Stages of installation of polyurethane ceiling plinth (continued).
Next, you will need to take the plinth and insert it into the miter box. Insert exactly how the product will be installed on the wall, and then cut the required angle according to the previously made marks. If you use a material with a complex shape, it will be more convenient to work with a two-plane miter box. Gently sand the cut area with fine-grit sandpaper.
Related article: Self-leveling floor mixture: consumption per 1 m2
Inexperienced workers often make one typical mistake - they incorrectly calculate the length, cutting off the length of the polyurethane plinth first, and only then the corner. As a result, the length of the resulting segment will be insufficient. To avoid this, remember a simple rule: first you need to cut the angle, and only then the length.
Recommendations
If the installation of polyurethane molding is carried out for the first time, then it is useful to familiarize yourself with the following recommendations:
- after purchasing the adhesive you like, you should try applying the sticker on a small piece of plinth before installation; the identified features will prevent mistakes;
- in the absence of special adhesives, “liquid nails” can be used to attach borders, applying the amount indicated on the packaging for this material;
- after pasting the entire perimeter, you need to wipe the elements with a damp sponge, thus eliminating any remaining adhesive;
- painting should be carried out in two layers, which will ensure a uniform color of the entire plane, including at joints treated with putty;
- To create LED lighting, you need to use a special fillet or use a composition of wide borders.
In the photos widely presented on the Internet you can see different interiors using fillets made of this material.
Installation of polyurethane floor plinths
Next, we’ll look at how to attach a polyurethane floor plinth. It is also usually mounted with special glue. Gluing decorative skirting boards should begin from the corner of the room. The work is carried out in several stages:
- The surface of the walls and floor is being prepared for the baseboard. They must be thoroughly cleaned and degreased;
- The plank is coated with glue on the reverse side. There are special grooves (shelves) here. The composition must be applied specifically to them, as well as to the ends;
Glue is applied from the back side
- The floor plinth is pressed tightly against the wall and held there for several minutes. You can press it against the wall with something heavy;
- The joints between the planks are treated with acrylic sealant.
Tip: In places where the walls are uneven, the polyurethane floor plinth may come off slightly. In order for it to stick evenly over the entire surface, you just need to nail it down not all the way. After the glue sets, they can be pulled out. It is worth nailing the strips at the corners as well.
The wide polyurethane floor plinth looks very impressive in the interior. They glue it using the same technology. However, since it can shrink quite significantly, the joints between such high planks sometimes diverge after some time. In this case, you should wait until the gap stops growing, that is, the baseboard shrinks completely. After this, the old glue will need to be removed. Next, the split seam is filled with joint glue using a syringe. Since it forms a foam, care should be taken that it does not reach the surface by approximately 2mm when applying.
Wide floor polyurethane plinth looks very impressive, but is somewhat difficult to install
Polyurethane plinth can also be mounted mechanically using self-tapping screws. The video below shows this process step by step: