Finishing any ceiling with plasterboard is the right decision. The process cannot be called complicated, and provided that the standards are followed, such a ceiling will last for quite a long time. It is important to take into account the specifics of the finishing material and apply all the necessary attributes. The reason for the popularity of finishing walls and ceilings in apartments with plasterboard is that they are far from perfectly smooth, but with this finish they will become ideal.
Ceiling with gypsum craton construction
What you need to know about drywall?
Drywall, abbreviated as gypsum board, has a number of important advantages, in addition to the fact that it can make walls and ceilings perfectly smooth. Among them:
- Absolute safety for humans.
- The pores in the material create the correct microclimate. If it becomes too humid, it absorbs moisture, and when the air dries, it releases it.
- Sheathing with plasterboard provides good sound insulation, which is especially important in apartment buildings.
- Heat loss is reduced. This is possible by reducing the ceiling height and creating an air gap. The niche that is formed as a result of finishing can be filled with insulation, for example, mineral wool.
- This material is not flammable.
- Any decorative material – plaster, wallpaper, paint – can be applied to the surface of such a rough finish.
There are also a few shortcomings, but you can put up with them. More specifically:
- Walls, like the ceiling with such a finish, will not be durable. You cannot hang heavy chandeliers, shelves, or even paintings on them. All this is due to the fragility of the material. You also need to work with him carefully, preferably with a widow or three of you.
- Such finishing will not save you from flooding from above; moreover, it will have to be completely changed.
- Temperature changes negatively affect the quality of drywall.
The disadvantages are significant, but they are quite acceptable, because the use of the material is quite simple, and for any room in the house.
A complex multi-level ceiling is not a problem
Working with drywall
Like any material, plasterboard has a number of features , advantages, and disadvantages, the knowledge of which will not hurt anyone who wants to cover the ceiling with plasterboard.
The advantages include the following:
- able to level the surface regardless of its curvature;
- hides or masks passing communications in the room;
- suitable for mounting any type of lighting fixtures ;
- many variations and possibilities for realizing design ideas and fantasies;
- lightweight in design;
- makes it possible to carry out sound and thermal insulation ;
- there is no need to wait during the process for anything to dry or reach the desired condition to continue the repair;
A few disadvantages of drywall:
- the height of the ceilings will decrease depending on the curvature on the surface;
- the installation process is of medium complexity and the mandatory presence of a screwdriver and a hammer drill;
- There is no way to carry out repairs alone.
To prevent errors at the installation stage and problems in the future, you need to know some nuances
when working with such material as plasterboard:
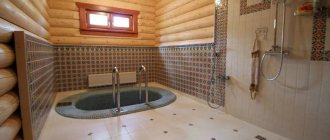
- The choice of drywall depends on the characteristics of the room where it will subsequently be located. The ordinary type of drywall is suitable for ordinary living rooms with normal humidity levels. For bathrooms and swimming pools, only moisture-resistant types should be used. If the ceiling is installed in the kitchen, then only fire-resistant plasterboard can be used.
- The preparatory stage before performing the main work should be to determine exactly which ceiling will be installed. Be sure to prepare diagrams and calculations , prepare the sheets of material themselves.
- The tool plays an important role when working with this type of material, because the quality of the ceiling installation in the future depends on it. You should take into account in advance all the nuances and devices that will be needed to repair the ceiling covering.
Read also: Repair in a narrow corridor. Best photo ideas.
First of all, preparation
Before finishing the ceiling with plasterboard, it needs to be prepared. This stage is the first and very important, because the further installation of gypsum board sheets depends on the thoroughness and accuracy of its implementation.
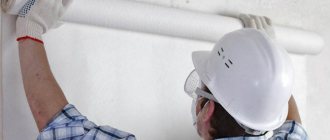
Important! All work on preparing and installing drywall on the ceiling of rooms is best done together. Firstly, it will be more convenient, and secondly, faster.
Frame of their metal profiles
Preparation stages:
- Taking measurements of the ceiling. This is necessary to purchase materials: plasterboard sheets, profiles, consumables. During the measurement process, you can decide exactly what the future ceiling structure will look like.
- Another important point is determining the location of the lamps. They will need to be wired, and for this you will also need to buy materials and decide on its connection.
- At the same stage, you can decide on the installation location of the fire safety system.
- Based on the heights of the existing ceilings, determine how much the new one will be lowered.
- If in the future heavy chandeliers will be attached to the ceiling or a built-in wardrobe will be mounted in the wall, then you also need to decide on the location of the embedded elements. These are wooden blocks that are laid between the rough ceiling and the plasterboard. It is they who bear the load when installing heavy interior objects.
The choice of material also needs to be approached responsibly
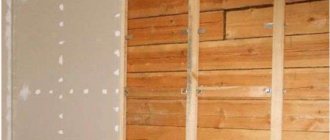
What types of frames are there for plasterboard on the ceiling?
As already mentioned, supporting frames for drywall can be wooden or metal. The first option was used much more often in previous years. However, today installers usually choose the option with a metal profile, which is more durable and strong. With wood, everything is much more complicated: in order to protect it from insect pests, rotting and fire, it is necessary to apply additional impregnation.
It is also of great importance exactly how many levels the design will include:
- One level
. In this case, the supporting profile for plasterboard sheets is fixed directly to the base. - Two levels
. Here you will first need to build a base for installing supporting profiles on hangers. Next, the second level is attached to them. Then the finished frame is sheathed with gypsum board.
In the first case, the difference between the main and decorative surfaces will be only 50 mm. This has its pros and cons. This option is most suitable for low-height rooms. On the other hand, too small a ceiling space complicates the installation of communications and the installation of built-in lamps. Two-level systems do not have these problems, since adjustable hangers allow you to set any height you like. It goes without saying that the second option is more difficult to implement.
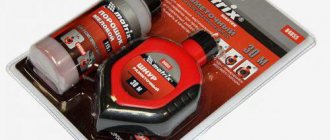
Tools and materials
Finishing the ceiling with plasterboard with your own hands continues with the preparation of tools and materials for installation work.
Drywall
The first thing, of course, you need to choose it. Ceiling plasterboard is thinner than wall plasterboard, its thickness is 8-9.5 mm, depending on the manufacturer. This thickness makes the sheets cheaper; they do not need to withstand heavy loads. When installing in a bathroom or kitchen, you should use a moisture-resistant one, as this is less permeable to moisture.
Frame elements
The frame will be created from important structural elements, which will be covered with plasterboard. Among them:
- The profiles that will be needed are of two types: PN and PP.
- Suspensions - for setting the level.
- Crosses - for securing perpendicular elements of the sheathing.
- Self-tapping screws - they are small, for metal, specifically for securing profiles.
Other materials
In addition, when finishing walls and ceilings with plasterboard, you need:
- Starting and finishing putties.
- Deep penetration primer.
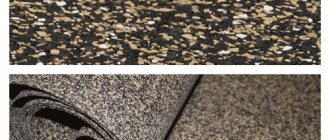
- Mesh for finishing joints, it is called serpnyanka.
Insulation can be installed in a niche in a plasterboard ceiling
Useful tips
One of the problems that a novice builder may encounter is choosing a metal profile for the frame. There are many of them on the modern materials market. In order to cover the ceiling with plasterboard, guide profiles UD and CD are usually used. There is also UW, but it is used less frequently.
Let us explain what these Latin abbreviations mean. CD (also called PP or PP-60) is considered a universal profile. It serves as the base of the sheathing and creates bends. UD (or PN-27) serves as a guide profile.
Another issue is thickness. Its value varies from 0.4 to 0.6 mm. For medium-sized rooms, it is recommended to use a profile with a thickness of 0.5 mm.
Next is the choice of suspension. Usually they take a classic pendant 12 cm long; People called him “pawn” or “toad.” If the structure may turn out to be too heavy, then it is recommended to use suspensions with traction that can withstand weight up to 25 kg.
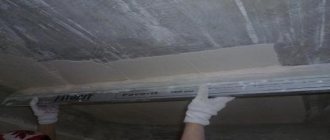
Marking
This is a key stage in decorating a plasterboard ceiling with your own hands; the final result depends on how accurately it is carried out, because profiles are mounted on it, and gypsum board profiles are mounted on it. Marking order:
- Mark the level of the future ceiling on the wall. To do this, find the lowest point of the ceiling and move 4 cm away from it. If the height of the ceiling allows, then more is possible.
- Draw a parallel line through the resulting point and transfer the markings to the remaining walls. A water or laser level and a painting cord will help with this.
- Next, mark the installation location of the PP profiles. To do this, retreat 10 cm from the corner and mark points on the opposite wall in increments of 60 cm, connecting them.
- Mark the position of the hangers on the lines. The distance between them is up to 50 cm; in order for their installation to be even, you need to draw a line through each row. The result will be a lot of rectangles.
Frame
If the markings are done correctly, then such work will be easy. The order is:
- Measure the length of the walls and cut the guides using metal scissors.
- Attach the guides to the walls and align them with the markings. The bottom edge of the profile should be placed along the line. The distance between the dowels is 25 cm.
- The fastening of the hangers is also according to the markings.
- Installation of PP profiles, which must first be cut in accordance with the measurements taken. The installation process is simple - the PP profile is inserted into the guide profile.
Important! During the installation process, the profiles need to be leveled, as they can sag under their own weight, resulting in an uneven ceiling.
- Installation of jumpers, the distance between them is 6 cm.
Curved frame for a multi-level ceiling
When installing a multi-level ceiling, the second level will be mounted not on hangers, but on a PP profile. Another important point is that to give the profiles a bend, they are cut, the number of cuts depends on the radius.
Sheathing
This is the next stage. You can cover the ceiling with plasterboard in a matter of hours, provided you have an assistant, or preferably two. The sheets have large dimensions - 2 meters in length; attaching one to the ceiling is sometimes an impossible task.
First of all, the sheets need to be cut to the size of the ceiling. Cutting rules:
- Measure the required dimensions.
- Apply a rule to the cutting line.
- Cut the paper layer.
- Break the gypsum layer.
- Use a knife to trim the cardboard on the other side of the sheet.
This method is not suitable for cutting curved parts. The part itself must be applied to the plasterboard and cut through it with a jigsaw.
The installation process is not complicated - secure the sheets in place using self-tapping screws to the profiles. Fasteners need to be recessed into the sheet, but so that they do not break through the paper layer.
If you have to work alone, clamps will help
Installation of gypsum plaster boards, frame cladding
Operating procedure:
- Before covering the ceiling, the edges of the sheets are processed using a plane, chamfering. The edges are equipped with a chamfer at an angle of 40-50 degrees, for which a construction knife is used. This will make it easier to seal the joints with putty in the future. Sometimes the sheet needs to be cut as you work. To do this, use a construction knife, moving it with force along the intended line. Next, having made a break, they cut the cardboard from the back side.
- When screwing the slabs with a screwdriver, it is necessary to ensure that the edges of the gypsum board coincide with the guide profile. It is best to use self-tapping screws with a flat head as fastening materials. The step of their fastening is every 10-15 cm. In this case, you need to ensure that the cap is recessed into the surface to a depth of 1 mm, so as not to interfere with the finishing putty.
The ceiling covered with plasterboard is impregnated with acrylic primer and puttied in two layers. The first stage involves sealing the joint areas (a sickle mesh must be glued to them) and edges (perforated corners are placed on them). The second layer of putty is applied completely to obtain a smooth surface for decorative finishing.
Preparation for finishing
The question often arises of how to finish a plasterboard ceiling. It all depends on the desired effect. So, immediately after installation, it is necessary to finish the plasterboard ceiling with sickle and starting plaster in order to hide the joint and screws. Procedure for sealing joints:
- Cut the gypsum plasterboard at the joints at an angle, so that a groove with flat edges is formed between the two sheets. If the edges are rounded, then there is no need to cut anything.
- Cover with sickle tape. It is sold with an adhesive base, which is more convenient to use.
- Apply primer and putty to the joints. Level the joint using a spatula.
Self-tapping screws are sealed without sickle, simply covered with plaster mixture.
Preparing seams for plastering
Advantages and disadvantages of plasterboard ceiling
A suspended plasterboard ceiling has many advantages over other finishing options for this surface:
- GCR is an absolutely environmentally friendly material. Its varieties can be installed in any residential premises.
- You can assemble a plasterboard ceiling without using specialized expensive tools.
- Its installation does not require special construction skills.
- If, before making a suspended ceiling from plasterboard, you think about the location of various communications, then later they can be hidden behind its plane. You can also place lamps built into the ceiling there.
- The plasterboard itself has good heat-insulating and noise-absorbing properties, but the design of such a ceiling makes it possible to strengthen them by placing sound-proofing materials in the niche of the frame.
- This ceiling is made quite quickly with a minimum amount of dust and other contaminants in the apartment.
- Drywall allows you to realize the most daring design ideas: create multi-level structures, various niches and arches.
- The result of installation is a perfectly flat surface suitable for all types of further ceiling finishing.
Naturally, there were some drawbacks:
- The structure “eats” at least 5 cm from the height of the room. This parameter may increase with significant curvature of the ceiling surface, when installing lighting fixtures. So before making a plasterboard ceiling, you need to assess whether the room will be too low. However, for the vast majority of apartments, the loss of a few centimeters in height is not critical.
- Hemming sheets of drywall to the ceiling alone is inconvenient, if not impossible. So it’s worth looking for a partner with whom the structure will be assembled.
- Over time, various defects may appear on the ceiling, for example, cracks will appear at the joints of sheets. But this can be completely avoided if you know how to properly make a frame, attach drywall and apply putty to it.
USEFUL INFORMATION: How to properly putty ceilings for painting: preparation for coating with water-based paint
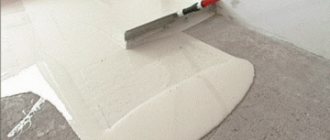
Plastering
This stage is necessary for further finishing work. The answer to the question of how to cover the ceiling plasterboard after installation is starting plaster. It has a fine-grained structure, which will allow you to qualitatively level the surface of the ceiling.
Before applying plaster, coat the sheets with a deep penetration primer. Plaster can be applied only after the primer layer has completely dried. Next, apply plaster and level with a spatula. After it has set, but has not yet completely dried, you need to go over it with a P120 sanding mesh - it will help remove serious flaws in the plaster. The next stage is dust removal and priming.
The last step before applying the finishing material is finishing plaster, the work procedure is similar to the starting one. Final sanding is carried out using a P150 mesh. This needs to be given special attention, because now you need to remove the smallest flaws so that the surface of the ceiling is perfect; if everything is done correctly, then you won’t even need paint for the finished ceiling.
Gluing sickleweed
Decorative finishing
The final stage is decorative finishing. There are several options:
- Coloring.
- Wallpapering.
The second option is far from the easiest; if you have covered the ceiling at least once, you are unlikely to want to repeat it. Although this finishing option has its advantages, you don’t have to plaster the sheets with starting and finishing putty. It will be easy to remove this finish and replace it with another one.
Installation and finishing results
Painting is actually much easier, but you also need to follow certain rules, namely:
- Once you start painting, you need to finish it. Applying the composition to one part of the ceiling, and then to the second, will not work. To be more precise, it will be possible to do this, but the result will not be the best.
- For application, use the same tool at all stages. That is, if you started with a roller, then you need to continue working with it. The same goes for a brush or spray gun.
- The working tool must not be turned over during work.
- The same area does not need to be painted again, as the surface will be uneven in color and structure.
- The corners of the room should be painted with a brush, the middle can be painted with a roller on a long handle.
- It is best to apply 2 layers: the first along a long wall, the second across the first layer.
Painting
Painting should be done only after priming and puttying the ceiling. For drywall, it is better to choose a water-based type of paint. It washes off easily and can be used without solvents. If you want a colored ceiling, then just add color to the paint.
Important! The color content should not exceed 5%.
Brushes, spray guns and rollers with short pile are used as painting tools. The paint should be applied in two thin layers.