Vadim
33515 0 24
Vadim November 21, 2016
In a living room, the presence of a stove or fireplace is a blessing, but the appearance of the chimney does not always correspond to the interior. If this is your case, then from this article you will learn how and with what to finish the pipe in the house. And not only indoors, but also outside, so that the entire structure meets modern architectural trends.
Finishing the stove in the house with bricks with your own hands.
Finishing and lining of the chimney inside the house
The functional necessity of a heating boiler or stove is a chimney. It must fulfill not only its intended purpose, but also fit as clearly as possible into the interior of the interior, as well as into the architectural appearance of the house. The finishing of the chimney inside the house and on the roof must be done correctly and fully comply with fire safety and building codes and regulations.
The work performed should ensure accessibility and convenience for the process of carrying out preventive work - cleaning up combustion products that have accumulated during the heating season.
Natural facing slate
Natural slate has an excellent combination with almost all materials, it is non-flammable, strong and durable. Roofing slate has any shape, so it is easy to work with. And besides, what is more important now, slate is natural, which means it is an environmentally friendly material; it can be used if cladding is carried out inside the house.
Slate used for tiles
To attach slate tiles, copper nails with a diameter of 2.5 mm and a length of at least 40 mm . And with a wide hat. The nails are not nailed down completely; there must be a gap between the head and the slate tile. This is a requirement for all roofing materials, as temperature changes can lead to deformation . The material breathes, waterproofing is not required when working with a chimney.
- The tiles are installed in the same way as the sheathing is attached to a tin roof. Only the fastening step between the beams is observed, the beams are fastened at the corners of the chimney and, if the distance is more than 60 cm, then another beam is installed.
For reference: with vertical mounting, a step between the guides of 40-60 cm is allowed, but this is in rare cases - it depends on the material and load.
- We set the outer guide bars to the level, pull a rope or fishing line, one at the top, one at the bottom, maybe in the middle, but this is when the height of the guides is more than 2 m, and then we place intermediate guides along the fishing line. You get one plane.
- If necessary, we insulate the chimney, as in photo 3.
- The next stage is laying plywood sheets on the guides. And only after that we begin to lay the slate tiles.
- We make a fastening step: tiles should overlap tiles within 1.2 or 1.3, no less and no more. We mark the step: we draw stripes with chalk along the horizon level (we will fasten nails along them strictly along the line), i.e. if the tile is 30 cm long, then the step we get is 15-20 cm.
- For reference: the angle of inclination of the tiles when laying must be at least 22º. If there are leaks, the reason is not the tiles, but incorrect installation and violation of technology.
Methods for laying slate tiles:
- Rectangular.
- Decorative (sharp corners).
- Wild.
- Universal.
- Scaly (“fish scales”).
Below we give examples and methods of finishing chimneys that can be used both inside and outside the house.
Natural slate panels
Natural slate panels
This material is perfect for working inside the house; the panels are attached using tile adhesive or cement to a plastered, leveled surface. They are joined to each other, inserted into the grooves, as you see in the photo.
What materials should be used to finish the chimney inside the house?
The chimney lining inside the room should be beautiful and fit into the design of the house . It is necessary to add the existence of several ways to pass a chimney inside the house, namely:
- in the wall of a house, when a fireplace or stove is located along one of them ;
- in the center of the room there is heating equipment , which has an island type installation.
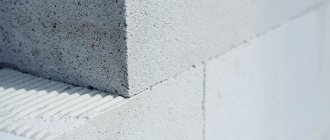
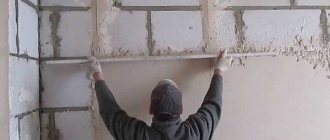
Carrying out work on installing a chimney inside a wall is only possible if it is made of wall blocks or bricks . In such a situation, you will only need to decorate the wall in which it is located exclusively with non-flammable materials . What can modern hardware stores offer? This is a special plaster, a huge selection of fire-resistant tiles - clinker, natural stone, terracotta, tiles and tiles.
Plaster can rightfully be called an old, proven finishing option and, moreover, the most budget-friendly one. There is only one drawback - the service life is short , since constant heating and cooling of the plastered surface eventually leads to the appearance of a network of cracks . To strengthen the plaster, you will need a metal mesh, which is fixed to the surface of the wall before the plaster . For a chimney inside a wall, you can use not only brick. Blocks are also used, especially for chimneys, made from cinder concrete or expanded clay concrete .
If there are curvatures or irregular shapes, then the best choice would be a liner - the pipes are too energy-intensive. It is worth considering that the internal surface of the chimney should not have sharp protrusions, and the combustion temperature at the outlet of the pipe cannot exceed 180 C.
Finishing the chimney on the roof
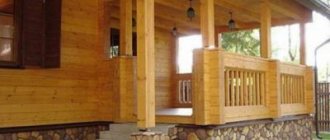
A beautiful chimney completes the architectural ensemble of the building. The roof of a house says a lot about the owner; a lined chimney testifies to a caring owner and even to his wealth. This part of the argument for the aesthetic finishing of the smoke exhaust duct is beyond doubt. However, there are several practical purposes.
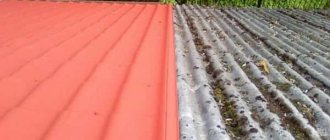
Why is the external part of the chimney finished?
- Insulating and lining the chimney extends its service life. During the heating season, the outdoor part of the chimney is subject to sudden and frequent temperature changes. This difference, coupled with the formation of aggressive condensate, leads to the rapid destruction of any chimney material. Insulation allows you to move the freezing point beyond the body of the pipe, reduces the temperature amplitude and prevents the formation of condensation inside the chimney.
- The insulated pipe provides good traction. Uniform and rapid heating of the smoke exhaust channel ensures high-quality draft during combustion. Soot and gaseous combustion products (including carbon monoxide) are quickly and completely removed from the firebox without entering the living space. This condition is decisive for the safety and efficiency of heating equipment.
- Finishing the connection between the pipe and the roof protects the roof from atmospheric moisture entering the roofing pie. The slightest defect in performing these works will lead to damage to the insulation and rotting of wooden structures.
A two-layer protective apron is installed around the chimney along its entire perimeter, where the pipe exits onto the roof. The first layer is placed under the roofing covering, the second is placed on top of the covering.
This apron is called a flashing or collar and is made of metal (galvanized or steel sheet). Currently, ready-made frames can be purchased on the construction market. The junction of the apron and the pipe must be sealed.
— the pipe laying is made of low-quality material (brick);
— there is no draft, it is necessary to perform additional insulation of the pipe;
— the appearance of the pipe does not match the appearance of the house, decoration is required.
How to close the chimney? Any material must be resistant to precipitation and any influences (wind, sun, temperature changes).
For any pipe lining, it is necessary to make a frame for attaching the finishing material. The frame is made of antiseptic timber or metal guides. The chimney lining is installed only on a metal frame.
The casing of the chimney and ventilation pipes on the roof can be galvanized metal coated with polymer. In appearance, it can be smooth or profiled (corrugated sheeting). This is perhaps the most inexpensive finishing option.
The most practical solution is a chimney made of clinker bricks. But you can simply line the pipe with clinker tiles, which are compatible with many roofing materials.
Finishing the chimney with artificial or natural stone, which is also used in finishing facades.
The finishing material must be non-flammable; lime-cement plaster can be used as finishing. In this case, the plastered pipes will be combined with the plastered facades, and the building will look seamless.
Double-walled (double-circuit) sandwich-type pipes are also suitable for chimney installations. You can read about this in a separate article dedicated to this topic.
The chimney can be lined with cement-fiber boards. This non-flammable material has an attractive appearance and is available in various colors.
The use of siding is only suitable for lining ventilation ducts facing the roof.
The choice of material here is much wider, right down to the roofing material used for the roof (metal tiles, soft roofing).
However, a lined chimney of a completely unconventional shape can become the main decoration of the house. Such a chimney will not require additional finishing.
Plaster is more often used due to its relative cheapness and lack of demands. As a rule, they combine classic colors, choosing soft colors to match the design of the room. In addition, you can create a variety of patterns by combining colors. You can use plaster in the house without fear, but when using it outside, keep in mind the characteristics of the mixture. Not every solution is suitable for street cladding due to temperature conditions and mechanical wear.
How to close the chimney? Any material must be resistant to precipitation and any influences (wind, sun, temperature changes).
We invite you to read: Installing shelves in a bathhouse
Plastering a chimney pipe is quite common throughout the world. In this case, it is possible to use both ordinary mortar used to level surfaces and decorative plaster. The second option is more interesting, since it becomes possible to create a unique design due to the special composition of the plaster (for example, some types contain crumb elements).
Features of plaster:
- Ease of use (plaster does not require any coating).
- Resistance to long-term exposure to water (during its entire service life, the plaster does not crack or wash off, even if the house is built in an area with a high average annual precipitation).
- Resistant to high temperatures (plaster does not burn or collapse, so it is excellent for finishing the chimney of a fireplace or stove).
- Fragility (high-quality plaster will last no more than 5 years, after which peeling and gradual destruction will begin; re-plastering can only be done after removing the old material and treating the surface).
Lining a chimney with plasterboard is carried out exclusively indoors, since this material is very sensitive to moisture. Drywall itself is not particularly visually appealing, but it is an excellent base for other finishing materials (for example, ceramic tiles or plaster).
If you decide to install a plasterboard box to hide the fireplace chimney, you must choose a material with a maximum heat resistance rating (most types are not resistant to high temperatures).
The process of installing a plasterboard box is quite simple and can be done with your own hands:
- Preparing the layout and cleaning the installation site.
- Installation of a metal frame.
The elements of the supporting structure are attached to the wall using self-tapping screws. The frame installation method ensures maximum reliability of the box and durability of the system.
- Cutting drywall.
- Fastening the sheets to the frame using self-tapping screws.
- Plastering the surface.
- Finishing.
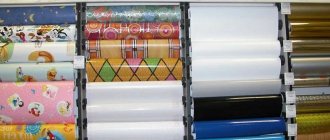
The tiles are suitable for both decorative and existing chimneys. Thanks to the variety of shapes and sizes, it fits perfectly into almost any architectural style, because it can imitate many surfaces. In this case, the front side of the tile can be glossy or matte, embossed or smooth.
The tile manufacturing process consists of the following steps:
- Selection of several types of clays to ensure maximum density of the finished product.
- Crushing all ingredients.
- Mixing components: clay, quartz sand, feldspar.
- Drying the tiles at a temperature of 600°C.
- Final formation of the product.
- Re-dry the tiles to remove residual moisture.
- Firing (carried out in 2 stages).
- Tile quality control.
When all stages are carried out responsibly, the output is a product with the following characteristics:
- Moisture resistance (tiles do not collapse even with prolonged exposure to water).
- Resistance to chemicals (the tile surface can be cleaned with any detergent).
- Resistance to high temperatures (especially important for chimney pipes).
- Frost resistance.
- Durability.
Watch the video
Rules and regulations
Work on installing and lining the chimney must be carried out in strict accordance with current standards and regulations. The main document is SNiP 41-01-2003 “Heating, ventilation and air conditioning”, which details all the requirements for chimney lining:
- All heated surfaces must be insulated from flammable structural elements (for example, the roof). Moreover, the fire resistance of the insulating material should be 20°C higher than the expected temperature of the hot surface.
- The material used to cover the pipe from the fireplace or stove must be resistant to rust.
- If brick is used to line the pipe, the thickness of the masonry must be at least 120 mm.
- The design should include protective canopies (or umbrellas), the main thing is that they do not reduce the draft from the pipe.
- The distance from the pipe to the flammable roof must be at least 130mm (important to consider when covering).
Watch the video
Strict compliance with all requirements guarantees the reliability and durability of the structure.
Chimney tiling
Several types of tiles can be used for cladding inside the house , and it does not matter where the stove or fireplace is located - in the middle or against the wall of the room. You need to understand that the stove and chimney are one whole, and therefore the finish will be identical . The most beautiful, but at the same time the most expensive option for cladding is stove tiles, made individually for each stove, and the installation process must coincide with the construction of the heating unit. Different tiles are used for cladding - terracotta is more expensive, but tiled tiles can be called economical, the principle of working with which is practically the same.
If modular chimneys in the form of a sandwich pipe are used, then there is no need for finishing, since polished metal has a place in almost any interior. Finishing the chimney on the roof is also not required. To increase the heat transfer of the furnace, natural stone is used - soapstone, jadeite, soapmagnesite.
To heat a multi-story home, install 2-3 stoves , the chimneys of which should not be connected - this is strictly prohibited. For normal functioning of the heating system, there is no need to plug pipes throughout the house; you need to make a masonry with three wells for each stove , which will allow all the pipes to be compactly located inside the house.
Brick chimney finishing
How to line a chimney on the roof of a brick house? The answer is obvious - brick. There are several types of facing bricks that are excellent for cladding: ceramic, silicate, clinker, and so on. They differ significantly only in external qualities, but the main advantages are the same for all:
- Durability and reliability.
Brick can withstand both static mechanical impact and strong shock loads.
- If installation work is carried out correctly, facing bricks do not require special care or constant cleaning.
- Resistant to prolonged exposure to moisture.
Brick does not absorb water and is not destroyed by prolonged exposure.
- Fire resistance.
- Low temperature resistance.
- Wear resistance.
The properties of bricks do not change over time.
By covering the chimney with brick, you will ensure reliable protection of the chimney and the attractiveness of the building for 30-50 years. After this period, the structure will gradually begin to collapse.
Properties of materials for chimney finishing
Brick lining of chimneys involves the use of materials that reliably isolate the room from combustion products and will not disturb the harmony of the interior. The external finishing of the chimney is developed not only to prevent the ignition of the roof, many of whose elements are made of wood, but also to minimize the impact of the external environment on the structure.
Materials for insulation inside the house
Heat-resistant bricks are used to lay the smoke exhaust; expanded clay concrete blocks are also used inside the walls. Chimney insulation comes down to finishing the structure with fireproof materials: clinker stone or tiles, tiles, natural stone, special plaster. Laying fireproof finishing provides access to clean the pipe from combustion products.
Plaster
A relatively inexpensive building material, finishing from which will take a little time. The main disadvantage is instability to frequent thermal loads. With constant heating and cooling, such a coating is deformed and cracks appear on it. To ensure a durable finish, it is recommended to plaster on a fixed metal mesh.
Tiling
For lining the chimney, the same texture is used as for the stove or fireplace. The most expensive and labor-intensive method is considered to be finishing with tiles, which are made to order. Natural stone increases heat transfer. The building materials market offers a wide range of tiles of different shades and patterns. This finishing method is the least expensive.
Materials for insulating a chimney outside the house
Finishing of pipes on the roof is carried out to protect the structure from the negative effects of the environment: precipitation, wind, temperature changes. Hot air inside the chimney and cold air outside provoke the formation of condensation, which subsequently destroys the pipe. With the help of fire-resistant materials, structures are given strength, insulated, and insulated.
In order not to compromise the integrity of the roof and prevent contamination, it is better to sheathe the chimney pipe before laying roofing materials.
Clinker tiles or bricks
Used for finishing any part of the chimney. It is recommended to use solid bricks, which are laid on a special clinker mortar. This stone is highly durable and resistant to sudden changes in temperature. The facing of the brick pipe is smooth and aesthetically attractive. If the outer part of the chimney is high, use tiles.
Plaster finishing
An easy way to line a chimney. Plaster comes in different shades and is suitable for any roof covering. To plaster the structure, use cement mortar. To ensure stability of the finish, another base is used: silicone, acrylic, silicate, mineral. It is recommended to plaster the chimney and then apply paint, which will protect the finish from moisture.
Cement fiber boards
Lightweight fire-resistant materials characterized by high strength. A chimney made of such slabs will be an original decoration of the house. The environmentally friendly material is available in a variety of texture colors. Slate slabs have a graphite tint and a scale, arc or polygon shape. Corrugated sheeting looks modern and is used for the roof and chimney.
Stages of finishing a chimney with a metal profile
Watch video - covering with metal profiles part 1
To cover the chimney with tin, you need to prepare the following devices:
- Tool for cutting sheets. The ideal option is a circular saw or an electric jigsaw, but if the amount of work is small, you can get by with a hacksaw or metal scissors. It is not recommended to use a grinder, since when it comes into contact with a metal sheet, the surface heats up, which can cause the material to deform.
- Level for maximum installation accuracy.
- Self-tapping screws and a screwdriver for fastening sheets.
The installation of the sheathing itself takes place according to the plan below:
- A metal or wooden frame is manufactured and installed on which the sheathing will be attached.
- Cutting out metal profiles.
- Laying sheets.
- Fastening sheets using self-tapping screws.
- Sealing joints.
- Installation of special corners at joints for aesthetic appeal.
Watch video - covering with metal profiles part 2
The main thing in installation is the most even laying of the bottom row (at the junction with the roof), since the tightness and reliability of the structure largely depends on it.
Sequence of work
The general technology of internal cladding comes down to several stages:
- Prepare fire-resistant glue, grout and the tile chosen for decoration.
- Soak the tiles in water for about a quarter of an hour.
- Dilute the glue according to the instructions.
- Apply adhesive to the surface of the tiles and chimney.
- Attach the finishing material to the base.
- Secure the gaps between the tiles with temporary plastic fasteners.
- The fasteners were removed after the glue hardened.
- Fill the seams with grout; it will dry in a few days.
For the street part of the building, you can use corrugated sheets.
To finish the part of the chimney that is located on the street, corrugated sheets are often used that are attached to self-tapping screws. It is prohibited to use vinyl siding, which is deformed by high temperatures. Sequence of work for finishing with plaster and tiles:
- Clean and prime the surface.
- Reinforce the pipe with galvanized metal mesh.
- Apply a mortar of cement and expanded clay sand.
- Plaster the surface (attach clinker tiles or natural stone), following the procedure for internal cladding.
Return to contents
Problems that arise during cladding
First of all, you should pay attention to maintaining tightness at the junction of the pipe and the roof; if the technology is violated, water and debris penetrate inside. After completing the finishing work, it is important to install a protective cap over the chimney so that the draft will not be disrupted. Sometimes they forget to install it, as a result the pipe becomes deformed due to precipitation. Finishing materials must be resistant to high temperatures and temperature changes, and have anti-corrosion properties. Often, instead of heat-resistant plaster, they choose regular plaster and the coating collapses.
Chimney treatment performs many functions, primarily ensuring the safe operation of individual heating. During facing work, a variety of fire-resistant materials are used, the choice of which depends on the type of firebox and the design of the house. At each stage of finishing, it is important to follow the technology in order to extend the life of the structure and protect the adjacent elements of the building.
Selection of material for decorating a chimney inside the house
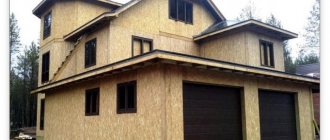
In a country cottage, a stove or fireplace is usually built in the living room. In this case, the chimney often passes through all rooms and through the ceilings. In this case, it is necessary to harmoniously fit all protruding parts into the interior. This is done in the following sequence:
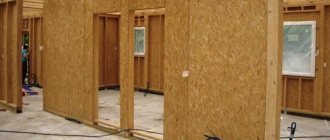
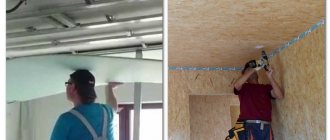
- First, a frame is constructed from a metal profile. It is then covered with plasterboard sheets. And not ordinary ones, but fire-resistant ones, marked with GKLO;
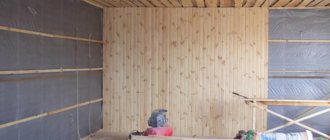
- To provide thermal insulation, fiberglass or mineral wool is placed inside the frame. The use of such a heat insulator makes it possible to finish the surface of the sheet with any material, and even simple wallpapering is not excluded;
- at the final stage of finishing it is recommended to use gypsum stucco or ceramic tiles. They will highlight the features of any interior style. It is advisable to make some elements in the form of a mosaic, in particular from glass of various colors.
Inside the house, the chimney can be hidden under a high-temperature resistant plasterboard frame
The most durable and durable for interior decoration is clinker brick. It fits perfectly into an interior designed in a minimalist style, and there is often no need for additional decoration.
To create an antique and simple interior finish, plaster is often used. This oldest method still has many adherents.
It must be emphasized that proper thermal insulation of the chimney will make it possible to carry out interior finishing with any material. And the choice of decoration method is determined by taste preferences.
Chimney lining inside the house
As already written above, focus not only on your own design developments and “trends”, but also on the correct installation of this or that material, depending on the type of channel. After all, not every chimney is suitable for a beautiful and weighty stone or tile. Calculate the weight and overall load-bearing capacity of the structure. For example, for brick buildings, no serious problems should arise, but metal pipes, for which a weighty foundation or fastening is not provided, will not tolerate bulky cladding. Therefore, think twice before finishing your chimney.
Traditional finishing methods
The lining of your chimney can be made of a completely different material. But keep in mind that in addition to the cladding material itself, you will also need to manufacture a special casing, sheathing or duct for the chimney, in particular this applies to ceramic and metal structures. For example, for tin, light tiles of different fractions and dimensions are often used, depending on the structures themselves. As for brick buildings, here, of course, preference is given to facing bricks, marble and tiles. Although in fact, the range of facing elements is huge. The most traditional for the entire existence of such structures was considered classical plaster, which can be performed for all types of channels, with some reservations regarding the purchased solution.
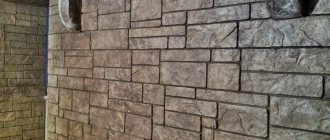
Facing with wild stone
This material gives the house an aristocratic appearance and allows its owner to distinguish his home from the gray and monotonous mass of other buildings. When using facing stone, pay special attention to caulking all seams, especially for interior finishing. But, wild stone is often used as a means of cladding on the outside, giving its natural and presentable appearance. In addition, the wear resistance threshold of such elements is also surprising.
Marble plaster
This is a crumb where particles of small pebbles are mixed into a solution. Cladding, therefore, is only permissible inside buildings, since the crumb does not like exposure to cold temperatures. It goes well with fireplaces and traditional stoves, especially if the kitchen area is additionally finished with such chips, not to mention brick chimneys.
Finishing stages. Sealing
The finishing of the chimney pipe on the roof begins with the installation of a protective apron at the point where it exits onto the roof. It is laid in 2 layers: one on top of the covering, and the second goes under the roof. The junction points should be carefully sealed.
The need for additional finishing arises in the following cases:
- the materials used for the chimney stand out from the general appearance, introducing disharmony into the style of the house;
- when simple brick was used for cladding, which does not have the proper level of aesthetics;
- for decorating chimney elements facing the roof;
- insufficient draft in the chimney system.
Ensuring the pipe outlet is sealed is the first stage of finishing a chimney on the roof. Relatively recently, SNiP standards prescribed the construction of expanded brickwork in the place where the pipe goes to the roof. The purpose of this requirement is to perform sealing by bringing roofing material under the apron. As a result, the design was bulky and aesthetically unattractive.
Flexible roofing material must be wrapped around the chimney masonry to ensure a tight seal between the pipe and the roof.
Modern materials make it possible to eliminate such requirements without compromising the effectiveness of sealing. Any roofing material is wrapped onto the chimney pipe masonry, after which a protective apron is installed. To make the apron itself, galvanized metal, 2-4 millimeters thick, is used. At the same time, to ensure resistance to weathering, it requires a polymer coating. Aprons are always made from non-flammable materials that can withstand high temperatures.
The most optimal option for implementing high-quality sealing is the combination of a metal apron with a protective polymer coating and a flexible sealing tape. This tape is made from aluminum foil, and additives of polymer and bitumen materials are used as a self-adhesive layer. They lay it under the apron where the chimney goes out onto the roof. After arranging the apron, transparent silicone sealant is applied to the seams. Actually, this is where the sealing ends.