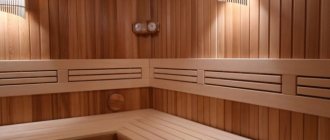
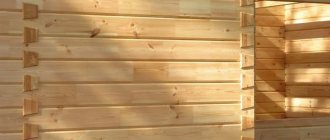
Lining is a convenient, practical, durable, beautiful-looking material. Ease of installation also plays an important role when choosing this type of home decoration. And yet, any good owner wonders how to properly line the interior of the house with clapboard?
The beauty of a wall covered with clapboard depends entirely on strict adherence to technology. Failure to comply with installation rules results in unnecessary waste of time, effort and material.
Pros and cons of cladding
During production, this type of finishing undergoes careful processing, including natural and chamber drying, grinding of the front surface, and in the case of eurolining, coating with antiseptics and fire retardants.
The result is a high-quality, durable edged groove board, which is easy to install and looks great in any interior. Advantages of lining:
- Aesthetics – depending on the type of wood, the front surface has a unique grain pattern.
- Environmental friendliness - wood, when processed with high quality and coated with only harmless protective compounds, is an absolutely safe finish for humans.
- High hygroscopicity - due to the structure of the material in the room, the microclimate and humidity level are effectively regulated, which make staying in it comfortable.
- The smell of natural wood is often almost undetectable, but it helps cleanse the air of extraneous aromas, refreshes the air, and fills it with a special atmosphere.
- Simple installation - attaching slats is simple and quick (how to attach lining?). The process often takes several days, taking into account the treatment of the lining and supporting structure with protective compounds, the preparation and painting of panels, acclimatization of the material and fastening.
- Long-term operation - when all processes are carried out using the recommended technologies, such cladding retains its appearance for up to ten years with minor corrections of the coating every couple of years.
- Reliable sound and heat insulation - allows you to create cozy rooms protected from extraneous noise and heat loss (how to insulate a room with clapboard, how to install thermal insulation is described in detail here).
- High strength of the cladding – resistance to mechanical damage and loads.
Advice The most important advantage is its natural origin, because there is no better material than one created by nature itself.
The lining has a number of disadvantages:
- low moisture resistance - wood without a protective layer absorbs moisture well, which over time deforms the canvas;
- low heat resistance - even minor temperature changes can cause bending or twisting of the lamellas;
- low fire resistance - if the material is not coated with fire retardants, then the risk of fire is very high, since wood is a highly flammable lumber.
But all the shortcomings can be easily eliminated with various impregnations, varnishes, paints, oils, and other protective compounds, making the cladding more durable, reliable, and durable (how to varnish or paint lining?).
Video description
Initially, they preferred to leave clapboard walls in their natural state. Modern trends suggest decorating the interior using painted lining, indicating several good reasons for this decision:
- The protective role of paint and varnish coatings . The coating protects the wooden board from premature aging under the influence of solar ultraviolet radiation. In a house with insufficient ventilation, a layer of varnish or paint will protect the wooden surface from fungus and blueing.
- Creative solution . The decorative advantage of lining (both wooden and plastic) is the possibility of tinting or painting it. In this simple way, you can create either an unobtrusive, muted background or add a bright accent.
- An easy update . If you are bored with the old look of the walls in your living room or bedroom, you can easily update it with a simple repaint.
Accent of color and texture Source rerooms.ru
Tips and tricks
Experts share their experience in installing lining, and it is better to follow these recommendations for successful work with your own hands.
- Before starting installation of the lining, it is recommended to leave it open in the room for one day. Thus, natural wood material will be able to adapt to the room conditions, acquire the same temperature, which will help avoid deformation. If installation will be carried out during the cold season, the material should be left indoors for at least two days.
- After the installation of the lining itself is completed, it is worth taking care of its protection, namely, what to cover the material on top with. Processing of facing material is an essential part of the repair. Thus, it will be possible to protect the lining from external damage and more. You can simply coat it with varnish. And if it is installed in a room with high humidity, then it must be treated with a protective compound.
- Before installing the frame, be sure to mark the areas where switches and sockets will be located.
- After treating the walls with an antiseptic solution, be sure to wait until they dry completely, and only then continue working.
- If the room does not need insulation, then it is quite possible to use beams less than five centimeters thick for the frame.
- To ensure that the nail heads do not spoil the appearance of the lining, you need to hammer in the nails with a special tool called a hammer.
- If there is a need to cut the lining, then it is best to do this with a regular hacksaw. Just choose a tool with fine teeth.
- If the installation of the lining is carried out in a room with high humidity, we recommend treating all panels with a special moisture-resistant varnish. The panels can be mounted only after the varnish has completely dried.
- When choosing a cladding method, remember that vertical wall cladding can visually give the room additional height, while horizontal cladding makes the room visually much wider than it actually is.
You can find out more information on this issue in the video below.
Preparation for installation
Before installing the lining, it must be thoroughly treated with chemicals that will prevent mold and also prevent the appearance of rot and pests. The material must dry well and sit in the house for at least a day so that the wood gets used to the atmosphere of the room.
Next, you need to make internal markings of the room, determine the location of sockets, switches and take into account window and door openings. This should be done to avoid unnecessary consumption of material and masking of unwanted joints.
DIY installation tool kit:
- Hammer;
- Level;
- Kern;
- Stapler;
- Hacksaw for metal;
- Plumb;
- Screwdriver;
- Screwdriver.
But you should be prepared for the fact that more tools may be required; this list does not include consumables such as screws, dowels, varnish and various putties.
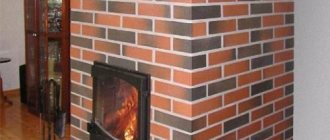
How to line the inside correctly if the bathhouse is made of bricks or blocks
Brick buildings are the coldest, blocks made of foam concrete are still better thermally insulated, but in general both of them need additional thermal insulation, so there is no option when you simply make a sheathing on a brick wall and start installing lining on it. Because it would take a very long time to heat such a bathhouse.
Therefore, it is possible to properly sheathe the inside of a brick bathhouse with clapboard only on top of a thick (depending on the cold of your area) layer of insulation. Since mineral wool is most often used, it is worth proceeding from its popularity. Below we will give an example of the entire “pie”, with insulation and lathing for the lining in the bathhouse.
Cladding technology finishing the house
How to level walls correctly with your own hands Video on how to level walls correctly How to level walls with your own hands using beacons video How to level walls using a rule How to level clay walls What mortar to use to level walls
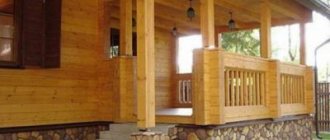
A house covered with clapboard
So how to cover a house with clapboards correctly and efficiently, following technology? And it’s quite easy to do. The main thing is to decide on the type of material and the location of the work. In this case, narrow stripes are used for the internal cladding, and wide ones for the external cladding. The lining itself can be made of wood or plastic. At the same time, plastic is usually used for conditions with high humidity and in places where the lining will not require special care.
So, you can sheathe a house with clapboard using the following method:
- Planks are taken only of the required size. The width should be the same, but the length may vary slightly. Most often this value is 10mm;
- On the boards it is necessary to delimit all the places where they will be cut;
- Grooves are made on both sides using a cutter, then the material is treated with special solutions;
- Next, you need to decide on the direction in which the lining will go, this can be a vertical or horizontal arrangement;
- The supporting grid for the lining is strengthened;
- Mounting bars are attached, the space between the wall and the grille is filled with mineral wool;
- The lining is cut according to the marks and secured with staples on the lattice;
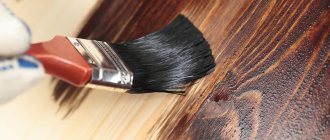
- After installation, the surface of the lining can be covered with stain or the selected varnish.
Useful tips and tricks
- The joining method is the most practical, as it creates a rigid connection if there is no backing block (how to join wooden lining panels?).
- Before starting work, turn off the power and remove sockets and switches.
- Trim the edges of the first plank before installation. Place the material in the corner to check the vertical plumb line.
- Create air circulation between the lining and the wall.
- When hitting with a hammer, use a wooden plank. It will soften the blow and avoid damage.
- If the lining is located vertically, then the cladding begins from left to right.
- The upper and lower sections of the planks are closed using a carved plinth.
- After finishing, cover with several layers of varnish (how to properly varnish the lining?).
Lining is wood panels that will help transform any room. Often used for cladding walls inside the house and for exterior cladding. The work is not difficult and even a non-professional can perform the installation.
Painting after installation
Upon completion of the work on installing the finishing in your home, another important question arises - what solutions to protect the cladding of your house with, how to cover the lining to extend its service life, to avoid the appearance of insects, and also to protect against rot and mold?
It would be unreasonable to neglect such an issue, especially due to the fact that nowadays hardware and construction stores have a truly huge assortment. Therefore, it is very easy to choose any variation of impregnations and protective solutions for your lining.
Calculation of the area of the internal lining
Let's imagine, for example, that we have a bathhouse measuring 4x4 and a ceiling height of 3 meters. We will cover everything except the floor. Also, our steam room will have a dressing room: a steam room - 3x4 and a hallway - 1x4 meters.
Steam room square:
- Quadrature of the longitudinal side: 4x3=12m²;
- End side square: 3x3=9m²;
- Ceiling area: 4x3=12m²;
- Total square footage of the steam room: (ceiling) 12+ (longitudinal sides) 24+ (end sides) 18= 54 m².
- Squaring of the waiting room:
- Quadrature of the longitudinal side: 4x3=12 m²;
- Quadrature of the end side: 1x3=3 m²;
- Ceiling area: 1x4=4 m²;
- Total square footage of the dressing room: (ceiling)4+(longitudinal sides)24+(end sides)6=34 m².
If you calculate the number of slats for interior finishing, you can save a lot, and also find out how much material is required in cubic meters.
The most common panel sizes:
- Lining thickness: 12.5 mm;
- Lining width: 96 mm;
- Lining length: from 2000 to 6000 mm.
One package contains 10 profiles, and from this calculation you can calculate the number of required packages for finishing
It is important to buy packaged panels, since without packaging they are of much lower quality and quickly lose their properties, so soon you will have to partially or completely replace the finish
How many squares in a cubic meter
How to cover a ceiling in a wooden house. Material. Advantages and disadvantages of wooden cladding. Types of lining, calculation and installation
When purchasing material, it is important to have certain knowledge. For example: how much area can one cube cover?
This value may change its value: it all depends on the thickness of the purchased product. Quadrature allows you to find out how many m2 of lining there are in one cube.
- It can be calculated by measuring the thickness of the coating (12 - 25 mm). This figure is converted to meters. If the thickness of the product is 16 mm, then accordingly it comes out to 0.016 m.
- The cubic unit is divided by the resulting number: 1: 0.016 = 62.5 squares.
Material required for interior lining
- The width and length of the room are measured. Additionally, the area of the ceiling is calculated if it is planned to be sheathed.
- The area of the walls is calculated based on the height and length.
- All obtained indicators are added together. From here the squaring of openings: windows and doors is subtracted.
Building material for exterior finishing
- When calculating the area, the method given above is used.
- Squaring the pediments by multiplying the height by the length. The resulting value is divided by 2.
- The results of each wall are summed up, and the area of the openings is subtracted from the result.
You can find out the number of boards in a lining cube by multiplying the total area by the thickness.
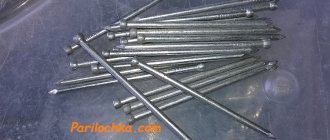
What to hammer in: nails, screws or staples?
The lining itself is a board with a certain profile, which must have a tongue-and-groove locking connection. It is attached to the wall or ceiling using nails, screws or staples. The tools and material required to hammer in the lining in the bathhouse are as follows:
- nails, screws, staples;
- hammer, screwdriver, hardware gun;
- a mallet or a piece of clapboard for knocking a tenon into a groove;
- building level.
What nails should I take for the lining in the bathhouse? It is desirable that these are finishing nails 30-40 mm long, with an anti-corrosion coating. It’s worth taking coated screws (their length is the same, by the way). Regarding the length, you should proceed from the thickness of the board (if in a groove, then only the walls of the groove), plus you need to punch through the block to which the board is attached at least to the middle.
The staples should be the same size, although there are comrades who nail 14-mm staples with a construction stapler through a clamp, but this is rather an exception. To properly line a bathhouse with clapboard, it is better to use long staples and shoot them at an angle of 45 degrees (approximately).
Of course, it is tempting to wonder which of these methods is better. There cannot be a definite answer to this, because everything depends on the experience of a particular person. And if it is not there, then the easiest thing to do is to shoot the staples using a pneumatic gun. True, it is not cheap, and few people would agree to buy it for a one-time job. Other methods are a little more difficult to implement.
Tools you'll need
We reveal the details of how to paint walls correctly
Covering a balcony with clapboard will require the use of the following tools:
- hammer drill or hammer drill
- drill with a diameter of 6 mm
- electric or battery-powered screwdriver
- wood drill bits with a diameter of 6 mm, 4 mm
- Phillips bit ph2
- jigsaw with wood saw, reverse action
- wood hacksaw
- square and tape measure
- construction level
- ax and hammer
- dowels 6x60, 6x100
- nails 30 mm, with a large head,
- wood screws 50 mm, 75 mm, 90 mm
Before installing the frame, you need to check the level of the wall. Installation of the frame should begin with the guide that is allocated less.
Method number 1 - how to sheathe walls with horizontal clapboard
Remember, work starts from the top - from the ceiling down to the floor.
The groove of each plank is better if it is directed downwards. This additionally protects the walls from debris or moisture penetration. You can fasten the lining to the sheathing with clamps (tin fastening grips), staples and decorative screws, or simple upholstery nails. The clamp is fixed in the recess of each panel, without interfering with the next one being installed in the groove. It is advisable to check the level and correct installation more often. As a decorative option, craftsmen use rounded logs, or rather, their imitation. Such a log lining is called a block house. In this case, the panels are attached to the sheathing with the grooves up, screwed with self-tapping screws. Each subsequent fastener is hidden from view by the previous board.
Which one is better to choose?
For the interior decoration of saunas, it is recommended to purchase deciduous wood , which does not allow moisture to pass through and does not release heat outside the room. A house decorated with softwood will be filled with a pleasant aroma.
There is an opinion about the fragility of wood and the influence of external factors on it. A few decades ago, one could agree with this opinion, but not today, when stores are filled with a huge selection of various wood care products.
When choosing suitable wood, its class is extremely important :
- Extra - has no defects or chips, is considered an ideal option for repair;
- A - has no core, knots and resin pockets are allowed on it (no more than two);
- B - material with two knots, two pockets, one spot of contrasting paint and two cracks can be classified;
- C - is already less suitable for finishing work, as it has a number of the above-mentioned disadvantages.
Two cladding options are especially popular
- horizontal cladding - fastenings are carried out from the ceiling to the floor, which prevents the ingress of debris and moisture;
- vertical sheathing is done from the corner, and on the back side of the board the clamp is placed in the groove, then attached to the sheathing.
LED option - which scheme is right for you?
Staircase lighting with LEDs can be done in two main ways. The first scheme is as simple as possible. To implement it, it is necessary to mount LEDs on the side parts of the staircase structure or under the overhangs of its steps. The lighting is turned on by a button placed on the wall.
When it gets dark, you just need to turn on the LED strip lighting. It will burn all night. In the morning you need to press the button again to turn off the lights. This type of lighting can be installed fairly quickly. Any home craftsman can install it. And if desired, the lighting scheme can be improved. For example, it is possible to install a regular time relay in the lighting circuit. Then the backlight will turn on and off independently at a clearly specified time. In this case, less electricity is consumed, which saves the family budget.
Staircase lighting with LED strip
The second scheme is intelligent, even more economical in terms of electricity consumption. But not every person can implement it with their own hands. The intelligent system operates through the interaction of a special controller and touch sensors. The latter are placed opposite the bottom and top steps of the stairs. As soon as a person passes between the sensors, they automatically send a signal to the controller, which activates the lighting. With this LED strip illumination scheme, much less electricity is spent. After all, the light does not burn all night, but only when a person goes up or down the stairs.
The intelligent system, if desired and having some electrical skills, is easy to modify. You can install separate sensors on each stage. Then the light will turn on on the stairs as a person moves along it. You can also use LEDs of different colors, giving the staircase design a special chic.
General information, material properties
The lining can be wooden, metal, or plastic.
Artificial ones are more resistant to external factors. But they are more expensive, do not disinfect the room, and do not in any way affect the quality of the microclimate. According to the installation technology, they radically differ from the clapboard paneling made of wood. Non-natural materials are better suited for outdoor use.
For interior work, you should choose a natural wooden board. The surface of the walls can be covered with different types of wood (pine, linden, alder, oak, etc.). Methods for surface treatment differ (tinting, varnishing, or without coating).
The cladding is carried out taking into account the slopes of the ceiling, height, structural features of the room (if any), and takes into account design wishes.
Attics and rooms with a figured or sloping ceiling are sheathed horizontally.
If a lot of moisture has accumulated, the lining will absorb all its excess; If there is a lack of moisture in the room, the wood will give up its moisture.
Other important benefits include:
- The ideal microclimate for a person is a room where clapboard cladding is present;
- Pleasant, unobtrusive scent that removes unpleasant odors;
- Phytoncides that fight bacteria.
Features and types of material
Wooden lining is the first type of material.
“Lining” can also be:
- Metal.
- Plastic.
The features of each type of material are:
- Wooden lining . There are a large number of varieties of such lining, due to:
- type of wood;
- its grade.
This is a natural material suitable for finishing any surface with the same number of positive and negative properties. The disadvantages of this material include its dependence on fluctuations in temperature and humidity, which requires quite complex care for the sheathed surface.
Advice: To reduce the influence of natural factors on wood, special impregnations should be used.
- Plastic lining . This is a budget option, the price of such material is acceptable for most people. Them:
- walls are sheathed;
- ceilings are assembled.
Having a fairly attractive appearance, plastic lining has a number of disadvantages:
- short service life;
- burns out;
- turns yellow quickly;
- takes on a faded appearance;
- breaks easily;
- In the cold it becomes brittle.
- Metal lining . To make it you can use:
- thin sheet steel coated with a protective layer. But it will not serve for a long time - even slight damage to the protective layer will cause metal corrosion, and it will be impossible to stop it. Due to its small thickness, the metal rots quickly;
- aluminum. This durable material is most often used for cladding the facade of a house.
Any type of lining can be made with different colors and structures, imitating any type of wood or other material.
Little things you need to know
Craftsmen, as a rule, tend to choose lining that is made of pine. Wood panels are made from a huge selection of different species, but pine is favored by its aesthetic and technological characteristics; this species is most suitable for those who are just starting to try themselves as a decorator.
Particular attention should be paid to the material from which the walls are made. The method of fastening the panels directly depends on what your walls are made of.
An important issue is the load-bearing qualities of the walls. If the building is dilapidated, then covering the room with wooden lining is unacceptable, due to the heavier structure than that of plastic lining (the latter is much lighter than wooden).
Clamps for profile installation are selected taking into account two factors: operational and technical features of the material and walls. Staples or small nails will do an excellent job of installing planks.
What nuances should be taken into account when working with lining
Lining is a board of different thicknesses, which is made from different types of wood. This material got its name because of the place where it was first used. These are carriages on trains, the inner walls of which were lined with small slats of wood. Today it is fashionable to cover the walls in a bathhouse with clapboard, as well as in a sauna or gazebo.
It is necessary to take into account that decorating walls with clapboard yourself requires a thorough, balanced approach. Please pay attention to the following details:
- Packed boards should be stored horizontally on a backing.
- The humidity of the storage room should be within normal limits.
- Storage should not be allowed when the packaging is exposed to direct sunlight.
- It is important to pay attention to the expiration dates indicated on the packaging.
- The cost of 1 m2 of forced linden wood, which perfectly tolerates temperature changes and high humidity, costs 500 rubles, and to cover the walls in the main rooms at the dacha, on average, you can spend a smaller amount - 300 rubles per m2. Important! The price of the material directly depends on the quality of the wood.
On a note! Wall lining is purchased with a reserve equal to ten percent of the total area. It must be remembered that the width of each element is measured by the internal depth, so you need to subtract 10-12 mm from the groove depth.
Methods of finishing a room
Of the many examples of design work, we will analyze the most popular. If clapboard finishing is carried out inside a country house, detailed photos of ideas on how to design the room can become the main assistants in the implementation of the interior of the room.
- The first method lies in the contrast of colored walls and a darker ceiling. Suitable for apartments with high ceilings. Visually expands the room.
- The second method: colored walls and a light ceiling - on the contrary, it will narrow the space. It is advisable to paint the walls in bright colors.
- The third method of painting - one color, but in two tones - will give the room a finished look. Lining for finishing this style will round out the room. However, the boundaries of the color transition will be noticeable.
- The fourth method is to outline the accents in the details of the room. Black is most suitable for highlighting accents or for the insides of cabinets.
- Finishing with clapboard inside the house perfectly hides the shortcomings of the room. By installing it vertically, you will visually stretch the room, and horizontally, on the contrary, you will expand the small space. This is the fifth point.
- The sixth will be the arrangement of wooden boards diagonally along the perimeter of the walls. This will add dynamism and originality to the house.
- In seventh place is rustic style. Country houses are ideally finished in this way. This relieves the pressure of the walls and diversifies the appearance of the interior.
- Painted lining on the eighth line is also popular in the country or in a country house. Combining a variety of objects in one color will decorate a dull room and add extravagance to the design.
- The ninth point will be the design of rooms in two colors. This will save money.
- The tenth option is individual items made of wooden material. For example, a panel or a headboard by the bed. Very beautiful and elegant.
Using hardwood parquet boards you can decorate any wall. In this case, the colors match each other. Decorating with wooden clapboard inside the house - beautiful photo ideas on our website.
When wallpapering a room, you can replace the bottom with clapboard panels. It will make for an interesting interior.
Cladding a house in the English style is also popular today.
Eco-style interior decoration is the most fashionable in big cities. It allows you to fill your apartment with the natural colors of nature.
Cladding finishing: installation options
Wooden planks can be placed along the walls in any direction:
- Horizontally. In our country, this option is the most common. It is believed that it visually expands the space. However, we must remember that with this arrangement, dust and moisture easily accumulate in the grooves of the lining. Therefore, the ridges must be directed upward, and the grooves - downward. In the bottom board, the side of the groove is cut off, eliminating the possibility of collecting moisture and dirt.
- Vertical. This arrangement creates the illusion of higher ceilings. Installation work begins from the most difficult angle. In bathhouses, kitchens and other rooms with high humidity, a vertical arrangement of planks is preferable.
- Diagonally. This option is the most complicated and involves generating an excessive amount of waste, but it makes it possible to obtain an interesting ornament - especially when using different types of wood.
Mixed options are also possible: herringbone, diamonds, etc. It is difficult for a novice master to recommend such a finish: you should limit yourself to vertical or horizontal.
Wooden façade cladding
There are some peculiarities when cladding a log house
Perform the work in the following sequence:
- Install the corner posts of the frame strictly vertically using a level. There should be two of them per corner. Each of them will be a guide for its own wall. The racks are fixed with nails or long self-tapping screws (10–15 cm).
- Place the beams near windows and doors strictly at level.
- Stretch a rope from the top and bottom of the opposite guides.
- Install frame guides at a distance of 500–700 mm.
- Fasten the lining using the external or internal method. In the first case, this is done using clamps or thin nails that are driven directly into the grooves. In the second, there are screws that are screwed directly into the lining strip, and they must be placed strictly at the same level.
The process of cladding the walls of the facade itself does not differ from the interior decoration.
Before lining with clapboard, do not forget to install a layer of insulation and vapor barrier
How to cover a “block house” with decorative clapboard?
Particular attention should be paid to the decoration for the house - “block house” . This finish is suitable for the living room, kitchen, hallway, and will be an excellent solution for the attic. An important advantage is that the “block house” technique allows the walls to breathe and create a pleasant microclimate for the inhabitants of the home. This type of fastening will create improved sound insulation compared to the above methods.
Read more about the “block house” in our article.
Before performing work, the calculation of fittings and quantity of material is carried out. But an even more important process is to let the freshly purchased material sit without packaging for about three days in the room where it will be installed.
Preparing the walls
The panels are installed on dry and level walls, so the surface should not contain defects. The walls must be waterproofed using a special film or deep impregnation.
Without this procedure, wooden panels may not withstand the increased moisture content, and the work will have to be redone.
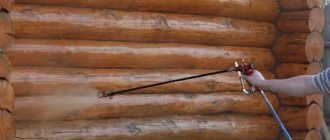
Areas with fungal infections on the wall are treated with an antiseptic. It is better to treat all the walls with it. After thoroughly impregnating the walls, they will become resistant to the negative effects of fire and mold. Impregnation with a water-repellent composition is required before starting such work.
Find out how to level walls with plaster from our article.
If desired, additional materials can be installed for thermal and sound insulating construction. Expanded polystyrene or mineral boards are installed as sound insulation.
A vapor barrier film can be purchased when purchasing facing material. The work begins with covering the walls with film, which in the future will serve as vapor insulation.
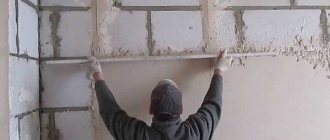
Frame making
The production of the frame occurs in the following stages:
- The selected vapor barrier material is attached to the wall with an overlap at a distance of 10-15 cm .
- Lathing bars are attached on top of the waterproofing material .
- Thermal insulating material is attached to the sheathing, and a waterproofing film is laid on top of it (see photo). The materials are secured with a stapler and staples.
- Another layer of sheathing is attached to the main frame, this time vertical.
Staples and a stapler will help create the desired fixation.
The sheathing will be more reliable if installed horizontally. The timber is fixed to the base using nails or self-tapping screws.
If the wall consists of brick blocks, fixation is carried out with frame dowels, and holes for fastening are made in the wall surface.
The second lathing is checked for level; it is on it that the blockhouse panels will be installed. To give the panels a smooth and finished look, a sheathing is created, since the panels are attached to it.
Wooden panels are heavy, so for high-quality sheathing you will need to make a reliable frame.
For a frame using the block house technique, a wooden base is suitable. The frame must be made of slats, the distance between which does not exceed 65 cm .
Before installing the frame, you need to mark out the places where sockets, switches and other electronics will be located. These marks are needed to make cuts in the cladding before installation.
The bars can be secured to the wall using either nails or mounting strips. After completing the frame manufacturing work, you can begin finishing it in the block house style with your own hands.
See the video for installation of the sheathing:
Panel installation
For accurate measurements, a plumb line, square and level are used. To calculate how much board will be used, you need to make simple calculations: divide the total area of the room by the area of one board.
By calculating the area of one board, it is easy to find out how much material will be needed to cover the entire surface. If there are not enough panels, additional clamps to eliminate the problem.
Fastening the wooden panels begins on the pre-installed sheathing. The initial strip is installed from below, with an indentation of up to 1 cm , this procedure is done to actively ventilate the walls and avoid further deformation of the material. A similar indentation is made at the top of the wall.
The block house is installed only in the horizontal direction. Sometimes craftsmen choose a vertical installation, but this method has a lot of disadvantages.
Fastening to the frame is carried out using self-tapping screws at an angle of 30-45 degrees. A hole is made on the surface of the panel with a thin drill, and then a self-tapping screw is screwed into it.
The screw head should not go deeper than 3 mm.
Next, the panels are gradually installed from bottom to top. The tenon should point upward when installing the panel. The wood is connected to each other using tenons and grooves. If desired, corner joints are fastened with corners.
Once the installation of the panels is complete, it is recommended to install skirting boards at the bottom and top of the walls. When the stage of fixing the main part of the sheathing is completed, you should disguise the screws to make the walls look beautiful.
There are several ways to hide screw heads:
- Using material left over from work.
- You can use “wood paste” made from PVA glue and sawdust.
- Special plugs, which can be bought at a hardware store, can easily cover the unevenness.
Plugs are formed from the scraps and secured in the recesses with PVA glue. Uneven places are smoothed with sandpaper.
The thick composition is poured into the holes. The disadvantage of this method is the possible discrepancy between the color of the composition and the wood.
Attached using PVA glue .
For detailed installation of the panels, watch the video:
Decoration of corners
Decorating corners using the block house technique makes it difficult to do it yourself.
You can purchase “boats” in advance for finishing internal corners and elements specifically designed for external corners. The finished baseboards will be in close contact with the block house only at the top point, as a result of which the cladding will have unclosed gaps, and this is unacceptable.
It is much more convenient to use planed timber measuring 5x5 . Its installation is carried out before the sheathing begins. The block house is attached to the timber and the finish will look much smoother and more professional. This method is effective for interior and exterior corners.
The final stage is grinding the surface, but such work should be done with caution. One awkward move can ruin the structure of the board.
How to carefully make corners, watch this video:
The cost of installing the lining
Installing wooden lining is a labor-intensive process, consisting of many operations: preparing the walls, installing the sheathing, attaching the material to the walls and final impregnation.
If you have difficulty installing it yourself, it is recommended to contact a specialist. The approximate cost of one square meter varies from 800 rubles.
The detailed cost of the work looks like this:
- Assembly and preparation of the sheathing costs 180 rubles.
- Wind protection device 150 rubles.
- Coating structural elements with an antiseptic costs 30 rubles.
- Installation 400 rubles.
- Impregnation with varnish or paint 70 rubles.
For a more accurate answer to the question about the cost of work, you should contact representatives of the construction company.
Lathing
You can’t just nail the paneling to the wall, even if the wooden wall is completely flat: a system of capillary channels will appear between the paneling and the wall, the room will become damp, and the paneling and, possibly, the wall will rot. Cladding with clapboard must be ventilated, for which ventilation channels are cut out in the undersides of the boards. That is, a wooden sheathing is definitely required for clapboard cladding.
Why made of wood? Because the sheathing material, which has similar properties to the sheathing, also serves as a mechanical damper, especially if the base wall is made of mineral materials. For the same purpose, deformation gaps of 6-10 mm must be left between the sheathing and the wall, see below. If you put wooden paneling on, say, steel profiles for drywall, it will quickly swell or cracks will appear. And if, after a year or two, you remove the baseboards from the sheathing along the wooden sheathing, you will find that its edges have moved, but the visible surface remains smooth.
Schemes of sheathing for vertical, horizontal and diagonal cladding are given in Fig. The general principle is that the sheathing bars are perpendicular to the boards. Don't neglect the edge beams (marked in red!): there should be no hanging ends of the boards; the sheathing for diagonal cladding must have a continuous frame. The thickness of the sheathing beams is 20-40 mm; width 30-60 mm. The installation step of the beams is 4-5 board widths along the top surface.
Lathing schemes for clapboard cladding
Note 6: fastening the beams to the wall - 6 mm self-tapping screws in plastic dowels. In concrete from 70 mm, in brick from 90 mm, in foam/gas blocks from 120 mm. For a wooden wall - wood screws from 4x60. The beam fastening step is 400-600 mm. Attachment points 50-70 mm from the ends are required.
Covering the bathhouse with foil and clapboard
Despite the fact that this material can be used in all rooms inside, covering the bathhouse with foil and clapboard is used only in the steam room.
The reason is that, in addition to excellent vapor barrier properties, foil has the ability to reflect infrared radiation, and therefore retain heat in the room, and in an amount that would be excessive, say, for a rest room.
Usually this property is called a “thermos” - the principle is the same, only without a vacuum, more precisely, it is replaced by an air layer, which, although it conducts heat, but weakly.
For more information on using foil, see this page.
In bathhouses, foil is used not even in cases where the heat does not hold, because here it would be more correct to eliminate leaks and increase thermal insulation, but when the owner would like to create the conditions of a Finnish sauna in the steam room.
Foil is also suitable for these purposes because it is not afraid of high temperatures, but polymer films that can be used for vapor protection are.
The use of foil in a Russian steam room is questionable, but there is no point in speaking categorically against this material, because the bath consists of many factors that influence each other. We admit that the conditions of a Russian bath are achievable in a steam room with foil.
As for the technology, the foil is placed on top of the insulation, overlapping, attached to wooden boards separating the insulation; All joints and fastening holes are sealed with aluminum tape.
Then a lathing (at least 3 cm thick) is nailed on top of the foil. And the lining itself is attached to the sheathing. If you need information about fastening, see this article.
PVC
And let’s start, perhaps, so to speak, with new technologies. After all, everyone has at least once seen a plastic version of panels that are easily fixed to walls, create an original coating, and at the same time have a number of advantages. Which ones, that begs the question, let’s take a look.
Water resistance. Decorative PVC lining is not afraid of moisture. It can be used for bathrooms, kitchens, hallways. The main thing is that, due to its water resistance, this coating is perfectly washable.
- Simplicity. Just try laying the clapboard. This is a pleasure that even the most inexperienced “repairman” can handle. The panels are already adjusted to a certain size. They have a lock, thanks to which installation is carried out. This is simply a unique solution for interior decoration.
- Decorative. Why, if it’s lining, is it immediately like wood or marble? There are many interesting examples. For example, with a fabric-like coating, with a decorative interesting pattern, etc.
So, we can conclude that decorative PVC lining is a good choice. They have not yet mentioned such an item as cost. Compared to tiles or some types of wallpaper, lining really leads in terms of low price.
Tree
Is it really necessary to say something about the tree? Yes, polymer materials have a lot of advantages, especially in maintenance and durability, but wood... This is a natural material that has been used for walls, ceilings, and floors since time immemorial. So why should he be given a humble place?
After all, it is not necessary to use a certain type everywhere. That is, for example, pine may well exist in the kitchen and technical rooms. It is beautiful, has a specific pleasant aroma, and original light veins. Moreover, it is quite durable. But the hall, living room, bedroom can be decorated with cedar. Of course, this is decorative lining, which is not cheap. But her appearance is enough to pay. At the same time, cedar gives off an unusually pleasant aroma. It will complement any interior in a classic style. At the same time, decorative lining for walls can be used in other styles. And the most interesting thing is that it can be painted and additional effects can be added, thanks to which it will fit perfectly into any interior.
Just imagine how the finished sleeping area in the bedroom looks with decorative wooden paneling. How pleasant it is to fall asleep, feeling the subtle aroma of wood and nature.
In general, with the help of decorative lining you can create the most interesting solutions in the interior. It's worth expanding your horizons. Many famous designers have long been using certain finishing materials in unusual but very interesting combinations.
Therefore, you should not be upset if you have to work with lining. And even more so if you want to make a modern, cozy renovation. Lining is the best option. Moreover, depending on the room, you can choose the material. You shouldn’t idealize renovations too much, especially when your desires don’t quite match your capabilities. The same lining can be a good intermediate option if you need to quickly finish the walls, but it is not financially possible to decorate it with tiles or other decorative material of a higher class. You just need to choose the color and texture. After all, no one forces you to choose the most popular, even boring colors.
Main types of lining
Before purchasing lining, you need to find out its main types, the price of which may vary significantly. Factors such as service life, design, and the use of certain materials for processing also differ.
Types of lining:
Wooden. It is most popular among linings, as it is made from real tree species (pine, spruce, cedar) and is an environmentally friendly material. After installation, the wooden lining can be opened with varnish, mastic or stain, applied a layer of paint or left in its original form. It has a rather attractive, natural design.
Example of wooden lining
Wood fiber or MDF. The structure of MDF lining consists of sawdust, which goes through a press at high temperature. It differs in cost from wood and reacts very negatively to water. There is an opinion among experts that this type of lining gradually releases formaldehyde, which is extremely harmful to the human body.
MDF lining
Plastic. As you can easily guess, plastic lining is the cheapest type of this material. In the manufacture of this product, high-quality and environmentally friendly plastic is used. Main advantages: low pricing, ease of installation, light weight and long service life. Unfortunately, plastic lining is extremely resistant to temperature changes and requires special fastening.
Plastic lining
Aluminum. If you need durable and high-quality material at an affordable price for external wall decoration, then you should purchase aluminum lining. Manufacturers of this type of material confidently claim that such a product can last at least 50 years. At the same time, aluminum is a light metal and does not create additional load on the building.
Aluminum clapboard strip
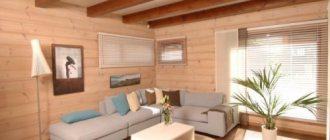
Lining in various interiors
Gradually, cladding with wooden panels is no longer used only for finishing a summer house, gazebo or bathhouse. Changing the established opinion, the interior decoration of a wooden house with clapboard is turning into a design technique in demand by designers. The relatively inexpensive natural material combines perfectly with other cladding and becomes an indispensable element in interior decoration. Lining is used when designing interiors in the following styles:
- Country styles . Country, Provence, chalet and Russian styles widely use wooden materials, and lining (especially aged) will come in handy. You don’t have to limit yourself to a palette of natural shades. In a living room decorated in Provence style, the walls can have soft beige, olive and lavender shades, which fit perfectly with plastered surfaces and natural wood floors.
Kitchen in Provence style Source pinterest.dk
- Japanese style . Associated with rigor, modesty and minimalism. Using wooden panels, you can make a bright accent on the ceiling or walls if you use dark-colored material.
Wooden panels in Japanese style Source landscape-a.com
- High-tech and loft . Stingy decor and limited choice of colors do not at all exclude the use of lining. It would be appropriate as an accent on one of the walls or as an element of space zoning. To smooth out the texture of the wood, the surface can be varnished or coated with glossy paint, so it will take on a modern look.
Living room in loft style Source d-holdid.ru
- Scandinavian style . The Scandinavian-style interior features plank floors and ceilings, and walls lined with horizontal clapboards and painted white. The combination of white with gray and pastel shades makes the space of the room elegant and visually expands it.
Scandinavian motifs Source stroyfora.ru
- Eco style . One of the modern trends where the use of wooden lining is encouraged. Unlike the Scandinavian style or Provence, which is also close to nature, here they try not to paint wooden surfaces. All that is allowed is primer, stain and varnish.
Natural beauty of wood Source yandex.ru