Interior decoration of the walls of a wooden house made of timber: types of finishes and features
– interior decoration of the walls of a wooden house with clapboards – interior decoration of the walls of a wooden house with wall panels – interior decoration of the walls of a wooden house made of timber with plasterboard
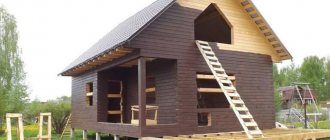
Nowadays, the construction of wooden houses and their interior decoration are becoming especially popular. They are attractive for their qualities, such as environmental friendliness, aesthetics, and the comfort of living in a good wooden house. As an example, compare your personal feelings from being in a brick house or a wooden house. I am sure that the second option will be chosen by the absolute majority. But when building a house made of wood, you need to take into account some factors on which the durability of the structure and the convenience of your living in it depend. And now we will look in more detail at a rather important issue - the interior decoration of a wooden house.
The process of preparing a log house for finishing work
After completing the construction of a wooden house, as well as the expiration of the period allotted for its shrinkage, you can prepare the log house for finishing work. The process consists of several stages.
The process of processing a log house in a new house is often limited to covering the wood with transparent varnish Source dom-expert.by
Wooden walls must be carefully caulked with insulating material: jute, tow or pre-dried moss. The process starts from the bottom, moving towards the ridge of the roof. The walls must be treated on both sides; in order to avoid distortion, insulation should be carried out promptly, treating the load-bearing walls on the same day.
After insulation, the house may “rise” a little, but later the jute (or other insulation) will “clog” between the logs or beams as tightly as possible, which will protect the building from drafts and provide a high level of thermal insulation.
It is recommended to caulk the walls for the first time two to three weeks after completion of construction, the second time after 6-8 months.
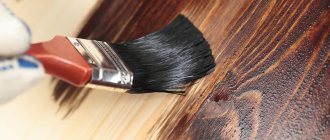
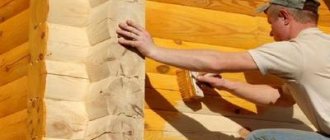
Regardless of visual characteristics, climatic conditions and other external factors, before finishing the wood should be treated with antiseptic compounds. The active use of such chemicals will not only extend the life of the home, but will also protect the surface of the material from unsightly external defects and prevent the appearance of mold or insects.
1) Features of the interior decoration of the walls of a wooden house made of timber
You should begin interior decoration of the walls of a wooden house made of timber only after a more detailed study of the technology, methods and their advantages. It is very important that interior finishing materials allow air to pass through. In a wooden house, this must be taken into account not only for interior decoration, but also for exterior decoration. If the finishing materials of the cladding do not allow air to pass through, the rooms of the house will have a basic greenhouse effect. To avoid this and ensure a normal microclimate in the house, you will then need to provide additional forced ventilation. This will require additional cash costs from you and an increase in the volume of construction and finishing work. The second important point when arranging the interior decoration of a wooden house is to use lightweight finishing materials. This will help avoid additional load on the walls and foundation.
General recommendations
In addition to installation with glue and lathing, there are several other methods that professional workers use. But they have not become widespread. In conclusion, we can give some general advice:
- The panels are recommended for finishing balconies, loggias, bathrooms, hallways and living rooms. For bedrooms and children's rooms, you should pay attention to more breathable materials.
- It is best to use seamless plastic in rooms with air conditioning or a forced ventilation system.
- In a bedroom for adults, it is permissible to use the material for certain sections of the walls.
- It is not acceptable to use the elements in the kitchen. In this case, grease and other substances will settle on the surface of the panels, which will become an excellent breeding ground for bacteria.
Polyvinyl chloride panels (or simply PVC panels) are practical, cheap and durable, which is why their popularity when decorating the walls of terraces, balconies, technical rooms, as well as kitchens and bathrooms is understandable. The material can be used in any room, and a huge variety of colors, textures and shapes allows you to realize your wildest design fantasies, making the interior stylish and cozy. It is also important that covering walls with PVC panels is quite simple and can be done even by a person with no experience.
2) When can you start interior decoration of the walls of a wooden house?
Finishing of a wooden house can begin only after the final active shrinkage of the wooden frame. It is imperative to take into account the material from which the house is built. A more accurate completion of shrinkage will depend on the average air temperature, humidity and climatic characteristics of the area. Final shrinkage of walls made of: – laminated timber – after 3-4 months – ordinary timber or logs – after 1 year
3) Preparing the walls before finishing
Before you start decorating the interior of a wooden house, look at how the walls are folded. If everything is done carefully, and there is no insulation sticking out of the joints, then perhaps in some rooms wall finishing is not needed. And it would be better to use high-quality paint and varnish products, avoiding financial costs, while maintaining the original flavor in the interior of a wooden house.
In which rooms is it appropriate?
In the minds of ordinary people, wood is most often associated with an interior in a “rustic” style.
Expert opinion
Sheveleva Oksana Maksimovna
Chartered Interior Designer
Indeed, light unpainted wood looks very impressive in combination with rustic furniture, homespun textiles, and bright decorative colors. However, wood trim is also appropriate in more formal interiors.
Living room
The best choice is wood paneling on an accent wall. Wood with a beautiful pattern, coated with matte varnish, looks impressive. The color scheme can be any, but it must be in harmony with the floor covering.
For living rooms in a minimalist style, you can use wood cuts or boards that partially retain the bark. They will become a bright element of decoration and make the interior truly unique.
Kitchen
Available as accent wall cladding or full wall cladding to match furniture and flooring. For kitchens, light wood in warm colors is often chosen, making the room more cozy.
Children's
The ideal option is partial cladding of the walls with treated boards coated with matte varnish. Light colors are suitable; thoughtful lighting will be needed to emphasize the texture of the wood. In a nursery, painted wood in white, cream, beige or light blue tones is often used.
Bedroom
In the bedroom, you can decorate the wall behind the head of the bed with wood, decorating the bed in the same style. Another popular option is paneling the lower part of the walls, while the upper part is covered with wallpaper or covered with fabric. The result will be a spectacular decor in a colonial style, especially appropriate in spacious bedrooms with massive furniture.
4) Interior decoration of the walls of a wooden house made of timber: options
The best options for finishing wooden walls inside a house are: – finishing walls with clapboards (of various colors and shapes) – finishing with wall panels – covering walls with plasterboard. For all of the above materials, it will be necessary to make a frame over the entire surface of the walls. Make a base, a frame, preferably from wood. Sheathing walls using a frame has the following advantages: – there is no need to level the surface – creating a gap for air circulation (this is very important for a house made of wood) – makes it possible to install additional thermal insulation. When finishing the interior of a wooden house, it is important to leave a gap between the ceiling. It will be necessary, taking into account various deformations and possible micro-shrinkage. The width of the gap is from 2 to 4 cm; it can be closed with a decorative ceiling plinth.
– interior decoration of the walls of a wooden house with clapboard
When finishing walls with clapboards, it is possible to use materials from different types of wood, different types of clapboards. The lining is divided along the transverse profile.
They fasten the lining in several ways: - with clamps - with screws or nails at an angle - with nails in the face (not very practical due to aesthetic considerations) The first two methods of fastening are quite labor-intensive. The fasteners are nailed so as not to damage the front surface of the lining. When finishing interior walls with clapboards, a construction stapler with staples is also used, using staples with a narrow back and long legs. All fastening elements used must be made of stainless steel. Lining made of wood, just like wooden walls, allows for the possibility of shrinkage. To avoid this, chamber-drying material should be used.
– interior decoration of the walls of a wooden house with wall panels
A very good finishing option and a great opportunity to diversify the interior and create your personal and unique look in the room. It is very widely used by designers for additional opportunities in the design of residential premises.
The interior decoration of a wooden house made of timber with wall panels can be of different types: – plastic – wooden – MDF – bamboo – leather When attaching the panels themselves, you must follow the manufacturer’s recommendations. The cladding is attached to the sheathing of the wall surface. Depending on the material of the panels, the mounting methods are quite varied, so before purchasing the selected material you should familiarize yourself with its features.
– interior decoration of the walls of a wooden house made of timber with plasterboard
The use of drywall for finishing is quite common. Quite light material, simple installation of the panels themselves and a price quite affordable for the average consumer. When choosing plasterboard for interior wall decoration, follow the following recommendations: – Drywall material is not durable and can be easily damaged. It is recommended to use plasterboard finishing no earlier than 1.5-2 years after the construction of the house. – It is necessary to strictly monitor and prevent the material from getting wet or high humidity. – If finishing the walls with plasterboard is done immediately after construction, then the sheets should be attached to a floating frame, then the finishing and the base will move separately during shrinkage and this will prevent damage to the surface. – To prevent the opening of joints or cracks in problem areas, it will be necessary to glue them with a reinforcing mesh made of polymer material.
Finishing wooden walls with clapboard
So, let's move on to more fundamental solutions, namely cladding. You can decorate walls in this way using different materials - wall panels, lining, plasterboard, plywood, etc.
The inside of the building is partially covered with clapboard
Installation of all of the listed materials is carried out through a supporting frame, for the manufacture of which timber and lath or a metal profile can be used. The structural differences between the frames may also differ; let's look at them in more detail.
The use of frame cladding allows you to solve many technical issues in a house, such as laying water, sewer and heating pipes, extending electrical wiring, hiding routes from air conditioners, installing ventilation ducts and much more. You can also hide heat and sound insulation materials inside. In the case of painting, all this beauty remains visible, although some moments are even considered beautiful.
Such sockets, switches and wires will cost much more than standard ones
Lining in a wooden house
We have already written about the fact that it is necessary for the finishing material to allow steam to pass through itself, just like the walls themselves. Therefore, the use of wooden lining is an excellent solution. Firstly, you will comply with this condition, and, secondly, you will preserve the natural appearance of the room.
For work we will need the following tools and materials:
| Tools, materials, photos: | Description: |
| Most of the connections will be made using self-tapping screws, which will require a screwdriver to tighten. Sometimes you need to use nails, so we add a hammer here too. |
| The lining and bars will constantly have to be cut to length. The neatest and fastest way to do this is by trimming. You can use a jigsaw and a hacksaw for wood, but it will be much more difficult to achieve the same result - you will have to use additional devices (miter box, guides on clamps, etc.) |
| When it is necessary to open the lamellas longitudinally, along the length, a “monkey” is used, that is, a circular saw with a wood disc. It will be even better if you have the appropriate machine. Then it will be much more difficult to make the cut uneven. Particularly meticulous craftsmen can use a thicknesser to level the frame slats, but to us this seems unnecessary. Then, if you need high precision, it is better to install a frame made of galvanized drywall profiles. |
| In order for everything to stand smoothly and beautifully, we need a level. Better, of course, is a laser one, but in the absence of one, a bubble one will do. |
| You can attach the sheathing to the wall in different ways. The simplest is directly, with a self-tapping screw, but it will not be able to resist the movement of the structure, if there may still be any. It is best to buy steel corners like these so that the hole is elongated on one side. This will allow the frame and sheathing to remain in place when the walls begin to deform. These corners are called sliding corners. |
| Selecting self-tapping screws. You can use oxidized (black), but in humid conditions they can rust, and they can burst under load, although the latter is not about finishing. Galvanized self-tapping screws are also perfect. They do not have the disadvantages of the previous ones, but are somewhat more expensive. If you fasten the frame through the corners, you can also take the option with a press washer or with a head for a nut. |
| The lining can be fastened openly or hidden. The second option is more aesthetic. To implement it, it is best to take these staples - clamps. They provide reliable fixation at a more than modest cost. There are other fasteners, but it makes no sense for us to disassemble them all. |
Prices for lining, imitation timber, block house
Lining, imitation timber, block house
Step-by-step instructions - fastening the lining
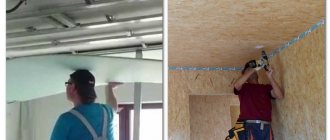
Step 1. Installation of the sheathing.
We start by laying out the frame. For this we need a wooden beam with a cross section of at least 35*35 mm . If your walls are initially flat, then you can use a lath, although this solution is somewhat worse. The sheathing will consist of parallel running belts, spaced in increments of no more than 50 cm . Increasing this distance is fraught with sagging of the cladding when pressed.
Installation of sheathing
The belts can be positioned both vertically and horizontally - their direction is perpendicular to the direction of the lining of the lining. The main requirement for them is the formation of a flat plane for covering.
Step 2. Using a level to mark the frame.
First, we attach the guides - these elements are the outermost belts. Let's assume that we want horizontal lining, which means we attach the belts vertically. The corners holding the beam will be located alternately on different sides of it. The distance between them will be about 60 cm , which means we screw them to the side that will face the corner - several pieces in increments of 120 cm . It is necessary to set the distance of the frame from the wall in advance. Such difficulties arise due to the fact that in the corner it will be difficult to attach the corner to the beam.
You can use a laser level for marking
We align the part strictly according to the level, making linings for the required corners if necessary, or simply adjusting their position. We put the corners on the other side of the beam - now it will be convenient to work. Then we install the second guide belt in exactly the same way.
Advice! Once the sliding fastener is screwed to the base, it does not require much tightening. We simply press down lightly on the part so that it can then move under load.
Prices for laser levels
Laser level
Step 3. Direct hangers were used to fix the sheathing.
A nylon thread is stretched from above and below between the elements, which will be necessary to align the horizontal guides. By the way, these elements may not be required at all, they simply give more rigidity to the lining. We install the guides, connecting them through the corners with the side belts. There is no need to tie them to the walls or floor.
With the planned step we set the remaining belts, which at this stage are only rigidly connected to the lower guides. Then we pull the thread in the middle of the structure and begin the final alignment and fastening.
Vertical belts
First we wind the corners along all the belts. Then, bending and bending the beams, we fasten them exactly along the threads; if the threads in the middle are pulled back by the belts, then first fix them by pressing them against the wall.
Step 4. Main verticals.
If there are door and window openings on the wall, then along their perimeter you need to form a frame of timber, consisting of the main verticals and horizontals. They are placed in front of the other belts and also help in their alignment.
Frame installation
Step 5. Installation of the first lining.
Now you can move on to the casing. Take the first lamella of the lining and cut it to the actual length, making precise markings using a tape measure, a square and a pencil. Take the resulting element, install it in the starting corner, align it exactly level, and nail it to each belt or guide beam through the ridge that should be in the corner. If you plan to install skirting boards or decorative corners in this place, you can use self-tapping screws for fixation.
Installation of the first part
Step 6. Fastening the lining to the clamps.
On the other side of the lining we install clamps and attach them to the belts with nails or self-tapping screws. In the first case, it is better to use a hammer, which will help prevent damage to the surface of the wood by an accidental blow.
Fastening the lining to clamps
The remaining lamellas are simply inserted into the grooves of the already installed ones, and are also secured through clamps. The work can be varied by walking around window and door openings.
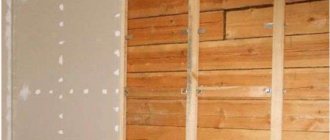
Installation of drywall on wooden walls
Drywall and plywood in a wooden house
Drywall must be mounted on a frame made of a metal profile, which, unlike the previous one, will have jumpers, since the sheet area is as much as 3 square meters. And if for the lining the sliding corners could be neglected, then here they will be mandatory, otherwise the walls will quickly become covered with cracks. Such deformations are generally undesirable if tiles are laid on drywall - they may simply fall off over time. Perhaps only wallpaper can withstand changes, and even then, why take the risk.
Video - How to cut drywall
The following tools and materials will be used:
Profile set
- Screwdriver;
- Stationery knife and hacksaw for cutting;
- Level, tape measure, square, pencil and dyeing thread for marking and aligning the frame;
- Metal scissors for cutting profiles;
- Frame elements: PNP 27*28 and PN 27*60 profiles, sliding fasteners, single-level connectors;
- Self-tapping screws for metal and wood, as well as short LN type (bugs).
Prices for cordless drill/driver
Cordless drill/driver
Metal frame made of metal profile
In principle, the assembly order will not be particularly different, so we see no point in repeating ourselves, but let’s just name the main differences and points that should always be remembered:
- Guides under such a frame are placed only on the ceiling and floor. The frame belts are not rigidly connected to them, and drywall is not screwed in either.
If the racks are fixed rigidly, then when the structure shrinks, internal stress will form in the frame
- To connect jumpers, single-level crab connectors are used. They are inserted inside the profiles, after which they are fixed with “bugs”.
- The cell sizes can be as follows - 60*50 or 40*50 cm.
- Drywall sheets are attached to metal screws. It must be attached to all profiles except the guides. Installation step – 15-20 cm.
- Drywall is cut straight with a utility knife. You can watch how to do this correctly in the video attached to the article.
- It is better to sew drywall in two layers, overlapping the seams by at least 40 cm.
Covering a metal frame with plasterboard in 2 layers
- When covering the walls in the bathroom under tiles, you need to use moisture-resistant green plasterboard, or even better, gypsum fiber boards.
Tiling plasterboard
Drywall is good because it allows you to create smooth walls in a wooden house, which are necessary as a base for many finishing materials.
Clapboard finishing
The most popular material for cladding a house is lining. These are edged boards up to 22 cm wide, which are made from natural wood:
Due to the fact that such boards have a system of special connections, installation of the lining does not require special skills. Even an inexperienced craftsman can carry out interior cladding with these materials.
Before you start covering the walls of a log house with wood, it is better to make a special sheathing that will ensure that the surface is more even. You can also lay specialized insulation between the beams and the sheathing, which will help create a more favorable indoor climate.
If insulation is not required, then you can install the lining directly on the walls of the house without making lathing. This cladding can be laid either horizontally or vertically, it depends on the preferences of the owners.
Questions and answers
Have you heard about wooden wallpaper - how can you use it?
Wooden wallpaper is a type of wallpaper made from different types of trees. More budget options are made from pine, birch or maple; exotic wood species are used to produce expensive wallpaper. Wallpaper does not have the usual roll texture - they are attached to walls in the same way as other thin panels.
What wall solutions are in fashion today?
The most relevant are dark tones and wood with an interesting texture. It is possible to combine wooden panels with other natural materials. The preferred coatings are matte varnish and natural waxes, which need to be renewed from time to time.
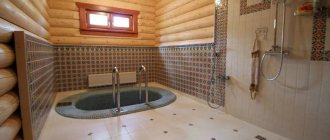
What panels are suitable for the bathroom?
Only wood with special impregnation can be used in the bathroom. Moisture-resistant wood species are suitable: Siberian larch, teak, beech, acacia, elm or walnut. You should not cover the room from floor to ceiling, otherwise it will look like a bathhouse. The best solution is accent panels on 1-2 walls, combined with stone or tiles.
We cover the walls inside the house with plasterboard
Another excellent material for cladding the inside of a house is plasterboard. Using this material you can significantly simplify finishing work and at the same time create perfectly smooth surfaces.
This material is lightweight and environmentally friendly, and the price is affordable for consumers with low incomes. Drywall is ideal for hiding a communication system that does not look very presentable against the general background.
It should be remembered that plasterboard sheathing cannot be done in a house that has recently been built. When the house shrinks, drywall can become deformed or even break, but if the sheathing is done after shrinking, then it can be used to cover various cracks and chips.
There are different types of drywall:
Special drywall - contains reinforcing additives, thanks to which it perfectly withstands exposure to open fire. Traditional drywall - suitable for rooms with normal humidity. Drywall is moisture-resistant - this drywall contains additives that protect the sheets from moisture and do not allow fungal spores to develop. Combined red - it has high fire resistance and moisture resistance.
When starting to cover a house with plasterboard, you should know some rules:
Sheathing begins no earlier than a year after the construction of the house. This is necessary so that the main shrinkage of the tree takes place.
Before installation, it is necessary to clean the walls of the house from resin and treat them with special compounds.
To attach drywall, you must use a special steel profile structure.
How to sheathe the inside of a house with a block house
In order to give your home comfort and protect it from unnecessary heat loss, a modern material is suitable - block house. This finishing material has high performance qualities and is very easy to install. Using a block house you can give the room individuality and gloss.
A block house can be distinguished by its material. It could be:
Basically, for cladding the inside of a house, a block house made of wood is used. For its production, deciduous or coniferous trees are used. Such materials are very environmentally friendly.
A house block is a board whose inner side is flat and the outer side is curved. These panels have parts for joining, thanks to which it is possible to avoid the appearance of cracks. They provide high level fastening.
Rules for cladding a block house:
- This facing material is installed on specially mounted frames, and not on the walls of the house.
- Before starting assembly, the boards must be kept indoors for some time.
- When installing, the panels should be positioned so that the tenon is on top and the groove is on the bottom. Thanks to this, dust and dirt do not accumulate in the grooves.
- Between the panels and horizontal surfaces (ceiling, floor) it is necessary to leave a small space for the circulation of air masses.
- In order to avoid deformation of the material from changes in temperature and humidity, it is necessary that there is also a tiny gap between the boards.
A house block made of deciduous wood is very moisture resistant, and if it is made of coniferous wood, then there will be a favorable microclimate inside the house.
Instructions for covering walls with PVC panels
After choosing the appropriate type of panels, you need to calculate the required number, taking into account the stock. The width of the panels ranges from 200 to 350 mm, length - from 2700 to 3000 mm, and thickness - from 8 to 10 mm. By measuring the height of the room and the width of the walls, excluding doorways and windows, you can calculate the required number of panels.
Required Tools
To cover walls with PVC panels with your own hands, you will need several tools that can be easily found or purchased. The process is quite simple and requires only basic knowledge. All the necessary tools can be included in a small list:
- Construction level, square for measurements.
- A hammer drill, dowels and self-tapping screws for securing the sheathing to the wall.
- A jigsaw or circular saw for cutting panels and sheathing slats.
- A construction stapler, or small nails and a hammer to secure the panels.
- Pencil, tape measure.
Preparing walls for lathing
Although there are no requirements for the wall surface before covering with PVC panels, it is nevertheless necessary to carry out some preliminary measures that will contribute to the best fixation of the sheathing.
Before installing the sheathing, pieces of old crumbling plaster, tiles, and pieces of peeling paint are removed from the wall surface. Gaps, cracks and other defects are cleaned out and filled with repair mortar. It is advisable to then treat the surface with an antifungal compound or primer to prevent the formation of fungus on the wall.
Cork panels to cover the inside of a house
Cork panels are perfect for interior cladding of a wooden house. They are made from natural material and give the house a colorful and elegant look. By choosing these panels for cladding a house, a person receives an environmentally friendly, lightweight material. Which, moreover, has a fairly diverse range of colors and a large selection of designs. These panels are very hygienic and do not accumulate moisture and dust.
This material is produced for house cladding both in the form of large panels and in the form of individual tiles of different sizes. This fact allows you to sheathe not only the entire room, but also individual areas of various configurations and small sizes.
Covering the walls of a house with cork panels is done using a special glue.
Other materials for cladding walls of a house
There are other materials for cladding a house. They consist of a mixture of natural and synthetic components.
Fiberboard panels
Quite often, fiberboard sheets are used to sheathe a house. This material does not deform or crack even with significant temperature changes. The sheets have a large area and are quite thin. They are perfect for covering the main walls of the house and partitions.
Fiberboard sheets are produced with various decors, and this makes it possible to choose the material for any interior.
MDF panels
This house cladding material resembles fiberboard, but the sheets are denser. MDF panels are very durable and have a smooth surface suitable for lamination and painting. They can be covered with wallpaper and washed if necessary.
Choosing material for cladding the inside of a house
Before starting all work on the interior arrangement, I would like to choose a material that would meet the following requirements:
- Firstly, the material must be suitable for the overall ensemble “wooden house - metal roof”. The house has wooden double-glazed windows and solid pine doors.
- Secondly, I would like the material with which I will cover the inside of the house to be as durable as possible, so that I don’t have to redo it every three years. And in general, I would like to do without constant cosmetic repairs, as was the case in a city apartment.
- Thirdly, there is very little money left to restore order inside the house, if not to say that there is none left at all. That is, I would like the material to be as cheap as possible, and even better – shareware. I understand, of course, that this does not happen, but I would really like it.
- Fourthly, the material had to be such that a wooden house, with all its movements and dynamics of the walls, would not break it. So that there are no constant new cracks or something worse.
So, based on these requirements, I began to choose a material in order to sheathe the inside of a wooden house and solve the issue of finishing, so to speak, with one sharp chopping blow, backhand.
After monitoring the market for finishing and building materials, the list of contenders for the post “I am your walls and ceiling” became very small. Here are the materials I accept for myself as the interior cladding of my house and wooden dwelling in general:
- Any planed, sanded and coated with environmentally friendly natural-based impregnations wooden planks, dies, tiles and panels. Lining, parquet and natural veneer - all these materials I could sit inside a wooden house and can be calm about my health and the health of my loved ones.
- Cork, cork coverings prepared and glued with natural adhesives can also be used for interior decoration of a house. The only disadvantage of this material is its cost. When I first saw the price tag for cork flooring, I decided that there was a gold plate at the base of the parquet. Jokes aside, the issue of the cost of a traffic jam needs to be resolved somehow.
- Panels from wood waste - MDF and the like. They are, of course, not cheap, but it is quite possible to find acceptable options. In the end. There are companies in our city that sell high-quality materials with minor defects for very reasonable money. I myself can carefully trim such panels so that no defects are visible, and the price is almost 2 times less.
By putting your hands to such material, you can get an excellent interior in a wooden house.
It was from these materials that I ultimately chose the material that I used in the interior of my wooden house.
When to start
On a “fresh” log house, you can begin finishing work no earlier than the main shrinkage has passed. If the log house is made of laminated timber, it should take 3-4 weeks. For all other types of wooden houses, the period is calculated in months, and sometimes years. The exact shrinkage time depends on the initial moisture content of the raw materials, climate zone and construction time. That's how difficult it is. In any case, it’s not worth starting finishing sooner than a year later, or at least 10 months later. During this period of time, active shrinkage of the wood occurs, logs and beams decrease in size, and the insulation laid between the crowns is crushed. If you attach the trim before the main processes have completed, it will fall off or become warped. Everything will have to be removed and redone. So there's no need to rush. Moreover, there will be enough work: you need to achieve tightness of the joints, and this is not easy. Careful competent caulking is needed.
Before starting finishing work, it is tedious to caulk a log or timber frame
Typically, the main caulking of a log house takes place in two stages. Primary - a few weeks after installing the log house, and secondary - after about six to eight months. Each time the cracks are clogged with insulation - jute, tow, sometimes moss. It is done immediately both outside and inside, otherwise the house will warp. Therefore, they walk around the perimeter of the building, caulking alternately, each crown, now from the outside, now from the inside. Work begins from below, from the lowest row of logs or beams.
With each caulking, the frame rises by 5-7 cm. Then, under the force of gravity, it gradually settles. The compacted inter-crown insulation reliably covers the cracks. The quality of this work is very important: it not least determines how warm the house will be.
Finishing work begins inside the wooden house after the frame has settled after the second caulking. To determine whether the process is completed or not, the height of the walls is periodically measured. If there are no significant changes within two to three months, we can assume that the main processes have passed. It's time to start decorating the inside and outside of the house.
Types of wall decoration for a wooden house
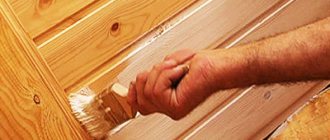
If the log house itself has an attractive appearance, it is rarely sheathed. In this case, it makes sense to reduce the cost of interior finishing: sand the log or timber and tint it. Only the floors should be varnished: the varnish will prevent abrasion of the wood. It is best to cover the walls and ceiling with tinting antiseptics or water-based paints. They do not paint over the texture of the wood, but only give it a tint, better showing the pattern. You will still have to use antiseptics to maintain the attractive appearance of the wood.
You will most likely have to use antiseptics, you can take them with a coloring pigment, at the same time highlight the beauty of the wood pattern
If the log or beam is normal, the caulking seam looks bad, it is sealed with a twisted cord, and the walls are finished in the same way - sanded and tinted. Everything also looks good, and the cord in the groove serves as an additional guarantee against drafts.
Ugly seams from caulk can be sealed with cord - it looks attractive, and even prevents drafts
How to cover the walls of a wooden house inside
If the frame is so crooked or old that sanding will not help, you will have to make the interior decoration of the wooden house from lining, wall panels, drywall or other material.
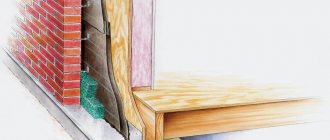
For any of these materials, it is better to make a lathing: this way you can level the surface of the walls. In addition, behind the sheathing there is space for free air circulation. In a wooden house, this is important, since only dry wood does not rot or blacken. Free air circulation between the finishing material and the wall will maintain their normal condition.
The sheathing in a house made of timber or logs is done in the same way: you need to remember that it must “float” so that the finishing does not fly off
The space behind the sheathing is also used for laying communications - electrical wiring, for example. In a wooden house it should be made in non-flammable pipes, so you need a fair amount of space for it. If necessary, you can put insulation there if your house is cold. If you spend little on heating and the house is warm, it is better not to use any additional materials: neither insulation nor vapor barrier. Wood itself does an excellent job of maintaining stable humidity in the house, and extra layers only upset the balance.
Not everyone likes attaching trim to the sheathing: if an animal or insects settle behind the sheathing, it is difficult to get rid of them. In this case, you can level the surface of the logs by removing the protruding parts and nail the finish to this surface. A perfectly flat surface is difficult to achieve, but possible. The gaps between the finishing material and the wall, which in this case still exist, were once covered with clay. It will both provide thermal insulation and protect against drafts. Technologically this is incorrect, but they do it too.
Whatever materials are used for cladding the walls of a wooden house inside, there should be a gap of at least 2-4 cm to the ceiling. For a “young” log house, this is insurance against shrinkage. For the old one - a gap to compensate for changes in the geometry of the wood. She breathes all her life: sometimes she gains moisture and swells, sometimes she dries out. The gap under the ceiling will allow the wood to easily expand or shrink, without consequences for the finish. If this is not done, then either cracks will appear or the finishing will bend/rip out. To prevent the gap from “hurting the eye,” it is covered with a ceiling plinth. It is only nailed to the stream, it is only leaned against the wall. In this case, all movements will be invisible.
Read about the interiors of a wooden house and methods of interior decoration in the article “Design of a wooden house inside in photos and videos”
Features of wooden buildings
Large log house
One of the special properties of wood is that it constantly takes moisture from the air and then releases it back. Thanks to this, a unique, favorable climate is established in wooden houses, which is very beneficial for human health.
When selecting finishing materials, it is very important to ensure that they are vapor-permeable, otherwise you will deprive your home of the plus that we wrote about. In addition, if moisture gets into the wood from somewhere, it will not be able to evaporate effectively, which will lead to accelerated rotting and a decrease in the service life of the structure. If the finishing, no matter external or internal, does not “breathe”, then a greenhouse effect is created inside. Again, mold may appear, it will be stuffy and unpleasant to be in it - it will be impossible to do without organizing good ventilation, and such a measure will require additional funds.
The wooden lining hides underneath the frame of the building, which is also made of wood
It is also recommended to choose lightweight materials. This will allow you not to greatly increase the load on the foundation of the building.
When should finishing work begin? If your house has recently been built, and whether it is made of logs and timber or has a frame structure, it is recommended to begin finishing only after active shrinkage has been completed. Usually this takes at least one cold season of the year, plus at least another 5-7 months. During this time, the design will undergo the following changes. Firstly, the foundation may sag a little, and secondly, the tree will acclimatize; if it is not dried well, then a significant shrinkage of the logs themselves will be observed due to their loss of moisture.
The walls need to be caulked
Price for interventional insulation
Intercrown insulation
After the tree dries out, gaps will appear between the logs and beams, through which heat and cold will penetrate into the house. To prevent this from happening, the walls are caulked - jute sealant, tow, ropes and other materials are hammered between the parts. In the old days, moss was used for these purposes. Caulking must be carried out sequentially - first one wall (part of it), and then the opposite one. If the order is disturbed, the walls of the building may warp. The house is caulked in two stages - the first is done immediately after construction, and the second after 6 or 8 months . As a result, the house becomes several centimeters higher; you must admit, if we had finished it, it would have become covered with cracks. 1-2 should pass , during which the height of the walls is constantly checked. As soon as the measurements no longer differ, the house can begin to be finished.
Once this procedure is completed, sheathing can begin. If the house is frame, then we won’t need anything like that - we’re just waiting for shrinkage.
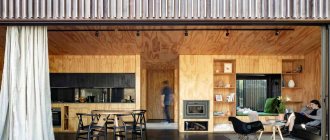
A house made from an OSB sandwich is also considered wooden
Frame houses today are beginning to gain unprecedented popularity - not so much here yet, but in the West the demand for them is very high. There are a lot of options for the execution of such buildings. For example, houses made of OSB panels, as shown in the photo above. They are erected in a very short time - no more than a month, but it is not recommended to finish them right away. Despite the fact that panels are used as the main material and polystyrene foam is used as insulation, the structures still gain quite a lot of mass upon completion, so they will also shrink to some extent. In this case, the frame will respond to changes in the geometry of the house.
A similar situation arises when houses are built from factory-dried timber or laminated veneer lumber. These materials will not change in size since their humidity is already at the optimal level
Interesting to know! There are materials that will not react in any way to changes in the structure. So, if the walls do not require drying, they can be finished immediately. Such solutions include lining (with care and knowledge of technological aspects) and drywall on a floating frame. We emphasize that we are not talking about all plasterboard structures, but only the floating type.
Cracks in the logs appeared as a result of their shrinkage - material with natural moisture was used during construction
Cladding inside the house
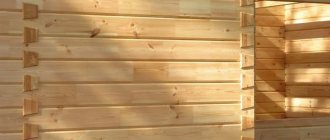
Lining is a leader among finishing materials. It is used both inside and outside the house, only with different treatments (impregnations and paints are used for external or internal work). It comes in different types. It's not just about different types of wood or different board widths. There are also different profiles: smooth, wavy, imitating timber or log house. There are several options in the photo below.
The most popular types of lining for interior decoration of a wooden house inside
The interior decoration of a wooden house can also be made from lining with a non-standard profile
To decorate the inside of the house, use thin lining: 1.5-2 cm is enough. It costs less and will perform its functions. The slats can be placed horizontally, vertically, or at an angle. From combinations of all these directions you can get amazingly beautiful panels, but this is a labor-intensive task.
Corrugated sheet
Initially, corrugated sheeting was used as a material for finishing non-residential premises. Along with the improvement of its characteristics, it moved into the category of finishing materials used for cladding residential buildings made of wood. The use of corrugated board finishing can significantly increase the life of the building, and the varied design of the material gives it a magnificent appearance.
There are several options for corrugated sheets, differing in their thickness and wave size. For finishing the facades of the house, material marked C10 is used. Its strength and light weight allow the material to be installed in a vertical position, which is very convenient during installation. You should know that in order to use all the positive qualities of corrugated sheeting, it is usually used together with insulating soundproofing material as the top finishing layer.
An important factor for the popularity of corrugated sheeting when finishing buildings was its affordable cost (the material belongs to the middle price category), as well as ease of installation. Buyers are also attracted by the variety of colors, the range of materials offered, and its quality.
We advise you to study - How to choose an entrance door to a private house
Using inexpensive materials, an old house takes on an original look.
Wall panels for interior decoration
Decorating the inside of a wooden house with wall panels gives a completely different stylistic result. This finishing material is made from different materials with different textures:
- wood;
- bamboo;
- MDF (laminated and veneered);
- glass (smooth with photo printing, embossed, colored, transparent, matte);
- plastics and plastics;
- skin.
They come in typesetting or panel form. Stacked - long thin elements connected to each other according to the tongue-and-groove principle. Lining is essentially also wall panels. It’s just that it has long been used as an independent category of finishing materials. Panel wall panels differ in geometry - they have comparable length and width.
Everything is usually assembled onto a sheathing (like lining), the bars of which are filled taking into account the dimensions of the chosen finish. This material is loved by designers: the materials, texture and color solutions allow you to realize a variety of ideas. Such interior decoration of a wooden house can be very expensive - made of leather - or cheap - MDF panels. But the appearance is quite decent.
If, according to the technology, wall panels must be laid with glue (gypsum, for example), then backing boards - plywood, gypsum fiber board, etc. - are attached to the sheathing (you remember that in a wooden house it needs to be made floating). The slabs are installed on this substrate with glue. An example is shown in the video.
Pros and cons of PVC panels
Before choosing plastic panels, you need to understand for what purposes and in what rooms they will be used. The service life of PVC panels will largely depend on the operating conditions. Thus, for cladding a terrace or balcony, you should not use materials with bright colors on a glossy texture, as the color will quickly fade under the influence of the sun, giving the material an outdated look. For bathrooms, it is preferable to use thicker and more durable panels with a matte texture that is not afraid of drips and streaks. Thanks to the abundance of materials, you can choose panels according to color and functional characteristics to suit any room.
The advantages of PVC panels are:
- Low price. Due to their availability, PVC panels are widely used in finishing. However, it is worth noting that the higher the quality and strength of the panels, the higher the price tag for them rises. This should be taken into account and always keep alternative finishing materials in stock.
- Moisture resistance. A parameter that affects durability when used outdoors, and also affects the protection of walls from moisture when used in bathrooms.
- The convenience of cleaning such surfaces also follows from the previous point. PVC panels are completely washable even with the use of household chemicals.
- Harmlessness. Modern technologies do not involve the use of harmful chemical compounds in PVC, which not only made the material safer, but also made it cheaper.
- Appearance. The range of colors and textures is impressive, but even if this is not enough, you can apply any design to the panels using photo printing, making them original and unique. This advantage, for example, allows you to use PVC panels in the bathroom instead of tiles.
- Ease of use and speed of installation. The light weight and structural features make it possible to use plastic panels for covering the most difficult places, for example, irregularly shaped surfaces and niches. The presence of grooves in the panels, as well as the starting and finishing profiles, connecting strips and other elements necessary for installation, ensures quick assembly of the entire structure.
- Persistence. Of course, the material is easy to break or pierce, but careful use and care will ensure up to 20 years of service for PVC panels without loss of mechanical and decorative qualities.
If we talk about the disadvantages of plastic panels, the following aspects can be highlighted among them:
- Low strength. Low impact resistance is perhaps the only serious drawback limiting the prevalence of this finishing material. However, depending on the price of PVC panels, there are samples whose mechanical strength is not inferior to, for example, wooden lining. Strength is ensured not only by the thickness of the coating walls, but also by the number of stiffeners located inside. This characteristic is checked simply - just lightly press the panel with your finger and if it bends, then its service life will most likely be short.
- Tightness. PVC panels do not allow air to pass through at all, creating a sealed space. This quality limits their use in residential areas.
- Due to the presence of lathing, insects can settle in the voids behind the panels. Also, when using panels in wet rooms, there is a risk of fungus arising when moisture penetrates into the cracks.
How to sheathe the inside of a wooden house with plasterboard
The technology for working in a house made of wood or another material is no different: the frame is assembled, and drywall is attached to it. Only, as in the case of sheathing for lining, you need to leave gaps near the floor and ceiling. The only condition: this type of interior finishing of a wooden house is possible only after complete shrinkage (at least several years must pass and the house must be heated). Gypsum is a fragile material and with significant changes it will simply tear. The only option that will allow you to ignore them to some extent is to make a floating frame, attaching the profiles to the walls not rigidly, but leaving freedom of movement. Then the frame will settle on its own, and the drywall will remain in place.
Using what and how to make a floating sheathing for fastening hard finishing materials (plasterboard, base for ceramic tiles, etc.), see the video.
Another feature of finishing a wooden house with plasterboard: all joints, seams and corners must be glued with a polymer reinforcing mesh. It will prevent the formation of cracks in the most problematic areas (or slow down their formation). If you need to line a house made of timber with plasterboard inside, but you really don’t want to lose precious centimeters of space due to the installation of profiles, you can do it as in the next video. There are some good tips.
“Compliance” of materials
What is a wooden house? This is a whole “composition” of wood, glass (windows) and roofing material (cement for the foundation does not count). Although everyone has their own preferences in terms of interior design, it is still worth paying attention to. For example, some people don’t really like the combination of plastic, metal and wood (however, some plastic windows are also installed in wooden houses).
It is impossible not to take into account such a factor as the deformation coefficient. Any material, under the influence of humidity and temperature, changes its “geometry” to one degree or another. According to this parameter, both the base (wood) and the finishing should be approximately the same. Otherwise, during the operation of the building, destruction (cracks, peeling, etc.) of the cladding cannot be avoided, and as a result, “unscheduled” repairs.
We offer a somewhat non-standard approach to considering the issue of choosing materials for the internal “cladding” of wooden houses - the “reverse” method. This will make it more clear what is the best way to finish.
Features of the interior decoration of an old wooden house
If a house made of timber or logs has stood for several decades, first of all you need to assess the condition of the wood. To do this, remove all the trim and “pick” at all suspicious spots - darker or lighter in color, different in structure or texture. This can be done with a screwdriver, chisel, even a knife. If the wood is dense throughout, there are no signs of destruction, everything is fine, you can begin finishing. You may need to first impregnate walls and other structures with a protective impregnation to protect the wood for several more decades. But not all owners of wooden houses agree to chemical treatment, so it’s up to you to decide.
If the wood crumbles due to your efforts, you need specialist advice. It is necessary to determine what caused the damage - insects, fungi or microorganisms - and what measures need to be taken. Then the damaged pieces or elements are replaced, paying special attention to treating the adjacent areas with antiseptics and protective impregnations.
After assessing or “treating” the wood, you can begin to update its appearance. The interior decoration of an old wooden house is no different from those described above. The only reason is that shrinkage is not worth taking into account: there is no longer any significant progress. So from this side everything is somewhat simpler.
How to install wood panels
To cover the walls with wood, you need board or lumber sheathing in increments of up to 50 cm. The structure is treated with antiseptics to prevent rotting and the appearance of pests.
Wooden panels are fastened with clamps at the joints of the bars and additionally secured with small nails. Small finishing elements can be fixed with liquid nails, but this method is suitable for fairly light materials. When using liquid nails, it is necessary to pre-level the walls.