What kind of screws are used when installing gypsum boards?
To fasten drywall to the frame, screws of different lengths are used:
- 25 mm – when installing plasterboard in one layer;
- 35 mm – with two layers of sheathing.
The type of screws is selected based on the frame material:
- the cladding is attached to the profile with metal screws;
- to the beam - on wood.
It is easy to distinguish them: hardware intended for working with metal have more frequent threads.
You should not use one type of screws instead of another: this will certainly affect the strength of the fastening.
The design of the fastener ensures convenience and quality of work:
- Hardware is protected from corrosion by a special coating that gives it a black color.
- The pointed spiral of the thread ensures easy penetration of the self-tapping screw into the metal profile and reliably holds it there in the future.
- The conical head is recessed into the material and does not interfere with subsequent finishing.
- The deep cross-shaped slot on it allows you to screw in a self-tapping screw with a regular screwdriver or screwdriver.
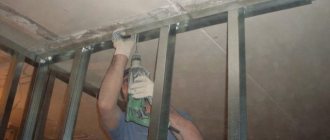
When using a screwdriver, you need to act carefully: there is a high risk of sinking the screw too deep and damaging the material. A special attachment for drywall will make the work easier: due to its design, it limits the depth of screwing in the hardware.
Professionals use screwdrivers with automatic feeding of screws. They make the process of installing drywall sheets much easier and faster. But the cost of such a tool is high, so there is no point in purchasing it for a single repair.
Recommendations for location and screwing
Before calculating how many self-tapping screws will be needed for a structure, it is logical to familiarize yourself with the norms and rules for their placement. The following nuances are taken into account:
- The distance between adjacent screws must be more than 10 cm, otherwise the plaster of the sheet will begin to crumble when screwed in.
- When leveling walls or installing partitions, a step of 25–35 cm is taken between the fastening points. It is reduced to 15–20 cm if in the future it is planned to cover the surface with heavy material, such as ceramic tiles.
- More hardware is used for the ceiling sheathing, since they are attached more often: the step is 15–20 cm. The rule works here: the thicker and heavier the drywall, the smaller the distance between the attachment points.
- When installing in two layers, the first one is attached less frequently - every 45–60 cm. The screws that secure the second layer are 10 cm longer. When screwed in, they additionally secure the first one. This reduces the consumption of hardware and eliminates unnecessary costs.
- The number of required attachment points increases when constructing curved structures. Here the pitch between the screws is chosen so as to fix the desired surface shape.
Calculation of the number of screws
It is produced according to the frame diagram drawn up. It is clear that the number and dimensions of the guides, as well as the jumpers between them, will be individual for each case. General recommendations are as follows:
- For walls, the distance between the guides is 40 or 60 cm. This step allows you to place the joints of the sheets on the surface of the profile.
- The number of horizontal jumpers depends on the dimensions of the room (one sheet of drywall is often not enough in height), as well as on the requirements for structural rigidity (mandatory when constructing partitions, but can be neglected when leveling walls).
- For ceiling structures, frames are constructed in the form of cells with dimensions of 40 × 40, 40 × 60 or 60 × 60 cm. This structure ensures a minimum of trimmings and joining of elements on the profile.
Having drawn a plan of the frame, you can calculate how many hardware will be needed to cover it with gypsum boards. For example, to install one standard sheet to a frame on a wall with a distance between posts of 40 cm, you will need:
- 11 self-tapping screws for each rack (the sheet is positioned vertically, its length is 2,500 mm, the fastening pitch is 25 mm).
- For 4 racks – 44 screws.
- Plus 6 - for fastening to the upper and lower horizontal jumpers (three for each - just place one self-tapping screw between adjacent vertical posts).
- In total, 50 pieces will be needed per sheet.
The number of screws for fixing individual fragments is calculated in the same way, after which all the results are summed up.
Recommendations for assembling the frame
The work is carried out in a dry and heated room at an air temperature of at least +10 degrees.
Work on the implementation of any frame begins with marking the design position of the ceiling surface. Using a level and a tapping thread, mark the corresponding line on the walls around the perimeter.
Next, depending on which Knauf plasterboard is selected for the suspended ceiling, work is done to mark the location of the guides and mounting points for the suspensions. The lines of the supporting guides are marked in accordance with the length of the sheet so that the end joint falls on the profile.
At the marked points, hangers are attached to the ceiling with dowels or anchors.
The wooden frame is mounted in two ways:
- Installation of the guide beam to the base using a direct or quick-mount suspension. When using a quick suspension, alternately change the side of attachment to the beam.
- Installation of the guide bar with anchor dowels directly on the ceiling. In this case, in places where there are differences in the base, pads are used.
Installation of a profile frame:
- The P112 ceiling is mounted in the same way, only in order to connect the guide and supporting profile, two-level suspensions are used. When cutting the guides, an expansion gap of 10 mm is made. It will prevent surface deformation due to temperature changes.
- The installation of the Knauf P 113 single-axis system is different in that the technology involves placing a sealing tape under the guide profile.
- The work of assembling the P 131 system differs from that described above in that a wall profile is used, and the installation of guides is carried out along the long wall of the room. These structures are usually mounted under a heavy ceiling, so the required spacing for fastening the dowels is no more than 30 cm. Only solid guides are used. The supporting profile must fit into the guide by at least 3 cm.
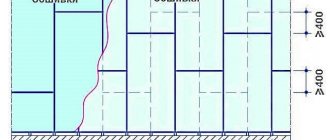
Installation staggered
Consumption of self-tapping screws per 1 m2
Table of fastener consumption for wall cladding in one layer according to the Knauf system (C 623.1):
| Name | Quantity per 1 sq. m |
| Dowel nails K 6/35 | 1,6 |
| Screws for connecting LN 9 profiles | 2,7 |
| Self-tapping screw TN 25 | 17 |
For two-layer wall cladding (C 623.2):
| Name | Quantity per 1 sq. m |
| Dowel nails K 6/35 | 1,6 |
| Screws for connecting LN 9 profiles | 1,5 |
| Self-tapping screw TN 25 | 7 |
| Self-tapping screw TN 35 | 15 |
For a partition with plasterboard fastening in one layer (C 111):
| Name | Quantity per 1 sq. m |
| Self-tapping screw TN 25 | 34 |
| Dowel nails K 6/35 | 1,6 |
For a partition with two-layer cladding (C 112):
| Name | Quantity per 1 sq. m |
| Dowel nails K 6/35 | 1,6 |
| Self-tapping screw TN 25 | 14 |
| Self-tapping screw TN 35 | 30 |
For suspended ceiling:
| Name | Quantity per 1 sq. m |
| Screw LN 3.5 x 9 mm | 1,4 |
| Self-tapping screw TN 25 | 23 |
| Dowel for fastening profiles PN 28/27 | 0,7 |
| Anchor dowel | 0,7 |
C 112
C 112
| Indicators | Values |
| Weight 1 sq. m | about 49 kg. |
| Maximum partition height | up to 9 m* |
| Partition thickness | 100 – 150 mm |
| Sound insulation index, Rw | Up to 58 dB |
| Fire resistance limit | EI 90 |
*Depending on the standard size of the frame profiles and the pitch of the racks.
Characteristics
The complete KNAUF C 112 system is a complete set of specially selected materials necessary to create a partition with two-layer sheathing from KNAUF plasterboard sheets (GKL) on a single metal frame.
Element-by-element partitions covered with KNAUF plasterboard sheets (GKL) are non-load-bearing structures.
Main building elements of the partition:
- plasterboard KNAUF sheet (GKL);
- metal profiles guide PN and rack PS.
The full composition of the complete system and the required amount of materials per 1 sq. meter of ceiling, see the “Technical Specifications” section.
Distinctive features of this system: it consists of a profile metal frame, sheathed on both sides with KNAUF plasterboard sheets (GKL) in two layers. The perimeter frame is attached to the building structures and is the supporting part for plasterboard sheets, which in turn are attached to the frame with screws, forming a rigid structure.
In addition to the main elements, the complete system includes the technical solutions necessary to solve a specific construction problem, recommendations for the work, as well as tools and devices.
All elements of the complete system C 112 are manufactured using modern technologies, undergo strict quality control, are functionally oriented and, as part of a complete system, ensure the reliability of the entire structure during long-term operation.
Composition of the complete system
| Pos. | Name | Unit of measurement | Quantity per m2 |
| 1 | KNAUF sheet (GKL, GKLV, GKLO) | m2 | 4,0 |
| 2 | KNAUF profile PN 50/40 (75/40, 100/40) | linear m | 0,7 |
| 3 | KNAUF profile PS 50/50 (75/50, 100/50) | linear m | 2,0 |
| 4a | Screw TN 25 | PC. | 13 [14] |
| 4b | Screw TN 35 | PC. | 29 [30] |
| 5 | Putty KNAUF-Fugen (Fugenfüller) | kg | 1,0 [1,5] |
| 6 | Reinforcing tape | linear m | 1,5 [2,2] |
| 7 | Dowel K 6/35 | PC. | 1,6 |
| 8 | Sealing tape | linear m | 1,2 |
| 9 | Primer KNAUF-Tiefengrund | l | 0,2 |
| 10 | Mineral wool plate | m2 | 1,0 |
| 11 | KNAUF-profile PU | PC. | ** |
** according to customer needs. [ ] values in parentheses are given for the case when the height of the partition exceeds the length of the plasterboard sheet.
Application area
Application area
It is used as internal enclosing structures in premises of various types, with dry and normal humidity conditions according to SNiP 23-02-2003, residential, civil and industrial buildings of all degrees of fire resistance and constructed in any areas, including seismic ones.
It is used both in reconstruction and in new construction.
The most universal design providing high performance, including special requirements for fire resistance and sound insulation.
If there are requirements for thermal, sound and fireproof insulation, the cavity of the partition between the plasterboard sheets is filled with insulating material made from mineral fibers.
The surface is intended for subsequent final finishing, for example, wallpapering, painting, tiling, etc.
The installation process includes the following stages of work.
- Marking the design position of the partition along the floor, ceiling and base walls.
- Installation of partition frame C 112.
- Installation of electrical wiring and embedded parts for fastening stationary equipment inside the frame.
- Installation and fastening of vertically oriented KNAUF plasterboard sheets (GKL) on one side of the frame.
- Sealing seams between KNAUF plasterboard sheets (GKL).
- Installation and fastening of the second layer of vertically oriented KNAUF plasterboard sheets (GKL) to the frame.
- Sealing seams between KNAUF plasterboard sheets (GKL).
- Fixing insulating material in the space between the posts, if provided for by the design.
- Installation and fastening of KNAUF plasterboard sheets (GKL) on the other side of the frame.
- Sealing seams between KNAUF plasterboard sheets (GKL).
- Installation and fastening of the second layer of KNAUF plasterboard sheets (GKL) on the other side of the frame.
- Sealing seams between KNAUF plasterboard sheets (GKL) and priming the surface for decorative finishing.
- Decorative finishing of the partition after installing the finished floor.
Recommendations
Installation of partitions should be carried out during the finishing work (in winter with heating connected), before the installation of clean floors, when all “wet processes are completed and the wiring of electrical and plumbing systems has been completed, under dry and normal humidity conditions in accordance with SNiP 23-02-2003 “Thermal protection of buildings.” In this case, the room temperature should not be lower than 10°C.
In conditions of high humidity (bathrooms, kitchens, bathrooms), it is recommended to use moisture-resistant KNAUF plasterboard sheets (GKLV), while it must be taken into account that in places where water directly hits the walls (bathrooms), the surface of the sheets should be covered with KNAUF-Flechendicht waterproofing.
The location of electrical wiring in the space of the partition frame should exclude the possibility of damage to them by sharp edges of frame elements or screws during fastening of KNAUF plasterboard sheets (GKL).
Partitions using KNAUF sheets C11
GENERAL INFORMATION Partitions using KNAUF sheets (plasterboard sheets, gypsum plasterboard) are used for dry finishing of premises. This method eliminates “wet” processes associated with the use of masonry and plaster mortars, and significantly increases labor productivity. The use of partitions from KNAUF sheets in most cases turns out to be more advantageous compared to well-known structures (brick, concrete), since their installation speed is higher and their weight is less. An important advantage of interior partitions made from KNAUF sheets is the ability to quickly dismantle them, giving the room its original appearance and installation according to an individual layout. The partitions consist of a supporting frame, sheathed on both sides with one or more layers of plasterboard sheets (information sheet K 71). The elements of the metal frame in systems S 111, S 112, S 113, S 115, S 116 are a rack profile (PS) and a guide profile (PN) according to TU 1121-004-04001508-2003 made of galvanized steel (information sheet K 6). Wooden frame elements in systems C 121, C 122 are wooden blocks with a moisture content of no more than 12+ 3%. The resulting surface of the partitions is suitable for applying various finishing coatings (paint, wallpaper, ceramic tiles, structured plaster, etc.). TYPES OF CONSTRUCTION
| Partition on a metal frame C 111 Design - a single metal frame, sheathed with one layer of KNAUF sheets on both sides. — The height of the partition* is up to 8.0 m. — The weight of 1 m2 of the partition** is about 28 kg. |
| Partition on a metal frame C 112 Design - a single metal frame, sheathed with two layers of KNAUF sheets on both sides. — The height of the partition* is up to 9.0 m. — The weight of 1 m2 of the partition** is about 53 kg. |
| Partition on a metal frame C 113 Design - a single metal frame, sheathed with three layers of KNAUF sheets on both sides. — The height of the partition* is up to 9.5 m. — The weight of 1 m2 of the partition** is about 78 kg. |
| Partition on a metal frame C 115 Construction - double metal frame, sheathed with two layers of KNAUF sheets on both sides. — Partition height * — up to 6.5 m. — Weight of 1 m2 of partition** — about 57 kg. |
| Partition on a metal frame C 116 Design - a double spaced metal frame with space for passage of communications, sheathed with two layers of KNAUF sheets on both sides. — The height of the partition* is up to 6.0 m. — The weight of 1 m2 of the partition** is about 61 kg. |
| Partition on a wooden frame C 121 Construction - single wooden frame, sheathed with one layer of KNAUF sheets on both sides | sides — The height of the partition* is up to 4.1 m. — The weight of 1 m2 of the partition** is about 32 kg. Partition on a wooden frame C 122 Construction - a single wooden frame, sheathed with two layers of KNAUF sheets on both sides. — The height of the partition* is up to 4.2 m. — The weight of 1 m2 of the partition** is about 57 kg. |
Notes: 1.* The height of the partition depends on the cross-sectional dimensions of the rack profiles used and the distance between them in the partition frame. 2.** Weight values are given for partition structures using 12.5 mm thick plasterboard sheets.
ORDER OF WORK WHEN INSTALLING PARTITIONS Installation of partitions from KNAUF sheets is carried out in the following order: - marking the design position of the partition on the floor; — transfer of markings to the ceiling; — fastening to the ceiling and floor guide PN frame profiles (C111, C112, C113, C115, C116) or wooden blocks (C121, C122); — installation of rack profiles into the guides and fastening them to each other; — installation inside the frame of electrical wiring and embedded parts for mounting stationary equipment on the partition; — installation and fastening of plasterboard sheets on one side of the frame; — laying insulating material between the frame posts (if provided for by the project); — installation and fastening of plasterboard sheets on the other side of the frame; - sealing seams between plasterboard sheets and screw recesses with KNAUF-Fugenfüller putty; — priming the surface for finishing coatings. BASIC REQUIREMENTS FOR WORK The installation of partitions from Knauf sheets must be carried out during the finishing work (during the cold season with heating connected), before installing a clean floor, in conditions corresponding to the operational ones. Finishing work using complete Knauf systems must be carried out in strict accordance with the requirements of the project, Knauf technical documentation and the following recommendations. Before installing partitions, Knauf sheets must undergo mandatory acclimatization (adaptation) in the room. Fastening of the frame guide profiles is carried out using KNAUF-Dichtungsband sealing tape or sealant using dowels or dowel-nails with a pitch of no more than 1000 mm, but not less than three fastenings per profile. Rack profiles are installed in guides with a pitch of 600 mm in standard or 400/300 mm in individual design solutions. Fastening of rack profiles to the guides is carried out with a special tool (notcher) using the “notch with bend” method. The placement of utilities inside the frame of the partitions should exclude the possibility of them being damaged by the sharp edges of the frame elements and screws during the process of attaching plasterboard sheets to it. KNAUF sheets are attached end-to-end to a metal frame in accordance with the design spacing of the racks. A multiple of the pitch of the frame racks is a displacement (“spacing” of the sheets of the sheathing layers relative to each other). Horizontal (transverse) seams formed by KNAUF sheets must be offset from each other by a distance of at least 400 mm. To fasten Knauf sheets to the frame, self-tapping screws with a countersunk head (type TY screws) are used, which must enter the sheet at a right angle and penetrate into the metal frame to a depth of at least 10 mm, and into the wooden frame at least 20 mm. The heads of the screws must be recessed into the KNAUF sheet to a depth of about 1 mm with mandatory subsequent puttying. Bent or incorrectly screwed screws must be removed and replaced with new ones at a distance of about 50 mm from the old ones. The screw installation pitch is 250 mm for single-layer sheathing. In two-layer sheathing, this step is: for the first layer - 750 mm (TM 25), for the second - 250 mm (TM 35). In three-layer sheathings, the pitch of the screws is: for the first layer - 750 mm (TM 25), for the second layer - 500 mm (TM 35), for the third layer - 250 mm (TM 55). It is recommended to complete multi-layer cladding within one day. Expansion joints are installed in partitions (with a height of up to 3.5 m) every 15 m with the obligatory repetition of expansion joints of enclosing structures. Puttying of longitudinal seams of Knauf sheets formed by a thinned edge (UK) is carried out using paper reinforcing tape and Knauf-Fugenfüller putty mixture. On the reinforcing tape, laid by pressing into the previously applied layer of putty, after it has dried, a covering layer and, if necessary, a finishing layer are applied. Transverse seams between adjacent Knauf sheets, formed by the end edges (not covered with cardboard), are sealed using the Knauf-Fugenfüller putty mixture. To do this, use a selected plane to chamfer at an angle of 45 to 1/3 of the sheet thickness, then putty using a reinforcing agent tapes. The recesses from the screws must be putty. After drying, the putty surface is sanded and treated with KNAUF-Tiefengrund primer. For two-layer cladding, puttying of the seams of the inner layer of KNAUF sheets is carried out without reinforcing tape. When installing partitions intended for use in conditions of high humidity, it is necessary to use moisture-resistant KNAUF sheets (GKLV). In rooms where there is a possibility of direct contact with water on the walls (bathtubs, showers), the entire surface of the GKLV should be covered with waterproofing mastic of the KNAUF-Flechendicht type, and in places where the walls connect with each other and the walls with the floor, use self-adhesive waterproofing tape type KNAUF-Vlachendichtband. CONSUMPTION OF MATERIALS Material consumption is given per 1 m2 of partition (based on 2.75m x 4m = 11 m2 without openings and cutting losses)
| ЂЂЂ | Name of materials included in the kit | Unit change | Consumption per 1 sq.m. | ||||||
| C11 | S112 | S113 | S115 | S116 | S121 | S122 | |||
| 1 | KNAUF sheet (plasterboard sheet) | m2 | 2,0 | 4,0 | 6,0 | 4,0 | 4,1 | 2 | 4 |
| 2 | Profile PN 50/40 (65/40, 75/40, 100/40) | p.m. | 0,7(1,3) | 0,7 | 0,7 | 1,4 | 1,4 | — | — |
| 3 | Profile PS 50/50 (65/40, 75/50, 100/50) | p.m. | 2,0 | 2,0 | 2,0 | 4,0 | 4,0 | — | — |
| 4 | Screw (self-tapping screw) TN25 | PC. | 29 (34) | 13(14) | 13 | 13(14) | 18 | — | — |
| TN35 | PC. | — | 29 (30) | 21 | 29 (30) | 29 | 29 (30) | 13(14) | |
| TN45 | PC. | — | — | — | — | — | — | 29 (30) | |
| TN55 | PC. | — | — | 29 | — | — | — | — | |
| 5 | Putty KNAUF-Fugenfüller | kg | 0,6 (0,9) | 1,0(1,5) | 1,4(1,9) | 1,0(1,5) | 1,0(1,5) | 0,6 (0,9) | 1,0(1,5) |
| 6 | Dowel | PC. | 1,5 | 1,5 | 1,5 | 3,0 | 3,0 | 1,5 | 1,5 |
| 7 | Sealant (tube 3 1 0 ml) | PC. | 0,5 | 0,5 | 0,5 | 1,0 | 1,0 | 0,5 | 0,5 |
| or sealing tape | p.m. | 1,2 | 1,2 | 1,2 | 1,4+0,5 | 2,4 | 1,2 | 1,2 | |
| 8 | Primer KNAUF-Tiefengrund | l | 0,2 | ||||||
| 9 | Insulation material | m2 | 1,0 | ||||||
| 10 | Reinforcing tape | p.m. | 1,5 (2,2) | 2,0 | 1,5 (2,2) | ||||
| 11 | Profile PU 31x 31 (corner protection) | p.m. | Depends on the number of corners and the height of the room | ||||||
Notes: 1. Values in parentheses are given for the case when the height of the partition exceeds the length of the plasterboard sheet)
Calculation of plasterboard partitions (GKL): calculator
It is impossible to calculate the material without first knowing the parameters of the partition. To determine them you will need a regular tape measure. To calculate the gypsum board, only two quantities are needed - the length and height of the future partition.
We measure them using a tape measure and write them down on a piece of paper. - If the height of the room is greater than the maximum height of the drywall sheet (3 meters), then the calculator calculates the materials according to the consumption, which is indicated in square brackets. This is due to the fact that there is a need to create jumpers from the profile at the joining points, as well as its subsequent finishing.
– if the height of the ceiling of the room is up to 2.5 meters, then the calculator counts sheets of plasterboard in pieces measuring 1.2x2.5 m (S = 3m2), and for heights over 2.5 m - sheets of 1.2x3 m (S = 3, 6m2). The issue of calculating consumables is very important when installing gypsum board partitions. In order to correctly and quickly calculate the amount, you will need our calculator. The gypsum board calculator for partitions has a simple interface and requires a minimum of data to accurately calculate building materials.
Let's look at how to use this calculator correctly and measure surfaces for installing a partition. Having made preliminary measurements, you can enter the data into the form. Our calculator allows you to calculate not only the amount of drywall, but also other materials necessary for the construction of the partition - guides, screws, putty, primer, etc.
Thus, already at the first stage of preparatory work you will be able to see how much money will be needed to erect the partition and what you can save on.
Wall cladding with the Knauf system for partitions
1) The design position of the partition is marked along the ceiling, floor and base walls.
2) Right before installing the profiles, you should stick a special tape or apply sealant for partitions in several strips on the side on which they come into contact with the building structures.
3) Fix the PN profiles (frame guide profiles) to the ceiling and floor using dowels in increments of 1 m (no more!). It is worth following the instructions on the official Knauf website. Unfortunately, most workers do not follow or simply do not know about the existence of these instructions.
4) Install the rack profiles in contact with the base walls and secure them with dowels.
5) In the PN profiles, install and secure the PS frame profiles with LN screws or using the cutting method, maintaining a distance between the PS profiles of around 60 cm.
6) Mount embedded parts and electrical wiring inside the frame for subsequent installation of stationary equipment. If the length of the plasterboard sheet is less than the height of the partition, PN profiles are mounted horizontally at the joints of the gypsum boards. The joints of the sheets should be spaced one relative to the other, and a chamfer for putty should be made on the end edges in the area of the joint.
7) On one side of the frame, gypsum boards are installed vertically and secured in increments of 75 cm using TN screws up to 25 mm long.
 If provided by the design, insulating material is fixed in the space between the racks.
9) On the other side of the frame, gypsum boards are attached in a similar way.
10) After installing the plasterboard sheets, the seams are sealed and priming is performed for further finishing.
11) After the finished floor is completed, the necessary decorative finishing of the partition is performed.
Sealing seams can be done using various methods depending on the type of gypsum board edge and the putty used.
Consumption of plasterboard and materials per 1 m2 of ceilings, walls and partitions
Often, plasterboard manufacturers themselves supply the market with special materials intended for finishing it. As a rule, the consumption of putty and primer for drywall produced under one brand is slightly lower than when using materials from other companies. Once the required indicators have been determined, you can easily calculate the consumption of self-tapping screws for drywall to fasten the sheet. One sheet will require approximately 70 pieces, while two layers will require at least 110 pieces.
In order for mixtures to be used more economically, it is necessary to properly prepare the base for using glue. First of all, you should make sure that it is dry and has a temperature of at least plus 5 degrees. The surface must be cleaned of dirt and dust deposits, peelings, form lubricant residues and other contaminants; if necessary, it can be washed. After this, any protrusions should be eliminated.
It is extremely important to remember that fastening screws closer than 10 mm to the edge of the sheet is unacceptable, as this can cause cracking. Acrylic paint can also give the surface a matte or glossy look. As for texture, achieving it is much more difficult than using water-based emulsion.
The approximate consumption of acrylic paint per 1 m2 of drywall is the same as the previous option, that is, approximately 0.2 liters per 1 square meter.
Calculation of profile consumption per 1 m2 of materials for plasterboard ceilings
- Suspensions, profiles, fixed to the supporting structure with hardware.
- Metal frame, less often wooden slats are used. They are connected into a single frame using couplings and brackets. Using a metal profile, you can build a cellular rail frame. The metal frame can be one- or two-level.
- Plasterboard panels fixed to the frame.
When performing calculations of civil code per square meter, the dimensions and footage of the premises are taken into account. It is best to make a preliminary plan diagram of the future structure, which will allow you to make correct calculations and find out how many materials will be required to create the structure. Indicate the dimensions of the room and the placement of the profile.
determine the number of connectors for the profile: K = S*2, where S is the area of the suspended ceiling, K is the number of “crab” connectors. For example, for a room with an area of 6 m2, 12 connectors will be required. When planning to install gypsum boards yourself, you must follow the technology, the sequence of work, prepare the necessary equipment, tools, purchase more than one type of profile, hardware (screws, screws, dowels), and reinforcing mesh. Let us give an approximate calculation of the consumption of building materials for a structure created on a metal frame made of gypsum plasterboard of standard thickness: 1.11. Suspended ceilings P 112 and P 113 are made of plasterboard sheets (GKL) measuring 2500x1200 mm, ceilings P 212 and P 213 are made of small-format gypsum fiber sheets (GFL) measuring 1500x1200 mm.
Having made preliminary measurements, you can enter the data into the form. Our calculator allows you to calculate not only the amount of drywall, but also other materials necessary for the construction of the partition - guides, screws, putty, primer, etc. Thus, already at the first stage of the preparatory work you will be able to see how much money will be needed to erect the partition and on what it will be possible to save money.
Plasterboard partitions using Knauf technology
Plasterboard partitions using Knauf technology have many undeniable advantages:
- the materials used comply with the best European standards,
- prices are moderate,
- There are no wet processes during installation,
- every stage of work is controlled,
- reliability is ensured by the design of the system itself,
- service life is long.
The Knauf integrated system is a special set of carefully selected materials from which a partition with gypsum plasterboard sheathing is mounted on a metal frame, which is attached around the perimeter to building structures. The entire system is assembled element by element and has increased structural rigidity. Each of its elements is produced using modern technologies, is functionally oriented, and undergoes strict quality control.
The main area of application of gypsum plasterboard partitions using Knauf technology is finishing the room using the dry method. Depending on the specific construction tasks that require solving, partitions of several designs are used. Their installation, accordingly, also has some features.