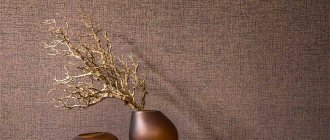
Advantages and disadvantages
The term “meter-long wallpaper” is conventional: under this name you can find 90-centimeter rolls and tubes much wider than a meter. Belgian manufacturers, for example, produce canvases reaching a width of 1.4 m.
Meter wallpaper came to us from abroad, where their advantages have long been appreciated:
- They make the pasting better, reducing the number of joints on the walls by at least half.
- They save effort and time: it’s easier to cut and stick 5 strips of meter-long wallpaper instead of 9–10 standard sizes.
- They are cheaper than traditional material: the price of one wide tube is less than the cost of two standard ones.
Flaws:
- Can only be placed on a flat surface: if there are defects, good joining of the wallpaper panels cannot be achieved.
- Consumption, compared to standard ones, may increase: due to a strip of several centimeters, you will have to buy an additional wide roll.
- It is difficult, sometimes completely unrealistic, to paste meter-long wallpaper alone.
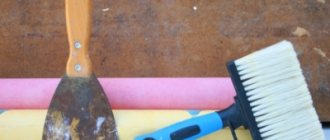
Purpose of the instruments
Before you start working with wallpaper, you should clarify how these tools are used, what each of them is intended for and how to use them correctly.
It is more convenient to apply glue with a medium pile roller
Painting bath. Intended for wallpaper glue, its size must correspond to the size of the roller. It comes with a corrugated surface and a smooth recess. To evenly distribute the glue over the surface, the roller must be rolled several times along the grooved side.
A paint roller is needed to apply glue to a strip of wallpaper. It is available with long and medium pile. A roller with medium-length bristles is considered more convenient to use.
Rubber roller. This tool is not used for applying glue, but only for leveling the surface of already glued wallpaper. It will help smooth out all the unevenness and air bubbles that often appear when gluing wall coverings.
Needed when working with thin wallpaper, when using a spatula is not recommended. A yellow roller is used when there is a relief pattern on the wallpaper.
The black roller is applied to a smooth wall covering that cannot be damaged during operation.
Useful tips
I suggest you familiarize yourself with the tips, following which you can avoid mistakes during the work process and make repairs correctly:
- Before you start gluing, read the instructions included with the meter-long roll of wallpaper and the packaging of the adhesive mixture;
- use a rubber spatula or wallpaper roller to level the canvas;
- cut the material during the gluing process, and not in advance;
- glue each next sheet end-to-end with the previous one;
- smooth the joints with a roller or spatula;
- Remove excess glue immediately using a damp sponge.
The process of gluing wallpaper can be divided into stages: preparing the necessary materials and equipment, preparing walls for pasting, preparing glue, marking, cutting meter-long wallpaper, as well as the gluing process itself.
Surface preparation
The quality and durability of wall finishing with modern types of wallpaper is largely determined by the level of surface preparation. First of all, this applies to non-woven trellises, although another point of view is widespread among non-professionals that they can be glued to old wallpaper.
From a technological point of view, this approach is possible - the non-woven fabric is lightweight and the glue will always hold it on the trellises that have expired. But from an aesthetic point of view, this finishing option is impossible - the old pattern will be very clearly visible through the newly pasted sheets, unless, of course, the previous wallpaper is plain and light in color.
The entire process of preparing walls for wallpapering is discussed in detail in the work “How to prepare walls for wallpapering.” Let us briefly recall what was discussed there.
Before decorating an apartment with wallpaper, it is necessary to perform the following work sequentially:
- clean the walls of old finishes and, if necessary, plaster;
- repair the resulting microcracks, peelings, cavities, etc.;
- prime the surface;
- level uneven walls with cement-sand or dry (plasterboard, plywood, etc.) plaster;
- putty the surface of the plaster;
- treat the surface on which the trellises are glued with a primer.
Advantages and disadvantages
In fact, meter-long wallpapers are not 100 cm wide. There are models larger and smaller than this value. Before purchasing, it is important to carefully evaluate the advantages and disadvantages of the material. The main disadvantage is that such canvases are difficult to glue alone. Also, on average, the consumption is higher, and docking difficulties arise. If the walls are uneven, the wallpaper may peel quite badly. However, for those apartments and houses where surface treatment has been carried out, this is the best option for many reasons.
- The quality of the pasting improves. The joints are less noticeable and the overall appearance becomes more attractive.
- Each room requires less preparation time. It’s easier to cut and you’ll need fewer blades.
- Even meter-long non-woven wallpaper is cheaper than its half-meter counterparts.
- Meter versions are made only of non-woven or vinyl, they can be removed and reattached, unlike paper ones.
Today, the choice of wallpaper for the living room, kitchen or bedroom is practically unlimited. You can easily find a huge number of options in stores.
Features and benefits
What is non-woven wallpaper
This is a non-woven multilayer finishing material consisting of cellulose fibers, binders and polyester. Can be combined with paper or vinyl, allowing you to create different combinations for different purposes. Thus, trellises with a paper layer are excellent for painting with paints for interior work.
Non-woven wallpaper is pleasant and smooth to the touch, sometimes complemented by three-dimensional patterns and images, and photo printing. The reverse side appears to be white or with a slight yellowish tint, less often a beige color.
Advantages and disadvantages of the material
It has a lot of advantages, which makes it an attractive option for covering walls in various rooms:
- Resistant to open flame and heat. When ignited directly, they smolder for a long time and do not emit pungent or dangerous odors.
- They are distinguished by their strength, resistance to abrasion and many mechanical damages. But they will not withstand targeted influence.
- You can also stick non-woven wallpaper on uneven walls - they hide defects in rough finishing and small protrusions well.
- They stretch, which is especially important in new houses that can shrink.
- They do not absorb moisture, so they are suitable for arranging almost any room - kitchens, corridors, bedrooms, living rooms and children's rooms. This also makes it easier to care for them - you can carry out wet cleaning and wipe them from dirt and dust.
- They are made from environmentally friendly and safe materials for people that do not contribute to the development of allergies.
- The brightness of the shades is maintained for a long time and does not fade even in direct sunlight.
- During repairs, they are quickly cleaned from the walls, which reduces the time for dismantling.
- They stick to almost any substrate - plaster, putty, concrete, wood, drywall.
- Available in various designs and finishes, which allows you to decorate and create interiors in different styles.
But there are a number of significant disadvantages that can scare off many:
- High price. The average price for one roll is 1000 rubles. If you need to cover a large space, not everyone will be able to afford such expenses.
- Transparency. This is especially true for plain non-woven trellises. Spots on the walls can be seen through them, and yellowness may appear over time. This type of wallpaper cannot be applied to newspapers or old trim. Also, traces of glue remain on them when they come into contact with the outside.
- Care. Dust easily settles on the surface and needs to be vacuumed or wiped with a damp cloth regularly. This is especially important in children's rooms.
- Ease of damage. Convex and three-dimensional images can be easily damaged, cut or damaged.
- Unusual width. The typical parameter is 1.06 m, which requires knowledge of gluing technology.
Tools and materials
To work you will need:
- pencil;
- plumb line;
- tape measure or measuring tape;
- roller or spatula;
- masking tape;
- wide brush;
- knife;
- clean rag or sponge.
If there are significant flaws in the surfaces to be pasted, you will need putty, primer, and sandpaper.
You need to take care of the wallpaper glue in advance. When choosing it, do not forget that different types of wallpaper (non-woven for painting, paper, vinyl and others) require their own type of adhesive.
Glue brands
Despite the fact that you can find a variety of glue brands in stores, the best are Metylan, KLEO, Quelyd.
Wallpaper adhesive Metylan Interlining is made by the world famous company Henkel Bautechnik.
Please note that the first Metylan glue was released in the distant 50s of the last century.
It should be noted that at the moment Metylan Interlining is one of the market favorites. And indeed, the glue is produced in packs of 250 grams. It's no secret that such a pack is enough to cover 30-40 square meters of surface. Everyone knows that glue combines well with lime and cement, and also has additional antifungal protection.
- It must be said that for non-woven wallpaper, it is recommended to use Metylan Non-woven Premium glue before painting. Everyone knows that it is resistant to high humidity, which is why it is good to use for vinyl wallpaper on a non-woven base. And there is no need to even mention that the consumption of this glue is 1 pack of 250 grams per 30 square meters. And there is no need to even mention that the cost of this glue is from 110 rubles per pack.
- The KLEO brand belongs to the Ascott Deco Rus company, which produces many types of construction and finishing materials. As strange as it may seem, KLEO Non-woven adhesive is intended for gluing a wide variety of types of non-woven wallpaper. And there is no need to even mention that its swelling time is 5 minutes. It is transparent, does not form lumps, and after preparation it can be used for another 10 days. Few people know that it contains antifungal additives and is safe for people and even animals. This glue is produced in packs of 250 grams. One such pack is enough to cover 30 squares of surface. Glue KLEO Extra Non-woven Line Special will cost you from 150 rubles for 1 pack.
- Quelyd glue is manufactured by the French company Bostik. It is necessary to emphasize that it is simply applied with a brush or roller, it sets perfectly, and does not interact with paint or cement. It goes without saying that wallpaper glued with this glue can simply be removed from the wall if you want to re-glue the wallpaper. Everyone knows that after drying the glue becomes transparent and is not visible even under thin non-woven wallpaper. As strange as it may seem, it is produced in packs of 300 grams, consumption is 1 pack per 35 square meters. This glue will cost you 90 rubles for 1 pack.
- Of the other brands on the market, we can mention Moment adhesive for non-woven wallpaper. And there is no need to even mention that it is also a development of the Henkel Bautechnik company. It's no secret that this glue is used for all types of wallpaper, it is diluted perfectly, forming an even, thick mass. Swelling time – up to 15 minutes. The finished glue is stored for up to 7 days in a closed container. Undoubtedly, it is worth mentioning that the glue is available in 270 and 500 g packaging. It would be bad if we didn’t note that half a kilo of packaging is enough to cover about 60 square meters of surface. The cost of a 270 g package is from 120 rubles.
Types of non-woven wallpaper
Non-woven wallpaper can consist of 100% non-woven material or have a base made of this material. Depending on this, different types of canvases have different properties.
Types of Wallpaper
| Paper on non-woven basis | Vinyl wallpaper on non-woven backing |
| + Easy to stick + Retains heat well indoors + Eco-friendly + Inexpensive | + Hide minor imperfections in walls + Do not get wet from glue and do not deform over time + Long lasting + Various in color, texture, pattern + The most common option for wall decoration |
| – Subject to mechanical damage – Unable to hide wall imperfections – Not intended for rooms with high humidity | - They are expensive |
Preparing wallpaper
After the type of wallpaper, color and pattern that fits into the overall design solution of the apartment’s interior is selected for each room, finishing material is purchased. Here it is very important to take all the rolls of one article and one change of issue, so as not to end up with different shades on the wall.
Quantity calculation
When calculating the number of rolls needed for repairs, you cannot use special tables that show the required number of wallpaper based on the perimeter of the room and the height of the ceiling - non-woven wallpaper has a different width.
The calculation begins with determining the area of the walls (the length of the wall is multiplied by the height and all results are summed up). The area of door and window openings is subtracted from the result obtained. The resulting number is divided by the area of 1 roll.
Having dimensions of 10x1.06 m, the area of one tube is 10.6 m². However, craftsmen do not take into account the decimal value of the indicator and divide by 10. To the result obtained, 1 roll is added per room for pasting corners, door and window openings, and another one for every 6 rolls if it is necessary to adjust the pattern.
Preliminary preparation of walls
The base for meter-long wallpaper should be perfectly flat. The operations themselves are traditional, but they must be carried out with special care so that insoluble problems with joining the wallpaper do not arise later.
- Nails, screws, self-tapping screws are removed from the walls, switches and sockets are removed, and the holes are sealed with masking tape.
- The old coating is removed: wallpaper, plaster, paint, etc. How to do this correctly is described in this article.
- The next stage is cleaning the walls with sandpaper.
- For serious unevenness, you will have to use putty.
- The surface is covered with 1–2 layers of primer. This way it will not absorb wallpaper glue, and the adhesion of the canvas to the wall will improve.
- If you plan to glue non-woven wallpaper, which tends to show through, apply a white primer or paint last.
Advice: you can start applying glue to the base only after the primer has become completely dry.
What is special about non-woven wallpaper?
The product contains non-woven lining, which is why it got its name. Wallpapers are divided into several types. The canvas can have a non-woven base or be made entirely of this material. It is not as fragile as paper wallpaper, and it is not so easy to tear. Externally, the canvas is similar to elastic fabric. A special feature is the ability to paint it. The canvas consists of several layers.
A special feature is the ability to paint it.
Advantages and disadvantages
When studying how to properly glue non-woven wallpaper, it is recommended to first familiarize yourself with the pros and cons of the canvas. This will allow you to prepare for the cladding and take into account some of the features of the coating.
Among the advantages of the product it is worth noting:
- Environmentally friendly. The material is produced without toxic substances. The canvas undergoes mandatory heat treatment, which allows you to remove harmful compounds that could have formed during the manufacture of wallpaper. The environmentally friendly purity of the material allows it to be used in children's rooms and in rooms where people with allergies live;
- Strength. It is difficult to tear the fabric. It is also not subject to deformation. The probability of damaging the surface by mechanical influence is difficult;
- Resistant to moisture. The surface of non-woven fabrics is not afraid of moisture. Can be used in rooms with high moisture levels, including kitchens and bathrooms. When water gets on the surface, the product simply dries, without changes in appearance;
- Good breathability. The material is highly breathable. Thanks to this, the room will not need constant ventilation;
- Shape stability. The wallpaper is quite elastic. They can be easily folded, bent, and their shape will not be lost. It quickly returns to its original form;
- Fire resistance. This makes the coating fireproof. They are resistant to fire;
- Decorative functions. The coating can give the room a noble look. Externally, the wallpaper is aesthetic. A wide selection of designs allows you to choose the right option for any interior;
- Possibility of coloring. This wallpaper is suitable for applying paint. The product instructions tell you how many times it can be repainted. On average, 5-6 stainings can be carried out. It is permissible to paint canvases already glued to the wall. The main thing is that the glue is completely dry;
- Simplicity of cladding. Pasting is simple; the canvas does not form a large number of bubbles when it comes into contact with the wall.
The surface of the wallpaper does not deteriorate from exposure to direct rays of the sun and does not fade.
A wide selection of designs allows you to choose the right option for any interior.
The density and multi-layering of the product allows it to hide the smallest imperfections in the walls. Caring for the cladding is simple; it is enough to occasionally wipe it with soapy water. But the material also has disadvantages. Among which:
- The product has high quality characteristics. This affects its cost. Compared to some other types, such wallpapers are quite expensive;
- The products are distinguished by a relief texture. This causes dust to accumulate in these areas. You will have to do cleaning more often.
Also, despite good wear resistance, there is a possibility of defects appearing on the surface from animal claws or sharp objects. But the coating has significantly fewer disadvantages.
The density and multi-layering of the product allows it to hide the smallest imperfections in the walls.
Marking walls and cutting canvases
Wide wallpaper is glued end-to-end, so work can begin from any convenient place.
- To ensure that the first strip lies on the wall as evenly as possible, a vertical line is drawn using a plumb line and a pencil. This will become the starting point for the sticker.
- Before cutting begins, it would be a good idea to measure the length of the wall and determine the number of strips that will fit on it.
- When cutting, you need to leave a margin of 10 cm at the top and bottom of each wallpaper. Don't forget about the allowance for matching the pattern. Excess can be easily removed with a sharp knife after the glue has dried.
- The rolls are rolled out on a dry, clean surface face down and the required length is measured. Having made a notch, bend and cut along the resulting seam.
Important! High humidity in the room where wallpaper is being applied is undesirable. A draft is completely unacceptable; extreme coolness is also contraindicated. It is best to glue at a temperature of 15–25˚С.
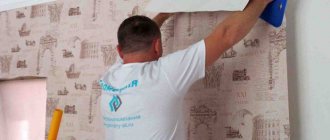
Pasting instructions
How to hang non-woven wallpaper with your own hands? Step-by-step work algorithm:
- The room where the work will be carried out is ventilated a day before it begins, after which the windows and doors are tightly closed;
- The height of the wall for pasting is measured;
- Sheets of wallpaper are cut to size or with a tolerance of 8-10 cm;
- Wallpaper glue is being prepared;
- The place to start work is determined - this type of wallpaper allows you to start work from any place, but preferably from a corner, retreating 4-5 mm;
- A vertical line is applied to the wall for gluing the first sheet a few mm from the corner;
- The surface of the wall is coated with a roller or brush with a thick layer of glue slightly wider than the size of the trellis;
- The first sheet is glued with the edge strictly along the drawn line;
- Using a roller or wallpaper spatula, roll the canvas to the wall. The movements go from top to bottom, from the center of the sheet to its edges. When glue appears on the front side of the trellis, it is removed with a foam sponge;
- The next sheet is glued end-to-end (beginners can glue wallpaper without a pattern overlapping - the seam is then cut with a knife and an imperceptible connection of two sheets is formed). If the wallpaper does not lie exactly vertically the first time or the pattern does not match, the trellises can be torn off the wall and re-glued - the material will not tear or stretch;
- Excess glue and air are removed from under the wallpaper with a rubber roller. Since the interlining stretches a little, it is necessary to ensure that during rolling the edge of the fabric does not overlap the previous sheet. The joint is rolled with a special narrow roller. If the edge of the wallpaper still lags behind - the glue has dried, then the wallpaper is removed from the wall, and it is re-smeared with glue.
Problems arise in the corners due to the large width of the trellises. How to properly glue non-woven wallpaper when passing corners? The techniques here are the same as when working with narrow trellises:
- The crooked angle is straightened out;
- The corner sheet is glued with a 2-3 cm overlap onto the adjacent wall;
- The next canvas is glued overlapping;
- An incision is made along the seam. The cut strips are removed. The seam is rolled with a narrow roller.
However, there is one caveat here. The cut-off part of the wide wallpaper is not thrown away, but serves as the next sheet when pasting the corner, even if the width of the cut-off part of the trellis is only 15-20 cm.
How to glue wide wallpaper in hard-to-reach places?
Wide wallpaper is especially difficult to paste in places such as corners, openings, niches behind heating radiators. But with some skill this problem can be solved.
For example, a piece of wallpaper can be cut into several fragments in advance, based on the location of certain structural elements that interfere with free access to the wall. Glue is applied to a hard-to-reach area of the wall, after which the wallpaper fragments are carefully glued without haste.
For such cases, non-woven wallpaper is best suited. Here you need to make sure that there are no additives in the glue that will speed up the drying of the mixture. Then, for at least 10 minutes, you can safely move sections of wallpaper along the wall, combining them. The ability to perform such manipulations is very important when we are talking about a place that is difficult to glue.
Return to contents
Glue preparation
The durability and quality of wall decoration with non-woven wallpaper directly depends on the type of adhesive chosen. He must:
- have good adhesion to trellises;
- diluted to a thick consistency, which allows it to be applied in a thin layer without smudges;
- do not leave marks when drying - do not turn yellow.
Only specialized glue satisfies such requirements - universal glue does not hold even light non-woven trellises well. There are two types of special glue: for light and heavy wallpaper.
Heavy trellises are represented by vinyl with a non-woven backing (vinyl trellises). Therefore, here we are talking only about glue for light non-woven types of wallpaper.
Which glue to choose
On the shelves of construction stores you can see a huge variety of brands of wallpaper glue for non-woven fabrics. But, due to the lack of reliable information about the quality characteristics of unfamiliar brands, it is better to buy popular brands.
"The Interlining Moment." The cheapest glue from recognizable brands (pack of 250 g from 200 rubles, 500 g from 399 rubles). Suitable for all types of non-woven wallpaper, including heavy vinyl wallpaper.
Provides good sliding of the wallpaper sheet along the wall during joining. Contains additives against mold and mildew. Can be stored diluted for up to a week. At the same time, it also has disadvantages:
- Dilutes poorly - it is difficult to obtain a homogeneous mass;
- not suitable for trellises with a three-dimensional pattern - it requires dense rolling, which cannot be done with a rubber roller on embossed wallpaper (a wallpaper spatula cannot provide such force).
"Methylane Interlining ultra premium." Product of the famous German company Henkel. It is made from methylcellulose and natural resins, which provide reliable adhesion of all types of non-woven wallpaper to various types of walls (plasterboard, concrete, cork, brick, etc.). Easy to divorce.
Does not leave stains when applied to the front side. It has an important feature: it must be diluted to a thinner consistency than indicated on the package, as it dries quickly. It is in the middle price category - a pack of 250 g from 290 rubles. up to 350 rub., packaging weighing 500 g from 535 rub.
"Quelyd Special non-woven fabric". Produced in France. It has the highest price among all brands of glue for non-woven wallpaper (a 450 g package costs from 360 rubles). However, the price fully corresponds to the quality - professional finishers consider it an ideal means for gluing trellises:
- perfectly holds light and heavy wallpaper, with a smooth and voluminous pattern;
- easy to divorce;
- does not smell;
- does not flow down the wall during spreading;
- does not leave marks when it gets on the front side, etc.
The “PUFAS” line of adhesives for wallpaper with a non-woven base (5 types on sale) provides better adhesion between the trellises and the wall surface. It has a color indication, which helps with spreading - no omissions are allowed. When purchasing glue from this brand, you can choose a product for a specific wallpaper: smooth, corrugated, light, heavy.
In addition, we can recommend: “FliziLex”, “Exclusive Non-Woven”, “Kleo Non-Woven”.
Bestsellers
Hit
159045-26 MaxWall non-woven wallpaper 1.06*10.05/6
- Covering: Vinyl
- Dimensions: 10.05 × 1.06 m
- Article: 159045-26
Price: 1826 ₽
Hit
3742-2 Eurodecor non-woven wallpaper 1.06*10m/6
- Covering: Vinyl
- Dimensions: 10 × 1.06 m
- Article: 3742-2
Price: 1886 ₽
Hit
31804 Sirpi Muralto Style non-woven wallpaper 1.04*10m/4
- Covering: Vinyl
- Dimensions: 10 × 1.04 m
- Article: 31804
Price: 4029 ₽
Wallpaper catalog
Pasting hard-to-reach places
It's not easy to apply wallpaper to hard-to-reach places, such as sockets and switches. It is important that the glue does not get on the outside of the material. All work must be done as carefully and accurately as possible. Be sure to turn off the electricity and take measurements, cut the strips to the required length. After gluing, you need to wait until the adhesive base dries, after which you can cut out holes for a switch or socket.
Before gluing the wallpaper begins, all the sockets must be unscrewed so that there are no too large holes in the wallpaper. Upon completion of all work, they must be installed in place, hiding the holes on the non-woven fabrics. The corners are glued with a 2 cm overlap on the adjacent wall. Wide sheets are trimmed. You should not stick a whole sheet of paper on the corner; it is better to use one piece on each half.
Tip: Non-woven wallpaper is quite thin, so you shouldn’t stretch it or smooth it too much. This may damage them, and then you will have to replace the entire sheet.
Useful tips
Before working with meter-long wallpaper alone, it is recommended that you familiarize yourself with some expert advice:
- There should be no drafts in the room, a suitable temperature range is from +5 to +25 C. In addition, it is also quite difficult to work in damp rooms, so at the preparatory stage it is necessary to ventilate and carefully close the room.
- If gluing is planned in the cold season, then it is better to turn off the radiator. If it is not possible to do this, it is recommended to reschedule the work while the central heating is turned off.
- Most adhesives are universal, but when choosing, it is better to ask the seller what type of products this composition is suitable for. This will help fix the wallpaper on the surface better.
- If immediately after pasting, defects are noticed, in particular uneven joints, it is necessary to lift the canvas with a spatula and correct the problem. It is very important not to pull the stripes.
- After gluing, sometimes difficulties arise with cutting the material. To do this, use a stationery knife or scissors. You need to press the excess part with a spatula and run a knife along the markings. In the case of scissors, you need to bend the edge along the markings and cut it off.
- If there are uneven cuts at the top or bottom of the wall, you should not try to fix it. As practice shows, this will lead to bad consequences. It is better to purchase skirting boards that will hide imperfections.
If ceiling fillets are not provided, then the perimeter can be cultivated using a frieze.
To obtain an original coating, it is recommended to combine meter-long materials. Using different patterns, you can create accents in the interior or visually expand the room. The main thing is not to be afraid to fantasize.
Still have questions? We recommend watching the following video (master class):
Required Tools
Tools can greatly facilitate the process of wallpapering.
For a beginner, it is sometimes difficult to navigate the huge selection of tools and their pricing policy. Eyes widen, and there are more and more questions every minute. And hanging wallpaper with your own hands seems like something unrealistic.
To avoid such situations, you must first decide what kind of wallpaper is needed. Having selected a certain type of wall covering, you can confidently buy tools and additional materials.
When purchasing the necessary equipment in a store, it is worth considering that you will need not only tools for applying glue and cutting wallpaper, but also special compounds for removing the old coating, if any. You also cannot do without auxiliary means for leveling and filling the walls.
Basic tools needed to work with wallpaper:
- Painting bath.
- Wallpaper roller.
- Construction tape.
- Level.
- Roller for wallpaper joints, etc.
Sockets and switches
Wallpaper is glued directly onto the holes remaining after removing switches and sockets, the outlines of which will be visible. Then in these places the panel is cut crosswise with a wallpaper knife. The cut sections of wallpaper are tucked inside. For round rosettes, the cuts are made star-shaped.
Some switches cannot be removed without dismantling the entire mechanism. In this case, trimming is carried out without removing the protective panel.
- The wallpaper strip is pasted only up to the switch; with a sharp knife, punctures are made in the corners of its frame, serving as a guide for the cross-shaped cut.
- After cutting, press the edges tightly with a spatula, remove excess, carefully roll the edges to the wall and continue gluing the rest of the panel.
Additional tools
Experienced owners can get by with a minimal set of tools
. Corner roller. This tool is equipped with a special roller that helps press the canvas against the wall in hard-to-reach places, especially in the corners of the room.
Bucket. Wallpaper glue is diluted in it. It is advisable that the bucket be equipped with a lid; this will allow you to store the adhesive mixture in a cool place for several days.
Drill. If you don’t have a construction mixer at hand, you can safely use a drill to stir glue or putty, the main thing is to choose a suitable attachment.
Pencil. You can't do without it when working with wallpaper. With its help, you can apply markings to the wall and mark the desired length of the canvas. Construction stores sell special pencils for builders, but if this is not available, any other dark color will do.
Exposed wires can be wrapped with electrical tape
Insulating tape. During repair work, sockets and switches are often unscrewed, which exposes the wires. For safety, they must be insulated with electrical tape.
Ruler. It is necessary in measuring the length and width of the wallpaper. It is worth remembering that you need to leave 5 cm to adjust the sheet.
Scissors. Used for cutting wall coverings to the required size.
A wide brush is convenient for coating the canvas and the wall
. In this work you will need two types of brushes: a wide and a narrow brush. Using a wide brush, coat the surface of the wall and wallpaper with glue, and a narrow brush is used to apply glue in the corners and at the joints between the covering and the ceiling.
Plumb. How evenly the wallpaper is glued to the wall depends on the use of a plumb line. You should fix its upper part at the top, the weight should dangle, draw a line along the plumb line with a pencil.
Flaws
- More serious preparation of the base is required. If the wall or ceiling is uneven, it will be impossible to properly glue such products. The joints will turn out uneven.
- As a result, wallpaper consumption may be higher. For example, if you have another piece of 20 cm left to glue and you need to start a new piece. Thus, almost the entire meter roll will remain untouched.
- Of course, it is more difficult for one person to work with such material. This is especially true if you need to glue the ceiling.
( 2 ratings, average 5 out of 5 )
How to prepare wallpaper?
It is advisable to cut all the rolls at once so that there are enough of them for all the walls. The more complex the pattern on the material, the more difficult it is to work with it, so when cutting you need to be as careful as possible. When the drawing is simple and does not require joining, all work will be much easier. The walls must first be measured, and this must be done at different points. If they are the same everywhere, you can start preparing the canvases.
If adjustment of the pattern is required, it is recommended to use the pictogram located on the label with non-woven wallpaper. The main thing is to select all the joints exactly, so that later you don’t have to glue the pieces on top or bottom. As a last resort, you can cut the rolls into pieces with a margin of 10-15 cm. You can glue the wallpaper on the wall yourself, or you can entrust this task to an experienced specialist.
Cutting can be done both on a clean floor and on a table, having previously laid polyethylene on it. The required length is marked and an incision is made with a knife. Then the non-woven wallpaper is folded and sheets of the required length are cut. The finished material is spread on the floor with the inner side, all subsequent sheets are spread in the same way. Now you need to prepare the glue, and then you can glue wide and any other wallpaper.
What if you have to glue alone?
Sometimes you can do without an assistant when attaching meter-long wallpaper - non-woven varieties of material will help out, because in this case the glue is applied only to the wall. Non-woven fabric will help you easily join seams even in corners. There are no particular difficulties with aligning the stripes. If it is not possible to glue the sheet correctly right away, the panel is removed and the operation is repeated again - non-woven fabric allows this. But meter-long wallpaper made from other materials will not allow this; a partner is necessary in such cases.
A lesson on gluing wide canvases is in the video below.
How to crop wallpaper?
Separating non-woven wallpaper is not difficult; almost always it is enough to grab the top of the strip and gently pull it off. Soaking is not necessary, provided that the preparation for gluing and self-adhesive glue went according to the rules.
Note: A peeling or warped backing means you will have to remove the entire strip. If the wallpaper is tightly adhered, be careful with the spatula so as not to damage the layer of plaster or other substrate.
Wallpaper
0 votes
+
Vote for!
—
Vote against!
It’s scary to remember, but about 25 years ago you couldn’t find wallpaper in every apartment. People painted the walls with ugly panels of green and blue colors, whitewashed them, made them fashionable at that time, but wallpaper remained a dream for many. Now everything is different! Any color, texture, pattern, pattern. All you want! And among this diversity, non-woven wallpaper can be distinguished as a special block. They are durable, resistant to deformation, adhere well and perfectly hide uneven walls. What else does a modern person need in conditions of constant rush and lack of time? Right! He needs to know how to glue non-woven wallpaper, because this process probably hides some “secrets” behind it. It is about them, about secrets, that this article will discuss.
Content:
- Where to begin?
- Choosing glue
- Preparing the walls
- We glue non-woven wallpaper
- Caring for non-woven wallpaper
Where to begin?
Naturally, you need to start with the instructions that are included in each roll of wallpaper. Usually the manufacturer indicates on this small piece of paper all the useful information about the type of wallpaper, expiration dates, operating conditions and, of course, methods and nuances of gluing. Even if you have already glued paper or vinyl wallpaper more than once, you should not think that you already know everything and even know how to properly glue non-woven wallpaper. This material is different from its “brothers”, therefore the technology for gluing it is somewhat different.
Most manufacturers of non-woven wallpaper write in the wallpaper instructions that their products should be glued to walls coated with glue, while the panels themselves must remain dry. However, there are also suppliers who recommend applying glue to both the wall and the wallpaper. It’s up to you - if you are not sure of the final result, then it is better to use the latter’s recommendation.
Choosing glue
In the store, you may be faced with a dilemma: “Which glue to choose - special for non-woven wallpaper or universal, designed for all types of wallpaper?” So there you go! Universal glue does not guarantee a high-quality result that suits you, but a special one is special in order to meet all the requirements for non-woven adhesives.
This glue is also available in two versions: for light wallpaper and for heavy wallpaper. The second type will definitely withstand light wallpaper, but the first type will definitely not cope with heavy ones. Therefore, be sure to choose an adhesive that is suitable for the wallpaper that you have already bought and under no circumstances use the one that was lying around in the pantry from the last renovation - most likely, its expiration date has long expired, and its characteristics are unlikely to be suitable.
So, what kind of glue should you use to glue non-woven wallpaper? A lot of them! These are Methylane, Qwelid, Pufas, and Kleo. The choice is yours!
In addition, you should know that excess glue that gets onto the wallpaper should be immediately removed with a slightly moistened sponge - some types of glues can leave behind unsightly stains. By the way, you may not notice these traces, but if you decide to paint the walls, then in the places where there was once glue, there will definitely remain a reminder of this in the form of a changed color. Don't take risks and get rid of excess glue immediately.
Preparing the walls
The walls in the room must be cleared of old wallpaper. To do this, they need to be moistened with a spray bottle and after a few minutes, carefully removed with a spatula.
If the surface of the walls has cracks, potholes and other defects, then you will have to spend time and effort leveling them using putty. After this, it is advisable to apply a deep penetration primer or a thin layer of glue. This will enhance the adhesive ability of the glue.
In addition, the walls must be absolutely dry, so if you leveled them with plaster, then give it time to dry.
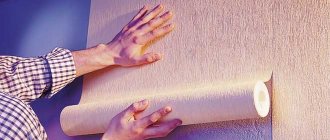
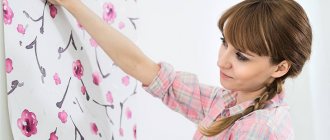
We glue non-woven wallpaper
Before you start gluing, you should cut the wallpaper into strips with an allowance of about 10 cm (later the remains can be trimmed with a knife or scissors). And when everything is ready, you can start! But where to start gluing non-woven wallpaper? In principle, there is no difference, because this type of wallpaper is glued end-to-end, which means no matter what angle you start from, nothing will be visible anyway. However, it is advisable to start from any corner located near the window.
It will be better if you glue the first panel along the pre-designated vertical. This can be done using a regular plumb line, which can be constructed from available materials: rope and a nail, for example.
Apply the glue, diluted to the desired consistency, to the surface of the wall in a layer that is not too thin, but not too thick, using a special brush, brush or roller. Don’t get carried away with the strokes - the width of the coated surface should correspond to the width of the roll. And if you want to clearly see how to glue non-woven wallpaper, a photo of this process is attached just below.
Next, standing on a stepladder or chair, carefully place the canvas at the junction of the ceiling and wall, leaving a small (about 4-5 cm) allowance for the ceiling. Using a wallpaper roller or rubber spatula, level the canvas, pushing air and excess glue to the side free from wallpaper. By the way, regarding the spatula and roller: if the surface of the wallpaper is smooth, then use a spatula, and if it is textured, then use a roller.
The next canvas is glued in exactly the same way as the previous one, just be careful - the canvases need to be adjusted strictly butt to each other, no overlaps are allowed. And since sometimes this is impossible to do (for example, in corners), use the double-cut technique: place two sheets on top of each other by 5-6 centimeters, apply a spatula to the place where they join and carefully cut through both sheets using a stationery knife. By removing the excess, you will see that the joint is perfectly smooth.
When gluing wallpaper, make sure that its edges are always thoroughly coated, otherwise, after drying, there is a high probability of them peeling off. If the wall has dried out and you see that there is not enough glue, it is better to additionally coat the edges of the canvas to achieve a high-quality result.
It is better not to cut off the excess wallpaper left for allowance right away - leave this event for later. The wallpaper will dry out and it will be much easier to trim off the excess.
You should not cut holes for sockets and switches in advance; it will be better if you first glue the fabric and then cut a hole of the required size. Don’t forget to first remove the plastic housings of sockets and switches and turn them off. Upon completion of work, return all elements to their place.
For greater clarity and for your own peace of mind in the question of how to glue non-woven wallpaper, a video is attached.
Caring for non-woven wallpaper
Colored non-woven wallpaper is a material that is very easy to care for. It is enough to occasionally wipe them with a damp or dry (depending on the type of top layer) cloth. You can also use a vacuum cleaner.
Non-woven wallpaper for painting, depending on what type of paint was used, can be easily cleaned with a vacuum cleaner or a dry sponge. If waterproof paint was used, the walls can even be wiped with a damp cloth.
As you can see, gluing non-woven wallpaper yourself takes a few hours. There is nothing difficult in this process and cannot be. The main thing is to be patient, because even banal jumping from a stepladder and back takes a lot of effort and time.