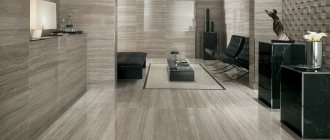
Inexpensive option for decorating walls with stone and gypsum tiles
Decorating the walls in a room with brick or stone is a beautiful, but very expensive activity. However, today there are offers from manufacturers that provide the opportunity to decorate the walls of a room with artificial imitation gypsum stone. Let's look at how to do this below.
Laying tiles
The surface of the hallway walls is marked depending on the chosen installation technology.
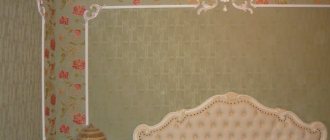
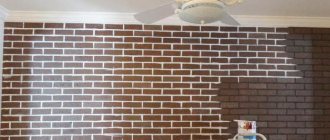
It is more convenient to distribute the adhesive mixture using a notched trowel with a tooth depth of no more than 10 mm. It is recommended to apply glue in advance to no more than 1 m2, this reduces the likelihood of premature drying of the composition (approximate setting time 30-40 minutes, depending on the manufacturer). To maintain the same gap between elements, use inserts of the same type (most often, wooden glazing beads are used for this). Zoning hallway walls using painting Source kormeshka.
Painted hallway wall made of raw brickSource kraski-net.ru
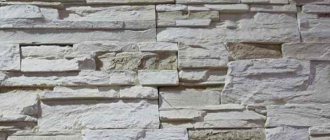
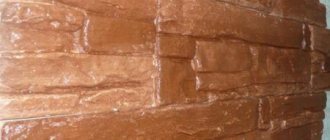
Gypsum tiles for brick interior decoration: advantages and disadvantages
Gypsum is a lightweight material that, if necessary, takes on the required shape, structure, and relief. The use of this material in decorating the interior space of a room is a simple, financially feasible and physically feasible task.
Advantages of gypsum stone finishing inside a building:
- A wide range of products differing in texture, price, size and appearance.
- Relatively low pricing policy.
- Natural compositions.
- The ability to customize finished tiles to suit the surface features.
- Simple design, wall mounting.
- Light weight of the finished product, which allows it to be used on any surface without the risk of wall deformation.
Disadvantages include such features as moisture absorption, lack of resistance to mechanical damage and crumbling. However, such disadvantages are insignificant, and during operation the material will not require labor-intensive care. If necessary, you can replace damaged burst tiles with new ones without compromising the integrity of the wall.
It is possible to decorate with gypsum tiles both the entire wall and its individual parts, combining with other finishing materials - tiles, paint, wallpaper.
Kit contents
| 1. | Pulley (roller) | 1 PC. |
| 2. | Reverse bracket | 1 PC. |
| 3. | Return spring | 1 PC. |
| 4. | Clutch cable with spring | 1 PC. |
| 5. | Control knob | 1 PC. |
| 6. | Washer M-8 | 2 pcs. |
| 7. | Pulley Taper Bushing | 2 pcs. |
| 8. | Grover washer M-8 | 1 PC. |
| 9. | Nut M-8 | 1 PC. |
| 10. | Belt Z(0)-1400 | 1 PC. |
Attention! This reverse kit is not an official product of the manufacturer of Neva walk-behind tractors, but is formed solely on the basis of applications, requests and recommendations from the owners of these walk-behind tractors themselves and was created to help them purchase all spare parts in one place. There are no specific rules, technical conditions or GOSTs for the use of this kit
Each owner has the right to independently make decisions on installation, adjustment, and design changes at his own discretion, at his own request and under his own responsibility
There are no specific rules, technical conditions or GOSTs for the use of this kit. Each owner has the right to independently make decisions on installation, adjustment, and design changes at his own discretion, at his own request and under his own responsibility.
The reverse gearbox is included in the main part of the walk-behind tractor - the drive. The durability of the walk-behind tractor depends on its reliability. The task of such a gearbox is to preserve and maintain the performance of the machine in difficult conditions.
How to properly lay gypsum artificial stone under a brick
Installing gypsum tiles on the wall is not a labor-intensive process that will only require time and patience. The main thing is to follow the recommendations for decorating a wall or part of it.
Leveling the base
The first thing you should pay attention to before laying a gypsum wall is the evenness of the surface. Of course, you can also lay it on uneven walls, filling the holes with an adhesive mixture, but in this case, the consumption of expensive glue increases, and it is also possible for the tile itself to crumble, which bursts when pressed.
Therefore, before laying gypsum bricks, it is worth leveling the wall with putty. After applying the putty and letting it dry, you should sand the surface and apply a primer for better adhesion. After all the work, you can start gluing the gypsum tiles.
The primer should be chosen according to the manufacturer's requirements: for wooden surfaces - separate primers; for cement walls it is better to use acrylic mixtures.
What to glue on: choosing an adhesive mixture, what to glue with
Depending on the area to be treated, the size and color of the gypsum tiles, it is worth choosing a separate version of the adhesive mixture on which the tiles are attached to the base. Today there are several options for fixing gypsum on walls:
- Dry semi based on gypsum and cement. If you choose dry mixtures for preparing a solution for gluing yourself, then you should pay attention to the composition of the material: cement is not recommended for use on light-colored tiles without varnish treatment for the reason that they will absorb moisture, take longer to dry, and possibly become deformed during work . The gypsum base is safer to use, but will require certain skills on the part of the worker. If the technology is not followed, the tiles will absorb water, becoming soggy over time. Popular manufacturers of dry mixes for gypsum tiles are Perlfix, Litokol K, Satyn PKG-28.
- Liquid nails or sealant. It is possible to glue gypsum tiles to sealant or universal glue such as “Dragon”, but the process is unreasonably labor-intensive. In addition to the fact that each tile needs to be sanded to form uneven surfaces for better adhesion to the wall, it also needs to be held for at least 2-3 minutes, which unnecessarily increases the duration of installation of the entire wall.
- Ready-made gypsum-based mixtures are the best option out of all existing ones. This glue has the outward consistency of very thick white sour cream, is applied with a special small spatula, adheres to any surface in a few seconds, and dries for up to 24 hours. In terms of price, such mixtures are more expensive than all previously mentioned ones, but the advantages of working with them are much greater:
- quick adhesion to the surface;
- no need to hold one tile for more than 3 seconds;
- the seams of light-colored tiles can be sealed without using special grout;
- powerful adhesion after complete drying;
- there is time to correct already attached bricks: if within 10-20 minutes after gluing it is necessary to correct a set brick, then this can be done without effort.
Can it be combined with wallpaper?
The advantages of finishing with gypsum bricks are not only the attractive appearance of the room, but also the ability to combine materials for wall decoration.
The tile, chosen for combination with wallpaper, emphasizes and shades the walls, complements the room with accents, and, at the same time, is a self-sufficient material that looks on any surface. You can combine gypsum tiles in one color scheme or in contrasting shades.
How to lay decorative bricks on a flat wall
A smooth, ideal wall is the best surface for decorating with artificial plaster stone. The tiles, having an average size of no more than a standard brick, when laid out on the wall, create a holistic image, a single canvas without seams or gaps.
To glue decorative bricks to the wall, you need to:
- Rub the inner smooth surface of the tile with sandpaper to remove irregularities and protrusions from the hardened plaster. A peculiar relief surface is formed, which is better attached to the wall, holding the glue.
- Apply a thin layer of glue with a special spatula (which usually comes with the finished mixture inside the jar). The layer of adhesive solution on the tile should not exceed 0.2 mm, otherwise it will take a long time to harden.
- Place the tile against the wall, pressing it slightly with your hands for adhesion, hold for 3-5 seconds and release.
- Spread the side seam of the tile on the wall for adhesion to the subsequent brick.
Thus, make the design of a brick wall from gypsum in the quantity in which it is necessary. Bricks can be cut, combined, matched and broken to create an uneven edge on the wall.
The first 2-3 rows from the bottom should be glued and left for at least a day. Only after complete drying proceed with subsequent installation work. This kind of work is necessary to ensure that the wall holds up and the bricks do not fall off.
Installation of stone: sealing joints
After the wall is completely decorated and frozen, you can begin decorative work to give integrity to the canvas.
To prevent gaps between the bricks from being visible from different angles, it is worth using grout for the seams. There is a huge amount of colored grout in the store, but if there is any glue left that was used for installation, you can use it. To prevent the adhesive solution from standing out and hardening into white spots, you can add the color of the required shade to it. In this case, it is worth remembering that the color when drying will be several tones lighter than that of the wet mixture. It is recommended to seal seams with your fingers without using a spatula. To do this, apply a small amount of glue to the seam, rub it, and wipe off the remaining residue with a cloth. Do all the grouting in this way.
Features and selection criteria
It is important to be able to correctly select gypsum bricks for interior decoration.
Since gypsum comes in different strengths, products made from it can also be of a wide variety of strengths. Various plasticizers are used in production for this purpose. The cheapest material is easy to identify. You have to break off a piece and see how it crumbles. If a brick is made of low-quality material, then a piece will crumble easily, but if it is made of expensive material, it will crumble with difficulty. In addition, it is worth paying attention to whether the product is painted on top or whether dye has been added to the mixture. To make an exclusive design, it is more practical to buy unpainted brick. After the finishing is ready, you can choose the appropriate shade yourself.
But it is also important to know that if you take colored tiles, it is better to use the one that was painted while still in the mixture state. The difference is determined by the cut of the material, since what is painted on top turns out to be white on the inside.
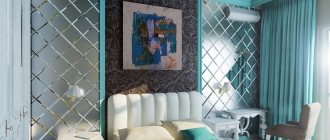
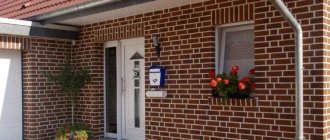
How to glue gypsum stone: ideas for the interior
Interior design in an apartment using plaster walls allows you to decorate a room without using unnecessary furniture. At the same time, they began to increasingly use stone finishing instead of the previously familiar walls and wardrobes.
How to lay it in the hall
If the room is not spacious enough, then you should not clutter it with unnecessary furniture.
In the living room it is enough to place a large corner sofa, a coffee table, and decorate one wall with brick in warm sandy shades. It looks interesting to decorate with plaster stones on one wall with design elements for the side corners of the hall. You can also decorate the side corners near the entrance by decorating the entrance to the hall with conventional stone columns.
You can also glue a plaster brick onto the wallpaper so as not to peel it off. If the wallpaper is held firmly, then part of the covering can be trimmed with stone, providing only a small amount of adhesion space on a concrete wall without wallpaper. To do this, use a utility knife to cut off a small strip of wallpaper.
Ideas on how to glue stone in the hallway and living room
Decoration with artificial stones is possible not only in the hall, but also in the corridor and living room. You can use individual design elements as several bricks along the edge of the wall at the entrance, and also decorate a small amount above the door. The stonework looks interesting in the form of baseboards near the floor.
Design options for the bedroom and nursery
In the bedroom and nursery, partial decoration of one wall is used to contrast with the main shade of the space. It is important to take into account such features as the predominance of calm, soothing shades for the rest room. It is better to use a combination of light sand stone and yellow shades, light green walls and white bricks with an antique effect.
Country
In country style, brick as one background wall will look perfect in the kitchen. Rooms are often decorated with brick inserts - along arches and doorways. The main feature of country style is its lightness, ease and simplicity
And it is very important not to disturb this harmony with a rather heavy brick
However, if there is room for a fireplace in the room, then a brick wall near it will add zest to the interior. Small brick inserts will go well with a simple small floral print on wallpaper and textiles. The main companion of country style is wood. Wooden floors and rustic furniture will add a real rustic feel to the interior.
How to care for stone
Caring for gypsum stone will not require much effort on the part of the housewife.
All that is required is to periodically wipe off the dust from the varnish base. It is worth noting that if bricks with an aging effect were used in the interior, then the dust on them is not visible as on dark varnished bricks. The varnish, in turn, protects the plaster from moisture. Gypsum bricks for decorating a room are the best budget solution. With the help of such inexpensive materials, you can create a cozy interior in any corner of the house, and all that is required to design an interior solution is imagination, time and compliance with installation technology.
Tools and accessories for installation
Having decided to use gypsum bricks in the interior of your home, you need to prepare the following tools and materials:
- plastic container;
- pallet;
- hacksaw or grinder;
- plain and notched spatula;
- building level;
- roulette;
- paint brushes;
- file;
- pencil;
- primer;
- electric drill.
Now you can proceed directly to preparing the surfaces to be treated.