Connection methods
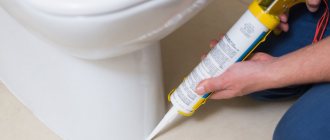
In general, they usually try to choose the width of linoleum so that there is only one piece in the room. Then there is no seam and no problems. But there is no way to get rid of the connection of two pieces in the doors. If the class of linoleum allows it (semi-commercial, commercial), you can call specialists, they will solder the coating. They have special equipment for this. If calling specialists is not part of your plans, you can create the joints yourself. There are two options: glue or cover with a metal or plastic threshold. The choice of docking method is determined by several factors. The first is the characteristics of linoleum itself:
- connecting soft (household) materials is easier and more reliable using a threshold;
- hard (semi-commercial) is more effective to glue.
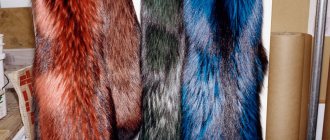
The most important thing when choosing a joining strip or threshold is to choose the right color.
So what and how to join the linoleum together depends on your linoleum. This has been verified. If you try to glue household soft linoleum, the seam will break after a short time. But you can put a threshold on semi-commerce. It will lie fine. It's just that not everyone likes this option. It is usually considered if there are no other options.
Thresholds are also laid at the junction with other types of coating. With tiles, laminate. Joining strips or thresholds also look better and more logical when connecting pieces of linoleum that are very different in pattern and color. If your class allows, you can, of course, cook it. But it will hardly look any better than with a well-chosen threshold or connecting strip.
When and why is this needed?
Linoleum is a practical, convenient and easy-to-install material. It is usually made from polyvinyl chloride, but there are other types of material. The coating can be of any color, which allows you to match it to any interior style.
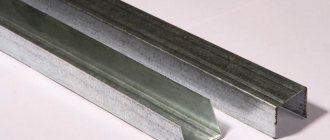
Structure of semi-commercial linoleum
The material has several classifications, the main one of which divides all its types into two types - household and commercial . The first has a small thickness and is used to decorate floors in the apartment. The second is more durable and reliable, thick enough and can be installed in industrial enterprises, high-traffic offices, shopping centers, etc. Some categories of commercial linoleum are suitable for installation at home.
Types of linoleum
Linoleum
Various sizes of rolls allow them to cover floors in rooms of different sizes - from tiny bathrooms to spacious halls. Particular chic is if the material is laid without noticeable joints. Then it is possible to achieve a monolithic and even coating without the notorious thresholds at the joints of the canvases, without visible nail heads. It is in this case that you need to know how to properly glue individual linoleum sheets together.
What are the sizes of linoleum
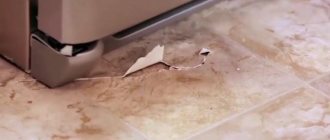
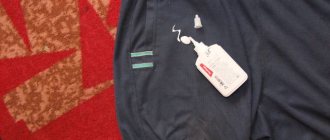
Also, gluing the material may be necessary if the coating has been torn due to careless use . This can happen as a result of cuts from sharp objects or when heavy furniture is carelessly dragged over it. In this case, the skill of gluing material can also come in handy.
In the photo - repair using a pencil
On a note! If the coating is severely damaged and torn holes appear on it, it is easier to apply a patch rather than try to connect scraps of materials into a single whole.
Damaged linoleum
Prices for Tarkett linoleum
linoleum tarkett
How to glue two pieces of linoleum
Almost any hardware store has glue for gluing pieces of linoleum. It comes in two types, which work differently.
- Type A is suitable for welding laid linoleum. It is more liquid and dissolves the edges, as if fusing two fragments. It is also called cold welding. This is a chemically active substance that dissolves linoleum. That’s why it’s called “welding”, since it works in a similar way. The seam is thin but durable. You must work with cold welding carefully. It is applied from a tube with a long spout exactly at the joint. If it gets on the surface, it will dissolve it. There will be ugly swellings, ulcers, and pits.
You can fasten linoleum together with glue - Type C linoleum seam adhesive is designed for gluing loose seams. It's thicker. Fills the gap between two pieces, connecting them very, very securely.
So the choice of the type of glue depends on whether you need to connect “freshly laid” linoleum or restore a broken seam in an already used one.
What else can be used? If PVC linoleum does not have a base, you can glue it with PVC glue. For example, “Liquid patch”, there is “Moment” and Kleyberg (Kleyberg), Sintacoll (Sintacol). These compounds are intended for gluing PVC products. If your linoleum does not have a backing, you can try. The composition also partially dissolves the parts to be glued, is applied to a degreased surface and left for a day. But it gains full strength in 7-12 days. Some compositions are tinted (Latka), there is a colorless pigment.
Cold welding is only one of the possible adhesive options for linoleum joints
For linoleum based (felt or some other) two-component glue is used: Texacol (Texacol), Bostik Vinycol 1520 (Bostik Vinykol). These compounds are mixed in certain proportions before use, then applied to the surfaces that need to be glued. They are kept for several minutes and pressed tightly. Leave for a certain number of hours. You can even glue the joints of thin sheets of linoleum. After gaining strength, they cannot be torn apart. But the exact dosage and sequence of actions must be read in the instructions for each glue, because there are differences. Failure to follow the recommendations leads to poor quality seams.
Glue selection criteria
The effectiveness of fixing the floor covering will depend on how correctly the adhesive mixture is selected. You can decide which glue to glue linoleum with based on the following criteria:
Concrete, wood, plywood and other materials from which the main floor is usually made have different water absorption rates. Accordingly, for each of them, glue with a certain percentage of water and active substance will be optimal. For linoleum on a wooden floor, a soluble mixture is suitable. If the coating is placed on a surface that does not absorb moisture at all (for example, tiles), then you will have to make do with joining the joints by hot or cold welding - the main sheet will not stick.
Type of linoleum.
There are three types of coating; One glue is intended for semi-commercial linoleum, another for household use, and a third for commercial linoleum. This is due to different densities and structure of the material, different thicknesses of the protective PVC layer, substrate material and other characteristics. The choice is also influenced by whether the coating is homogeneous or heterogeneous, natural or synthetic, etc.
Room area.
In small rooms (up to 10 m2) glue is not needed at all. If fixation of the material is required, then in a small area the mixture without using a solvent is applied to the base of the floor in a continuous layer. In large public, commercial, and industrial premises, a more effective two-component composition is used, which is applied to the floor locally. To process the seams, the hot welding method or reaction adhesive for linoleum joints is used.
From the video you will learn more:
Since it is often not possible to find one specific option, they also focus on glue consumption per 1 m2. It depends on many characteristics; the average consumption calculated by the manufacturer is indicated on the packaging. It is approximately 300–400 g per m2.
How to use cold welding for linoleum
How to work with cold welding is written on each tube. Please read before starting work. Please allow 10 minutes as there may be some peculiarities. Typically the sequence of actions is as follows:
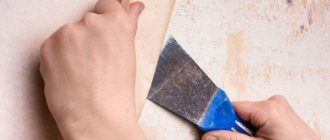
- Two pieces are laid with an overlap of 5 cm (one overlaps the other by 5 cm). Then take a ruler or rule and a sharp (very sharp) construction knife. The ruler is applied in the place where the seam will be made. In the doorway, they try to get under the door leaf or threshold, if there is one. Along the ruler, you need to cut both pieces at once. The trick is to cut through both pieces of linoleum in one pass. Therefore, you need a very sharp knife. You also need to put in a solid effort.
Linoleum joints between rooms: making the seam precise - Remove excess strips of coating. The joint turns out perfect. If the coating is monochromatic or the pattern is unclear, the connection is hardly noticeable even without welding.
- Take wide masking tape. We glue it onto the seam so that the middle of the tape is at the joint. Use your finger to press the seam and cut the tape along the seam. As a result, several centimeters of linoleum are closed on the sides of the joint. This is enough to get the job done.
- Take a tube of cold welding glue and put on a nozzle with a narrow spout. Carefully fill the seam with the compound. Remember, it is quite liquid. But if it spreads a little, it’s not scary. For protection we put tape on it. You can level the composition using a metal (stainless) plate. Plastic may dissolve.
How to glue linoleum together: if it has no base, cold welding glue works well - We wait 15-20 minutes (exactly indicated on the package), then you can remove the tape. Excess glue is removed along with it. The seam is ready.
If you have never tried working with cold welding, before gluing linoleum together indoors, practice on unnecessary pieces. Moreover, the linoleum should be the one you will weld. Each has its own nuances. After training, application “in real conditions” will go like clockwork.
Which to choose?
The variety of adhesive compositions is so great that it is not always possible to make the right choice. To get a quality result, the following factors should be taken into account:
- Application area. If you are planning to lay linoleum on the floor, then you need to look towards water-dispersed compounds. It should be noted that they are completely harmless and can be used in domestic premises. When you need to glue seams, then cold welding is the best option.
- Surface type. Adhesives are intended for certain types of floors. Some can withstand moisture, while others require minimal amounts of it to deteriorate. You can find out all these characteristics on the packaging of each glue.
- Type of linoleum. This characteristic is one of the most important. Almost all types of glue work with PVC-based materials, but there are products for natural substances. Cold welding can often be used for homogeneous foam sheets, as this will result in a reliable and elastic seam. For commercial and semi-commercial linoleum, varieties of bustylate or polymer compositions are suitable.
Repair of a broken joint
First, a few words about why linoleum seams come apart. Most often the reason is a violation of the installation technology. What are these mistakes? What rules are being broken? Yes, basic ones. First. Linoleum should not rest against the walls. It is cut around the perimeter so that there is a gap of about 1 cm to the walls. Second. Skirting boards must be nailed to the walls, and only pressed against the floor and floor covering. Then seasonal fluctuations in size will occur unnoticed and without damage to the seams. And if a seam on your linoleum has come apart, remove the baseboards, check the gap and attach them to the walls. Then repairing the seam will no longer be necessary.
Gluing joints of old linoleum - for repairs you need type C cold welding glue
Next, we’ll talk about how to glue linoleum together if it comes apart. First, we thoroughly clean everything with a vacuum cleaner. And what got under the linoleum on the sides of the seam too. Next, degrease with any available means. Both linoleum and the floor under the edge of the covering.
We stick masking tape onto the linoleum on both sides of the joint (it comes off normally later, without leaving marks and is quite dense and resistant to chemicals). We cut along the edge with a knife. If the edges are frayed or curled, cut them off too. But don't overdo it. Cold welding type C looks normal with a seam width of no more than 3-3.5 mm. Next, it’s worth using a docking strip or threshold. Or glue a strip of linoleum, widening the seam.
Remove debris and degrease - first steps
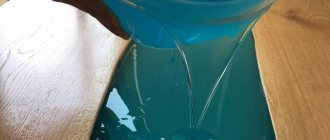
Next, fill the free space with glue. Level its surface and leave to dry. The excess flows onto the coating, but it is covered with tape, so it's not a big deal. If there is too much glue, remove it from the tape with a piece of rag, but do not blot the seam with the rag. The surface will be uneven and dirt will accumulate in the uneven areas.
After complete drying (the period is indicated on the packaging), the tape can be removed. Some manufacturers recommend several hours of “rest” even after drying. If you need to move around the room, you can stick the same masking tape onto the dried seam glue. It will protect the surface from litter and dust.
↑ Why is it necessary to glue linoleum
When laying linoleum, you want it to look like a whole monolithic layer on the floor, and there are no visible joints. Today, it is not difficult to purchase foreign-made material, which is produced in rolls up to 4 m wide. This size will be quite enough so that in domestically built premises it will occupy the entire area. In this case, there is no need to glue the joints: you can choose linoleum exactly to the size of the room.
Domestic manufacturers produce linoleum 1.5 m wide. When purchasing it, you cannot do without carefully adjusting the canvases and gluing the joints.
Gluing linoleum to the base will create a more durable monolithic coating
Of course, you can lay linoleum without gluing it to the base. But the so-called loosely laid linoleum has a number of disadvantages.
Firstly, during use, potholes and swelling from the legs of the chairs will appear.
Secondly, when moving furniture, a wave will “go”, the linoleum will swell, and it will be difficult to straighten it without removing all the heavy furniture from the room.
Thirdly, the distance between the joints of the canvases may increase over time, they will “spread apart”.
Fourthly, un-glued linoleum is easier to damage with a sharp cutting object.
Gluing linoleum to the base will avoid these problems and create a monolithic coating. Even if you purchased a canvas that is wide enough to cover the entire room, you should still use glue. This will extend the life of the flooring by 40-50%.
How to glue linoleum together with double-sided tape
If the base is flat, the linoleum is rigid, and a large shear load (in the form of large dogs or playing children) is not expected, the linoleum joint can be fixed using double-sided tape.
Quick gluing of linoleum joints with double-sided tape
As you understand, everything here is elementary. We cut the connection to fit the ruler (described above), and glue wide double-sided tape to the base. Remove the protective film and fix the edges of two sheets of linoleum. If the pruning is done well, then there will be no problems. Unless a roll that has not rested is laid down and it may decrease in size. That's when the edges can come off the tape. But in this case, the glue seam will not hold up.
Types of adhesives for linoleum
Today there are several types of adhesive compositions, which differ depending on the additives. The latter determine the performance characteristics.
Dispersion adhesives
The presented products are distinguished by a high rate of adhesion, which exists in an aqueous suspension of acrylic, latex, PVC and carboxymethyl cellulose. This group of consumables is considered the least toxic, has no unpleasant odors and can be used without restrictions at home or in crowded places. The products go well with various types of linoleum, including felt, polyurethane and so on.
Dispersion adhesives are often used to fix linoleum to a wooden floor.
The most famous types include the following.
- Acrylate. Has excellent resistance to water. It is used in buildings and premises where there is average traffic.
- Bustilat. A mixture of latex and carboxymethylcellulose is used to make it. Construction industry specialists recommend using products for linoleum with a felt base.
- Gumilax. The presented adhesive is created through the use of a special type of rubber. It has excellent compatibility with the rubberized base.
All products in question must be applied to a wooden surface using a spatula.
Glue Bustilat
Reactionary
This type of material is considered more expensive, but is distinguished by high quality and practicality of use. The group refers to complex chemical compounds that are created by combining polyurethane and epoxy. This composition creates a reliable connection, which is applicable in commercial practice. Disadvantages include an unpleasant, pungent odor, as well as the risk of an explosion during work.
These types of products are often used for “cold welding”. The connection is made through molecular diffusion. The type of seam when using reaction adhesives can be as follows.
A-type. Used for linoleum that is completely consistent in pattern and all edges fit tightly
It is important to note that the presented seam is invisible.
C-type. Used when large gaps appear between individual pieces
Can be used at a distance of 0.5 to 3 millimeters. The reaction adhesive should have a higher thickness. Similar variations of glue are often used for repair work. T-type. The cold welding presented is professional. They are used only using special technology. The seam requires sanding.
cold welding for linoleum
Thresholds, joining strips
As has already been said, if linoleum sheets of different thickness, texture, or pattern are joined together, it is better not to glue/weld them, but to join them using a threshold or a joining strip. They are of two types: with fasteners installed through or with countersunk screws/dowels.
Thresholds are available for hidden or open installation
There are usually no difficulties during installation. You cut a piece of the required length (by the way, it is sold in whole strips, not by the meter; but there are ones cut to fit standard doors), apply it to the installation site and mark the holes for fasteners. If the base is concrete, we drill holes for installing dowels; if it is wooden, we pre-drill holes for self-tapping screws (in both cases we take the drill diameter a little smaller). Then we put the threshold or bar in place and screw it on.
Fasteners are usually included in the kit. So it doesn't protrude above the surface. If you buy screws/dowels separately, then be sure to have a flat head. And before starting installation, it is better to first check whether the fasteners protrude above the level of the bar. If it sticks out slightly, widen the hole (with a larger diameter drill).
Hidden fasteners are not that difficult to install
Installing a concealed threshold is not much more difficult. After 20-30 cm we drill a hole in the gap between the linoleum sheets. We install plugs for dowels in them. We thread the fastener into the corresponding guides on the back side of the decorative strip, turn it on its side, and position it so that it fits into the dowels. This is the most difficult stage - you need to hit it as accurately as possible.
When all the screws are in place, we apply force. You need a hammer and a piece of board. Place the piece of wood over the screw and hit the board with a hammer. It is necessary to hammer evenly along the entire length, and not individually. So they tapped a little, moved it, and again, and again.
Recommendations for choosing and using glue
So, the main criterion when choosing an adhesive is the type of subfloor. Absorbent and non-absorbent substrates use different formulations, and if you use the wrong adhesive, a strong bond will not work. Absorbent surfaces include cement and concrete screed, solid wood, plywood flooring, chipboard, fiberboard, OSB.
Wood is a highly absorbent surface
Linoleum is glued to them with water-soluble compounds, but this also has its own nuances. Board materials such as plywood, fiberboard and others can become deformed from excess moisture, so for them you need to choose thick adhesive mixtures with a minimum water content. For a concrete floor, the consistency of the glue is not particularly important.
If the floor is concrete, the consistency of the glue can be any
Floors lined with natural stone, porcelain stoneware, and tiles are considered non-absorbent. Here, water-soluble compounds will be ineffective, since there is nowhere for moisture to escape, and high-quality adhesion between surfaces will not work
For such substrates, reaction adhesives are used, when applying which it is necessary to take precautions - use protective gloves and masks, ventilate the room
If the floor has tiles, it is better to use reaction adhesive
You need to buy glue along with or after linoleum to make sure that the composition is suitable for this particular coating. The glue packaging always indicates what types of linoleum it is suitable for and what the coating base should be. Be sure to check the expiration date, because expired glue will not hold the canvas. It is best to buy adhesive compositions in construction supermarkets or large stores where there are conditions for proper storage of such materials. This is especially true for water-soluble adhesives, which completely lose their adhesive properties after freezing. The exception is special dispersions with frost-resistant additives: they can withstand 3 to 5 cycles of freezing and thawing without losing their basic characteristics.
Universal adhesive fixer for linoleum and carpet Axton
Information about the glue is always on the packaging
This is what linoleum glue looks like
In order not to overpay, before purchasing you should calculate the required amount of glue. To do this, you first need to take measurements of the room and calculate the total coverage area. As a rule, consumption varies between 200-500 g per m2 (this is influenced by the type of working surface and coating base). For example, a fabric or felt base requires more glue than foam and rubber, and a plank floor requires more than a concrete screed.
To reduce glue consumption, it is recommended to prime the floor. Glue should be purchased with a small supply so that you do not have to interrupt installation and go back to the store.
Linoleum and glue must be kept in the room where the covering will be laid for at least 24 hours. Work should be carried out at a temperature not lower than 15°C and air humidity not higher than 75%. In this case, the humidity of the floor base should not exceed 8% for wood and 2% for screed.
Let the linoleum sit at room temperature for 24 hours
Immediately after applying the glue, you cannot lay linoleum; you need to let the composition dry a little for 5-10 minutes (the exact drying time is indicated on the packaging). Also, you should not apply glue in a thick layer: this will not make the fabric stick better, and excess glue will appear as thickenings and bumps on the surface of the linoleum.
Joining linoleum and other floor coverings
It is relatively easy to connect a couple of pieces of linoleum. But linoleum is more difficult to join with other types of coating. Here you need to solve several problems at once:
- height differences between materials;
- selection of a suitable shade;
- problems with joint tightness.
If you want to combine linoleum and another type of flooring, and both types are on the same level, the ideal option is a threshold. If you are going to leave steps, this is where a corner profile can come in handy.
You can join, for example, linoleum and laminate using a threshold
If the linoleum is joined correctly, neither debris nor moisture will ever get under it, and the coating will remain attractive in appearance. Let us remind you that the average person can lay out and connect linoleum correctly on his own, as long as his hands, figuratively speaking, grow from the right place.
Laying methods
Linoleum is easy to join. Here you just need to follow a special algorithm as accurately as possible. However, the connection of its canvases depends on the material and the method of its installation.
There are a couple of main types of this coating - household and commercial. They differ mainly in thickness: the commercial one is much thicker and stronger than the household one. Therefore, commercial linoleum is more difficult to connect, which is compensated by durability and strength. Before laying such material, you need to decide on its type. But you can also find semi-commercial linoleum on the market.
Attention: the thickness of linoleum must be at least three tenths of a millimeter, otherwise it is unsuitable even for living space - very soon you will have to replace the worn-out coating.
Linoleum should not be too thin, otherwise it will wear out quickly
This coating, although it seems monolithic, is made up of layers. The top one is the front one, it is made from PVC. It determines how strong and wear-resistant the linoleum will be. The type of linoleum depends on how thick it is:
- household, with a PVC layer 0.1-0.3 mm thick;
- semi-commercial, PVC layer 0.4-0.5 mm;
- commercial, PVC no less than 0.6 mm.
The front layer is not the only one, there are also the following:
- middle layer, a layer of reinforcing mesh made of glass cotton;
- bottom layer for heat and sound insulation, made from PVC foam.
The manufacturer sometimes coats the top layer with a moisture-resistant varnish, which adds aesthetics and protects from external factors.
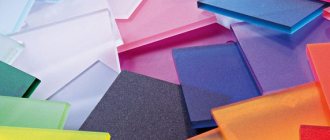
You should decide on the shade and pattern of the material. Today there are a great variety of different shades of linoleum on the market. Here they are both plain and covered with ornaments, imitations of stone and plank floors. Even carpeting or tiles. From all this variety, you just need to choose something that matches the overall style of the room.
If the linoleum has a complex pattern, it is important that it matches at the joints
Important! If there is a complex geometric pattern, its coincidence at the joints is required. The material should be purchased with such a reserve in order to properly join the canvases. This means more money will be spent on the purchase.
Linoleum with a joint can be laid overlapping or joint to joint. Disadvantages of overlap laying:
- moisture gets under the canvas, causing dampness to form there. As a result, mold and mildew appear on the base;
- the layers of canvas will create a small step, due to which the floor will no longer be level;
- loose sheets on top of each other will allow debris to accumulate underneath them. And if they are held together with glue, they may one day come unglued.
It turns out that this installation method is not the best solution, and it is recommended to do the installation joint to joint. Having laid the canvases, you need to connect them, thereby avoiding the ingress of water and debris. Today there are several good docking methods. Now we will analyze them.
It is better to lay parts of linoleum end-to-end, since when laying overlapping, debris and moisture can accumulate under the linoleum
Hot welding
This method is more complicated than others, but more reliable. Due to the need to use special equipment for hot welding, the method is rarely used for home coating. This method is in demand mainly in commercial premises. It is unsuitable for household linoleum: this coating is very thin, and it will melt due to too much heat.
Interesting! During the process, equipment and materials are heated to 450 degrees Celsius.
Linoleum is first glued to the floor. Hot welding should not begin before the glue has dried. In this case, the canvases should be laid very tightly end-to-end, and not overlapping.
Here you will need the following equipment:
- a cutter that allows you to make grooves between the blades;
- manual machine for linoleum welding;
- a sickle-shaped knife that allows you to remove protruding glue.
You can hide linoleum joints using hot welding
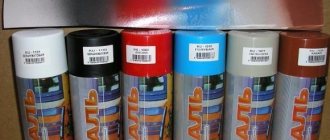
The connecting material here is a special four-millimeter PVC cord. This type is sold in construction markets in coils of one hundred meters, and such coils are painted in any shade. The heat melts the cord, and it fills the joint between different pieces of coating. The cooled cord has all the same characteristics as linoleum.
Step-by-step instruction
| Sequencing | Description |
Step 1 | Make a groove with a cutter by cutting out a narrow piece of material, but not cutting all the way to the floor. If debris appears, remove it. |
Step 2 | Insert the hot welding cord into the welding machine. |
Step 3 | Place the nose of the device at the beginning of the groove, along which it is then guided. In the process, the groove is filled with molten cord. |
Step 4 | Along the way, material residues are formed; remove them with a knife or a special device. It is important to do this before the material hardens. |
Attention! The length of the taken piece of cord should be suitable for processing the joint along half its length.