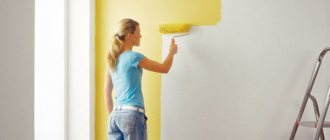
Do you want to affordably update your interior? One of the easiest ways is to transform the surface of the furniture.
First you need to remove the previous coating. After removing the film, glue remains. Sometimes it is very difficult to wipe it off, it sticks so tightly to the coating. Contaminants must be completely removed so as not to spoil the appearance of the furniture.
How to properly remove glue from self-adhesive film from furniture - we will look at this article.
There are effective simple and complex ways to do this at home. First you need to decide - what products will be safe to cover your furniture?
It would be nice to know what kind of adhesive base this is? How long has it been since pasting?
If you want to preserve the integrity of the furniture as much as possible, start from an inconspicuous place.
Sometimes you have to try several options before you get the desired result.
First, try wiping off the glue with hot water and a soft cloth to avoid scratching the coating. If it is water-based, it will clean well. Then, if necessary, use other, more labor-intensive methods.
Method number 1: hot water
If your design work has fallen into disrepair and the question arises of how to remove the self-adhesive film from furniture, use this advice.
First, boil water, cool it to 50-60 degrees and soak a rag in it. Then walk it over the entire surface of the self-adhesive and wait 3-5 minutes. Next, start trying to remove the film from the furniture. As an additional tool, you can use a small spatula or a stationery knife.
Using this method, you need to be very careful when removing self-adhesive PVC film for furniture, as there is a possibility of damage to the surface.
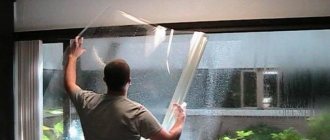
When to remove the coating from a profile
Manufacturers recommend doing this immediately after installation or within one to two months after it. Adhesive material is used to protect PVC from mechanical damage and contamination. After transportation and installation there is no longer a need for it.
If you leave it for a long time, especially in summer, the strip will stick almost tightly. It will become more difficult to remove it. Although it happens that the old tape quickly moves away from the surface. The only difficulty that arises is to pick up the edge of the paper. So, how to remove film from PVC windows and traces of it?
Method number 2: hot air
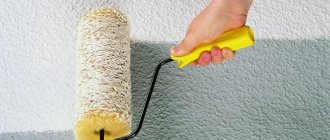
A hairdryer is the next handy item that you can use to remove the film from a cabinet, cabinet or chest of drawers.
Experts say that in order to get rid of this material, it is enough to warm it up well. Therefore, when solving the problem of how to remove self-adhesive film from furniture, the first thing you need to remember is how you can increase its temperature.
If you don't have an industrial hair dryer at hand, a regular hair dryer will do. You will have to work harder with it, since the area heated by it is much smaller, but the result will be 100%. You can also use a regular fan, which is set to warm air mode. After 5-10 minutes, it will warm the surface of the film, soften the glue, and you can easily get rid of the coating. The transparent self-adhesive film is also removed in the same way.
If traces of glue remain on the surface after removal, you need to use solvent or gasoline. These liquids will help eliminate minor imperfections. To do this, just moisten a piece of rag in one solution or another and wipe the problem areas with it.
Mechanical methods
Let's talk about simple options first.
Eraser
The old protective coating cannot be removed in this way, and neither can the new one. First you have to pry it off with something sharp and peel it off with your hands. A stationery or regular knife will do. But with an eraser you can remove the adhesive marks that will remain after the film. Take the most elastic eraser. Make sure it is clean—no ballpoint pen stains. The surface of the frame must be dry.
Scotch
If the film has not dried to the window much, this method will work. You will need wide clear or construction tape that sticks well. Stick it around the perimeter of the glass unit, smooth it with a towel, wait one or two minutes and sharply tear it off the frame. Both tapes should come off together.
Method number 3: sunflower oil
If the previous methods do not suit you, you can use regular sunflower oil to remove the film. The main disadvantage of this method is that it is inconvenient to use, but the result will be positive.
Apply a thin layer of oil to the surface of the self-adhesive, leave for 15-20 minutes, then use a spatula or credit card to remove the coating from the surface of the furniture. The last problem in this case will be scrubbing off the greasy deposits. To do this, just use a soap solution, which will remove all dirt from the furniture in a matter of minutes. Then you need to rub its surface with a hard cloth.
In the article we looked at how to remove old self-adhesive tape from furniture. This information will be useful in cases where there is a need to restore the previous appearance of a cabinet or cabinet or you decide to change the film.
Advantages of self-adhesive
In addition to the fact that with the help of this material you can restore the attractiveness of furniture, you will have the opportunity to feel like a designer and create an original chest of drawers or bedside table. To do this, you can use several types of self-adhesive. It has the following advantages:
- The ability to prevent moisture from entering the surface of furniture.
- It has different designs, colors and textures, which will allow you to choose the most suitable option for your interior.
- Affordable price.
- Ease of use.
- It does not require special care.
How or with what can you peel off adhesive furniture film?
The auto store sells a special aerosol composition. Its label says: Sticker and Label Remover . Simply spray the product under the edge of the film, and slowly tear off the film as the composition penetrates under it. This product is highly penetrating. VD-40 also belongs to such means .
This is what is written on the packaging of a container of penetrating multi-purpose lubricant:
- cleans surfaces of glue;
- removes dried adhesive tape;
- makes it easier to peel off stickers;
- even removes bitumen stains;
- and leaves no traces.
peels off labels;
So, as they say, I bought it for my car, and after reading it, I now use it in everyday life, and I wish you the same.
The self-adhesive film, in principle, will come off easily, if it is tight and there is a danger of the furniture covering being torn off (although it is probably not so great there anymore, that is why they were sealed), it needs to be heated with a construction hairdryer, the glue will soften and go more fun, you need to warm it up and pull it, and Don't heat it up completely and then try to rip it off.
If the coating is to be repaired, then safely remove the remaining film and glue with sandpaper; if you need to preserve the coating, then this is more problematic; you need 646 solvent and a soft cloth.
Wet the corner of the cloth, wipe it with solvent, apply it to the remaining glue and quickly wipe it off until the solvent evaporates.
Attention! The solvent evaporates very quickly and you cannot rub it, as you will rub it even deeper and ruin the coating, if you get wet and immediately wipe the area clean, you need to act quickly and confidently!
Do not forget about safety precautions, work in protective gloves and goggles, in a well-ventilated area, and even better in a respirator,
It is best not to try to immediately tear off the film from the furniture, since basically all self-adhesive films now are of good quality and the glue in them is quite sticky, which will not be so easy to remove from the surface. So here's what you need to do:
- Take a hair dryer; you can use either a hair dryer or a regular home hair dryer to style your hair. The goal is to heat the film to a certain temperature, which will facilitate better film removal. I won’t say what the temperature should be, I always do it by eye, the main thing is that the film begins to lag on its own.
- Next, if possible, wipe off the remaining glue with a soft cloth soaked in hot water, but without an abrasive, so as not to scratch the furniture.
- Remove all glue that remains with a non-greasy solvent, but first test the solvent in some less visible place on the furniture; if the solvent leaves traces, then try changing the brand.
In principle, it is not so difficult to remove adhesive film from furniture; it is problematic to remove the glue that remains after it, which has firmly grasped the surface. To remove the film, you need to heat it with a hairdryer; the hot film can be removed very easily. Heat to a temperature that is not dangerous for furniture.
And remove the remaining glue with white spirit or gasoline. Some offer another option, using unrefined oil. Apply the oil to the glue, leave for 20-30 minutes and then use a soft cloth or paper napkins to collect the remaining glue. Depending on what material the furniture is made of, oil can leave greasy stains. Then there will be another question: how to remove greasy stains from furniture.
The adhesive film can be easily removed if it is preheated. I once did this with a hair dryer (hot air supply), but if you don’t have one, you can heat the film with an iron. First, of course, place a damp cloth on the surface of the film.
You can stick another film on top - however, flaws may be visible. It will be easier. As it is, it’s quite difficult to peel off the film. Take a spatula and gasoline, slowly pry it up with a spatula, wipe with gasoline. You can use white spirit. The work is long.
Surface preparation
Due to the fact that for proper filming, the door structure must be smooth and clean before carrying out the process, it must first be prepared, since even minor defects and potholes can be clearly visually noticeable upon completion of gluing the material. To do this, before finishing with film from the canvas, box and trim, it is necessary to remove burrs and roughness. It is recommended that before starting preparatory measures, dismantle the door, remove the handle and lock, and then carefully prepare the structure.
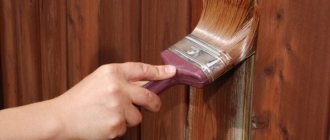
Elimination of roughness on the platbands, frame and canvas should be done using sandpaper or a grinding machine. Particular attention should be paid to doors made of wood. To remove knots and bulges present on their surface, it is effective to use a plane. If the surface of the door structure was previously exposed with a paint composition, then it is necessary to remove any existing smudges and chips from it, which requires removing the paint.
The process itself is often labor-intensive, which means that it takes a significant amount of time to complete the work.
After quality paint removal, you need to degrease the door structure with a rag, pre-moistened in dishwashing detergent and diluted with water. Next, you need to wipe the door with a dry cloth and wait until the product dries completely. The cracks and cracks present on the door must be treated with putty or mastic. After carrying out the preparatory measures, the door structure must be opened with a primer, which will make it possible to simplify the process of gluing the film in the future.
If the door has a varnished or glossy coating, then gluing the material to such surfaces is much more comfortable, since such an old layer only needs light correction. You can remove the protrusions using sandpaper, fill up the potholes and cracks with a special mastic, and then, as in the previous case, open the door with a primer mixture, after first cleaning it from dust, dirt and degreasing.
If there is an old film on the door, then to remove it you need to use a hairdryer, heating the coating or wetting it with hot water, after which you need to pick it up and remove it from the door structure. Upon completion, it is also necessary to wash with soapy water or degrease, as well as, if necessary, apply putty and rub it down. The final stage is primer treatment.
Self-adhesive film: material features
Now there are many types of self-adhesive film for any surface: cars, furniture. walls in any room, even in the kitchen and bathroom. What they have in common is that they are manufactured using adhesive tape technology, which combines the qualities of adhesive tape and wallpaper.
Using self-adhesive film, you can not only apply various design solutions. This material has a number of the following advantages:
- moisture resistance;
- resistance to high temperatures - up to 80 degrees;
- a variety of not only patterns, but also textures;
- low cost;
- ease of use;
- easy care of the pasted surface.
Features of self-adhesive wallpaper
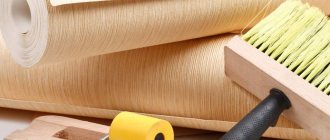
The main feature of this material is a polyvinyl chloride film, on which a dry layer of glue is applied on the back side, covered with a reliable protective paper film, which is removed immediately before work. The paper protects the film so that it does not stick together when packaged into a roll.
Rolls of self-adhesive wallpaper are produced with the following parameters:
- Width from 40 centimeters to one meter.
- Approximately 15 meters long.
Self-adhesive wallpaper has a wide range of applications.
They are used for:
Tip: When choosing a film, you should pay attention to what surface it will be used for: for antique furniture, use a transparent self-adhesive that helps get rid of minor scratches and abrasions without changing the color and structure of the wood. It is better to cover glass with mosaic patterns.
Self-adhesive wallpaper has several important advantages.
These include:
- Durability.
- High strength.
- Safety for others.
- Large selection of colors and patterns.
- High speed of application with your own hands and performing decorating work.
- Easy to clean.
- Relatively low price compared to other analogues.
- Moisture resistance.
- Can be applied to all surfaces:
- tree;
- metal;
- ceramics;
- glass;
- plywood;
- plastic;
- drywall (see Wallpapering drywall: instructions).
In what rooms can it be used?
As mentioned above, self-adhesive film is not afraid of moisture and high temperatures, and it is completely unpretentious in maintenance. Therefore, it can be used to decorate absolutely any premises and furniture in them, and even household appliances.
- In the kitchen, especially if you live in a private house, self-adhesive film will not only help you update the interior as often as you see fit and without special expenses, but will also serve to maintain cleanliness and neatness. As you know, it is kitchen surfaces that often become dirty and deteriorate during use. The easiest way to fix this is with self-adhesive film.
- For the bathroom and toilet, covering with self-adhesive film is also the best option. This material will protect the walls from excess moisture and splashes of soapy water, which can be very easily wiped off the surface.
- Do you have little things to do? Then you know how much trouble their love of drawing on any surface causes. It is much easier to erase traces of paint or felt-tip pens from self-adhesive film than from wallpaper or fabric upholstery. As a last resort, you can re-glue the film, which will cost you very little.
- In fact, self-adhesive film is an excellent material for a child's room. and it doesn’t matter how old the child is, whether he goes to kindergarten or graduates from school. A child will have fun in a room with bright colors, and a teenager will be able to independently work on the interior of the room.
- If you decide to use film for covering interior items, for example, chairs, tables, cabinets, chests of drawers, then the modern range of colors and patterns of this material will help you not only update the appearance of the rooms, but also completely change the style. In the photo you can see many options that can be used in your work.
Advice: when choosing a film, pay attention to what surface you will use it for. For example, for antique furniture, transparent self-adhesive is suitable, which will help get rid of scuffs and minor scratches without changing the color and structure of the wood. Mosaic patterns are perfect for glass.
Caring for self-adhesive film is very simple. Usually, warm water and detergent are enough for this. It is undesirable to use powdered cleaning substances, as well as solvents - they will damage both the structure of the film and its color. If the stains are quite persistent, use ethyl alcohol.
What furniture can be covered with self-adhesive film?
Adhesive tape
for furniture, it is resistant to moisture, is not affected by temperatures and is easy to care for. Thanks to these qualities, it can be used for furniture finishing work in a wide variety of residential areas:
- For pasting kitchen furniture. Self-adhesive film
, can help you update your kitchen set quickly and without much effort . A similar film on kitchen furniture will become an avid assistant in maintaining cleanliness and order. The kitchen furniture surface is constantly dirty, and this can be corrected with the help of self-adhesive films; - For pasting furniture in the toilet and bathroom. Due to the fact that this material is not afraid of water and moisture, the furniture in these rooms can last longer. And plus, the film will create an original design, which, if desired, can be easily corrected after some period of time;
- For pasting furniture in a children's room. Children, as a rule, love to draw, and they do it wherever they go. The furniture
in the nursery
also takes a hit However, if you cover it with self-adhesive film, then as a result, any design can either be wiped off, or the film can be re-glued, or left as is, if desired. In addition, children love everything bright and interesting, and with the help of such a film, even very ordinary children's furniture
can be beautifully decorated to such an extent that they will not be recognized; - For pasting furniture in the living area, hallway or bedroom. Decorative self-adhesive film
for furniture is well suited for these rooms, as you can always choose the necessary texture and color of the film so that it fits perfectly into the overall interior of the room.
Initial stage of work: prepare the surface, cut the film correctly
- Before gluing self-adhesive film, carefully prepare the surface. It needs to be cleaned well, degreased with alcohol or gasoline, and dried. The most convenient base for applying film is a smooth surface with a varnish coating. If the surface is matte and rough, it is better to coat it with polyester or primer varnish. It can be replaced with methyl wallpaper glue.
- Surface made of wood, plywood. fabrics, chipboard, plaster must be wiped down and cleaned of dust and particles of material. If necessary, use putty and acrylic primer. This will ensure good fixation of the film for a long time.
- If you plan to paste over a glass or metal surface, then the base needs to be slightly moistened.
- The centimeter grid printed on the reverse side will help you correctly cut the film into pieces of the required size. Apply markings on it, and leaving a margin of a couple of centimeters, cut it using scissors or a special knife.
- You also need to cut the film correctly; this process has its own tricks depending on the design. For example, if the pattern on the film is stylized as a tile. It is better to cut along the “seams”. In case of applying a pattern with rapport, you need to cut along the front side.
How to cover furniture with self-adhesive film: master class + tricks and tips
About the types of self-adhesive film, about its properties, the subtleties of its gluing and care for it - in our review.
Self-adhesive film is a simple and affordable way to quickly update furniture and hide its defects (scratches, abrasions). Of course, in terms of resistance to external influences, the film cannot compete with, for example, wood or natural stone, but with proper care it can last for quite a long time, and besides, it can be quickly changed.
Painting furniture: 5 main rules and master class
What is self-adhesive film and how to choose the right one
* Self-adhesive film, also known as self-adhesive film, is a film with a decorative design on one side and an adhesive layer on the other side. To protect the adhesive layer from dust and damage until use, it is covered with a paper backing. When gluing, the paper base is removed, and the film is glued to the surface to be decorated with the adhesive side.
Wood-effect film on a coffee table
* The top layer of self-adhesive can be different: it can be made of glossy or matte vinyl or plastic, it can be dense or translucent, metallized or paper. Plastic and vinyl films are usually the most durable and can be wiped down and washed frequently. Metallized is usually more susceptible to water, its top layer can be damaged, so it is better to use it on those items that will get dirty less and be wiped less often. It is generally better not to expose paper film to water.
It is better to use metallized film to cover surfaces that are not very exposed to external influences.
* The base most often has markings - this is convenient.
* Thick film is usually used to cover furniture, window sills, doors, while translucent film is used for glass and mirrors. There is also a special colored translucent stained glass film for creating a stained glass effect on glass.
Translucent matte film on glass
* In terms of color and texture, the film can be very different - for different types of stone, wood, fabric, leather, plain, with a pattern, patterned, textured, glossy, matte, velor and so on.
* The film can also be protected from ultraviolet radiation - this means that, when exposed to direct sunlight, it will not fade or change its color.
* The choice of film also depends on the surface you are covering. For a surface that is not completely smooth, it is better to choose the so-called cast film. It is somewhat more expensive, but more flexible. If there are protruding heads of screws, rivets, or nail heads on the surface, it is also better to use cast film. The so-called clandered film is usually cheaper, but not so flexible: it is better to use it when you need to cover large, flat surfaces.
* Textured, textured, patterned film will help hide flaws and unevenness of the original surface. And smooth, metallized, glossy, on the contrary, will emphasize them.
*Usually, water, a cloth and liquid detergent are enough to clean the film. Do not use abrasives or acetone.
How to paint a carpet (and why to do it): master classes + ideas
How to work with self-adhesive film: master class
To understand the stages of work, let’s look at a simple project: covering the top of such a bedside table with film.
You will need:
- ruler or measuring tape;
- to smooth the film - an unnecessary credit card, a plastic spatula, a dry soft cloth;
— depending on the condition of the surface, you may need medium and fine-grained sandpaper, primer and putty.
Step 1
First you need to prepare the surface. Wash it, dry it and degrease it, wiping it with alcohol. If the surface has significant unevenness, it may be necessary to fill the holes and/or sand it first with coarser sandpaper, then with fine sandpaper. After sanding, carefully remove all dust and degrease the surface. In some cases, you can apply a layer of acrylic primer (if the surface is not perfectly flat, if the pasted item will be subject to mechanical stress and you need particularly strong adhesion to the film). It is better to cover a wooden surface without varnish with a layer of polyester or primer varnish.
Sticker of self-adhesive film: steps, nuances, tips
The instructions for the self-adhesive film describe the gluing process in sufficient detail. You can see in practice that it is very simple and does not require much time. But be careful and be attentive when working to avoid making many mistakes that will have to be corrected.
- Take the prepared “pattern” and separate the film from the paper backing by literally 5 cm. Apply the sticky side to the surface to be pasted so that the shape and dimensions exactly match.
- Carefully, slowly, separate the backing from the film, while simultaneously distributing the film over the surface and smoothing it with a dry soft cloth. The principle of smoothing is the same as when gluing wallpaper. from the center to the edges of the canvas. This way you can avoid the formation of air bubbles.
- If you notice any error during your work, you need to correct it immediately. Peel off the film and level it over the surface until it has set thoroughly. Otherwise, the work will have to be completely redone.
If you are covering a large area, make sure that the surface being treated absorbs moisture well. Clean and dry the wall on which the self-adhesive film is being applied, cover it with a layer of wallpaper glue and, without waiting for it to dry, spread the film, adjusting it to size. After this, iron the film with a dry soft cloth.
Please note: if you purchased a film that sets almost instantly to the surface, this may cause inconvenience when it comes to adjusting the dimensions. Talc and powder can help with this; they will slow down sticking. Any air bubbles that have arisen must be punctured and carefully smoothed out.
If you decide to cover surfaces made of metal, glass or synthetic materials, moisten them with water adding a small amount of detergent or soap solution. Separate the paper backing and the film completely, apply it to a damp surface, the solution helps the film to be correctly adjusted to the required dimensions. After this, wipe thoroughly with a sponge or soft cloth.
Options for door leaf pasting
Let's take a closer look at the options for gluing room doors at home, and also consider the main pros and cons of each method.
Self-adhesive film
Self-adhesive film is made of PVC. This is a durable, waterproof and wear-resistant material in different colors .
It can be either plain or with a pattern, including one imitating wood, stone, or leather. The film is also divided into glossy, matte and mirror. To stick a door with film, you need a small number of tools and mandatory preliminary preparation of the surface.
Stages of gluing a door with self-adhesive film:
- The previously prepared sanded surface is degreased.
- The sheet of film is measured according to the size of the door. When gluing, it is important to remove the protective layer of the backing gradually, smoothly moving from top to bottom.
- Use a roller or spatula to smooth the film so that there are no bubbles or creases.
- Along the perimeter of the door, the film is additionally fixed with a hot iron (be sure to iron it through a cloth) or a hairdryer.
The resulting air bubbles can be removed with a regular sewing needle, which is used to carefully pierce the film, after which the surface is further leveled with a spatula.
Before covering the doors with self-adhesive film, it is worth knowing some features. There are many advantages, but the main ones are that the material can withstand high temperatures, it is easy to maintain and durable. But preparing the surface for this method takes a lot of time. If this process is not given due attention, then all the flaws will be visible through the film, and bubbles and creases will also form. In addition, the film is not capable of masking large errors - it is, first of all, a decorative element for a smooth, but not aesthetic, surface.
How to remove self-adhesive film?
Over time, you may get bored with the color or design, you will want to update the interior again, and you will be faced with the question: how to remove the self-adhesive film without damaging the surface on which it is applied?
Self-adhesive film is a very durable material, and it has earned its popularity precisely because of its durability. It is not recommended to paint it - the coloring agents will lie unevenly on the surface. Gluing a new layer on top of the old one is also not the most convenient option. Therefore, the self-adhesive film will need to be removed.
- Try using hot water first. Wet the surface thoroughly, and after a few minutes, begin to peel off the film, helping with a flat, sharp object, such as a knife or spatula. Make sure that the surface on which the film is applied is not damaged.
- If the hot water option does not pay off, a hairdryer will help you. The fact is that the film needs to warm up properly for the glue to detach from the surface. You can also use a regular household hair dryer that you use to dry your hair, but it is better to take an industrial hair dryer: it is more powerful and will heat up a larger area.
- In addition to a hairdryer, you can also use a heater-fan, setting it to maximum power and pointing it at the surface from which you want to remove the film. After the material softens and begins to peel off, pry up the corner and begin to gently pull the layer toward you until it separates completely.
- Residues of adhesive on the surface can be removed using solvent, alcohol or gasoline, depending on the material from which the surface is made.
how to wash off old film adhesive from a façade
how to wash off old film adhesive from a façade
Post by Muravisha » 12 Jul 2021 13:46
Re: how to remove old film adhesive from a façade
Post by Alexander Belov » 12 Jul 2019 14:58
Re: how to remove old film adhesive from a façade
Post by Alexander Belov » 12 Jul 2019 15:39
What kind of cosmophen for erasing have you tried? 5k or 10k?
Re: how to remove old film adhesive from a façade
Post by Muravisha » 12 Jul 2021 17:50
Re: how to remove old film adhesive from a façade
Post by Alexander Belov » 12 Jul 2019 17:53
The most non-aggressive) they would at least try 10k)
Re: how to remove old film adhesive from a façade
Post by Muravisha » 12 Jul 2021 17:55
Re: how to remove old film adhesive from a façade
Post by nuker » Jul 13, 2021 11:41 pm
Re: how to remove old film adhesive from a façade
Post by Ruslan EFF ADV » 13 Oct 2019 21:18
For this case, it may not be relevant, but in the future it will be useful to everyone. Remember the No. 1 solution for removing old glue from any films - SOAPY WATER))) I myself somehow ended up re-gluing a part of the facade with a screwed-up tint, which left all the glue on the glass after dismantling! (I decided to entrust a new person with what turned out to be a very responsible job) I tried everything to wash off the glue, both solvents and degreaser, while simultaneously scraping it off the glass with a spatula. Until I just tried an interesting method: We fill a sprayer with water with a good portion of fairy or a similar product, pour the surface and let the glue soak into it (it will absorb, don’t worry), you can repeat several times, after which we take a scraper with a blade for cleaning glass and scrape it off all the glue is like butter from a sandwich. When it comes into contact with water, it does not dissolve, but on the contrary, it begins to coagulate, so you don’t get smudges (like from solvents) and with one good pass of the scraper you can remove all the glue from the area being cleaned. As for the sandwich panel, you just need a more humane tool, as an option - a plastic scraper, or try rubbing it with rags while pouring the same solution at the same time.
Having subsequently taken an order for plywood façade (200m2), the task was to remove the old film, which had already shrinked wildly, was full of cracks and had separated into separate segments, having stood on the façade for N number of years. The experience with the screwed-up tint turned out to be very helpful. Without hesitation, we stuck to this technique and removed the film with glass scrapers, because... It was no longer possible to tear it off completely, then they filled it with soapy water and removed the remaining glue COMPLETELY, without smudging. The guys spent a very long time with this, it was actually not easy, but this method turned out to be the most effective for such cases. I hope it is useful to someone. (traces from double-sided tape are also easily removed)
Source: sign-forum.ru
about working with self-adhesive film
As you can see, self-adhesive film is an almost universal material that will allow you to completely change your home as your imagination dictates, at any time and without special costs. It is not at all necessary to change the environment for the sake of new experiences; it is enough to use this easy-to-use material to make your life sparkle with new colors.
If you have already dealt with self-adhesive film in the interior, please tell us about it in the comments and share your experience with other readers.
Film for doors
- Peculiarities
- Kinds
- Review of manufacturers
- How to paste over correctly?
- How to remove?
- Examples in the interior
Things that are outdated or have lost their appearance are ready to serve us for quite a long time, so there is no need to rush to look for a replacement for them. This is especially true for doors, because their functionality remains, as a rule, for many years. And self-adhesive film will help restore the appearance of the door leaf.
Kitchen painting
You can paint MDF facades with everything, with the exception of options with an acrylic panel. This kind of repair requires great care and some experience. Especially if you need to paint a complex surface - milled or radius.
The renovation consists of three stages: choosing paint, preparing and painting.
Selection of paints and varnishes
To paint MDF boards, ordinary acrylic or oil paints can be used. Alkyd compounds are better in quality and more durable. The ideal option for the kitchen are polyurethane paints and our own polyurethane primer.
1. Water-based polyurethane primer is absorbed by the top layer of the material, shrinks the loose surface, imparting sufficient strength and smoothness. This coating is easy to sand and significantly reduces the consumption of paint and varnish.
If fairly old kitchen facades are being repaired, it is highly recommended to apply a second layer of filler primer.
2. Polyurethane enamels are distinguished by a rich range of colors and provide varying degrees of gloss. The following paints are produced:
3. Varnish. Acrylic and polyurethane varnishes are used. The former are transparent and do not turn yellow over time, but are inferior in mechanical strength to polyurethane ones.
Preparation of material
If the facades are really old, the surface includes not only peeling of film and paint, but also chips and cracks.
If the dimensions of the sash have changed, for example due to constant dampness, then it is advisable to abandon the restoration. It will be much faster and cheaper to completely renovate the kitchen.
If you decide to radically change the design of the kitchen, then do-it-yourself renovation is quite possible.
- The hinges and handles are removed from the sash.
- Get rid of the film coating. Since PVC film and melamine film are not resistant to heat, the facades are simply heated with a hairdryer and the film is removed. This cannot be done with an acrylic panel.
- The old layer of enamel is removed with a solvent.
- The surface is polished using sanding sponges, brushes or a sander. The treatment removes glue and paint residues, minor scratches and chips. Grinding is carried out in three stages using abrasive materials with coarse grains - P180, medium and fine.
- Then the part is cleaned of dust and primed. This is best done with a spray, but you can use a roller or even a brush. The primer dries in about 8–10 hours.
- After drying, the surface must be cleaned again with the finest grain abrasive.
The process of preparing the material is covered in detail in the video.
Painting material
You can paint kitchens with a roller or a brush, but it is still better to use a sprayer. This significantly reduces work time and allows you to obtain uniform painting on any surface - flat, milled or radius.
You need to paint in two layers, the second is applied after the first has completely dried. If you use paint and varnish material of the same shade, you can get a uniform matte or glossy surface. However, with the help of enamel you can create more interesting effects.
Kitchen set with enamel coating and Chameleon effect
- Metallic is a special enamel containing aluminum powder. The first layer is metallic paint, the second is glossy varnish.
- Marble coating - the facade is painted with the main color, and then a kind of “web” of a different shade is applied. After drying, open with clear varnish.
- “Cracking” (craquelure) - the facade is painted in two layers of different shades, and after drying - with a solvent. This product is not varnished.
- “Chameleon” – obtained by painting with two colors of enamel and covering with glossy varnish.
After the paint and varnish coating has dried, install the fittings and hang the doors on the hinges.
In the video you can see how to properly paint MDF panels.
Repairing an MDF kitchen, if the material itself is reliable and durable, can completely change the design of the furniture. With sufficiently developed artistic skills, you can even draw on smooth facades. No industrial design can provide such a degree of uniqueness.
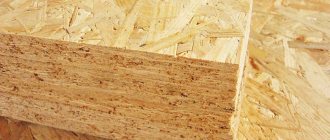
An interesting example of developing chipboard painting technology from True Factory
Let's give a practical example from True Factory, which concerns the painting of melamine-coated chipboards. The manufacturer encountered poor adhesion of the paint and varnish coating, which is, in principle, expected for surfaces with low porosity.
The low-quality soil from a little-known manufacturer used by the company did not help. True Factory technologists conducted a series of tests using different options for adhesive primers.
The best results were obtained using the following combination: Sayerlack TUL3530/00 Adhesive Primer for Melamine Paper (100%) + TH0790/00 Hardener (10%) + DT0452/00 Solvent (40%).
See the results in the photo below, in the photo test before and after using the TUL3530/00 adhesive primer. For testing, we used a familiar adhesion test - lattice cuts.
What does this experience from True Factory show us? First of all, do not be shy and contact the technologists of paint suppliers in case of problems with painting chipboard, laminate in terms of adhesion and more, to select the required adhesive primer and obtain stable painting results.
| Rice. 3. Adhesion of paintwork materials before applying adhesive primer |
| Rice. 4. Adhesion of paintwork after applying adhesive primer |
Feedback from site visitors:
I’ll tell you about my own experience in painting chipboard and film facades in furniture production.
Painting chipboard
Chipboard was painted, but rarely when the project indicated that, for example, the outer side wall of the kitchen or the details of the portal had to be the same as the painted or patinated facades.
In this case, the surface of the chipboard was sanded with paper of P220 grit or coarser in order to break the top protective layer of the laminate on the chipboard to a matte surface. Next they applied paint, but more often they worked according to the scheme - sanding, one layer of primer, sanding, finishing. No adhesives were used.
Problems arose if the edge was poorly glued and after finishing the paint fell into places where the edge did not fit well, worse if it peeled off, but again this was due to poor performance of the gluing equipment, a violation of the gluing technology.
Painting facades covered with PVC film
We had to resort to the technology of painting film facades in order to simplify the technology of painting facades with complex internal milling.
What were the difficulties: the main ones were the labor intensity of grinding complex milled profiles and the risks of damaging the profile itself, which already required reworking the facades.
In addition, it was necessary to apply sealing primer, sand it, apply base primer, sand, apply primer again, and sand again. In the case of film, the surface and profile of the MDF facade in PVC film were simply pre-grinded and finishing layers were applied.
It turns out that the technology was reduced to a minimum, well, sometimes they could apply primer to the film before painting, but sanding the primer in this case was much easier than sanding unlined MDF.
An important point in all this is how well the film is glued to the MDF facades. If the film peels off from the edge, if there are inclusions under the film, glue sagging, poor-quality milling, poor preparation of the facade surface before pressing, then we will get not the advantages, but the disadvantages of this technology.
Therefore, the technology for pressing facades in a membrane vacuum press must be at a high level.
In addition, the film itself must be selected for the facades. Firstly, it should be white, and secondly, it will be better if it is intended just for painting, that is, without a protective top coating.
Film suppliers called this film primer. In principle, you can use just white film, but a trial application and an adhesion test are necessary.
Interestingly, no adhesive primers were applied to the film facades; it was enough to matt the film by sanding. But, in any case, experiments are always needed, and then mass application of the technology, otherwise primer may be needed to improve the adhesion of paint to film or chipboard. For such primers, contact your suppliers, they will help you select the necessary paints and varnishes.
How to paint chipboard and MDF facades in PVC film?
It seems absurd why paint chipboard and furniture plastic. But, nevertheless, the customer’s demands and legibility have grown significantly and sometimes, in order to solve some problem in the manufacture of furniture or interior items, it becomes necessary to paint chipboard or facades lined with plastic or film.
When does it become necessary to paint chipboard and films?
Chipboard is painted when they want the front part of the furniture body to be the same color as the painted facades.
When they can’t find chipboard of the right color. Then they do this - buy white chipboard and paint it in the desired color. Costs, both material and time, are lower than when painting MDF.
When they want products coated with film or plastic to have a more advantageous decorative appearance after applying varnish. This, in particular, applies to the creation of a decorative patina finish for film facades.
When you need to paint MDF facades with complex milling. In this case, MDF facades are wrapped in white film in a membrane vacuum press and then finished with enamels.