In the list of materials in demand in interior decoration, paper wallpaper is far from the last place. Invented back in medieval China, they are practically the cheapest and, most importantly, environmentally friendly solution, with the help of which you can create a cozy and pleasing environment without much effort. But in order for an interior made with paper wallpaper to serve as long as possible without causing unnecessary trouble, it is important to study the basic criteria for their selection and understand the practical intricacies of gluing and caring for them during operation.
Types and features of paper wallpaper
Assortment of paper wallpapers
Paper is a fibrous material whose structure is easily penetrated by moisture and fat. It is an excellent springboard for dust and can even absorb odors. All this must be taken into account when decorating the premises - if you choose the wrong wallpaper, the atmosphere that reigns here will very soon leave its indelible imprint on it.
Protection of the paper web from aggressive operating factors is provided by a number of modern technologies. In accordance with them, the following types of paper wallpaper are distinguished:
- Smooth
The basis is paper of various types, sometimes with a light-resistant base, and the design is applied to the front side using a printing method.
Smooth paper wallpaper
- Duplex
They have 2 layers, thanks to which they do not tear, and, if necessary, can be easily removed from walls or ceilings.
Duplex wallpaper
- Embossed
Also double-layered, but the front side is embossed, i.e. has a certain, often patterned, relief.
Premium embossed paper wallpaper
- Structural
They are made with the addition of sealants - sawdust, crushed nut shells, etc., due to which they acquire a unique facial relief.
Paper wallpaper with a structured surface
- Acrylic (foam wallpaper)
They are a two-layer canvas, on the front side of which a thin layer of foamed acrylic is laid - the result is quite unusual designs.
Paper wallpaper with acrylic pattern
- Moisture resistant
This type of wallpaper has a moisture-resistant coating, thanks to which it can be cleaned and washed.
Moisture-resistant wallpaper with a paper backing
Obviously, the more aggressive the atmosphere in the room being finished, the more wear-resistant the wallpaper should be and the more it will cost. But the most important thing when purchasing is not to confuse different types of fabric. For example, some paper wallpapers are practically indistinguishable in appearance from vinyl ones, but the same cannot be said about their price. In short, make sure you don't accidentally overpay for features you don't need.
How to get rid of bubbles
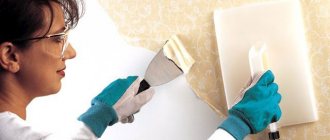
Even if paper wallpaper is properly glued, bubbles can still form on it - the worst nightmare of anyone who has ever done wallpaper repairs on their own.
It is almost impossible to paste wallpaper without the formation of bubbles - air bubbles always appear on a wet surface, even after you have perfectly smoothed the canvas. Usually the strips can dry for several hours, then they are stretched onto the wall - and the bubble disappears by itself. However, this does not always happen. If, after drying, air voids remain on the new wallpaper, you can remove them in two ways.
Take a syringe, fill it with liquid glue and carefully push it under the paper. Then smooth with a spatula and squeeze the excess onto the surface to wipe off with a wet sponge. If the voids are very large and the wallpaper is thin, you can try to make a cut at the bottom of the bubble with a sharp razor and inject glue there. However, this method can lead to cracks in the paper, so first check the reaction of the wallpaper in an inconspicuous place.
The process of gluing wallpaper is quite simple, and even a novice repairman can handle it if desired. But even if you are sure that you know how to glue paper wallpaper correctly and beautifully, it never hurts to study all the intricacies of the issue - and then your walls will look luxurious even with the simplest and most inexpensive coating.
Preparation for gluing
Wallpapering
Paper wallpaper is a fairly simple material to work with, which is not difficult to handle even if you have no pasting experience and alone. But first, it is necessary to properly prepare the surfaces to be finished: dust, remnants of whitewash and old wallpaper, etc. will not allow the gluing to be completed properly, and defects in the rough finishing will immediately appear on the front side of the canvas.
To hang paper wallpaper you will need:
- roller or brush;
- wallpaper brush;
- tracer;
- plumb line;
- construction knife;
- sponge;
- container for glue;
- wallpaper table;
- ladder;
- roulette;
- long ruler;
- wallpaper glue.
Tool for wallpapering
Having collected everything you need, you can begin the preparatory work. They are performed in the following order:
- Removing old wallpaper, whitewash and peeling plaster
Old wallpaper can be removed very easily if you first scratch it and moisten it with a soapy solution using a sponge. It is most convenient to work with a metal spatula. Those areas that come off poorly will have to be moistened again.
- Removing paint residues
Oil paint or enamel is removed using coarse sandpaper. Water-based emulsion and whitewash, similar to old wallpaper, are first soaked in a soap solution and then removed with a spatula.
- Elimination of defects in pasted surfaces
For high-quality gluing of paper wallpaper, it is necessary to carefully plaster all the cracks and smooth out any unevenness on the walls or ceiling, after which they should be cleaned using a plaster mesh.
- Primer
Before wallpapering, the surface of the walls and ceiling must be primed. This will ensure normal adhesion of the glue and prevent the formation of air bubbles under the wallpaper.
- Cleaning
After completing the preparatory work, the room must be wet cleaned. This will avoid contamination of the new wallpaper during the cutting process.
Preparation for gluing paper wallpaper in the photo
Preparatory stage
In order for the event of gluing paper wallpaper to be crowned with success, you must first prepare, and thoroughly. The task is to obtain a hard, dry and even surface on which the wallpaper will be glued.
First, you need to turn off all electrical appliances in the workroom and remove the covers of electrical outlets and switches. It is advisable to separate the baseboard and floor plinths. To avoid disturbing the sequence of installing them in the same place in the future, it is recommended to make notes with a marker or pen on the inside.
The process of preparing the base takes place differently, depending on the type, material and condition of the surface.
Walls with remnants of old wallpaper
It is necessary to clean the surface of the previous wallpaper, since high-quality adhesive is only possible on a rigid base. Near jambs, corners, baseboards, etc., usually the dilapidated coating comes off immediately. But to thoroughly clean the walls themselves, you will have to work hard. If you have previously hung structural wallpaper or vinyl with a paper layer, you should first get rid of their top layer.
If the old wallpaper was pasted overlapping, then at the joints the wallpaper can be cut or sanded. As a last resort, the joints can be puttied (the width of the strip is about 15 cm). In lumpy areas where there were previously remnants of torn wallpaper, you will have to sand the entire area. It is recommended to lightly sand the entire surface of the wall, including putty areas, to completely level the surface.
You should go over the putty areas with a vacuum cleaner, then treat them with a special primer.
Advice! Use a special compound or diluted wallpaper glue as a primer.
Surface covered with glass wallpaper or painted fabric
To clean such surfaces, they must be treated with a solvent or similar product that can remove the paint. Then the entire base is puttyed, sanded and primed.
Surface previously covered with textile or straw cloth
We recommend using a commercially available product specifically designed for removing textile coverings. There are cases when the top layer of such wallpaper can be easily removed without the use of additional compounds. After removing the old coating, the surface must be puttyed and primed.
Painted surface
The wall should be thoroughly washed with solvent or another similar paint remover. Then scrape off the softened paint with a spatula, starting with cracks or peeling coating. Then fill and sand the base.
Advice! Construction paint may not be removed from the walls, but one must take into account that it will show through thin and especially light-colored wallpaper. You will have to either use plaster or choose thicker wallpaper.
Plaster or concrete
It is necessary to carefully fill all irregularities, joints and the entire surface with a thin layer. Then you should sand and collect small particles with a vacuum cleaner. Now you can prime.
Gypsum, fiberboard and chipboard
Here you need to cover all joints and recesses from nails and screws with putty. It is more convenient to carry out the work with a traditional spatula. Then the base is sanded and primed. At the joints of chipboard, it is necessary to ensure protection from destruction by resorting to priming with alkyd paint.
Contrasting surface
If the prepared base differs sharply in color from the wallpaper, then it is recommended to prime the wall with the recommended primer, choosing a suitable shade. You can paint only those places on the walls where the joints of the new wallpaper will be.
Advice! When purchasing paper wallpaper, be sure to check the article number of each roll. This is the number shown on the label. It should be the same on all rolls. This simple procedure guarantees that the pattern and shade are identical throughout the entire room.
Fabric preparation
Wallpaper is sold in rolls, which are printed immediately before starting work. But first you need to mark the walls. To do this you will need a plumb bob and a tracer. If you don't have the latter, you can use a level, a long ruler and a pencil or chalk. You should mark the top level of the wallpaper (for rooms with high ceilings) and use vertical lines to mark the joints of the canvas.
Vertical marking of walls using a plumb line
There are two methods of wallpapering: butt and overlap. If the first option cannot be used, gluing the canvas should be done in the direction towards natural or electric lighting.
Wallpapering with an overlap followed by trimming
Immediately before gluing, you can perform wall stripping: apply a 10-cm strip of glue along the corner lines, as well as the area along the baseboard and ceiling line. After 2-3 minutes the wall will be ready for gluing.
When starting to cut wallpaper, you should wipe the surface of the table or, in the absence of the latter, the area of the floor on which you will temporarily stack the cut pieces of canvas. The cutting is carried out with a 3-5 cm margin on both sides of each segment for a small overlap along the line of the plinth and ceiling. The finished stack is shifted with a 10-15 cm indentation, due to which, when applying glue to the top sheet, you will glue the joint strip on the next one. And remember that paper tends to get wet quickly, so the glue should be applied in a moderate layer.
Gluing the fabric using a wallpaper brush
After gluing, the top strip is folded in half, after which the same action, only in the opposite direction, must be repeated. The folded strip is set aside, after which you can proceed to the next one while the previous one is soaked in glue. It’s not worth using more than 3-4 strips: you may not be able to complete the pasting in time, since wallpaper glue dries very quickly in air.
Option for folding a glued sheet of wallpaper
General recommendations
So, you have chosen the design that suits you, cleared the room and got to work. DIY paper wallpaper sticker has some features. To hang wallpaper correctly, without subsequent surprises, you should consider some general recommendations that will help you avoid mistakes during the work process:
- Study the recommendations from the wallpaper and adhesive manufacturer. On the roll itself you will find information on how to glue this type of paper wallpaper. Manufacturers also indicate whether to glue them end-to-end or overlapping.
- Prepare the walls, this is the most important point, pay special attention to them. The surfaces must be thoroughly cleaned, and, if necessary, all possible irregularities and cracks must be puttied. A primer must be applied to the prepared walls. You should start gluing only after the last one has completely dried.
- All switches and sockets are disconnected from the network and freed from external boxes; they can be put back in place after completion of work.
- The gluing of the first strip must be approached with the greatest responsibility; the quality of gluing of all other strips will depend on the correctness of the work.
- There should be no drafts in the room where the work takes place, otherwise all the work will go down the drain. The canvases may simply peel off.
- Wallpaper coverings made of paper, which are not intended to be glued end-to-end, are equipped with a special edge, but it should be noted that gluing with an overlap is only suitable for thin sheets. Thick wallpaper, such as embossed duplex wallpaper, is best glued end-to-end, so the seam will be less noticeable. In this case, if there is an edge, it will need to be cut on both sides.
Selection, preparation and application of wallpaper glue
For gluing medium-density paper, lightweight wallpaper adhesive, for example, KMC, is ideal. As for its quantity, it depends on the area to be pasted, which, like all the necessary proportions, must be indicated on the packaging. When purchasing, it is very important to pay attention to the presence of a quality certificate. The glue must not contain substances harmful to health.
Lightweight, quick-drying glue for paper wallpaper.
Preparation of wallpaper glue:
- 5-7 liters of water are poured into a pre-prepared container;
- the water is shaken and the dry adhesive mixture is poured into the resulting whirlpool;
- the resulting mass must be thoroughly stirred and then left for some time to swell.
Thickened wallpaper glue should be uniform. If you find lumps, they can be easily eliminated by re-stirring the mass.
Ready-to-use adhesive mass
The glue should be applied evenly to the back side of the wallpaper, distributing it over the entire surface. It is most convenient to use a roller for this. After applying the glue, you need to wait 5-7 minutes so that it is well absorbed by the paper web.
If the glue accidentally gets on the front side of the wallpaper during application, it must be removed with a damp sponge. You shouldn’t put too much effort into this – it’s better to use more water. This will preserve the structure and color of the front surface.
Gluing the fabric with a roller
Some types of wallpaper glue have special additives that reduce its setting time. Therefore, before cooking, you must carefully read the instructions, otherwise you will face unpleasant surprises in the form of a composition that thickens too quickly.
It is recommended to buy wallpaper glue at reliable points of sale, having previously learned basic information about the brand and properties of the product you are interested in.
Which glue to choose
It is better to use the one recommended by the manufacturer and indicated in the instructions for the wallpaper. As a last resort, take non-woven glue, which is highly effective. It is usually used for vinyl, American wallpaper, as well as duplex, so it is certainly suitable for attaching paper. However, if there is an adhesive specifically designed for paper wallpaper that is affordable for us, we use it.
The most common such adhesive is CMC. Available in powder form. It does not lose its quality for a long time if properly stored in a dry place. The glue is gradually poured into warm water and mixed thoroughly. Then they leave it in the room in which they plan to glue the wallpaper for 9-12 hours, stirring occasionally, until it is completely ready. First, pour just a little water, then add in small portions until it reaches a jelly-like consistency, stirring constantly.
Paper wallpaper also attaches well to Gumilax and Bustilat glues. The procedure for preparing the compositions is approximately the same as the CMC, but before starting work you should still read the instructions on the packaging.
Technology of pasting walls and ceilings with paper wallpaper
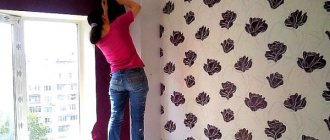
You need to glue wallpaper quickly and carefully. That is why it is advisable to work together. Paper wallpaper is almost always laid with a slight overlap, otherwise, due to the low wear resistance of the canvas, the joints will fray very quickly.
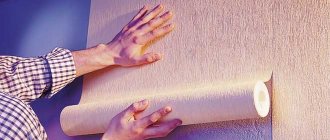
The sheet of canvas that you glued first, after 5-7 minutes, is unbent so as to gain access to the upper edge. Next, you need to stick the top strip on the wall - just on the section of the wall that you treated with glue. Now, holding the canvas by the top, you need to carefully unbend it and stick it on the wall. At the same time, using smooth arcing movements using a dry sponge or rag, you need to smooth the wallpaper until it sticks properly.
Gluing wallpaper to the wall
Small air bubbles can be left alone. When the glue dries, the paper wallpaper will shrink slightly and allow air to escape. If large bubbles have formed, they need to be carefully pierced with a needle and the air removed. In such areas it won't hurt to add glue. This can be done using a syringe, while the edges of the canvas are best glued using a brush.
Removing air bubbles
After gluing 4-5 sheets, it is very desirable to remove the indents - after the glue dries, carefully cutting them off without affecting the main sheet will be very problematic. Do not forget to control the orientation of the pattern on adjacent sections of the canvas - it must match.
Wallpapering the ceiling is done in the same way, with the only difference being that the canvas should be placed perpendicular to the direction of lighting. Please note that wallpaper on the ceiling is always glued end to end.
Rolling joints with a rubber roller
The joint lines between adjacent sheets need to be rolled with a narrow rubber roller. It doesn’t hurt to carry out this operation when gluing wallpaper onto walls with an overlap - as practice shows, this is where they most often come off due to the different microstructure, and therefore the absorbency, of the front and back surfaces of the wallpaper. You also need to remember to cut out the fabric in the currents for placing switches and sockets. It is advisable to do this before gluing - after the hole, all that remains is to correct it with a stationery knife.
Wallpapering the ceiling
If you have carefully prepared for gluing, chosen reliable glue, and correctly cut and pasted the paper wallpaper, it will serve you for as long as possible. Of course, provided that you protect them from damage, moisture and dirt.
How to hang paper wallpaper correctly
If the wallpaper needs to be installed with an overlap, then work must begin from the window opening in order to avoid a shadow effect at the joints. In a room with several windows, gluing should begin from the southern opening.
- It is necessary to draw a vertical line along the wall with a pencil, retreating from the window to the width of the strip of wallpaper. To determine the vertical, you can use a plumb line, a level, or a string with scissors.
- Straighten the “wallpaper” folded in half.
- Attach the upper part of the strip to the wall, taking into account the 2-3 cm allowance that is intended for the ceiling plinth.
- Make sure the strip is applied vertically. The rest of the stripes will be equal to it.
- Unfold the lower part of the canvas and glue it to the wall surface.
- Press the canvas with a smoothing motion using a roller or a wide wallpaper brush. Directions of movement from the middle of the strip to the edges.
- The fabric should be pressed most carefully along the edges near the baseboards and sockets. It wouldn't hurt to re-apply glue in these places. Cut off excess with a blade or wallpaper knife.
- When applying the next strip, you need to make sure that it runs vertically, focusing on the glued canvas.
- When gluing butt joints, special care is required.
- The overlap method differs in that the second strip is glued overlapping the first by 2-3 mm.
- To apply the next strips, repeat steps two through seven.
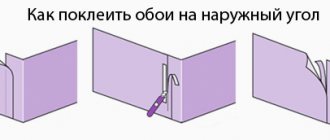
Pasting the outer corner
First, you need to measure the gap between the top of the corner and the edge of the last strip of wallpaper, and cut a strip of this width with a 1-2-centimeter bend beyond the outer corner. And if you make cuts at the top and bottom, you can easily bend the canvas around the corner.
Place the second strip, cut from the previous one, overlapping the first one by 1 cm, even if the pattern does not match.
Internal corner
Measure the required distance. Cut the canvas lengthwise so that it extends 1 cm onto the next wall.
Glue the second strip, cut from the previous one, from the corner. To control verticality, use a plumb line.
Rough stripe
There are cases when the canvas is glued crookedly. Can we close our eyes to this? Keep in mind that it is better to correct a noticed error immediately than to “admire” the curvature of the picture for a long time later.
To correct the situation, do not move the canvas on the wall under any circumstances. So it will definitely break. It is better to carefully remove the entire strip from the wall and re-stick it as expected, or cut off a fresh strip.
Photo gallery
Vladislav
The nuances of working with wallpaper
The fight against bubbles will differ significantly in each case, which is due to the different density of the wallpaper and the composition of the glue.
Non-woven wallpaper
For production, non-woven materials based on cellulose are used. Polymer additives make them the most durable, resistant to soaking and loss of shape.
Solution to the problem:
- removing the first sheet and leveling the wall;
- smoothing new canvases from the middle to the edges to expel all the air;
- If bubbles are detected after drying, filling the void with thick glue will help.
Blisters on such material are extremely rare and are caused by poor wall preparation. In some cases, when dismantling is impossible due to severe unevenness, additional decoration is used with stickers, frames with photographs or paintings.
Vinyl
Vinyl wallpaper comes in 2 types:
- Paper based . In this case, glue will need to be applied to the canvas and the wall. Let it sit for a while, and then fasten it, starting from the top.
- On a non-woven base , which does not require pre-impregnation. Such wallpaper is immediately glued to the oiled wall.
Non-woven fabric is a rather heavy material that requires special thick glue.
Paper
This option of budget material is often produced with a minimum width of 52 cm, convenient for gluing, but still requires care.
After applying the adhesive, the canvas is allowed to sit for a while so that it is saturated with the composition, becomes obedient and easier to lay on the wall.
This material is more susceptible to swelling and damage. You should carefully attach the canvas first from above to the ceiling, then lightly move the roller from bottom to top, from the middle to the edges, to expel excess glue and air.
Materials and tools
Despite the apparent ease, gluing paper wallpaper requires care and has its own characteristics. Violation of technology and errors in the choice of materials can lead to the fact that the trellises will weakly adhere to the wall, the joints will separate, and bubbles or yellow spots will form on the surface.
Glue selection
The determination of the adhesive composition depends on the selected type of wallpaper. For thin single-layer trellises, cotton or cellulose products are best suited. You can also use universal formulations. To glue a thicker two-layer duplex, non-woven compounds, CMC and even adhesives for vinyl wallpaper are used, if you add PVA to them, which will increase the adhesion strength. There are special varieties developed for paper wallpaper (this must be indicated on the packaging).
Glue for gluing paper trellises must meet the following requirements:
- dissolving in water to the desired consistency without forming lumps;
- good adhesion not only to paper, but also to stone walls;
- preservation of color shades on the surface after drying;
- affordable cost and simple preparation.
If we consider adhesive compositions by price indicators, we can highlight expensive European brands, “Metylan” and “Kleo”. The cost of these materials is fully justified by their high quality and excellent adhesion.
More popular glue varieties from the middle price range:
- “Quality” – mixes quickly and easily, recommended for gluing duplex canvases;
- “Moment” is a thick composition that slowly impregnates paper, so it can be used to secure thin single-layer trellises;
- "Econ" is a high-quality German-made adhesive designed specifically for paper wallpaper.
The cheapest gluing option involves the use of cellulose CMC, Bustilat, or their mixture with PVA.
In addition to glue, you need to buy primer for pre-treatment of walls. This will increase the adhesion of the paper coating to the stone, concrete or plastered surface.
Glue calculation
Almost all manufacturers indicate the standard consumption of adhesive solution for the number of standard rolls (10 x 0.53 meters). Sometimes the required amount of glue per 1 m2 is indicated. However, the standard consumption requires priming the surface, since a dry wall surface quickly absorbs moisture and glue consumption increases significantly.
Calculation of rolls
Determining the amount of wallpaper begins with measuring the height of the room and determining the length of the canvases. In this case, it is necessary to take into account the presence of permanent skirting boards. After this, you need to divide the length of the roll (usually 10 or 12 meters) by the resulting value and you can find out the number of strips obtained from one tube.
Next, the perimeter of the room is measured, the result is divided by the width of the roll. The area of windows and doors is not deducted. This will be your supply of material in case of unexpected losses. Once you know how many strips are required to decorate the room, it will be easy to calculate the number of rolls.