It is not always possible to make a strong concrete screed in an apartment, so alternative methods are used, one of which is leveling the base with plywood.
You can lay linoleum on such a floor or cover it with a laminate, but the question remains open: is it possible to lay tiles on plywood, because this is a wooden base that will never compare in strength to concrete.
The developments of professionals and modern technologies make it possible to lay tiles on plywood, being confident that it will adhere firmly to such a base.
Advantages and disadvantages of a plywood base
Before you start doing the work, you need to know about the advantages and disadvantages of this technology.
pros
- The work is completed in a short time frame.
- There is no need to bring concrete and reinforcement into the room, lay down film waterproofing, and then worry about the neighbors below not getting their ceiling wet.
- In old houses, the low load-bearing capacity of the structure does not allow pouring a heavy concrete screed, so laying tiles on plywood on the floor is almost the only acceptable way to level and strengthen the existing foundation.
- You can lay tiles in rooms with high humidity (bathroom, kitchen).
Flaws
- It is necessary to use plywood with a thickness of at least 22 mm, and when installing it on joists, then 30 mm.
- In rooms with high humidity, it is necessary to take care of reliable waterproofing.
- It is impossible to make a warm floor.
- If water gets on the base under the tiles, the plywood will delaminate.
Having weighed the pros and cons, and made the final decision in favor of this technology, let’s look at how to lay tiles on plywood.
A special case
How to glue plywood to ceramic tiles? Yes, the need for such a connection rarely arises; however, it is worth considering it too.
- A small plywood shelf or picture frame will be held in place by silicone sealant. While it is setting, you will need to fix the gluing area.
- Massive plywood cabinets or shelves will have to be attached not to the tile, but to the base underneath it. The tiles are drilled with a special drill for glass and tiles; Then a hammer drill and anchors are used.
In any case, you need to be careful
Preparation
When you decide to glue tiles onto plywood, you need to take care of the base, making it durable. Depending on the type of floor you have, the approach to leveling it varies.
Smooth wooden floor
Very rarely, an old wooden floor is level, with differences of no more than 5 mm per 1 m2. In this case, it is still recommended to check the condition of the joists and boards.
Most often, the problem is observed in the corners of the building, so it is necessary to dismantle the end board and look under the floor - if the board is intact and not corroded by bugs, then, having installed the board in place, you can continue working.
It is important! If the floor creaks, then you need to fix it by screwing 2 self-tapping screws into each place where the floorboards come into contact with the joists, placing them at an angle to each other.
Using the rule, you need to check the condition of the floor. The illustration below shows what kind of floor there is and how to navigate the existing wooden base when selecting the thickness of the plywood.
note
A wavy floor cannot be leveled with thin plywood, as it will subsequently sag and the tiles will fall off.
Wooden floor with significant differences
A very uneven floor will have to be leveled using wooden sheathing (like under drywall when leveling walls).
It is important! It is not recommended to use large sheets for making a plywood base for tiles - maximum size 1525x1525 mm or less. Professionals recommend cutting the sheet into 4 parts to reduce temperature deformation.
The design of the sheathing should be such that the plywood sheet is located in the middle of the board. For example, if a board with a width of 50 mm is used, and the sheet has dimensions of 1525 × 1525 mm, then the cell should have internal dimensions of 1500 × 1500 mm, and external dimensions of 1550 × 1550 mm (you need to add 5 mm (or a little more) for the gap between the sheets, otherwise you will have to trim the edges of the plywood later).
The internal parts of the sheathing, which act as stiffeners, are located at a distance of no more than 500 mm from each other. If tiles are laid on plywood in a bathroom, then a plastic film should be laid under the sheathing to serve as a waterproofing material.
The laser level marks the horizon along which the sheathing is leveled. Pieces of plywood of different thicknesses can serve as stands. Having finished leveling the sheathing, you should securely attach it to the floor with self-tapping screws, screwing them through the paved supports. Then a sheet of plywood is laid and secured to the sheathing with self-tapping screws.
Preparing the surface for a plywood base
Before laying plywood, you need to perform the following preparatory measures:
- remove old finishing putty from the surface;
- clean the base from debris and dust;
- seal cracks and joints between the floor and walls using cement-sand mortar;
- in the case of a rough wooden floor, additional antiseptic measures must be taken;
- install the necessary beacons using a building level.
You can replace the level with a line drawn on the wall along the entire perimeter of the room. It will indicate the level at which the plywood sheets should be laid.
Installation of plywood on joists
The most unpleasant, but, unfortunately, the most common situation is that the floor has rotted and must be dismantled, but a concrete base cannot be made. This is not a death sentence, because laying tiles on plywood can be done if the plywood is attached to the joists. The principle is similar to installation on the lathing, only the technology is different.
We bring to your attention a video demonstrating the process of installing joists and attaching plywood to them.
When attaching sheets of plywood, it is important to take into account possible thermal expansion, so they need to be placed at some distance:
- from each other – 5 mm;
- from the walls - 1 cm.
The voids near the walls can be covered with plinths. The seams between the sheets are sealed with polymer elastic putty.
It is important! There are many ways to level a floor, but we have only talked about a few so that the reader has an idea of what will need to be done.
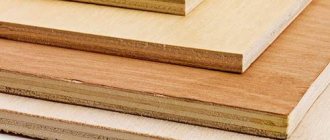
Plywood selection
Tiles are a rather heavy material, so it is necessary to choose the right plywood sheet that will have the appropriate density and thickness. It is one thing to purchase such a base for the ceiling and walls, and another thing for the floor. In this case, the instructions recommend purchasing material whose thickness is 28 mm or more.
The problem may lie not in the moment of laying, but in the consequences when insufficient sheet thickness leads to deformation. There is not much to say about the material itself. It is only necessary to note that it is environmentally friendly. Plywood can be moisture-proof, in this case we are talking about its veneered variety, which is not inferior to clay brick.
Which glue to buy
How to glue tiles to plywood? This issue deserves detailed consideration, because you will have to glue the tiles to a base made of wood material, which is characterized by its instability.
Therefore, when choosing an adhesive composition, it is necessary to take into account some nuances:
- A sheet of plywood is made up of thin layers of brittle veneer, and if the bond is broken, the plywood will delaminate and will no longer be strong. This feature of the material is a good reason to choose an adhesive that does not penetrate deeply into the structure of the material.
- No matter how strong the base is, it can still bend slightly under load. In this case, the cement-based adhesive will not hold the tile, and it will easily come away from the plywood. Therefore, only elastic adhesive mixtures should be used.
The composition of such mixtures includes highly elastic components:
- microfiber;
- fiberglass;
- silicone;
- silane and other modifying additives.
It is important! When purchasing glue, make sure that the list of listed materials for which it is intended to work includes plywood.
Types and requirements for glue
Since plywood is a flexible material, the adhesive must be selected with increased elasticity properties. The most effective is polyurethane glue. An example is Thomsit P 625.
This glue fulfills all installation requirements. The composition does not include water or solvents, so the surface layer of the building material does not swell or peel off. Significant adhesion and strength of the coating to the base is achieved after a short period of time.
Glue containing silane has also proven itself well. Its advantage is the ability to have significant adhesion even in a damp room. An example of such glue is Ceresit CM 9. It can prevent the formation of fungus. Has high adhesion. The seams are flexible.
Often, liquid nails or silicone sealant are used to glue such surfaces together.
Before using liquid nails or sealant, be sure to treat the plywood with drying oil and primer.
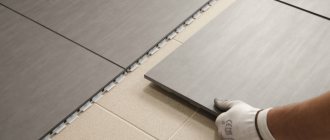
Laying tiles
Having made a solid base, let's look at how to glue ceramic tiles to plywood.
Regardless of the technology used to level the base, the work is performed in the following order:
- If you are not sure that each screw is recessed into the plywood, you should check again and, if necessary, tighten them with a screwdriver.
- The existing base must be sanded and dusted with a vacuum cleaner, and then wiped with a damp cloth.
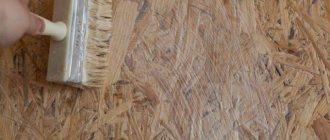
- Regardless of whether simple plywood is used or moisture-resistant, the surface is primed twice. The primer is applied a second time only after the previously applied glue has completely dried.
- Before gluing tiles to plywood in a kitchen or bathroom, an additional layer of waterproofing is applied to the base.
Upon completion of these steps (only after the wooden base has completely dried), the tiles can be laid on the plywood floor.
How to lay tiles on plywood, step-by-step video instructions
Sealing seams
Grouting tile joints
The width of the seams can be controlled using spacers.
Therefore, even at the stage of purchasing them, it is worth deciding on their width, because this will determine what the final result of the work will be.
Such crosses vary from 0.1 to 0.3 cm in size.
Grouting of joints begins only when the glue is completely dry.
But professionals recommend adding another 1-2 hours to the time indicated on the package. The work then looks like this:
- separators are removed from the seams
- the entire floor is re-cleaned of debris and additionally wiped with a damp sponge
- While the surface is drying, dilute the selected grout in a container
- using a rubber spatula, apply the product to the seams
- after a few minutes, clean the surface of the tile itself with a damp cloth to remove excess grout
- as soon as everything is dry, the entire floor is washed again, but with detergent
After 72 hours, the seams must be treated with another special grout. It is spread and applied to the seams with a rubber knife at the joints of the elements. Here, too, after some time, wet cleaning is carried out, and after half an hour, the surface is wiped with a dry cloth.
After such events, the floor is ready for full use.
The process of laying tiles on plywood
- One of the important preparatory steps that is performed before gluing the tiles to the plywood is marking the base. The center of the room is determined, and 2 intersecting lines are drawn from it parallel to the walls at an angle of 90˚.
For diagonal laying of tiles, the markings are done slightly differently - lines are drawn diagonally, but certainly also at an angle of 90˚. - In large rooms, installation begins from the center, but this is not a rule, but a preference. So, in a 1x1.5 m toilet there is no point in making markings, and work starts from the wall. In the kitchen, you can find not the center of the room, but the center of the working area, on which furniture will not be installed.
- Now the floor tiles are laid on the plywood “dry” - the tiles are laid out on the floor in the same way as they will later be glued. If necessary, the center point can be moved to the side so that you don't have to do a lot of trimming. It may also happen that the chosen pattern or the chosen scheme for laying tiles on the floor does not look right in this room. In general, it all depends on the type of room and the preferences of the owner. Video instructions for laying tiles on plywood
- Having chosen the appropriate method for laying tiles on plywood, you can take a photo of what happened or draw up a new diagram.
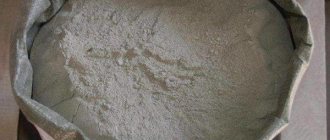
- If you purchased tile adhesive for plywood in powder form, then it must be properly mixed with a mixer, observing the manufacturer’s proportions indicated on the packaging. It will not be possible to thoroughly mix the composition by hand, and lumps will remain in it. A small amount of glue is prepared at a time, as it dries quickly.
- Even plywood well-impregnated with a primer absorbs moisture well, and the glue intended for installing tiles on a wooden surface dries quickly. Therefore, especially when a non-professional gets down to business, it is better to start with a small area, 1-3 tiles in size.
- Apply glue to the floor using a notched trowel, and then lay the tiles on the plywood. The use of thin adhesive imposes some restrictions on the force applied to the tile when it is pressed to the base. If you overdo it, the mixture will come out between the seams, and the tile itself will drop below the level. When gluing tiles, it is recommended to use a SVP, then each time you will not have to check the evenness of the laid facing material with a level.
- It is imperative to leave a gap between the tiles, which will be helped by the SVP or mounting crosses.
- After the glue has dried, the auxiliary elements (crosses or SVP) are removed, the seams are cleaned.
- An elastic fugue should also be used for grouting joints.
An example of laying tiles on a plywood floor - video
We hope that you have found the answer to the question of how to glue tiles to plywood, and now you can do this work yourself.
Installation methods
Tile is a material that is not capable of transforming under the slightest changes in the original base. Wood is considered as an organic substance that undergoes geometric changes under conditions of interaction with external humidity indicators or temperature conditions. If the adhesive does not match the characteristics of the two main materials, visible defects will appear on the cladding over time. Correcting masonry defects will require additional financial expenses to restore the structure of the entire structure.
Method No. 1
Option for boards that are close to perfect condition or require minor repairs.
Installation sequence
- Clean the surface from previous layers of old material.
- Soak in antiseptic and let dry.
- By applying glassine or a vapor barrier membrane, install a waterproofing layer.
- Use a thick plywood sheet or chipboard to level the surface. Lay the sheets in a checkerboard pattern, leaving compensating gaps around the perimeter, which are then filled with mounting mortar.
- In order to properly and efficiently glue tiles to a wooden surface, you need to use an adhesive composition based on epoxy and polyurethane. The substances retain their elastic properties after drying, which compensates for minor fluctuations in the base.
Epoxy-polyurethane adhesive is an expensive material used in professional cladding. How else can you glue tiles to wood as part of a budget renovation?
If the room is high, a regular screed with reinforced mesh will help compensate for unevenness and ensure good adhesion. To do this, impregnate plywood or chipboard with latex or hot drying oil. Then stretch and secure the reinforced mesh with self-tapping screws. Fill the holes with a self-leveling solution with the addition of liquid glass.
The second alignment option is to fasten gypsum fiber sheets in a checkerboard pattern with minimal gaps between them
It is important to leave only compensating gaps between the wall joints
Gypsum fiber and liquid glass screed are characterized by deformation-resistant properties, so you can glue the tiles to a wooden surface with ordinary cement.
Method No. 2
This option is suitable for damaged boards where it is necessary to partially disassemble the structure to replace them.
Before gluing the tiles to the wood, it is necessary to perform preliminary waterproofing with roofing felt. Install a plaster mesh onto the roofing felt at a distance of 1.5 cm from the wall. Use cement mortar to level the wall around the entire perimeter. And as the cement mortar dries, make notches to ensure better adhesion.
Apply the cladding onto a completely dry cement surface. To quickly fix the masonry, experienced craftsmen recommend pre-soaking the tiles in water for 8-10 hours. Here, ordinary cement can also be used as an adhesive.
Method No. 3
An ideal option for quick repairs in conditions of limited time and limited financial investments.
- Strengthening the coating with moisture-resistant plasterboard using a two-component polyurethane composition.
- To improve rigidity, lay plasterboard slabs in two layers without matching bottom and top seams.
- Fill the surface joints with sealant and prime with a non-absorbent solution.
- After the screed has dried, the tiles can be laid using a spiral application of any adhesive compatible with plasterboard.
As you can see, with a competent approach to the preparatory process, the issue of installing tiles on wood is realistically feasible within any budget. A detailed examination of the properties of cladding adhesive will allow you to accurately determine which composition can be used in a particular room, taking into account the characteristics of a certain type of wood surface.
Masonry process
Step-by-step instructions will allow you to get excellent results, making the coating not only strong and durable, but also beautiful. Waterproofing plays an important role, since wood soon becomes deformed due to changes in temperature and moisture. The choice of glue must be made carefully; the composition must be as elastic as possible - thanks to this, the ceramics will not crack under load. It is extremely important to calculate in advance the required amount of materials, estimate the amount of future work, and examine the surface in order to prepare for the installation process.
Primer for plywood: types and properties
For application to plywood, it is permissible to use different types of primer. Such mixtures contain film-forming components - adhesive mixtures, oils, polymers, and special additives.
Each brand offers a unique primer formula, adding fillers that provide quick drying, viscosity and other characteristics. Manufacturers can also introduce coloring pigments and bactericidal additives.
Depending on the base, there are oil, acrylic, alkyd, and mineral compositions. Surfaces treated with different types of soil differ in their characteristics during operation. Therefore, before purchasing this or that mixture, it is important to determine the desired surface properties.
Acrylic
This primer is made on the basis of acrylic. That is why the composition has the best characteristics inherent in acrylic dyes and impregnations. The composition forms a protective film on the surface and enters the pores and cracks of the sheets, creating an additional protective layer on them. These properties can be enhanced by coloring. To do this, it is recommended to use special paints and varnishes that are compatible with the primer.
The advantages of the material include the following:
- quick drying;
- no pungent odor;
- creating a protective film on the surface of plywood.
However, the material also has some disadvantages:
- high soil consumption;
- the presence of harmful components in some mixtures.
Alkyd
Such primers fit perfectly on untreated plywood. On wood they help create a perfect finish. Thanks to the formation of the film, it is possible to strengthen and protect the base. As a result, it is possible to achieve uniform application of paints and varnishes. Alkyd compounds are considered a good impregnation. They can be applied in one or more layers as desired.
The advantages of alkyd primers include the following:
- uniform application;
- creation of a protective film;
- impregnation of plywood sheets.
However, the materials also have disadvantages:
- long drying period;
- strong toxic odors.
Compositions from drying oil
Such products are distinguished by pronounced moisture-protective properties. Thanks to this, they protect surfaces from liquids.
Expert opinion
Zakharova Irina Yurievna
Cleaning professional with 15 years of experience. Our best expert.
Ask a Question
Drying oil-based primers can be used for interior and exterior work.
The advantages of the material include the following:
- moisture-repellent properties;
- versatility of application.
At the same time, primers also have disadvantages:
- toxic components in the composition;
- Strong smell.
Phenolic
Such primers are most often used for processing plywood sheets in the furniture industry. They are characterized by high impregnation characteristics and an affordable price.
On average, it takes 10 hours to dry completely.
The advantages of the material include:
- versatility of use;
- high absorbency;
- affordable price.
There are also disadvantages:
- relatively long drying time;
- danger of phenol to human health.
See also
Technical characteristics and composition of enamel KO-8101, application rules
Shellac
This is an excellent option for different types of wood surfaces. Such primers can be used as impregnations before using varnish. The milky juice of insects is used to produce shellac compositions.
The advantages of primers include:
- high efficiency;
- possibility of use as an impregnation;
- safe composition.
However, the material also has disadvantages:
- high price;
- high consumption.
Epoxy and polyurethane
Such products are made on the basis of polyurethane and epoxy resin. Before using them, it is important to carefully read the instructions for use.
The advantages of such compositions include:
- resistance to the influence of external factors;
- economical consumption;
- high strength and durability.
At the same time, the soil also has disadvantages:
- the presence of toxic components in the composition;
- high price;
- long hardening time.
Styrene
Such mixtures lead to the formation of a film on the surface of the plywood. They provide reliable protection of materials from mold and rot. The compositions can be combined with phthalic and alkyd enamels.
The advantages of the substances include:
- creation of a protective film;
- protection of materials from mold and rot;
- compatibility with different types of enamels.
There are also some disadvantages:
- high price;
- harmful components in the composition.
Nitrocellulose varnish
This type of varnish is often used as a primer. It is great for woodworking.
The advantages of the coating include the following:
- quick drying;
- good adhesion to the surface;
- high moisture resistance;
- ease of application.
At the same time, the substance also has disadvantages:
- risk of detachment;
- presence of flammable components;
- low wear resistance.
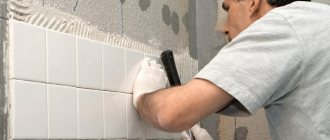
Grout
So, the last stage is grouting the ceramics. The process is the simplest, for which you will need the grout itself (ready or dry) and a rubber spatula. The material is applied with a tool along the joint areas of the tiles with slight pressure so that the grout fits tightly into the gap. The spatula should be held at a right angle to the tiled surface from above.
Pay attention to some points regarding the quality of grout.
- It can be applied over ceramic cladding only after the latter has completely dried.
- In the process of laying the tiles themselves, crosses are used that determine the thickness of the seam. So, if a large amount of glue accumulates in the gap, then you need to make sure that it does not take up much space. It is necessary to leave space for grouting. Therefore, excess glue must be removed at the cladding stage, when it has not yet dried and turned into stone.
- After the fugue has completely dried, it must be removed with a clean cloth or sponge. No brushes or other rough materials.
Features of the preparatory stage
Laying ceramic elements on plywood sheets has its own special installation moments and specific pitfalls. Since ceramics and tiles are heavy, the selection and preparation of a plywood base must be approached very responsibly.
- Plywood for walls should have an optimal thickness of 28 mm, for the floor, when laid on joists, at least 30 mm. Its structure should be strong and not fragile.
- All plywood structures must be securely fastened with self-tapping screws. During installation, parts of the products must fit tightly against each other, since gaps between them are unacceptable. This is done so that in the future during operation there will be no slightest deflections that will lead to sagging, peeling and cracking of the tiles.
- The step between the lags, when further laying the floor covering, should be about 30 cm to ensure even distribution of the load on each ceramic element.
- The number of tiles required for installation must be purchased, taking into account:
- Room area;
- Size of one tile;
- Laying method;
- Feature of the drawing;
- Waste for cutting.
Tools and materials
A set of necessary materials and tools in the form of:
- Machines for sanding plywood sheets;
- Special glue with elastic properties;
- Polyethylene film for waterproofing;
- Primer composition;
- Self-tapping screws for wood;
- Notched trowel;
- Pencil for marking;
- Construction level;
- Roulettes;
- Special plastic crosses;
- Rulers;
- Grout of the required shade;
- Special glue.
Design solutions
The financial costs of repairs directly depend on the correct calculation of the amount of material for forming a porcelain stoneware floor and the planned installation scheme; in connection with this, it is important to consider the following:
- It is customary to add 15% to the area of purchased tiles for trimming to adjust the covering to the perimeter of the room. With complex styling patterns (zigzag, checkerboard), the increase in volume will be another 5%.
- When selecting tiles, tone and size are of great importance, where the latter is the difference between the declared and actual size of the product. There are often cases when the parameters of 300 × 300 mm are indicated on the packaging, but in reality they differ by several millimeters up or down. The reason for this is that the manufacturer calibrates the products after carrying out the entire complex of technological measures and packages them in packages, indicating the rounded size. The tiles in one package are uniform, but in another batch they may differ. With large floor areas and small discrepancies, geometric errors can be leveled out due to the expansion joint and the thickness of the adhesive.
Porcelain tiles
- There is a high probability that the tone of the product in different boxes is also different. Therefore, when purchasing a product, it is important to select according to this parameter.
- Giving preference to the formation of a complex pattern, it seems useful to a person without sufficient experience to mark the base according to the expected outlines. This will help you accurately calculate the required amount of tile material and make sure you choose the right ornament.
Important! If you decide to lay tiles using a seamless method, pay special attention to the uniformity of the calibration and tone of the purchased materials.
Distinctive feature of wood-containing materials
Materials containing wood in the form of shavings or chips and various resins as a binder, subject to certain technological requirements, can be successfully used as a base for covering the surface with ceramics. The most common ones are plywood, particleboard (particleboard) and oriented strand board (OSB).
Before applying the adhesive composition to plywood, it is recommended to learn more about its composition
To obtain a high-quality result and prevent premature destruction of the surface being tiled, laying ceramic tiles on these materials must take into account two important factors:
- Since the main component of plywood, chipboard and OSB is wood, these materials will have the same properties as the original material. In particular, under the influence of excess moisture, wood swells and, conversely, in the absence of moisture, it dries out. That is, the surface being coated lacks dynamic stability, and constant movement of the base can negatively affect the condition of the coating and even lead to its destruction.
- The resin contained in plywood as a binder worsens the adhesive characteristics of the material, and therefore it is not possible to glue tiles to plywood in the traditional way.
Cladding wood-containing surfaces with ceramic tiles differs from laying them on concrete bases and sand-cement screeds and has its own subtleties and features.