Tile masonry - reliability and practicality in a modern interior
An excellent option for facing coating, which has a lot of advantages, are clay layers, fired and covered with glaze. Of course, we are talking about tiles. In rooms where it is appropriate to lay the floor or wall with ceramic tiles, this type of finishing will look advantageous and will last a long time and be reliable. All thanks to the high quality and durability of this material. This cladding is not afraid of temperature changes; it can be used to decorate not only home interiors, but also outdoor elements.
Tool for the job
After you learn how to glue tiles to a wall, you need to know the necessary equipment. The preferred, but not required, option will be indicated in parentheses:
- straight spatula, comb spatula;
- rubber hammer;
- primer brush (spray);
- level horizontal, vertical (2 in 1);
- thread for marking, plumb line (water level, laser plotter on a tripod);
- containers for mixing glue (electric drill with a special attachment or construction mixer);
- a set of crosses;
- square, glass cutter, steel ruler (machine tile cutter);
- rubber spatula.
What you need to know
Before purchasing the material, it is worth calculating it so that the total area of the tile coincides with the area of the surface to be finished.
When buying facing material, you should pay attention to:
- Angles must be strictly 90 degrees.
- The thicknesses of the samples are the same, minor differences are allowed.
- The length and width of the tile, for each sample these parameters must match accordingly.
Tiles cannot be attached to a curved surface. If the wall is uneven, it must be leveled with plaster. Before facing work, you should mark the future masonry: arrange the tiled finish depending on the chosen scheme. For symmetry, the layout is performed from the center or the most visible corner to the sides. After this, the outer samples are cut to the desired size.
It is also necessary to prepare working tools in advance so that during the finishing process everything you need is at hand.
Primer
Having made sure that enough time has passed to begin the next stage of work, the technology instructs to prime the wall. The primer additionally cleans the surface, destroys potential sources of fungus and increases the adhesion of tile adhesive to the wall material. This adds up to longer tile life and improved sanitary performance in the bathroom. Primer compositions are most often sold in ready-made liquid form. It should be applied to the entire surface of the wall using a brush, roller or spray, and then wait until it dries completely.
The time intervals after which the next stage of work can begin are indicated by the manufacturer in the instructions on the packaging of building mixtures
How to put: step by step guide
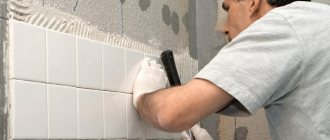
After the preparatory work, you can begin the actual laying:
- Strictly parallel to the horizontal surface, a flat plank should be nailed to the wall at the height of one tile from the floor. This can be a metal profile or a simple wooden block. This bar will act as a support for the starting row;
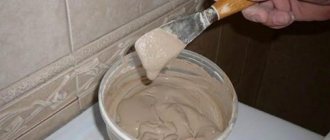
- Apply tile adhesive to the wall with a wide spatula;
- The glue should also be spread evenly on the tiles, carefully covering the edges;
- remove excess with a special notched spatula;
- attach the finishing material and lightly press it against the wall;
- check the result with a level, level if necessary;
- remove excess adhesive with a damp sponge;
- install special crosses between adjacent tiles.
The crosses must be removed when the adhesive has set, but has not yet dried, otherwise it will be difficult to do this later.
Preparing the wall for tiles
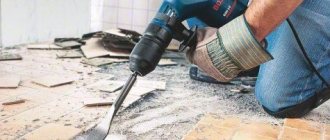
Before laying a number of preparatory steps must be completed:
- during repair work, remove plinths, trim and thresholds;
- if there is an old finishing coating, remove it;
- level the wall with cement mortar. To do this, plastering is carried out with reinforcement with a construction mesh;
- for better adhesion, make notches on the wall with a hatchet;
- clean the surface to be treated from dirt and dust;
- For better adhesion, apply a deep penetration primer.
How to lay tiles correctly: where to start?
The finishing should be laid in accordance with the previously made markings, starting with solid tiles from the center or the most visible corner of the surface to the sides. Finish the cladding in places where it is necessary to trim the material.
What adhesive is best for gluing large tiles?
The finishing in question is attached using specialized tile adhesive or cement-sand mortar. Moisture-resistant glue is used for the bathroom and kitchen.
Before use, you need to read the instructions for using the adhesive, as some manufacturers indicate the need to moisten the tiles before attaching them to the composition.
How to lay patterned tiles
You can decorate the surfaces with plain ceramics, or you can create a composite panel or mosaic by combining different tiles.
Such work will require a lot of effort: you will have to control not only the evenness of the masonry, but also the correctness of the pattern. It is worth starting the cladding from the central point of the surface to ensure the symmetry of the pattern being adjusted. For convenience and the correct order of laying, the back parts of the tiles are designated by numbers.
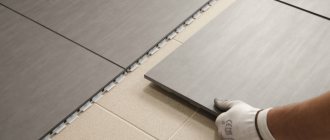
How to glue tiles to the floor
Floor covering technology includes the following steps:
- clean the floor from dirt;
- Check the surface for evenness with a level. If necessary, level by making a screed;
- Apply the adhesive composition to a small area of the floor with a spatula;
- apply the tile and press lightly;
- In the necessary places, the ceramics are cut to the desired shape and size.
Choosing ceramic tiles for walls
The selection of tiles is an important step not only from the point of view of the design approach. It so happens that the lower the price of the tile, the worse its geometric shape, which in turn leads to difficulties when laying it. When laying tiles of irregular shape, it is difficult to obtain uniform seams and a smooth surface without differences. This also leads to the fact that when using such a material it is difficult to achieve a thin seam at the joints of the tiles. Therefore, if the size of the joints is of great importance to you, choose either foreign samples or domestic tiles in the above-average price range. The photo below shows the differences in the shape of tiles from one pack:
Close attention should also be paid to the format of the tiles. Laying large-format tiles alone will be quite problematic. In addition, if you lack experience, you may encounter overuse of material, which, given the high cost of such tiles, will lead to unjustified expenses. For beginner tilers, it will be most convenient to work with small and medium format tiles.
In addition to size, the shape of the ceramic is also important. When choosing its type, you need to rely on the design project of the future room and the need for trimming. For example, when using wide rectangular tiles in a narrow room, you may encounter either the need to glue small fragments in the corner, or the need to double the number of tiles to finish a given wall.
All these nuances are individual for each specific room and project, so there is no universal solution for all rooms.
When choosing tiles, it often happens that the option you like is intended for laying on the floor. It is not prohibited to lay floor tiles on a wall, however, such tiles are often made of porcelain stoneware, which is many times stronger than ordinary ceramic tiles and is more difficult to cut and drill. This needs to be taken into account as there is a lot more cutting involved when laying wall tiles than when laying floor tiles.
The last piece of advice when choosing tiles is that when purchasing, you need to check the lot numbers on each pack of material and purchase tiles of only one article and lot number, as this will protect you from differences in the color scheme of one or another lot.
Grouting seams
Only when the glue has completely dried should you start grouting. It happens:
- cement;
- silicone;
- epoxy.
The work must be done as follows:
- remove the remaining crosses;
- Clean the tile surface and tile joints with a vacuum cleaner;
- in order not to stain the tile finish with the grout, it is necessary to cover its edges with masking tape;
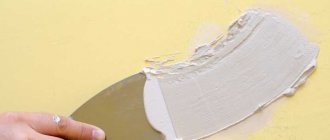
- Apply a little grout inside the seam;
- run a rubber spatula along the seam, removing excess product;
- let the composition dry;
- remove the tape;
- wash the tiles.
The technology of laying tiles can hardly be called easy, especially for beginners. But a truly high-quality result will definitely please its owners. A rich color palette and a wide selection of layout schemes will create comfort and a unique atmosphere.
Corner technology
Internal corners are formed at the joints of the walls. It is necessary to try to lay out the trim as accurately as possible. Many novice craftsmen leave gaps of 1-2 cm in the hope of sealing them later with tiled grout. This is not true, because first of all, it violates the aesthetics, and secondly, the grout is not intended for such tasks, and after a short period of time it will weather and begin to deteriorate.
External corners, as a rule, are formed to hide the installation of niches and projections for communications. You can form a corner joint with uncut, factory edges of the tiles, making an undercut near the wall. The easiest way is to lay it “overlapping” on the corner, leaving a gap of 3-4 mm between the tiles for grouting. The verticality of the corner is checked after laying 1-2 rows using a plumb line.
When forming an end-to-end corner, after drying, you can glue a special rubber corner. It will hide possible defects in the joint and make the protruding corner itself softer, which will subsequently protect the owners from possible household injuries.
Corners can be sealed with a corner
Accompanying work
In most cases, using a level is sufficient to control the horizontalness of the rows. But if you wish, before starting work on the next row of tiles, you can install the thread along the beacons at a distance of 2-3 cm from the wall, using a water level. After completing 2-3 rows, the thread is rearranged. This procedure will be simplified by a laser axle builder on a tripod; if you have the opportunity to borrow or rent such a device for the duration of the work, then it is better not to neglect it. The ideal option is to use a special elevation tripod, which allows, using a screw mechanism, to accurately set the height of the horizontal line projected onto the tile. If you have a laser builder, it is much easier to control the formation of vertical rows when laying end-to-end. But under normal conditions, the technology allows the use of a simple plumb line.
You can apply markings to the wall in advance
When cutting tiles with a glass cutter, the process is reminiscent of working with glass. On the front side of the tile, you need to make a cut under the ruler, and then simply break the finished product. A machine-mounted tile cutter greatly simplifies this process - perpendicular or 45° cutting is performed in two movements. Some collections of ceramic tiles have a relief surface and complex ornamental curves, and without special tools it is almost impossible to correctly cut such tiles for installation. You can use a grinder to trim tiles yourself, but this is a rather noisy and dusty process.
A cut is made on the tile with a tile cutter, then it breaks easily