What is grout used for?
First of all, such mixtures affect the appearance of the coating. Tile adhesive is characterized by a white or gray color, which often disrupts the overall picture of the interior.
To change the tone of tile adhesive, grout solutions are used. They contain a pigment that allows you to improve the external characteristics of the cladding: get a more seamless coating or, conversely, highlight the tile.
Additionally, grout mixtures help prevent the destruction of the subfloor.
When laying tiles in a toilet or bathroom in areas near plumbing fixtures, the likelihood of surface contact with water or hot steam increases. As a result, moisture penetrates under the cladding and contributes to the loss of properties of the tile adhesive (if a hygroscopic composition was used).
If there is a protective layer in the form of grout, the service life of the cladding increases.
In addition, the treatment of tile joints helps protect these areas from rapid contamination. The grout is characterized by a fine-grained structure. This allows for a smoother surface between the tiles. As a result, contaminants are less actively retained on the coating
.
Another reason to use grout is its ability to strengthen the siding. Most modern compositions of this group are characterized by increased strength, sufficient elasticity, and can withstand changes in temperature and moisture. This allows you to further strengthen the coating.
The properties of grouting compounds are also noted, such as the ability to prevent the formation of fungus on the surface. Thanks to this, it becomes possible to use tile coverings in rooms with high humidity. Grout mixtures of this group do not allow fungi to develop, which is due to the structure of the materials and their composition.
Such mixtures are used to improve the properties of the rough base and cladding. Tile adhesive is characterized by moderate strength, but does not withstand constant exposure to negative factors. For this reason, the base begins to collapse faster. Cracks appear in the space between the tiles, the coating is deformed with the constant expansion of the base material.
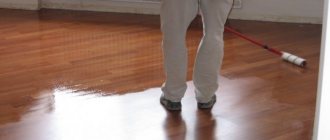
Stage No. 2: applying grout
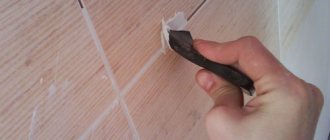
So, the cracks between the tiles are cleaned, the grout is removed, all the necessary tools are at hand. You can start applying the mixture.
- We start work from the ceiling, if it is a wall, and from the far corner from the passage, if it is a floor.
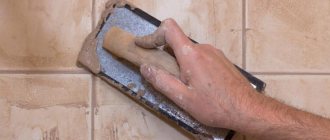
- We scoop up the grout with a spatula and spread it diagonally over the crack.
- We collect the excess from the surface, placing the spatula perpendicular to the surface, and stretch it again, slightly tamping it into the gap.
- We go through the third time without compacting.
- We collect excess grout from the tiles and transfer it to the next area.
- We continue to rub the seams until the entire surface is worked out.
- It is important to work quickly, but efficiently: the seams must be filled to the full depth, and there should be a minimum of streaks on the tiles.
Important. According to the rules, the seams should be slightly recessed (located a few millimeters below the surface of the tile).
Advice. If the grout protrudes or lies unevenly, you can place a cable wire or other round object on top of the joint. Or run a wet finger over the grout, as in the photo above.
Processing narrow seams
Narrow seams look neater than wide ones, but they are a little more difficult to rub.
If the gap width is 3 mm or less, grout can be applied using a special construction applicator (gun). Alternatively, the composition can be pushed into a regular syringe with 20-25 cubes, and then squeezed out. The needle, of course, needs to be removed. If the tip of the syringe is too wide, the hole can be made smaller by wrapping electrical tape on top and cutting off the corner. This application method is suitable for cement grout. You need to make it more liquid, but not overdo it. The consistency should be like thick sour cream.
We recommend: What is the best sealant to choose for insulating seams in the bathroom?
Is it possible to do without grout?
If the tiles will be laid, for example, on a wall, the likelihood of contact with water and moisture is small, and the coating is not planned to be used for a long period, then in such conditions it is permissible to refuse to grout joints.
When the cladding is not affected by negative external factors (temperature limits, hot steam, water), then the process of destruction of the seams and the rough base will develop much more slowly.
In rooms where there is a significant level of humidity or the surface is subject to intense load (for example, in high-traffic areas), the coating cannot be used without additional protection. If you plan to lay the cladding for a long period, you should close the seam.
If you plan to lay the cladding for a long period, you should close the seam, and grouting the seams in this case is a mandatory step when performing the work.
Flaws
- Many of those who used Ceresit grouts noted one feature: after drying, the color of the material changes and sometimes it differs significantly from that indicated on the package. Therefore, it is better to purchase grout in a store where you can test a sample sample.
- The manufacturer packages some types of Ceresit grout in paper bags. If all storage and transportation conditions are met, then packaging does not matter, but sellers do not always comply with these conditions. This is why customers often complain that Ceresit packaging allows moisture to pass through, which negatively affects the quality of the product.
- Ceresit CE 33 Super. Designed for sealing tile joints less than 0.5 cm wide. Can be used for cladding external walls. Best suited for finishing the toilet and kitchen area, it is resistant to low temperatures. Has antibacterial and antifungal properties.
- Ceresit CE 35 Super. Designed for sealing tile joints with a thickness of 0.4 mm to 1.5 cm. It has water-repellent properties and withstands exposure to sunlight and precipitation. Suitable for use in swimming pools. This type of Ceresit grout should be chosen if you are working with cladding made of decorative stone, marble and other similar materials.
- Ceresit CE 43 Super Strong. High-strength grout, designed for sealing joints between tiles with a thickness of 0.4 to 2 cm. It is suitable for use in any conditions, as it has waterproof and hydrophobic properties, and is resistant to sunlight, precipitation and temperature changes. This grout can be used on most tiling materials except marble and glazed tiles.
- Ceresit CE 40 Aquastatic. Designed for sealing tile joints up to 1 cm thick. It withstands high and low temperatures, as well as temperature changes, and is therefore recommended for use in rooms with heated floors or outdoors. It has dirt- and water-repellent properties.
- Ceresit CS 25. Silicone-based grout designed for sealing joints between tiles with a width of 0.5 to 3 cm. Ideal for use in the bathroom, including finishing the shower stall. Has good antifungal properties. This grout should not be used for tiling the kitchen area.
- Ceresit CE 79 UltraPox. Epoxy grout designed for sealing joints of any width. Like all two-component grout mixtures, it is characterized by high abrasion resistance. Can be used for cladding external and internal walls. It tolerates the effects of chemicals contained in cleaning products well.
We suggest you read: How to lay tiles on boards
Take a sample of the tiles with you to make it easier to select the shade of the grout.
The time for complete drying of grout is usually about 24 hours.
How long does it take for tile grout to dry?
There is no definite answer to this question, because it depends on the composition of the mixture, its properties, and the presence of errors during mixing. If you are wondering how long it takes grout to dry, you need to consider that cement is a material that sets more slowly than others. This means that most compositions based on it will maintain viscosity for a long time.
This applies to cement and cement-sand mixtures.
Epoxy and epoxy-cement compositions harden somewhat faster. Given the difference in drying speed, you can only rely on average values. So, in most cases, the mixture sets within a day, but the coating can be used only after 5-7 days. Then the grout will dry not only on the surface, but also inside the layer.
Much depends on the intended purpose of the materials. So, if you plan to drill tiles in a room where there is a high probability of direct contact with hot steam or water, then it is better to start installation work later. If you wait only 3 days from the moment of applying the mixture, there is a high probability of faster destruction of the coating, since the grout will not have time to become durable during this time.
In addition, the drying time depends on the thickness of the layer. If, when applying glue, the space between the tiles was filled insufficiently, unevenness in the seams is eliminated at the grouting stage. In this case, sometimes the layer of material is significant, which leads to an increase in the drying time of the composition. If in this case cement grout was used, then its maximum hardening can be expected 1.5-2 times longer.
What affects drying time?
Under different conditions, the same materials behave differently. To speed up the process of full setting, it is necessary to perform the installation correctly and change the environmental conditions. There are a number of factors that contribute to increasing the period during which the mixture gains strength:
- Material composition: different types of grout set at different speeds, which is due to the difference in the combination of components, as well as the properties of each substance.
- Non-compliance with mixing technology: when changing the ratio of materials, using raw mixtures, increasing/decreasing the initial amount of water, poor-quality mixing of large fractions of the composition, a loss of grout properties is observed (it does not gain strength, absorbs moisture).
- Cement mixtures must be cured for a certain period before work begins.
- The grout is applied to slightly moistened surfaces; if there is water left in the space between the tiles or the coating is too moistened, the mixture will take a long time to dry. In addition, its application under such conditions can lead to loss of properties and reduced adhesion to tile adhesive.
- Removal of excess grout should be done soon after application (10-40 minutes), which will allow the joint to be formed of sufficient thickness and speed up the drying of the material.
- Unsuitable environmental parameters: if the tiles are laid in the bathroom, the grout may be affected by water, hot steam, and temperature changes. In such conditions, the drying rate is reduced, so it is recommended to begin use no earlier than 7 days after application.
How long does grout take to set?
The time for complete drying of fugues, as well as the specifics of the work, depends on their components.
For conventional cement-based compositions, this period is 7 days, with acrylic additives - 10-14 days, and for epoxy and silicone - 15-20 days. After drying, you can use various household chemicals to treat the tiles.
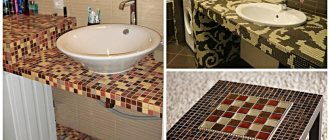
Using a wide palette of grout colors, you can easily change the overall impression of the finishing surface. The use of a particular material is dictated by the operating conditions of the cladding and is included in the repair estimate.
When can you start cleaning?
It is necessary to pay attention to the area where the tiles are located. Thus, it is recommended to clean the lining on the floor later, when the solution has set, since any deformation of the fresh material can lead to destruction of the mixture layer during operation. You can begin cleaning the wall covering 1-2 days after applying the grout.
However, in this case it is permissible to use a damp cloth. General cleaning, accompanied by a thorough washing of surfaces, even in this case is not recommended for a week.
When the grout is completely dry
When can you walk on tiles after they have been laid? The glue finally dries in about 5-7 days. You can step on the floor already on the third day, but for now you should not overload the surface.
The grout dries quite quickly at first glance. Within a day it brightens and thickens. At this time, it can be moistened with water so that too sudden loss of moisture does not lead to cracking. The final fixation of the mass occurs only on the third day. Full load can be applied after a week, only then can you wash the tiles with plenty of water, install furniture and fittings, drill, use household chemicals, etc.
If you carry out the work taking into account all the technological features, the grout will reliably protect your walls and floors from moisture penetration. At the same time, the appearance of the surfaces will remain attractive for many years.
We suggest you read: Laying tiles on wood on a wall
If possible, then on the second day. Especially if you need to fill the seams of the tiles on the floor. What are the reasons for such a rush?
1. If you leave the seams on the floor unfilled, then simply walking on the tiles by the end of the day will fill the seams with sand and dust. And if at the same time you perform any work related to glue or putty, then you are provided with work for half a day. Unfilled seams become clogged with various debris. Styrofoam is especially dangerous. Light balls are difficult to sweep out, and when filled with grout, they float to the surface.
2. When grouting on the second day of installation, the tile adhesive has not yet hardened sufficiently. Missed stains can be easily corrected.
3. The glue and tiles are still quite wet on the second day. The applied grout will firmly adhere to the tile. Wetting the grout and tiles before filling the joints is not a good solution. When filling such seams, the grout is diluted with water and becomes liquid, which in itself is unacceptable technologically. Therefore, thoroughly cleaning the tiles with plenty of water on the day of installation is the best option for creating clean joints.
Grout consumption
Grout consumption depends on the following factors: - The width of the seam (the size of the crosses used) - The size of the tile itself (the larger the size of the tile, the fewer seams are formed in the square) - The pattern on the tile. So, if there is a raised or depressed pattern on the tile, it is difficult to collect the remaining grout from such a surface.
Therefore, manufacturers also do not give a specific figure, but indicate the upper and lower flow rates. These numbers sometimes differ by 2-3 times. For the basic consumption you can take 400 g per square meter of tile. This value is valid for smooth tiles measuring 300x3000 and a joint width of 3 mm. For mosaics with smooth seams 2 mm wide, this value is twice as large.
If you have doubts about how much grout is needed, it is better to test it. Use one pack of grout (2 kg) to fill the joints. Measure the resulting area. Divide the weight (2 kg) by the area, you will find out the grout consumption per square. Then you need to calculate the remaining area unfilled with grout and multiply it by the consumption per 1 square meter obtained above.
Features of different types of grout
Main options:
- cement-sand – contains Portland cement and fine-grained sand, has moderate strength, the disadvantage is weak hygroscopicity;
- polymer mixtures (polyurethane, silicone) - characterized by increased elasticity, sufficient strength, do not absorb water and are often used in rooms with high humidity levels;
- epoxy grout - characterized by high strength, moisture resistance, contains resin and hardener, and is second only to the furan mixture in terms of reliability.
Features of epoxy grout
Epoxy grout is different in that it consists of two components. One part is packed in a bucket and is like a thick dough. The second component is the hardener - a liquid, usually amber in color. It is packaged in polyethylene or a plastic bottle. These two components must be mixed before use. Moreover, the proportions must be observed very precisely. Otherwise, either the composition will harden very quickly (if there is a large amount of hardener) and you will not have time to “work out” it, or it will not harden at all (if there is not enough of it). It is equally important to mix everything well, achieving a homogeneous composition. Poorly mixed epoxy grout also does not harden or sets in lumps.
It is more convenient to work with a special tool with a rubber sole.
The most questions arise about mixing polymer grout in parts. As already mentioned, it is sold in buckets. There are packages of 1 kg, 2 or 2.5 kg, 5 kg. The viability time of the composition is very short - the stated time is about 40-60 minutes. As usual, we take half as much (to make sure it doesn’t seize). Without work experience, a kilogram, or even half a kilogram, cannot be worked out in 20-30 minutes, and after this time it turns into stone.
How to avoid mistakes and not affect the drying time?
To avoid thickening of the layer of material in the space between the tiles, you should use special tools for applying grout:
- Rubber spatula - used in most cases, but due to its small width it is not recommended to use it if you plan to perform a large amount of work. A spatula with these characteristics is suitable for applying different materials.
- Grater - used when finishing mosaics, since in this case the use of a spatula increases the installation time. A construction float is also suitable for filling joints in large areas, which allows you to speed up work.
- Syringe gun - designed for filling deep seams. This tool is often used for applying polyurethane and silicone mixtures; thanks to it, neat seam joints are obtained.
- A cone is an alternative to a pistol. This option is suitable for cases where it is necessary to protect porous base material.
Why is grout needed?
Grout is a combination of polymers and cement. It is offered both in powder and in the form of a ready-made solution. In the first case, you need to dilute the mixture yourself, following the manufacturers' recommendations. Some grout already has some color. Other colors must be added immediately before use.
Grout for joints is called fugue. It is designed to fill joints between facing materials. Grout performs not only decorative, but also functional tasks. In the first case, it allows you to transform the interior, make it original and attractive. In addition, it significantly extends the life of ceramic tiles.
Dust and dirt often get into the spaces between the facing elements, which are almost impossible to remove. This is a favorable environment for the proliferation of bacteria and harmful microorganisms. As a result, the tiles are subject to destruction, and mold and mildew can spread to the wall, after which it will be difficult to get rid of.
Thus, the grout protects the finish from moisture. The surface of ceramic tiles is moisture resistant. But the base can absorb water through the joints. Therefore, grout is considered a kind of barrier that will extend the life of the finish.
Removing excess grout
It is recommended to remove excess mixture within the first 10-40 minutes after application. To do this, use a dampened and well-wrung out cloth. Traces of grout can be removed after 1 day. For this use:
- A foam glove soaked in vegetable oil is used to clean areas of the cladding that have been dirty, and the fatty components are cleaned with alcohol.
- Sandpaper - to eliminate unevenness in the space between the tiles.
- Citric acid - to remove stains.
- Soda, which is applied to damp tiles to remove white marks.
When it was not possible to remove the remaining grout on the 2nd day, it is recommended to begin intensive cleaning of the coating after the mixture has completely hardened.
How to calculate the amount of grout
As a rule, manufacturers indicate on the packaging the approximate consumption of grout per 1 m² of cladding. The easiest way to calculate the amount of grout required is to use a special table that shows the consumption depending on the width of the joint and the size of the tile.
Another option is to do the calculation yourself. The following tile parameters are taken into account:
- length (A);
- width (B);
- thickness (h);
- planned seam width (d).
The density of the ready-to-use mixture (P) is also required for the calculation. The average density of cement grout is 1.7–1.8 kg/dm³. Next, the flow rate (R) is calculated using the following formula:
R=(A+B)/(A×B)×h×d×P (kg/m²)
For comfort. You can use a calculator that calculates using this formula.
Overview of methods
How to choose a color
The seam between the tiles can unify the space in the room or highlight individual elements. Accordingly, the grout can be the same color as the tile or a contrasting shade. Some designers suggest making seams that are close in tone to the finishing material. Each of these options has its own characteristics.
Tiles and grout in the same color will create a single space in the room. This method is often chosen for small rooms decorated with light tiles. A monochromatic design visually expands the room. The grout also looks impressive in the same color as dark tiles. But it is not recommended to use the technique if there is too much black in the room, especially in small bathrooms.
The use of contrasting grout is appropriate if you want to emphasize the unusual shape of the tile or a rich shade. A fugue, close in color to the finish, allows you to create a calm atmosphere and at the same time focus on individual elements.
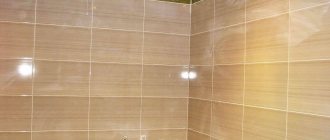
We rub the seams
Before you start grouting, you need to check whether the glue has completely dried. When you are sure of this, you will need to clean the seams from residual glue and cement, and also remove the installed level crosses. Ceramic tiles with a glazed surface do not require additional treatment, but if the surface is unglazed, you will have to wet the tiles in advance so that they absorb less moisture from the grout.
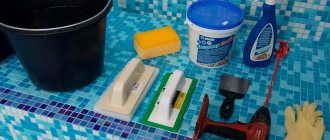
Next, they move directly to the grouting itself. You will need the following materials: - dry grout in the required quantity;
- grater;
- sponge;
- bucket;
- water;
- spatula with a rubber tip;
- gloves;
- protective glasses;
- sharpened stick;
- brush, preferably a new one;
- rag.
Let's move on to preparing the grout. To do this, you need to mix water and dry mixture in the required proportion. Then put on special clothing designed specifically for this purpose and begin processing the tiles. Instead of a spatula, you can purchase a grouting brush; it can be found at any hardware store. When applying grout, keep in mind that your movements should be rubbing, not stroking, this will determine how much grout gets into the seams. After processing a certain area, you can stop and see what you got. Some specialists use a pastry bag instead of a spatula; this is especially important when processing complex surfaces.