Types of sealants for waterproofing tile joints
The composition of materials characterized by hydrophobicity includes components that prevent the penetration of moisture into the cladding structure. This is due to filling the pores of the base, creating an impermeable layer. The materials are divided into 3 groups:
- cement;
- polymer;
- based on resins.
Combined mixtures are popular. They contain 2 active ingredients, for example, cement-polymer, epoxy-cement. The composition determines the properties of the material and based on this the sealant is selected. Operating conditions should be taken into account: intensity of exposure to water, air parameters (humidity, temperature).
Cement grouts
This is the most common option due to its affordable price and average characteristics.
Such compositions can be found in the range of products from different manufacturers. There are single- and multi-component sealants. The first group includes mixtures that contain cement. Sand is not used. Cement mixtures are used to fill joint joints of small width - less than 4 mm. However, when using such a material without special additives, cracks may soon appear. This is due to the fact that the cement mortar is not characterized by elasticity, which means that the coating will not withstand the effects of deformation loads (compression and tension).
In order to increase strength, a plasticizer is used; due to this component, the service life of the coating increases and the resistance to temperature changes increases.
Cement-sand mixtures are used to finish the joints between the tiles and the wall. In these areas, the width of the suture joints often exceeds 4 mm, which means that the use of pure cement mixture is not recommended.
Portland cement is popular. It is characterized by a fine-grained structure, therefore it is often used to fill narrow cracks. The composition also often includes a lime component to improve properties. Cement mortars may contain a coloring pigment, making the coating more attractive.
Silicone based fillers
Such mixtures are characterized by high elasticity. They do not deform under the influence of loads, since they tend to retain their original shape. The main component is silicone. Thanks to it, areas adjacent to plumbing fixtures in the bathroom and kitchen are sealed.
Silicone mixtures do not lose their qualities from exposure to temperature changes. However, such material cannot withstand the influence of intense loads. For this reason, they are not used to lay tiles in high-traffic areas. Due to its moisture resistance, the service life of the coating increases significantly.
Silicone mixtures tolerate the influence of extremely high and low air temperatures: -50...+200°C, without being destroyed.
Use acidic silicone-based sealants with caution. Such mixtures can contribute to the development of rust on the surface of metal elements.
A universal option is a neutral composition. However, it comes at a higher price.
A construction gun is used to work with sealants. Thanks to a nozzle with a small hole at the end, this tool helps fill joints in difficult areas, for example, near baseboards, curbs and other corner joints.
Epoxy resin based compositions
Materials in this group consist directly of epoxy resin and hardener. These components are packaged separately. They are mixed before surface treatment. This need is due to the fact that the material quickly hardens.
You need to work with it quickly - within 5 minutes the mixture begins to set. After this, it will be impractical to seal the seams with such material.
Advantages of epoxy resin:
- strength;
- elasticity;
- long service period;
- moisture resistance;
- versatility: the material can be used for various purposes, including for fastening tiles.
The solution must be removed from the coating immediately. If this is not done, the tiles will become very dirty during the repair process. It will be difficult to clean it from the epoxy mixture later.
Features of working with furan and polyurethane grouts
Furan resins are based on furfural, extracted from plant waste in agriculture and wood. To prepare a mixture with the required characteristics, it is also necessary to use a hardener, as in the case of epoxy resin. This material is a strong acid or its salt. The concentration of this component is up to 30% of the total volume of the finished mixture.
Furan resin contains coke, andesite or graphite as a filler. The hardening process takes several days if the work is carried out at room temperature. You can speed it up; to do this, you need to apply the mixture in a cold environment. When exposed to temperatures ranging from -60 to -80°C, the material will harden in a few hours.
Compared to analogues, furan resin stands out for its increased strength. Moreover, in this parameter it surpasses even epoxy resin, which is reliable in operation.
Another advantage of furan mixture is chemical resistance. This material is characterized by high adhesion to ceramics and other materials.
Furan resin can be combined with other varieties: epoxy or phenolic. This mixture has only one drawback - it is not elastic.
Polyurethane sealant, on the contrary, can withstand significant deformation loads. This is due to increased elasticity, which allows the layer of material to maintain its original shape.
This type of sealant does not need to be combined with other components. It is already ready for use. Sold in sealed plastic containers.
Polyurethane composition is recommended for filling joints with a width of 2-5 mm. It is characterized by its ability to withstand prolonged contact with water without the risk of wetting the subgrade.
Treatment with a protective solution
As mentioned earlier, tile joints are subject to contamination, constant exposure to moisture and cleaning agents, and are prone to the formation of mold and fungi, so additional impregnation of the joints with specialized compounds with hydrophobic additives is simply necessary.
Hydrophobic impregnation has the following qualities:
- it provides a moisture-resistant coating, which is very popular when decorating a bathroom;
- prevents the occurrence of pollution;
- has an antifungal effect.
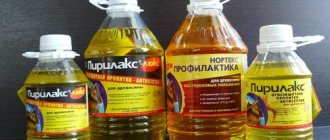
Means with this effect include:
- easy-to-apply water repellents, due to their liquid consistency allowing them to be applied with a thin brush;
- polymer varnishes that have good penetrating properties and can properly saturate the grout;
- silicone and acrylic sealants, most often used in corners or at joints in bathrooms and tile walls.
Protective coatings have now begun to appear on the construction market that do not form a glassy layer, but, on the contrary, allow the grout to “breathe.”
Increasingly, two-component compounds are used, which, when dry, give strength, durability and tightness to the seams. The advantage is that there is no need to additionally treat the joints with impregnations.
Choosing a sealant for waterproofing tile joints in a bathroom of the required quality
When considering the option of laying tiles in a bathroom, you need to protect the subfloor by filling the seams with sealant. The choice is made taking into account the requirements for materials used in rooms with high humidity:
- homogeneity of composition: uniform consistency without inclusions or large fractions;
- a sufficient degree of viscosity and elasticity, which will avoid cracking of seam joints when the material expands;
- for installation on the wall, compositions with an average strength rating are used, and for installation on the floor, the most reliable mixtures are chosen;
- water resistance, this criterion is met by most modern compositions, except for cement mixtures that absorb moisture during prolonged contact with it;
- hydrophobic properties that the material retains throughout the entire period of operation.
Pay attention to the shade of the mixture. It should fit well into the interior design.
Preparation for sealing seams and joints with sealant
Work begins with preparing tools and materials:
- rubber spatula;
- container for preparing the solution;
- construction gun;
- rags, sponge;
- masking tape;
- primer mixture for surface impregnation;
- acetone for degreasing;
- respirator, gloves.
The coating is cleaned of dust. The mixture should be applied to primed surfaces. Tape tapes are glued along the seams, which will create a kind of edges that protect the tiles from contamination.
Sometimes it is necessary to renew the coating at the joints of the tiles. To do this, first remove the layer of old material. You should prepare a special chemical-based remover: in the form of a paste or aerosol.
Such materials are used in a ventilated area, as they often contain aggressive components. To avoid damaging the coating, it is recommended to apply the composition to a small area. The duration of action of the wash, its amount during processing - these parameters are determined by the manufacturer. It is important to prepare rubber gloves and a respirator.
If required, compositions of this type are applied to the seam joints several times. This need arises when it was not possible to completely remove the moisture-resistant material from the seams during initial processing.
Household grout cleaners
If the condition is not so critical, you can clean the seam using household chemicals and traditional methods. Special mixtures are used to clean ceramics that do not contain abrasive materials. It is more convenient to remove dirt in hard-to-reach places with a toothbrush or a narrow brush with stiff bristles.
In this case, it will be necessary to use protective gloves to prevent burns when coming into contact with aggressive chemicals.
Powdered cleaning products
The basic rule when working with powdered products is to dilute with a small amount of water to obtain a paste-like consistency. In addition to an excellent cleaning effect, most modern mixtures have antibacterial protection, which increases their effectiveness.
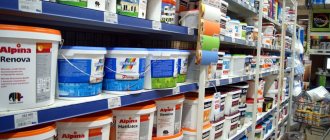
Tile cleaning powders:
- Bref.
- Domestos.
- Pemo Lux.
- Comet.
It should be borne in mind that the composition of such cleaners is very aggressive, so it is imperative to protect the skin of your hands, as well as the respiratory system, from possible damage.
Sprayers for renewing joints
Maximum ease of application with spray products. They can also be used for regular hygienic cleaning.
Compositions with sprayers:
- Tyron Power.
- Ecover.
- ValoClean.
The spray treatment process is extremely simple: apply a thin layer, leave for a while, then rinse with water and wipe with a soft cloth.
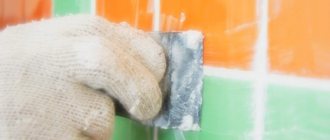
Proper waterproofing of tile joints with sealant
They use a construction gun, thanks to which the seam joint becomes smoother and thinner.
First you need to cut the spout correctly - at an angle. The width of the future seam depends on the diameter of the hole.
After the sealant is installed in the gun, they begin to squeeze it out. Moreover, it is important to do this without interruption in order to obtain a uniform seam. Excess mixture is removed with a rubber spatula. You need to wait until the sealant has completely set. Then they begin to clean the coating from the masking tape.
Fugue application
After you have removed the grout between the tiles, you need to start applying new ones.
Materials and tools for application
- Fugue
- Dilution container
- Drill or screwdriver (if the amount of work is large)
- Mixer attachment
- Rubber spatula, grater or cone of your choice
- Water or special liquid for dilution
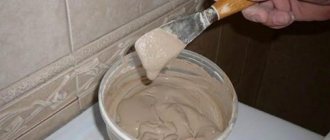
Dilution of the mixture
To dilute the mixture, use the proportion indicated on the package.
Important! When diluting, first add ¾ of the water indicated in the proportion, and then, little by little, the remainder, making sure that the consistency of the mixture is quite dense, not runny.
If you are diluting to cover a large area, then it will be convenient to dilute the mixture in a bucket or other container using the same drill with a mixer attachment at medium speed.
But for small jobs (for example, an apron in the kitchen), you can do it manually, mixing in a small container.
So, as soon as you have diluted a new mixture to replace the grout between the tiles, give it time to brew - 10-15 minutes is enough.
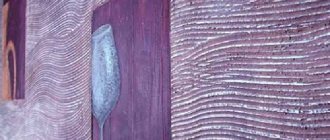
How to apply fugu
Once the fugue is prepared and ready for work, you can begin processing the seams between the tiles. Place a little mixture on the prepared rubber spatula and apply it to the empty space. To do the job efficiently, as the tool passes along the seam, it is necessary to press the solution inward. This will allow you to efficiently fill all the free space.
Important! When applying a fugue, you need to follow some rules. First of all, apply enough pressure on the spatula, which will ensure high-quality filling of the seams. Also, immediately after application, you need to remove excess fugue.
Grouting old tile joints in the bathroom can be done using a special trowel and cone. In the first version, the fugue is applied directly to the tile, after which it is pressed into the seams. Use a grout float to move diagonally across the tiles, carefully pressing the solution into the voids between the tiles. Excess fugue is removed with the same tool. Only in this case the movements are directed along the tile.
An equally popular tool is the cone. It, as in cooking, is filled with fugue. After this, it is squeezed directly into the seams. Thus, replacing the grout for bathroom tiles will be done quickly and without much effort. Excess fugue is carefully removed with a spatula.
When carrying out work, it is important to know how long it takes for the grout to dry in the bathroom. This will make it possible to finally remove excess fugue and give the finish shine.
Methods for sealing the joint between the wall and plumbing
The choice of option is made taking into account the width of the gap in a given area:
- leaks are eliminated with a layer of sealant; the principle of applying the mixture is the same as on other surfaces;
- install decorative borders, they must match the interior;
- the gap is filled with mounting foam with moisture-resistant properties, then the curb is fixed, and the seams in the areas where it joins the wall and bathtub are protected with sealant;
- border tape is used, often it is made in the form of a self-adhesive strip; for fastening, the material is bent in the center and fixed on the wall and bathtub; this tape has a polyethylene base and does not get wet.
The first 2 methods are suitable for working with narrow gaps. The latter methods are used to fill wide gaps between the wall and the bathtub.
Methods for removing old grout
Before removing the grout between tiles using this method, you should clarify some operational points regarding the process itself. Sometimes replacing the grout is necessary in the room in which the tiles were installed 15 years ago. At the same time, no one is going to dismantle the tiles yet. In this situation, special care should be taken when working. Often the old grout layer is the only component that holds the tiles to the wall. And as soon as it is removed, the tile itself disappears. What could this lead to? Firstly, the fact that the fallen lining will need to be replaced with a new one, but there is none. What to do then? Should I remove all the ceramic coating?
Secondly, flying fragments are traumatic; they can cut or scratch the skin, which could have been avoided.
So, everything is clear with precautions. Then you should proceed directly to studying the jointing process.
The first method is the most budget-friendly. Involves the use of a painting knife
The sequence of actions here is as follows:
- Take a knife in your hand and run it along the seams of the tile;
- The second action is to make the next cut along the same seams, but with a slight tilt of the blade - from one end of the tile to the other, the third movement is also tilted, but in the other direction.
The old mixture will begin to crumble, its remains are cleaned off with the same blade.
Please note: you should make cuts on the grout slowly so as not to touch the edges of the ceramic itself, and working at a fast pace can lead to the formation of chips and cracks along the seam line. Therefore, you immediately need to be patient when starting manipulations at a monotonous and measured pace.
Don't miss: Crosses for laying tiles. Crosses for tiles - all the subtleties of obtaining an even and beautiful seam
Second way. Working with an electric chisel
To update the grout on the tiles, it is better to choose an electric chisel. However, for one-time work it does not make sense to purchase a power tool. It’s a completely different matter if he is then involved in other types of home repairs. Then it is quite possible to buy it and have it in your arsenal of tools in your home workshop. And it will come in handy more than once when you need to update the seams between tiles in different rooms or on different surfaces. Dremel is a great solution here. The upper part of its disk is covered, and the lower part is a small cutting disk. It is through this disk that they move along the seam, selecting the used fugue.
Please note: when using an electric chisel, it is forbidden to touch the ends of the ceramics. Otherwise, damage to the instrument will be inevitable. When working with a Dremel, you must take personal safety precautions - wear glasses that will protect your eyes from flying particles of old grout.
Method three. Selecting the reveal using a screwdriver. Before you renew the seams on the tiles using this device, you need to purchase a special attachment called a brush. This is nothing more than a disk equipped with wire pile.
Putting the attachment on the tool and turning on medium speed, the hairs are carefully immersed in the seam. A similar remark that was made above in the case of an electric chisel is appropriate here - if the quality of the ceramic coating has not been ideal for a long time, then it is better to leave this method and choose another. And all because tile hairs can cause irreparable harm to poor-quality and worn-out coatings. Which is highly undesirable.
After removing the old grout between the tiles, proceed to the next stage - filling the vacated gaps with a fresh compound. And here it will not be superfluous to know what composition is best used for these purposes to rub the joint between the tiles.