Grouting tile joints on the floor is a necessary job. This measure provides additional protection to the coating, but it is important to choose the right material: seam joints must withstand the load placed on them, and attention should be paid to mixtures with a low level of hygroscopicity. When applying, you need to adhere to certain rules, which will also help increase the service life of the grout. In order for the flooring to look organic, the materials used must be selected according to color.
Why is this necessary?
Grouting (fugue) is not required when laying seamless walls - tiles without chamfers are used for this. A perfectly even, tight butt laying is assumed. At the same time, it is almost impossible to find joints on a textured surface.
But ordinary citizens are unlikely to lay out designer collection tiles in their baths and kitchens, so the grout that is needed for ordinary tiles is a pressing issue.
For ordinary tiles with chamfers, grouting is necessary - this is the only way to achieve the tightness of the wall.
Without proper treatment of the joints, moisture will accumulate under the tiles, which will ultimately lead to the tiles falling off.
What should be the optimal seam width?
The appearance of the tile depends not only on the color or texture, but also on the width of the joints, which surround each element on all sides and affect the visual perception. The opinion that wide seams suppress the tiles is wrong.
On the contrary, too narrow seams interfere with full visual perception, and they are also dangerous from a functional point of view: grout hardly gets into them, so it is difficult to judge their integrity and tightness.
When calculating the width of the tile joints, take into account two important factors: ease of application of the solution and preservation of such properties of the grout as waterproofness and strength
The disadvantage of too wide seams is their weak resistance to external factors. The grout cracks, crumbles and requires constant updating. For this reason, sand is added to cement mixtures for wide joints. The average dimensions of the sides of bathroom tiles are from 10 to 33 cm, a suitable joint width is 3-4 mm.
Criteria for correct selection
It is important to approach the choice correctly; the fugue must perform the following tasks:
- fill the void between the tiles.
- protection from dampness
- maintaining the properties of the adhesive composition.
A well-chosen material turns a tiled wall into an airtight surface.
Qualities of a good material:
- Uniform texture - to create an even layer, without uneven inclusions
- Elasticity – a coherent, plastic structure that makes application easy
- Durability – preservation of the seam and its protective properties over time
- Hydrophobicity – the internal structure of the wall is protected from moisture
- Resistance to different temperatures
- Resistance to aggressive environments (relevant when laying out a pool)
- Wear resistance (especially when laying floors or paths)
- Ability to maintain a given color (for example, when exposed to ultraviolet light)
- The optimal seam width for this composition.
The color of the fugue usually matches the main color of the tile; contrasting combinations are used much less frequently.
Types of grout based on material of manufacture
Depending on the material used as the main component in the manufacture of grout, inter-tile fillers are divided into the following types.
Cement
According to EN 13888, cement-based grouts are designated CG and, depending on their water absorption and abrasion characteristics, are divided into two classes.
Cement grouts are intended for filling joints on non-deformable monolithic bases (brick or block masonry, cement plasters and screeds). Suitable for use indoors and outdoors, on walls or floors. In addition to cement and fine sand, the aggregates contain mineral or chemical pigments and polymer modifiers that increase the plasticity of the finished mixtures. Depending on the plasticity (amount of modifiers and sand fractionation), the product is intended for filling narrow (up to 6 mm) as well as wide (up to 40 mm) joints.
The advantages of cement-based grouts include their versatility, the ability to be tinted in any shade, and their low cost. In addition, cement grouts, with a well-chosen shade, can hide minor defects and unevenness in tile laying, which, combined with the ease of preparation and application, makes this type of grout the most widely used. The disadvantages of cement compositions include their lack of resistance to moisture and their tendency to accumulate contaminants that literally eat into the coating.
Epoxy
Epoxy resin-based grouts are classified as reactive grouts and are designated RG according to EN 13888. Such grouts are almost completely waterproof. Their main area of application is swimming pool bowls and various tanks, where it is necessary to ensure maximum impermeability of the facing carpet, as well as industrial and laboratory complexes with special requirements for the strength and acid resistance of the floor covering. In domestic premises, using two-component grout is very problematic: the resulting mass has a high viscosity and does not fit well into narrow joints. The minimum application thickness is 3–4 mm.
But thanks to the high strength, durability and ease of cleaning the surface, the cost of filling joints with epoxy is completely worth it. In addition, hardened epoxy resin is resistant to any household chemicals and has a rich color that practically does not change throughout the entire life of the material.
Another advantage of using epoxy joint filler is the possibility of decorating with metal powder, which is added to the composition during its preparation. Such seams in the bathroom look original and attractive.
The main disadvantage of epoxy grouts is the price; on average, they are five times more expensive than cement grouts.
Polyurethane
Polyurethane grouts are made on the basis of aqueous dispersions of polyurethane resins. This product is a one-component composition, supplied in a sealed container (plastic bucket) and is completely ready for use. Polyurethane has high mechanical resistance, does not wash out, and forms a durable waterproof coating.
The recommended application width is from 1 to 6 mm.
Note! During long-term storage, the mixture may lose some of its moisture and appear dry. You just need to sprinkle a little water from a spray bottle and mix.
Polyurethane grouts are even more expensive than epoxy grouts, and this is their main drawback.
Silicone
Silicone grout (sealant) is sold in plastic tubes and is squeezed out with a syringe gun through a thin spout, which allows you to seal even the narrowest seams and crevices. Silicone grout has high adhesion to all types of tiles and most building materials, including those with a smooth and glossy surface. In conditions of high humidity, it is better to use moisture-resistant sanitary sealants, which are less susceptible to the formation of fungi, mold and other microorganisms on their surface. Available in a wide range of colors, which allows you to choose the composition for any shade of tile.
Silicone joint filler is designed for sealing corner joints, wall and floor tile junctions, as well as sanitary equipment to wall cladding (sinks, bathtubs, showers and trays). It is not used for grouting tile joints.
Note! The optimal ratio of the thickness of the sealant layer to its width is 1:2. If it is necessary to seal a deep seam or joint, it is recommended to place a tubular sealant made of foamed polyethylene into it, and apply a small layer of silicone sealant on top.
Correct technology for sealing deep expansion joints.
Latex
The term “latex grout” most often refers to latex additives added to cement mortars, tile adhesives and grouts to increase their ductility and other characteristics.
Latex additive for cement mixtures.
Additives are made from aqueous dispersions of synthetic resins and are used to add to solutions and adhesives instead of or together with water. In addition to increasing the plasticity and workability of cement compositions, additives increase the following indicators:
- Elasticity, which allows the use of solutions and grouts for heated floors and deformable bases.
- Abrasion resistance.
- Adhesion of compounds to smooth surfaces (stickiness).
- Reduce porosity, water saturation and tendency to contamination of cement mortars.
When introduced into colored grout, the additive does not affect the shade, but prevents it from discoloring and being washed out from the surface during use.
Furanic
Grouts made from furan resins have a dark, often black color. After curing, the grout practically does not absorb moisture, is resistant to acids and some chemical compounds, and ultraviolet radiation. During the manufacturing process, latex additives are introduced into the raw materials, which makes the hardened coating sufficiently elastic and resistant to mechanical, vibration and deformation loads.
The compositions are difficult to work with and toxic, so they are not used in residential premises; their main area of application is industrial and production facilities.
Types of grouting compounds
For a successful result, it is not enough to know how to grout tiles. The material for grouting also needs to be chosen correctly. Mixtures and ready-made solutions and pastes vary in composition and purpose.
On cement
The usual type is cement-based. The composition may include sand and other fillers.
Cement mortars are unsuitable for conditions of high humidity; they are more often used to fill joints when laying garden paths and platforms, as well as for facade finishing.
You can mix this grout yourself:
- cement
- sand (fine, preferably sifted)
- latex fillers (they will make the solution plastic).
Cement and sand are mixed in equal parts, filler - according to the instructions.
On Portland cement
For bathrooms and kitchens, it is preferable to use a mixture of Portland cement and lime. The homogeneity of the solution is due to the fine grinding of the components.
Ready-made polymer-cement mixtures are mixed in the factory with a special latex composition.
Buyers are offered colored mixtures and light ones; they are tinted independently using pigments.
On resins
There is another type of grouting material - based on epoxy resins. The composition is sold in the form of two separate components; they are mixed in portions during processing.
Working with this material is difficult: all movements must be calculated and perfected - after hardening, the material becomes as durable as tiles. It is almost impossible to wash off or clean it.
Most often used for wide seams - from 6 mm. Experienced professionals use metal powder for standard seams. The result is tiles in chic frames.
Special-purpose grouts
A material that is not inferior in cost to epoxy is furanol. It has a rich black color and is rarely used. In terms of wear resistance and strength, it is even stronger than epoxy mortar - it can withstand the effects of acids. This category also includes grouts with heat-resistant properties.
These materials are not very common due to their special properties and high price.
The tile adhesive itself
Some craftsmen use tile adhesive for grouting - for this they use a special variety of it, which is produced for majolica. It is pure white in color and has hydrophobic properties.
Sealant
Hard-to-reach places are sometimes filled with silicone sealant. It is sold in tubes for a construction gun, which allows you to close seams in the most difficult corners.
Over time, the sealant turns yellow. In addition to changing color, it shrinks, which will ultimately compromise the waterproofness of the wall. Therefore, replacing the fugue with sealant is not recommended.
On polyurethane
Water-based polyurethane grout seems to be the most convenient for a person without much experience in repair matters. Variants of this material are sold ready-made, in buckets.
Polyurethane material is used universally - for all types of tiles and glass mosaics. This material is convenient and the permissible seam width is from 1 to 5 mm.
It is easy to apply and shape, good adhesion and water-repellent properties are maintained for a long time.
Working with epoxy grouts
- Preparation of seams. Similar for cement-based grouts.
- Preparing the mixture. Measure the resin and hardener exactly according to the manufacturer's instructions. The use of electronic scales is mandatory. Only the corner should be cut off from the package with the hardener. To preserve, the bag is pressed with the lid of a jar of resin: this ensures the tightness of the remaining mixture. The amount of finished grout is calculated based on the ability to use it up before curing. After mixing, the composition temporarily brightens. If necessary, glitter (no more than 3% of the weight of the mixture) or a fluorescent composition is added to the finished mixture.
- Filling seams. The grouting compound is applied with a spatula with a rubber base specially designed for epoxy resin (from LITOKOL - green). After grouting the tile joints, the surface is abundantly moistened. Vertical surfaces - using a sprayer.
- Washing the tiles. Water is removed with light movements only with a cellulose sponge: the foam rubber reacts with the mixture. The sponge is washed well and wrung out. This way, excess mixture is washed off the tiles.
- Final cleaning. After no less than 12 hours, use a special product offered by every epoxy grout manufacturer to finally clean the tiles. The cleaner must be used in strict accordance with the instructions. At the final stage, the surface is wiped with a dry soft cloth.
- Surface operation. Final hardening occurs after a few days. At this time, it is necessary to protect the surface from dust.
Tips for choosing a composition
Knowing the purpose and main characteristics of various types of grout, it is quite easy to decide on the required composition:
- For relatively dry areas of the bathroom, where splashes only occasionally reach, a regular cement composition is suitable.
- To fill joints in wet areas, for example, in a shower, it is better to use waterproof mixtures: epoxy, polyurethane or cement with additives.
Also, when choosing the type of filler for joints, the type of base: stone wall or sheet cladding is taken into account in order to select a material with the required degree of elasticity.
In addition, when choosing a grout, you should pay attention to the structure of the tile itself:
- If the surface of the ceramic is glossy, you should not use coarse-grained grouts, but rather fill the seams with finely dispersed cement grout.
- The shiny "glass" joint created by using epoxy aggregates works well with mosaics and colored glass tiles.
- It is best to fill the joints between porous and relief tiles with coarse-grained cement or polyurethane fugue.
Removing streaks
Leave the solution for at least one hour or until it becomes quite hard, otherwise the solution will wash off. It will harden significantly and you can start removing the dullness from the tiles with a microfiber towel.
- If residue is difficult to remove, especially from coarse-grain tiles, it is best to use a stain remover such as Intensive Cleaner.
- Keep the rag dry enough to avoid rubbing new moisture into the grooves, as this will increase the curing time.
- Remove the haze from the tile and you'll find a freshly grouted wall or floor with evenly filled grooves!
Nuances of choosing a shade
The universal rule for choosing the color of the grout is to match or slightly darker/lighter than the shade of the tile. Another universal option is to use a white fugue, which matches most shades of ceramic cladding, visually slightly expands the bathroom, and also hides minor unevenness in the edges of the tiles and errors made during its installation better than other shades.
For the floor, it is recommended to select dark shades to fill the joints: this will make accumulated dirt and dust less noticeable. White grout on the floor will turn gray in just a few months.
For finishes with a rich pattern or made of multi-colored tiles, a transparent aggregate or a special “chameleon” mixture, which has a different shade from different angles, is suitable.
Another interesting option is to add metallic powder of golden or silver color to the fugue, which makes the seams original and provocative. But it is worth remembering that this method of highlighting seams is suitable for certain design styles.
How to choose grout
Grouting tile joints is a special solution applied to the tile joints at the finishing stage of cladding. The main criteria by which professionals evaluate the mixture:
- homogeneous composition;
- elasticity of the material;
- type;
- price;
- color;
- manufacturer.
It is important that the composition is of high quality and meets the first two points: uniformity and elasticity. Then you can avoid lumps during application and it will be easy to work with.
The compositions can be very different by type (species), it all depends on the quality of the tiles and the financial capabilities of the owners.
Note!
Epoxy grout for tiles: pros and cons, scope, varieties, how to work with it (instructions + photos)
Do-it-yourself tile shower tray step by step: instructions, dimensions, design, installation of communications, types of structures, photos
White tiles in the bathroom: 170 photos of the best ideas and new tile designs. Layout schemes and beautiful combinations
The color of the grout of ceramic tiles depends on the preferences of the homeowners. You can choose a putty to match the tile, or you can play with contrast, i.e. choose a color different from the main background. For example, for a light cladding - a darker shade, and for a dark surface - white grout. A monochromatic mixture will suit patterned tiles. For example, for light blue - blue, and for purple - pink. The main thing is to choose a composition that is lighter than the main background of the cladding.
The price of silicone grout will differ from the cost of other types, so you can only determine the prices in the store. It also depends on the manufacturer.
For information! A high-quality composition should contain not only binding components, but also various impregnations, latex, additives, minerals and fillers that improve the performance characteristics of the mixture.
Stages of grouting tile joints
The belief that sealing the seams on tiles is the easiest part of the job is wrong. The process itself looks simple: mortar is introduced into the spaces between the tiles, leveled, and excess is removed.
But this is the finishing touch that determines the appearance of the finished work, so you should pay close attention to the nuances and subtleties.
Preparation of tools and materials
You need to prepare everything you need in advance. The mixture hardens quite quickly, so you should have on hand:
- Rubber spatulas. They are made of dense rubber - even with strong pressure there are no marks or scratches left on the surface.
- Several containers.
- Construction bag. A device that resembles a baker's bag. From it, under pressure, the mixture will be gently squeezed out along the seam.
- Construction knife. A construction knife has a blade located at an angle to the handle, which is convenient when working.
- Brush for pre-cleaning seams.
- Shaping spatula. Some craftsmen use a regular piece of cable instead. They smooth the surface.
- Regular dish sponges are for wet cleaning.
- Thick gloves.
Preparation of seams and surfaces
Before preparing the solution, the tile joints are cleaned of any remaining glue and dust. This is done with a knife, then carefully swept with a paint brush. A clean surface will provide good adhesion to the wall and tile edges.
The question may arise whether it is necessary to remove the crosses installed during installation. Many craftsmen leave them in place and simply cover them up. However, if tinted grout is applied, it makes sense to pull them out - otherwise the color of the seam above the cross will be 1-2 shades lighter than the main color.
Preparation of the solution
The final stage of work is carried out only after the tile adhesive has completely dried - this can take up to 2 days.
- You can buy a ready-made solution in jars. Dry material is sold in kilogram bags; the required proportions for dilution are indicated on the packaging.
- The powder is dissolved in warm water and mixed with a drill and mixer. If you mix it by hand, you need to stir it with a clean wooden stick. There should be no lumps, it should be homogeneous.
- Taking into account the fact that the solution dries quite quickly, it is advisable not to dilute everything at once, but to mix it in small portions.
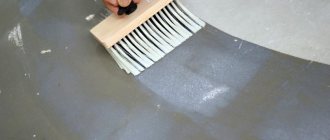
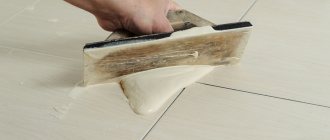
Fuging (application and compaction)
For better adhesion to the surface, it is recommended to wet it with a spray bottle or brush.
You can combine wetting with additional treatment against fungus (the product used to treat the walls before laying the tiles is suitable).
Next, the solution is quickly applied with a rubber spatula - overlapping strokes. It is necessary to ensure that the spatula runs clearly perpendicular to the seam. To fill the voids, you need to press down on the spatula so that no air remains.
To press in the solution, apply a spatula with a little force along the application line, turning it lengthwise, and then level everything with transverse movements.
Can I use a grater?
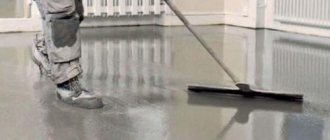
There is almost no difference between processing a wall and a floor, but on the floor it is possible to carry out the work faster and easier.
You can quickly clean the seams on the floor using a float with a rubber pad. In this case, the solution is not applied at the seams, but completely. For this purpose, the solution is made more liquid.
Processing is carried out in small areas. You need to apply the solution sweepingly and energetically; it will lie flat and fill all the seams.
This method is applicable if the tiles are smooth. If the floor surface is textured, with protrusions and depressions, it will subsequently be difficult to remove the solution, which will fill all the unevenness.
The same tool can successfully remove excess mixture, but instead of rubber, a foam sponge is installed.
The final stage of work is filling the spaces around sockets, fasteners, pipe inlets and other elements.
Cleaning the surface and smoothing the seams
There will be marks on the edges and should not be left until dry. If you carefully apply the grout, there will be few traces or excess left, so it is better not to be distracted during the process and do everything with as precise movements as possible.
During the application of the grout, excess is collected at the same time: if you use a spatula without pressing, the excess is removed from the edges.
Part of the surplus is collected immediately when part of the work with the prepared portion is completed. Without waiting for complete drying, the treated part of the wall is wiped with a damp sponge - when wiped, it evens out the seams and makes them smooth.
Cleaning after work should be carried out as quickly as possible, because the solution hardens quickly, and dried residues are more difficult to remove.
After finishing all the work on the wall, you will have to wipe the entire wall several more times.
Sealing the joint between plumbing fixtures and the wall
After installing the plumbing in the bathroom, the junction of the bathtub, shower tray and sink to the wall is sealed. The optimal material for this is silicone sanitary sealant. Let's look at the technology using the example of sealing the junction of a bathtub to a wall:
- The bathtub is filled with water so that it shrinks after installation.
- Then the edges of the bathtub adjacent to the wall are sealed with masking tape. The adhesive tape is also glued to the tiles so that there is a gap of approximately 10 mm wide.
- The resulting seam is filled with silicone sealant.
- After filling, the seam is leveled with a rubber or plastic spatula. If you don’t have this tool at hand, you can do this with your finger moistened with soapy water or wrapped in plastic wrap.
- While the sealant has not dried, carefully peel off the masking tape and leave the seam for 24 hours. After the silicone has completely dried, a neat and tight connection is obtained.
Rules for selecting grout color
The general principles are simple, but the final design requires professional judgment: a color mistake is costly. Such assistance can be obtained from the store where the material is purchased.
- Light grout on light tiles creates the effect of a monolithic coating and visually expands the room.
- Figured tiles require a contrasting fugue: this way the shape will be clearly visible.
- The joints on the floor are filled with grout one or two shades lighter or darker than the tiles, but not white: it will quickly darken.
- For walls, white grout is universal: if other colors are not satisfactory, the seams are made white.
- Bright grout from the Noname brand can tint the tiles.
- The color of the grout can be matched not to the tiles, but to the furniture or sanitary fixtures.
When choosing a color, the first place should be the performance of the material and durability. For the sake of this, decorative effects can be sacrificed.
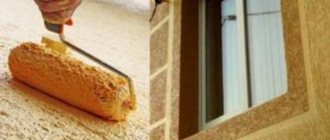
Grouting corner joints
To decorate corners, it is not recommended to use ordinary cement grout, since when this material shrinks at a fracture, it cracks. There are two options for sealing cracks: silicone or epoxy. Both are suitable for wet rooms, but due to their greater aesthetics and resistance to external factors, epoxy mixtures are a priority.
The difficulty of the work is that it will not be possible to place the puffer into the recess with either a spatula or a sponge.
Specialists work simply with their fingers. The mixture is applied liberally to the seam and roughly wiped with a damp sponge. The next stage is smoothing with your finger, during which excess grout will come out onto the tile. To form an even line, you need to walk along it several times. Horizontal seams adjacent to the corner are made in the same way, so that the spatula does not damage the already formed vertical. The outer corners are treated with a rubber spatula, removing excess from one side and the other in turn.
Remove excess grout
Use a squeegee or similar rough but dry sponge to remove excess solution. The idea is not to scrub the wall, but simply to remove enough grout so that you can see the tiles and properly judge the gaps between them.
Keep the tool you use for this dry - you don't need to add moisture to the mixture at all at this stage.
Features of grouting seamless tiles
Even rectified tiles are laid with seams, only these distances are very narrow, only 0.5–1.5 mm. It is difficult to work with because regular grout installation can cause shrinkage and unwanted grooves over time.
A cement composition is used for the work. Using a small rubber spatula, apply the grout mixture diagonally level or slightly above the level of the surface to be treated. It would be ideal if you get a bump. Any excess that appears on the tiles is removed immediately with a damp sponge. To make this easier, pre-wet the surface with water, making sure that moisture does not get into the space between the tiles.
When the grout has dried, take corrugated cardboard, with which you clean off the tubercle in the transverse direction. This is a labor-intensive process. When you start it for the first time, try to grout the tiles in a small area. If that doesn't work, you can always use the classic method.
What the modern market offers: popular brands and formulations
The market for grout mixtures offers options from foreign and domestic manufacturers. The most popular brands with brief characteristics:
- Ceresit - this kind of fugue has long been a success among tilers, because the company produces easy-to-use cement grouts. Just add water and achieve the desired consistency - the material is ready for use. Latex and epoxy compounds are sold separately. Bulk mixtures are sold in packages of 2 and 5 kg, suitable for joints up to 10 mm. The finished compositions are packaged in buckets of 2 and 5 kg.
- Mapei . An Italian company offering cement and epoxy mixtures. Suitable for 2-5 mm seams, available in 2 and 5 kg packs.
- Litokol . A company from Italy also produces cement and epoxy grouts for joints. Cement compositions require preliminary dilution with water; they are suitable for grouting joints of 1-6 mm. The epoxy base allows the composition to be used for joints of 1-15 mm.
- Kerakoll . The company produces dry and liquid mixtures that are immediately ready for use. Epoxy grouts are suitable for tiles in the bathroom and where there is high humidity. The mineral composition is suitable for seams up to 8 mm in size.
- KIILTO . Manufacturer from Finland, cement mixtures are suitable for narrow joints; they tolerate moisture and air well. Such compositions are packaged in packs of 1.3, 10 and 20 kg.
Manufacturers of grout mixtures Source remontidei.ru
Each manufacturer offers tilers different types of mixtures. Cement-based compounds are more suitable for narrow joints, while ready-made epoxy or latex compounds can be used on larger tile joints.
See also: Contacts of companies that specialize in insulation and finishing of houses.
Is it possible to grout tiles with tile adhesive?
This is a frequently asked question, especially since most often the glue remains, and the grout must be purchased separately. Most craftsmen agree that for rooms lined with ordinary tiles, it is best to use grout, since it performs protective and decorative functions and is available in a large palette of shades, while the glue is gray.
Filling the joints with tile adhesive may be justified in the case when facades or other surfaces exposed to weathering are used with porcelain tiles.
In this case, if there is no reliable waterproof grout, the seams can be filled with glue, since the unreliable grout will fall out of the seams over time, and the tiles will move away from the base under the influence of moisture. In this case, it is better to grout the seams immediately during installation so that the adhesive layer is completely monolithic.
We recommend watching a video on this topic and drawing your own conclusions about the advisability of this method.
Would you use tile adhesive instead of grout?
Not really
Common mistakes when grouting joints and how to avoid them
Typical mistakes do not allow you to obtain high-quality and beautiful cladding. Therefore, it is worth familiarizing yourself with common cases when the wrong approach harms your work. Grouting on dirty walls is unacceptable. Be sure to remove any remaining glue. The rule also applies to inventory. It is allowed to work only with clean tools. It is better to have several different spatulas, separate for grout and glue.
First remove the solution from the seams. It is impossible to apply grout without such a procedure. Before applying a new grout layer, the old one is removed. It is a mistake to mix the mixture with a drill. The tool speeds up the process, but degrades quality due to air entry. Metal spatulas should be avoided. A common mistake that occurs frequently is mixing a large amount of mixture at once. It is better to knead in portions, processing a small area of lining.
It is allowed to work only with clean tools.
Grouting is a simple process if you take it seriously and study the process carefully. Careful adherence to the recommendations will allow you to obtain high-quality, clean and beautiful cladding.
Why does grout crack?
One of the common problems that arise after tiling and grouting is the formation of cracks between the tiles. The main reason for this is a violation of technology when preparing and working with grout:
- A larger amount of water was added than recommended by the manufacturer: when dry, such a solution shrinks and cracks.
- A mixture that is too dry is difficult to compact in joints, which also leads to the formation of cracks.
- Also, joints will crack if the filler is applied in a thin layer and the mortar is not compacted.
- Another reason for the appearance of cracks is that the grout was applied when the tile adhesive was not completely dry or drafts were allowed in the room during the drying process.
To eliminate cracks, it is recommended to remove the grout from the problematic seam and apply a new one in compliance with the technology.
In conclusion, here is some advice on how you can easily and relatively quickly remove set grout if something goes wrong during its application. Usually a special scraper knife is used for this, but if you take a hand saw blade designed for plywood or other wood boards, the process of grinding off the grout layer will significantly speed up. After scraping off the main mass, the remaining filler from the ends of the tiles is removed with a knife.
Cleaning the tile surface
The tiles will take on a finished look after removing traces of putty. Since the mastic sags when it dries, grouting is done in several steps, and the floor surface is cleaned at the final stage.
Take a foam sponge, moisten it in water and lightly rinse the tile so that the mixture that has dried on it gets a little wet. Then, using a scraper or spatula, holding them perpendicular to the tile, remove the remaining composition from its surface. Stains are removed with a damp cloth or sponge; using them you can correct the work.
The joints should not be made convex or extend into the tiles. To clean grooved tiles, use a toothbrush dipped in water. The putty should be removed before it is completely dry - otherwise it will be quite difficult to soften the grout. As a result, the cleaning process will become longer and more complex.
Peeling off the dried mixture can damage the surface of the tile, especially on glossy products. It is almost impossible to remove hard grout from embossed tiles. Shiny tiles can be treated with window cleaner and then polished.
Useful tips
There are some subtleties to this seemingly simple job. But if you do it yourself, you save a significant amount.
Optimal seam width
The impression of a tiled wall is determined not only by the quality and pattern of the tiles. Well-made seams and the right shade of pigment will only emphasize a well-executed styling.
You should not try to make the seams as narrow as possible; a narrow seam is difficult to fill with grout material.
Seams that are too wide are also bad. Excessive space between tiles weakens the structure's resistance to moisture and other external factors.
Wide seams are prone to cracking - therefore, cement-sand compositions are used for them.
If we talk about the bathroom, the standard distance between tiles is 3-4 mm.
How to prevent cracking?
Cement grout is most often susceptible to cracking. The reasons may be:
- solution too thin
- failure to comply with the required proportions when preparing the solution
- changes in the composition of the air before drying (if you started using the bathroom and turned on hot water)
- oscillating base (for example, when laying on wooden surfaces).
If cracks appear, you will have to immediately begin repair work to avoid dampening of the tiles and the appearance of mold.
In this case, the seams are cleaned and re-rubbed.
Cracks may appear directly during the application process - this means that the solution is liquid. In this case, you urgently need to rub dry grout powder into them.
The information on the packaging of the grout material may be useful; it usually states:
- rules for preparing the solution;
- optimal seam width for a given material;
- complete drying time.
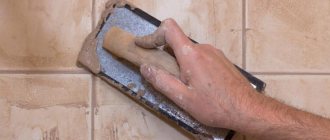
Clear the lines
Tooling is the process of finishing grout lines to a smooth, even surface.
- Use a dry sponge, just enough water to retain the lube, and press right along the edges with your index finger.
- You don't have to push the grout out - you're just trying to even it out between the tiles.
- At this point, there should be no actual grout on the surface of your tiles, but instead they will be covered in grout marks.
- Note: Before cleaning, it is important to ensure that the solution is sufficiently hard, but not dry. Check it regularly after application while it dries.