When designing various types of structures, an important step is the selection of suitable material. Each customer gives priority to structures that can be erected in the shortest possible time, have good performance characteristics and an attractive appearance. Sandwich panels are considered an excellent option among those actively used today in residential and commercial construction.
Sandwich panels
Introduction:
Even at the stage of designing the house (I was a design engineer myself), it was decided to use a plaster facade as cladding for the walls of a house made of gas silicate block. This was one of the most popular solutions for the facade without additional wall insulation. Upon completion of the main stages of building a house, installing internal communications, internal finishing work, arranging and preparing the house for moving and living in, it became obvious that a plaster facade is not quite a suitable solution for two main reasons: - the cost of the facade plaster mixture: a good resistant mixture that in a couple of years it will not crack or begin to crumble, it costs good money, for our wall area it was a good amount; - cost of work: in our house we try to do everything ourselves, it’s cheaper and often better, but plastering the facade alone is hellish work, especially taking into account the height on the gables. Moreover, experience is still needed here, since the work is finishing, you can’t cover up the defects with putty, and transferring the material for rework is a very expensive pleasure. Hired labor for such work is very expensive, and taking into account the current arrangement of the house, money is becoming less and less; It was necessary to consider alternative options: vinyl siding, metal siding, large quantities of facade panels for every taste and color, fiber cement siding, etc. But after a long search, viewing and choosing different options, color schemes and combinations, patterns, constant travel, inspection of existing houses with ready-made facades, all these sidings and panels became so boring and an eyesore that they had already become boring before even getting to the point of purchase and installation. We needed something different, something that had never been seen before, something interesting and unusual. While searching online, I was lucky enough to come across a version of a façade made of large-format PVC sandwich panels. I liked the material because it was easy to install, and it also matched the desired color scheme - light walls and dark additional elements.
Advantages and disadvantages
The use of wall panels as a building material allows for high speed of installation work and low cost of the constructed structure. In addition, BSCs have the following significant advantages:
- when using SSP, there is no need for additional heat and sound insulation, which significantly reduces material costs for building construction;
- the small specific weight of the panels allows one to avoid constructing a powerful foundation, and, therefore, reduces the consumption of building materials;
- the technology for installing sandwich panels is so simple that it allows you to carry out the work yourself, without the involvement of specialists and special equipment;
- the presence of a polymer protective and decorative layer provides not only an attractive appearance of the structure, but also significantly increases the service life of the building;
- a large selection of colors and the ability to imitate various materials allow you to use sandwich wall panels to implement any design solutions;
- the attractive appearance of the cladding allows the material to be used for decorative cladding of facades, in addition, it eliminates the need for additional exterior finishing;
- the affordable price contributes to the widespread use of the material both in industrial construction and in private development.
Despite the rather significant advantages of the material in question, before starting construction, it is necessary to take into account some characteristic disadvantages:
- buildings are significantly inferior to permanent buildings in mechanical strength. In order to damage the metal shell, a strong blow with a sharp object is sufficient;
- It is quite problematic to attach a wall cabinet or other massive object to interior partitions covered with sandwich panels;
- You should only buy products from trusted manufacturers, since low quality filler and improper application of protective and decorative coating will inevitably lead to rapid destruction of the panel.
The service life of a building made of SSP, its heat and sound insulation characteristics largely depend on compliance with the installation technology.
PVC sandwich panels:
PVC sandwich panel is a three-layer sheet material, a white front PVC sheet, an EPS layer, and a PVC sheet on the back side, but softer than on the front side.
For ease of installation, panel formats of 3x1.5 m and 3x2 m were chosen, panel thickness 10 mm. There are thicker panels (24 mm and 32 mm), but for my purposes the thermal insulation properties of the facade are not so important, and the strength of a 10 mm panel is quite enough for vertical cladding.
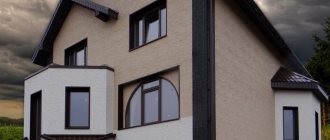
The following compositional solution for the facade was designed in Sketchup, with elements on a half-timbered theme:
It was decided to make additional elements at the joints of panels and corners, window and door frames, as well as cross elements from planed chamber-drying pine boards 140x20 mm.
Last year, over the summer, the gables of the shingle-attic floor were slowly lined with metal siding in the color of the roofing metal tiles according to the project. I really liked the material, having understood the principle of fitting elements into the finishing and starting profiles, the work went quickly.
The TBM-Market company, which is a dealer of the Rospanel plant (Rospanel plastic sandwich panels) in our region, was chosen as the panel supplier. The order was placed on the website, delivery terms and volume discounts were discussed with the manager, and after 4 days the panels were on site.
It was purchased: Sandwich panel (insulated slope) Bauset RS 10x1500x3000 mm (0.8x1.0 mm), white matte - 9 pcs.; Sandwich panel (insulated slope) Bauset RS 10x2000x3000 mm (0.8x1.0 mm), white matte - 19 pcs.; Profile (L) initial Bauset TPL 27x20mm white 6.0 m (U-shaped profile) - 108 m; Profile (F) final Bauset TPL 10x60x6000 white (F-shaped profile) - 78 m;
Unfortunately, I didn’t have time to take a photo of a large stack of panels, as it very quickly went to pieces on the walls and scraps. It took my wife and I about 4-5 hours to install large panels of one wall together, the work went quickly, we didn’t get around to taking a photo, and at that time I wasn’t thinking about a review. But I took a few photos of the large top trim of the largest panel)):
What are the benefits of sandwich panels?
The popularity of the material among builders and consumers is easy to explain. What are the characteristics of multilayer panels?
- Their use makes it possible to reduce construction time tenfold and save on labor costs.
- Decent thermal insulation characteristics (a wall made of 100 mm panels has approximately the same thermal conductivity as a brick structure 64 cm thick) helps optimize heating costs.
- The small mass of the products and the structure as a whole makes it possible to simplify the procedure for studying soils and laying out the foundation. In addition, transportation and movement of products is easier.
- The minimum service life of the panels exceeds a quarter of a century.
- The material is not subject to atmospheric influences.
- Many types of panels have good fire resistance.
- Externally, the panels look very aesthetically pleasing.
Roofing sandwich panels
The functionality of a building material is largely determined by its multilayer nature. It perfectly protects walls and roofs from low and high temperatures and precipitation, provides excellent thermal insulation and protects against noise. With low construction costs, it is possible to build an attractive and reliable structure in a short time.
Important! Sandwich panels are produced by many manufacturers. To become the owner of high-quality building materials, it is recommended to purchase products from trusted factories.
Sandwich panel house project
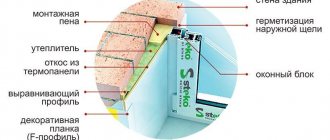
Facade subsystem:
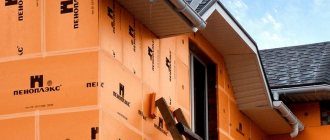
A ventilated facade is required for the wall of a house made of gas silicate block.
No matter what they say that modern Russian-made gas silicate blocks often do not meet the standards for vapor permeability, and the cladding can be sculpted anyway, I did not check these thoughts on my house. Accordingly, when installing the panels, it is necessary to provide a ventilated gap through vertical sheathing. Wooden bars/slats or galvanized profiles for gypsum boards are often used as lathing in private construction. These options seemed very low-tech to me, especially since various façade systems are currently available. Their curtain wall subsystem was purchased from a local Grandline dealer (Facade subsystem for individual construction)
Galvanized profile 40x40 (0.9 mm) - 60 pcs.; Galvanized profile 40x60 (0.9 mm) - 34 pcs.; Wall fastening / Galvanized corner 50x50 (2 mm) - 500 pcs.;
The profiles were mounted on the wall with a pitch of approximately 500 mm, the 40x60 profile was used directly at the corners and at the joints of the panels.
To install the profile, galvanized corners are used, which are attached to the wall using dowels and screws with a hex head (caps) and a washer. The hole for the 10 mm dowels is drilled using a Pobedit drill directly with a screwdriver:
The profiles are attached to the corners with self-tapping screws with a press washer and a drill:
To fasten the 40x40 profile I used 4 corners per 3 meters of length, for the 40x60 profile I used 5 corners per 3m. The profile can be cut perfectly with metal scissors.
Wall panel installation technology
Step 1. The supporting base is cleaned of dirt. Most often, the panels are installed on a metal frame. Before installation, its surface should be coated with an anti-corrosion compound.
Step 2. A wide butyl tape is installed on the upper surface of the base (it should be in contact with the frame). After this, a sealing tape is attached to it. A sealing element is also fixed to the frame. This reduces sound vibration and air permeability at the joints.
Laying butyl tape
Step 3 . Base guides are installed at a distance of 7...9 mm from the frame. Butyl tape is placed in them close to the inner edge. Mineral wool strips are installed end-to-end over the guides.
Laying the tape over the guides
Step 4. A base strip is mounted on the outside of the base rail (with an overlap of 10 cm).
Installation of the plinth strip
Step 5. The first panel must be installed strictly level; the quality of all work depends on this. The wall will be uneven, and gaps will appear at the junctions of the elements, which will affect the thermal insulation ability.
Fastening starts from the top of the panel and is done in increments of 400 mm. When mounted horizontally on a plinth, the panel is fixed with the groove down.
Installing the first panel
Step 6. Before installing the next panel, the already secured lock is treated with sealant. You can also use a butyl rubber cord with a diameter of 8 mm for sealing.
Step 7. The transverse joints of the panels must be laid with insulation (mineral wool). This technological seam must have a thickness of at least 2 cm. After installation of the panels is completed, it is sealed with sealing tape and covered with a shaped element.
Transverse joints are laid with insulation
Step 8. Shaped parts must be installed with overlap. When finishing horizontal panels it should be at least 5 cm, vertical panels - 8...10 cm.
Installation process of facade panels
From the outside, the shaped elements are fastened with 28 x 4.8 mm self-tapping screws with an EPDM gasket (or rivets) and sealing the connection plane with sealant.
A properly installed sandwich panel structure will last for many years.
Installation of sandwich panels and slopes:
To cut large-format sandwich panels, it turned out to be easiest to use a jigsaw with a plastic file. The cut, of course, is not the neatest, there are a lot of chips. But considering that all joints are covered with additional elements, the quality of the cut can be neglected for the sake of cutting speed.
We attach the panels to the metal profiles using self-tapping screws with a press washer. To compensate for the coefficient of thermal expansion of the panel (and it is 0.7 mm/m for every 10 degrees of temperature change), we first drill holes at the fastening points in the panel with a 7mm drill for self-tapping screws to ensure freedom of movement of the panel during expansion. We fasten the panels themselves with a 10 mm gap between adjacent panels. The lower edge of the panel was leveled using a laser level, so they tried to carry out work on direct fastening of the panels in the evening, when the beam was clearly visible.
For the installation of the subsystem and panels, a “goat” like this was previously made; it is not very heavy and can be moved without difficulty.
From the front and back parts of the house, where the panel rests on the soffit, a U-shaped profile was placed on the upper end of the panel. The top edge of the panel on the sides of the house extends directly under the starting profile of the gable metal siding.
To attach the vertical pipes of the drainage system and attach the satellite dish, I made embedded parts from 50 mm boards.
After completing the installation of all panels, you can proceed to installing the external window slopes. For the slopes, I cut strips 160 mm wide from scraps of large panels on a sawing table. With a circular saw the cut is perfect.
We begin the installation of slopes by installing starting U-shaped profiles around the perimeter of the window. I bought profile sticks in 6m pieces and cut them with scissors. We attach the profile directly to the window frame using small self-tapping screws.
In this case, the strips were cut to size using a cutter, which is more convenient and faster at such a cutting length. Next, we insert pre-cut slope strips into the U-shaped profile.
At the junction of the side and top strips we add pieces of the U-shaped profile.
From the outside we put an F-shaped profile over the strips with a good overlap on the panel.
Recommendations for the use of panels
Sandwich panels can be fixed horizontally, which is most often practiced, or vertically. In the first case, installation begins from the foundation of the building, in the second - from the corner of the building.
Installation of wall panels
Vertical installation of the material is usually used for the installation of structures up to 6 m high. The two installation methods cannot be combined.
Vertical installation of panels
Several important requirements when working with multilayer material.
- Unloading is done one package at a time using a crane or forklift.
- The packs must be placed on a flat surface (stacked on top of each other is prohibited).
- For convenience, the panels are installed near the work site.
Installation of panels to the frame or base is carried out using special self-tapping screws made from hardened steel. The fastener must have a sealing washer. The type of hardware is determined in accordance with the type of supporting structure and its thickness. It can be made of concrete, wood, brick or metal.
Self-tapping screws for sandwich panels
Before installing the panels on a metal or wooden base, you will need to pre-drill the mounting holes, but if you use self-drilling screws, this step will not be necessary. The length of fasteners depends on the thickness of the panel and varies from 85 to 235 mm. The most commonly used parts are 5.5 mm in diameter.
To fix the material to concrete, preliminary installation of holes is mandatory. And both in the panels and in the base. The products are fastened by installing dowels.
Fastening panels
Rules for fastening sandwich panels.
- The fasteners must be located at a distance of more than 5 cm from the edges of the material.
- Installation of hardware must be carried out strictly perpendicular to the outer layer of the panel.
- An important point that largely affects the quality of installation is the correct tightening of fasteners. Self-tapping screws with a sealing washer must be tightened until they come into full contact with the base. In this case, you should avoid over-tightening, which over time can lead to depressurization of the connection.
How to tighten self-tapping screws - Before installation, the protective film must be removed from some areas: locks, fastening points. Complete dismantling of the protective coating is carried out immediately after completion of installation work.
For installation, you will need clamps to support the panels until they are completely fixed. To cut the material, you can use saws (circular or band saws), a jigsaw, or electric metal shears. The grinder is not used in this case, since the temperature effect that occurs during the operation of this tool leads to damage to the material.
Prices for inexpensive sandwich panels
sandwich panels
Installation of sandwich panels
Before starting work, it is necessary to check the ends of the products. The insulation should not protrude. Otherwise, this defect must be eliminated. Waterproofing must be applied to the upper part of the plinth.
Preparation and installation of additional and decorative elements:
After completing work with the slopes, you can move on to preparing wooden additional elements that will serve as platbands, flashings and simply additional elements.
As the material, as I wrote earlier, a chamber-dried pine board measuring 140x20 mm was chosen, a pack of 60 boards of 3 m each was brought. Since it was necessary to carry out a lot of sawing work, including making corner cuts, a new one was purchased for the occasion miter saw Caliber Master PTE-2100/305PRm and a new disc for finishing cuts. I immediately took a large saw, with a large depth and length of the cut, since it is planned to build a gazebo in the future.
All elements were measured, filed and immediately tried on in place to minimize gaps at the joints. The corner elements were made from two boards, which, after adjustment, were glued together with PVA along the entire length, without self-tapping screws.
Then the elements were removed and sent for priming and painting. My wife was responsible for this process, so we successfully used the flow method of work with sequential cutting and painting of elements. Tikkurila Valtti Primer was used as a primer, and a Tikkurila Pika-Teho bucket was purchased for painting. Priming the elements on all sides in one layer, painting the front side in two layers:
The most labor-intensive, of course, were the crosses under the windows, a lot of measurements and adjustments:
All additional elements are attached through pre-made holes with 4mm metal screws directly into the metal profile of the facade subsystem behind the panels.
Upon completion of work with additional elements, new metal window sills were installed:
A staircase was also assembled from a metal profile 40x40x3 and larch steps (Leroy Merlin) for the exit to the rear of the house. The steps were already painted with TEKNOS TEKNOFLOOR flooring paint, but tinted in the same color as the additional elements.
A few photos of what we ended up with:
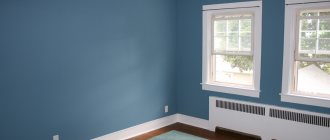
Interior wall decoration from sandwiches
Sandwich panels need not be finished on the loggia.
The premises of frame houses, the outer walls of which are made of “sandwich” slabs, are undoubtedly subject to interior finishing. Since the panel itself inside the room will look too dull and official. At the same time, methods and materials can be absolutely any. Only finishing will require preliminary preparation. Let’s say it’s impossible to paste wallpaper onto sandwiches. Therefore, first you will have to cover the walls with plasterboard. It may be necessary to take additional measures to better insulate the walls. For this purpose, a layer of insulation is laid between the frame profiles, and then it is covered with sheets of plasterboard. The following is the standard procedure: sealing the joints with putty with reinforcing tape, grouting the heads of the screws and wallpapering, tiling, textured plaster, painting over the finishing putty.
Some interior styles require the presence of a large amount of wood. In this case, the owner of the house can use his talent and cover the walls with beautiful lining, imitation timber, and wooden wallpaper. To do this, you need to arrange a frame of beams along the surfaces of the walls, arranging them in such a way that the cladding lays as intended - in a vertical or horizontal position. If the building is built in a frame version and does not require additional insulation, then it is not necessary to install lathing, and wooden cladding can be attached to the frame posts. All work can be done with your own hands, showing maximum imagination. The main thing is to select materials with taste and install them according to all the rules of finishing art.
and Gypsum Tile Review
Costs, general impressions and comments:
The total installation costs for this version of the curtain wall were:
Pediments (50 m2):
| № | Name | Price, rub.) |
| 1 | Grandline facade subsystem | 10'000 rub. |
| 2 | Metal siding (eco-timber) and additional elements | 52'000 rub. |
| 3 | Fasteners | 2'500 rub. |
| — | TOTAL FRONTS: | 64'500 rub. |
First floor (125 m2):
| № | Name | Price, rub.) |
| 1 | Grandline facade subsystem | 18'500 rub. |
| 2 | Sandwich panels | 58'600 rub. |
| 3 | Fasteners | 3'000 rub. |
| 4 | Board for additional elements | 13'500 rub. |
| 5 | Paint, primer, brushes | 14'000 rub. |
| 6 | Metal castings and foam | 4'000 rub. |
| — | TOTAL FIRST FLOOR: | 113'000 rub. |
Installation turned out to be very simple. It took approximately 1.5 days to install the metal subsystem on one side of the house. Installing the panels directly on each side of the house took a total of 1 day, but we did it gradually. First, the two of us fastened all the large panels around the perimeter of the entire house, then from the marked scraps we could independently cut out and install smaller elements above and below the windows. I had to tinker with the slopes of windows and doors; one side of the house also took one half day, and after the second window this work quickly became boring. Wooden additional elements will take 2 full days on each side, and since it is not so easy to find so many free full days, this work took about 3 weeks. All the window tides were installed in one evening.
Regarding thermal expansion, it exists and is clearly visible on the widest panels. Immediately after hanging the panels on the sunny side, after a very hot day, I noticed that the panels seemed to swell outward, easily return to their original position when pressed by hand, and bulge out again, in the evening, when the sun sets, the panels are smooth again. I loosened the fastening screws, I thought maybe the panel was pinched at the edges and there was nowhere to expand, but even if you remove all the screws and leave the panel hanging on the top two, it still bends outward. I am sure that this is the effect of uneven heating in the sun and thermal expansion of the front and back layers of plastic; if the front layer begins to expand from heating, and the back layer is cold, then it begins to bend the sheet in an arc. I didn’t want to fix the sheets in the center with small white screws to the intermediate sheathing, although it won’t be visible later, but I know.
All problems were solved after installing the additional elements; they pressed the sheets at the edges, and they no longer tend to stick out so actively, and taking into account that the wooden elements have generally changed the viewing plane, a slight bulging of the panel in the center can only be felt by hand. And the diagonal and horizontal elements generally pressed the largest panels. But the problem with bulging was only on one, the sunniest side, it’s good that it was solved. I liked the material, it’s easy to cut and process, it’s fast to install, it’s strong enough, it’s easy to clean, the surface is smooth, but more matte, without gloss. I can confidently advise!
It’s very good that we finished the facade, because by the end of the work we already felt like our cat:
If you have any questions, I will be glad to answer.
Installation time
The approximate time frame for the construction of walls made of sandwich panels, for example, by a professional construction company, with the availability of the necessary tools, equipment and transport, will be the following period :
- Drafting and approval of the project – up to 1 month.
- Construction of the foundation (depending on the option chosen and agreed upon with the engineer):
- tape – 5-7 days;
- Reinforced concrete pile – 1-2.
- Manufacturing and transportation of panels of the required size takes 5-6 days.
- Construction of the walls of a house, for example, with an area of 120 m2, takes up to 3-4 weeks.
Total : the overall result of the work was approximately 2.5 months. If the future owners of the building want to build a reliable building that should last more than 30 years, then, according to building codes, the foundation must be given time to shrink.
For a strip foundation, this time is up to 6 months. Make the foundation in the fall, build the walls in the spring. But, if the customer is in a hurry, and this is not important to him, then you can do without waiting for shrinkage.
Description
Facade sandwich panels are a multilayer building material consisting of external and internal protective layers, as well as insulation. Between the outer cladding and the mineral insulation there is a layer of vapor barrier. It protects porous mineral wool from saturation with atmospheric moisture on the one hand, and ensures condensate removal on the other.
The facing material and insulation are connected to each other by pressing and adhesion. Multilayer panels are available in several standard sizes: 3000×1150×32 mm, 3000×1150×24 mm, 3000×1150×10. The first number indicates the length, the second – the width, the third – the thickness. For the installation of interior partitions, more compact panels are produced with a length of 1500 mm and a width of 1000 mm.
Characteristics and features of building material
Wall panels are made from a variety of insulating materials, which are protected by rigid sheet materials. For this purpose, PVC, polyurethane foam, mineral wool, EPS (expanded polystyrene) are used. Regardless of the type, the products are suitable for cheap and quick construction. The sandwich panel is made of 3 layers. The top and bottom are protective; most often galvanized steel is used for it. It is protected from corrosion, resistant to temperature changes and reliable.
Between the protective sheets there is thermal insulation material. The main requirement for it is a low heat conductivity coefficient, moisture resistance and durability.
Sometimes a 4th layer is added to create a sandwich panel for interior decoration. It is made from plasterboard. Thanks to this, the fire resistance of the structure increases.
In the diagram below you can see a cross-section of a similar sandwich panel.
The main components of which it consists:
- Facing material (external).
- The first adhesive layer (two-component).
- Second adhesive layer (two-component).
- Trapezoidal mineral wool lamellas.
- Facing material (internal).
- Protective film.
- Roof lock.
- Mineral wool lamellas (structural).
Due to their composite structure, sandwich boards have many advantages. We will consider them further.
Types of cladding imitation
Manufacturers offer a wide selection of imitations on facade panels. Both regular and online stores provide catalogs where you can see all the samples in the photo. You should not ignore such an offer; perhaps a suitable option was not on the shelf, but it will be possible to make it to order.
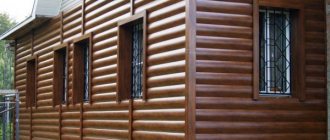
Under the tree
An excellent option for simulating timber is a metal or vinyl block house. Among other options, buyers are considering fiber cement, compressed wood fiber, or Japanese facade panels.
Under tiles
To imitate tiles, choose thermal panels, where the insulation is polyurethane foam. For a decorative layer, clinker or terracotta - facade ceramics - are perfect. The option costs a lot, but it will please the owner for a long time.
Under the brick
Fiber cement, clinker brick, and polyurethane can cope with recreating the texture of brickwork. This option will perfectly protect the house from negative influences. Very often this option is used specifically for basement siding.
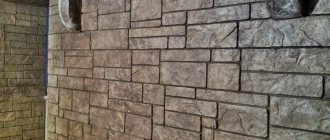
Under the stone
Manufacturers create all types of facade panels using imitation natural stone. They are very popular both for wall decoration and for protecting the base.