When is reinforcing mesh needed?
In some cases, during plastering work, builders install a special reinforcing mesh made of metal or plastic wire. By analogy with reinforced concrete structures, it is designed to resist tensile loads that can occur due to temperature changes and transfer of deformations of the load-bearing wall to the outer finishing layer.
The mesh helps increase adhesion, i.e. improves the adhesion of materials, prevents cracking and delamination. In addition, the use of fittings minimizes the consequences of possible technology violations, for example, non-compliance with temperature and humidity conditions.
For finishing up to 50 mm thick, the use of mesh is optional and directly depends on the client’s requirements and the allocated budget. If this indicator is exceeded, most professionals prefer to install it, despite the fact that this requirement is not in the current SNiP 3.04.01–87.
Methods for leveling surfaces
Leveling surfaces using the mixture can be done in two main ways: the dry method, using drywall, and the wet method, using special solutions for the mixture. Plaster solutions differ in their composition and scope of application.
Initially, you need to decide on the scope of work. If the wall is relatively smooth, but there are small defects, then you can just use putty. This usually applies to cement walls and ceilings. If the house has just been built, then, of course, you can’t do without plastering work. Plaster is applied to perfectly level the walls. The wall leveled using the mixture can be seen in the photo.
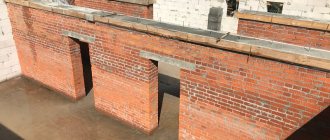
Brick walls require a thicker layer of mixture to ensure perfect alignment of the walls. Usually a brick wall is plastered in several stages. The work uses reinforced mesh for greater strength of the mixture.
Not only the walls need to be plastered, but also the ceiling. There are also some subtleties here. It is much more difficult to plaster a ceiling using a wet method than to plaster walls, so plasterboard is usually used to plaster the ceiling. You can see in the photo what a dry-plastered ceiling looks like.
Optimal plaster thickness
When deciding the question “what layer of plaster can be applied to the wall in my case?” you should strive for the minimum numbers that are possible without loss of quality of work.
Finishing brick, concrete and aerated concrete walls
The minimum thickness of plaster on brick is 5 mm. This is due to the characteristic surface topography. With a smaller layer, it will clearly appear outward. In this case, puttying for further leveling will be troublesome and, most importantly, unproductive. The maximum thickness without the use of reinforcing mesh is 20 mm, anything larger (up to 50 mm) is only with it.
The thickness of the plaster on concrete, thanks to the good adhesion of this base with all finishing materials, can be almost any. The minimum layer can be from 2 mm, and the maximum, if you work without the use of reinforcing mesh, is 2 cm. With meshes, the minimum is 2 cm, the maximum is 7 cm. In exceptional cases, with significant curvature of the walls, it is permissible to increase the figure to 10 cm.
Gypsum plaster, layer on gas silicate blocks should be from 2 to 15 mm
Finishing of wooden and plasterboard surfaces, as well as insulated
With plastering on a wooden surface, everything is different. In total we get two working layers. The first one is made in such a way that the reinforcing mesh or shingle lattice is completely hidden under it; there are no specific numbers here. The counting begins on the second layer, and it should be at least one and a half, and preferably two, centimeters.
Plasterboard sheets themselves form a fairly even coating, so in most cases a very small leveling layer is required. The maximum thickness of wall plaster is 1-1.5 cm. In excess of these figures, finishing is carried out very rarely and only subject to the preliminary installation of reinforcing mesh. There are no special restrictions on the minimum thickness, usually 1.5-2 mm.
Maximum and minimum layer of plaster
Plaster is a building material for leveling the surface, masking defects and protecting the building foundation from the negative influence of the environment.
The service life of the finish depends on the quality of the product and the application of the product. The thickness of the plaster layer is responsible for the thermal and sound insulation of the building. The indoor microclimate depends on this. For finishers who carry out reconstruction with their own hands, it is important to familiarize themselves with the rules for plastering the surface and find out what the maximum and minimum layers of plaster can be applied to the building base.
Optimal thickness for different types of bases
The construction roughing process is very important for the quality of all subsequent finishing. You need to remember that a thick layer does not mean good. Most likely, under its own weight, the plaster will simply begin to fall off the wall or crack.
Important! The opinion that for thin walls the thickness of the plaster should be greater is a misconception. If the walls are not thick enough, you will not be able to do without insulation and a thick layer of plaster mixture will not be enough.
Let's find out what the thickness of the plaster will be when leveling the walls yourself, based on the type of base:
- Brick – brick walls are distinguished by their relief, so it will not be possible to make a layer less than 5 mm. Otherwise, subsequent alignment will suffer. In this case, you can make the layer as thick as possible; it will be 5 cm. This will require the use of reinforced mesh. If you plan to level the wall without it, then the maximum layer is 2.5 centimeters
- Concrete wall - the porous concrete base adheres well to the plaster, so the minimum thickness is 2 mm, and the maximum is 7 cm, provided that reinforcing mesh is used. Without them, it is permissible to make no more than 2cm
- Aerated concrete - for a structure that is almost identical to concrete, the same thickness is allowed as in the previous case. In this case, the maximum for aerated concrete floors can vary from 8 to 15
Maximum wall plaster thickness
- Wood - it is not easy to plaster this surface, which is why it requires the additional installation of a metal or plastic mesh with a cell size not exceeding 40mm. For a wooden base you will need two layers - the thickness of the first is not important, it is necessary to cover the mesh, but the second is made no more than 15-20mm thick
- When leveling walls, drywall is often used. It should be noted that the gypsum board sheet itself is quite smooth and therefore putties are used only for sealing joints and fasteners. In this case, the mixture consumption will be minimal, since a leveling layer of 15 mm is sufficient for the plane
- Foam block - foam block walls can be easily plastered, and the thickness depends on whether the work is being done outside or inside. For the street the layer is from 5 to 10 mm, and for interior walls it is 10-20 mm
Important! In the process of leveling the walls, it is necessary to adhere to the permissible thickness and evenness. The plaster rule helps to check the base.
On different surfaces
For all types of mixtures, according to SNiP 3.04.01-87, the single-layer maximum wall plaster thickness is 20 mm. Data on the standards, what thickness of plaster should be when installing a multi-layer plaster surface:
- Spray - thickness of plaster on brick, stone, concrete - up to 5 mm, on wood - 9 mm.
- Soil with cement mortars - 5 mm, gypsum-lime and lime - up to 7 mm.
- Covering – 2 mm, for decorative finishing no more than 7 mm.
Good to know: Contact of gypsum with improved lime or cement mixture is unacceptable. It is forbidden to apply lime compounds over gypsum, since the first one shrinks when dried, and the second one, on the contrary, expands. Peeling occurs and the outer finish falls away.
The optimal layer thickness on a flat brick wall is 10 mm
Plastering wooden surfaces involves filling shingles or reinforcing mesh. The minimum thickness of plaster, SNiP regulates: from reinforcement 20 mm, and not less than 25 mm from the base. A thinner one will crack along the cells.
The maximum thickness of wall plaster depends on the unevenness of the surface; for large differences it can be 50 or 100 mm; reinforcement is required. Such work is not advisable, entails too much expense and there is a high risk of cracking. In cases where surface differences exceed 50 mm, leveling with plasterboard is recommended.
For finishing wooden surfaces, shingles are required, the thickness of the slats is 3-5 mm
Features for cellular concrete
When carrying out work on gas and foam concrete surfaces, it is necessary to follow the rule: the thickness of the outer plaster layer should be 2 times thinner than the inner one. Optimally for aerated concrete walls 20 mm in the room and 10 mm in the façade. For foam concrete surfaces, 5 mm is sufficient on the inside and 10 mm on the outside. This ratio is due to the vapor permeability of the materials in order to avoid the appearance of a dew point.
How to control the layer of plaster mixture?
Since we are talking about the application of plaster mortar, it is necessary to consider ways to control them. Plasterers use the following methods:
- Peephole overlay . If a thin-layer coating is applied and the technician has sufficient experience, this method is the simplest.
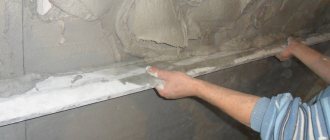
- Use of beacons . This term refers to special guides that are attached to the wall along the boundaries of the area to be plastered. If you set them correctly using a level and plumb line, you can achieve their exact location in the horizontal and vertical plane.
After this, it is enough to simply apply the solution so that its height between the two beacons is equal to their thickness.
Using beacons from the plaster mixture itself (landmarks) . This method is similar to working with metal or wooden beacons, but consists in pre-filling reference sections of plaster of exact thickness onto the wall. Then, when plastering, the master is guided by them.
The thickness standards established by the rules for a decorative plaster layer are not a dogma; deviation from them is permissible. But it's better to follow them. This is especially true for beginner plasterers who do not yet have sufficient experience in finishing work.
Possible deviations
If we are talking about simple plaster, then in the vertical plane the deviation can be no more than 15 mm along the entire wall and no more than 3 mm per meter. For high-quality coatings, the maximum permissible deviation is 5 mm over the entire wall or 1 mm per 1 meter. In addition, the number of deviations is also limited. For every 4 square meters of surface there can be no more than 3 defects, provided that ordinary plaster is used. For high-quality surfaces no more than 2 deviations. The depth of unevenness should not exceed 5 mm for simple coatings and 2 mm for high-quality ones. Deviations in the horizontal plane are regulated in the same way as in the vertical plane.
Thickness of plaster on aerated block for wet rooms
For rooms with high humidity, such as kitchens, bathrooms and saunas, it is recommended to use cement plasters with special additives. The reason for this is constant moisture, which harms the gypsum composition, but cement is not afraid of moisture, but on the contrary, it gains strength.
Moreover, cement plasters, due to low vapor permeability, prevent the passage of excessive moisture from inside the room into the thickness of the wall, which is good. Excess moisture from wet rooms should be removed by forced ventilation.
for wet rooms :
- Self-mixing cement-sand-lime mixtures (15-20 mm thick).
- Ready-made cement-sand with special additives (layer thickness from 10 mm).
- Ready-made cement-lime plasters (layer thickness from 10 mm).
Drywall plaster for painting
Attention: It should be remembered that they must be screwed into the thickness of such a sheet no more than 5 mm. The head of the screw should not be allowed to be recessed deeper, but if this happens, you just need to unscrew it and screw in a new screw a few centimeters from the old hole. Before plastering a plasterboard ceiling, you need to take measures to protect floors, walls, furniture and plants from the abundance of fine dust that will be released during work.
These 10 little things a man always notices in a woman Do you think your man doesn’t understand anything about female psychology? This is wrong. Not a single little thing can be hidden from the gaze of a partner who loves you. And here are 10 things.
This treatment is necessary to equalize the absorbency of the base. Plasterboard putty for painting requires a two-layer rough application of leveling compounds. Moreover, the second time it is necessary to create a continuous cover.
- Sealing seams, edges and holes.
- Creating a base from a layer of starting putty.
- Applying a leveling layer of finishing plaster.
- Leveling, grinding and polishing.
Features of layer thickness depending on surface quality
The maximum and minimum thicknesses of plaster depend on the quality of the material on the surface of which the composition is applied. There are several types of surfaces on which plastering work is carried out:
- Brick. The maximum thickness of plaster on brick walls should not exceed 2 cm if we are talking about single-layer plastering. In cases where the use of reinforcing mesh is envisaged, it is possible to increase the thickness of the plaster up to 5 cm. Reliable fixation is guaranteed due to the high adhesion and special relief texture of the brick blocks. The minimum layer of plaster on such a wall cannot be less than 0.5 cm. Otherwise, after complete drying, the relief of individual parts of the wall will appear through the composition.
- Plaster on a concrete wall has a maximum layer of 2 cm. Such work also often requires reinforcement, and in this case the thickness of the mortar applied to the walls can reach 25 mm. The use of reinforcing mesh in this case is mandatory.
- Plastering gypsum board walls is used quite rarely. The work involves sealing seams and joints, and for decoration a layer 2 mm thick is sufficient. If tiles are chosen as cladding and it is decided to lay them on a gypsum plaster mixture, then the layer of such a mixture increases to 1 cm, but a mesh fastener is required for reinforcement.
- Cellular concrete is a material characterized by excellent adhesion and an absolutely flat surface. It is not plastered, but a layer of the finished mixture serves as finishing, and its thickness does not exceed 5 mm. In rare cases, it may be necessary to level the walls with plaster, and then construction beacons are installed and plastering is carried out, applying the mixture in a layer whose thickness can reach 7 or even 10 mm. Of course, installation of reinforcing mesh is mandatory in this case.
- Wooden walls are plastered with shingles first. Various options for using the plaster mixture are possible, but most often such walls are leveled by applying a layer of plaster no more than 2 cm, and covered with decorative material that does not weigh down the structure.
Before determining the maximum thickness of the plaster layer, it is necessary to set construction beacons, using the level to determine the evenness of the intended surface.
In cases where insulation is fixed to the outer layer of the wall, plastering is a mandatory type of work. However, before you start applying the mixture, the layer of which does not exceed 5 mm, you should attach a nylon mesh for reinforcement to the surface of the heat insulator.
You can find out what the minimum and maximum layers of the plaster mixture applied to the wall surface should be by reading the instructions on the packaging of the composition or by studying the SNiP data in the “Insulating coatings” section.
What should the layer be?
Attention
The optimal thickness for plaster coatings has long been determined in practice and is included in SNiPs.
When doing home renovations, you don’t have to follow them - but don’t be surprised if the coating then starts to crack and the wall starts to freeze or fog up. Therefore, even where responsibility for non-compliance with standards cannot be expected, it is better to comply with the requirements.
When determining the thickness for decorative plaster, you need to take into account:
- Placement area – external or internal. This is due to different conditions in temperature, humidity inside and outside.
- The composition used for plastering . Gypsum mixtures are usually not recommended to be applied in a layer of more than 15 mm. For cement, the thickness increases to 20 mm.
- The grounds on which the work is being carried out . Different materials absorb moisture differently, they have different adhesion abilities, so they can support different layers of plaster.
- Application technology .
“Clean” plaster should be relatively thin, but reinforced plaster (at least the old-fashioned way with shingles) allows the walls to hold a thicker layer. This point is very important in cases where decorative plaster is used to correct flaws that arose during construction: incorrect wall geometry, uneven corners, masonry defects, etc.
Types of plaster mixtures
Calcareous (mineral). Traditional plaster mixture, in ancient times, was made without cement, today it is used as an additional binder to improve physical properties. The presence of lime in cement-lime mixtures weber.vetonit 414 and 411 prevents the development of pathogenic bacteria, moss and mold.
Cement-sand. In all physical and operational parameters, it occupies a leading position, the most common, universally used, like weber.vetonit TT40.
Plaster. Gypsum loses strength when in contact with water, so it is not used on facades or in rooms with high humidity. Designed for interior work in dry rooms (living room, bedroom, children's room, etc.), gypsum plasters include weber.vetonit profi gyps.
In the product catalog you can get acquainted in detail with all types of Weber plaster mixtures.
Is it possible to plaster drywall: how to do it correctly and with what?
Many novice craftsmen who have started DIY repairs are interested in how to properly plaster drywall. Indeed, after installation, plasterboard sheets require some manipulations before finishing: sealing and reinforcing seams, filling in recesses from self-tapping screws, and final leveling of the entire plane. But not everyone knows what material is used for these purposes - plaster or putty. Let's figure out whether it is necessary to plaster drywall, what materials are used for rough processing, and consider the case when plaster is really necessary.
Process steps
We decided on the thickness. But you need to remember that plastering is not carried out in one layer. Therefore, the total thickness must be divided into several stages. The process distinguishes:
- Spraying - up to 5 mm on concrete and brick and up to 9 mm on wood;
- Basic (leveling) – from 5 mm;
- Finish (if the previous one turned out to be of insufficient quality) - up to 7 mm.
If we calculate these data, it turns out that the minimum thickness of plaster that should be applied to concrete or brick is 10–15 mm, and to a wooden surface – 13–17 mm.
Standards according to SNiP
SNiP “Insulating and finishing coatings” indicates the following values for the maximum and minimum thickness of one layer of plaster:
When applied in one layer:
- cement-based mortar – up to 20 mm;
- gypsum-based solution – up to 15 mm.
When applied in several layers:
- splashing (marking) of stone surfaces – up to 5 mm;
- splashing (marking) of wooden surfaces – up to 9 mm;
- primer with cement mortar – up to 5 mm;
- primer with lime or lime-gypsum mortar – up to 7 mm;
- covering layer of ordinary plaster – up to 2 mm;
- covering layer of decorative plaster – up to 7 mm.
In a multilayer coating, each layer is laid only after the previous one has set; this should be taken into account when assessing the duration of the work.
What are the advantages and disadvantages of plastered ceilings?
The very first thing to start with is efficiency. Not every one of us can afford to spend money on installing a complex suspended ceiling structure, not to mention stretch ceilings. In terms of materials costs and labor costs, plastering the ceiling is considered the cheapest way to bring the ceiling part into proper shape.
Advantages
Here it would be appropriate to talk about the advantages that plaster has. This technology has the following advantages:
- environmentally friendly (lime-cement and gypsum mixtures are absolutely harmless to humans);
- the plastered layer does not reduce the height in the room (the maximum permissible layer thickness is 5 mm);
- durability (a properly made solution guarantees the integrity of the plaster for 7-10 years).
Against this background, you can correct the idyllic picture by mentioning the shortcomings that plaster for ceilings in residential premises has.
Flaws
It should be said right away that self-repair always means significant cost savings. However, when you do plastering work yourself, only your skill and skill can guarantee you good quality work. If you hire professionals for such work, plastering ceiling surfaces will become an expensive pleasure for you. Do-it-yourself plastering of an apartment ceiling will cost you more in terms of labor costs than installing a suspended ceiling system made of PVC panels or plasterboard.
Let's return again to the manufacturability of plastering panels. The current limitation on the thickness of the applied layer of 5 cm will not eliminate significant level differences on the ceilings.
And one last thing. Plastering a ceiling with your own hands is not as simple a task as it seems at first glance. To do this, you need to have certain skills and abilities, an idea of how painting and plastering work is carried out. When you start plastering a ceiling surface for the first time, it is difficult to achieve a perfectly smooth coating the first time. When working with suspended structures, the result the first time can be more or less tolerable.
Ceiling plaster from plasterboard
- We prime drywall with any penetrating primer . It will make the surface stronger and provide it with good adhesion to wallpaper and putty.
Please note: it would seem a little unnecessary to glue the seams with paper over the fiberglass mesh. However, they complement each other well: serpyanka ensures the strength of the seam, but does not prevent the appearance of barely noticeable microcracks. Paper, on the other hand, provides a perfect surface but can tear if it shrinks severely. However, a plasterboard ceiling itself serves the same purpose. After attaching the sheets of drywall to the guides, we should have a perfectly horizontal surface above our heads.
Yes, with small flaws where the sheets meet each other. The screw heads are also, of course, still visible.
- The sheet adjacent to the wall should be a few millimeters away from it . A clearly defined joint, filled and spaced with putty, will reduce the likelihood of cracks.
- The cut or broken edge of the sheet at the junction with the wall must be processed : half the thickness of the sheet is chamfered at an angle of approximately 45 degrees. The goal is the same - to create space for putty.
- The screw heads should not protrude above the surface of the sheet anywhere..
After applying the last layer, the ceiling is sanded. It is optimal to use sandpaper and a sander connected to a vacuum cleaner: this will ensure the surface is as smooth as possible and you will not have to breathe dust.
Lime mixture for plastering walls
Lime plaster is good because it can be used in any room and under any conditions.
But there is also a small problem that may arise when using it. Lime is a difficult substance to use and sometimes behaves unpredictably. The binding element of the mixture is fluff lime, which also contains a filler for the solution - limestone sand or white quartz sand obtained by crushing.
The limestone used in the production of this dry mix is essentially pure calcium carbonate. It is fired at high temperatures - about 1000 °C. The burnt stone is calcium oxide, or quicklime. This is a very caustic material that is almost impossible to preserve in its original form, so it is immediately converted into calcium hydroxide, or lime paste. This is done by quenching, or, in other words, by adding water to the material.
When exposed to air, lime begins to react with carbon dioxide, and the lime paste hardens, resulting in the formation of calcium carbonate. This process is called carbonization. To protect lime paste from carbonation, it is necessary to store it in a special airtight container with a small amount of water to avoid overdrying.
Lime is widely used by masons in the masonry process, and also finds its application in the work of sculptors, and it is mixed with the necessary auxiliary substances.
To illustrate the resistance of lime plaster to various types of influence, we will give an example of its use in the field of art.
The lime plaster mixture used by sculptors can be modified within 5-10 days. During this time, the created work is protected from drying out too quickly and cracking. Once lime plaster has hardened, its appearance cannot be changed, and the resulting sculpture will remain in its original form for many centuries.
Plastering a concrete ceiling
Depending on the degree of unevenness of the concrete base, leveling can be done in 2 ways:
- without beacons with the application of one or several layers of solution;
- by lighthouses.
The first method is suitable for more or less smooth surfaces with minor defects. The sequence of work will be as follows:
- A cement-sand, gypsum or polymer solution is prepared in a metal container according to the proportions indicated on the packaging of the dry mixture. To avoid the formation of lumps, everything is thoroughly mixed with a drill with a mixer attachment.
- Using a trowel, the first layer is laid - the spray.
- The applied solution is leveled with a trowel. Excess plaster is removed immediately.
- After the first ball has set, the second one is mounted. If the total thickness of the plaster is more than 10 mm, an additional reinforcing mesh made of nylon fiber is laid.
- Using a trowel, the final layer is applied over the mesh, which is carefully leveled with a trowel.
- When the solution has set a little, the working surface is grouted, during which all unevenness is finally smoothed out.
If the concrete base has height differences of more than 30 mm, it is recommended to level it using guide rails. Ceiling plaster on beacons will look like this:
- Using a laser level installed under the ceiling, the maximum height differences are identified, and then the zero level is indicated. This conditional plane is transferred to all walls and is marked off with a painting cord.
- Perforated slats are placed along the resulting line. Each beacon is fixed to the ceiling using a thick gypsum mixture. This installation method will allow you to install all the guides exactly according to the mark. For example, if any element protrudes from the general plane, more solution is placed under it. The first beacon is mounted at a distance of 20-30 cm from the wall. Subsequent slats are attached to the floor slabs in increments of 120-130 cm.
- After this, the prepared solution is applied to the ceiling between the beacons and leveled using the rule. Excess mixture is removed into a common container.
Plastering the ceiling with your own hands using beacons is carried out in stages, that is, first we completely plaster one span, and then move on to the next. At the same time, we double-check the evenness of each section with a laser or regular level. When the plastered ceiling dries a little, the beacons need to be removed and the resulting cracks filled with a newly prepared solution of the same consistency.
After the plaster has completely hardened, go over the ceiling with sandpaper to remove any defects that have formed. At the last stage of the work, the base is puttied, and then it is painted, whitewashed or wallpapered.
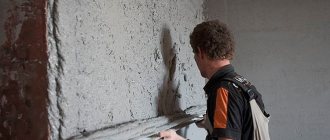
We spray and make primer.
How to repair the foundation of a wooden house
First, the wall is sprayed with a weak solution. This is an important technological point, since the spray composition is designed to prepare the surface for applying the next layer - primer. Due to its liquid consistency, the spray solution can easily flow into all crevices and depressions. They are filled with the mixture. This creates the most even surface possible – a field for applying primer
It is important to spray very well, without missing a single centimeter of the base surface. Then the entire plaster layer will adhere firmly to the wall and will not peel off or crack for a long time.
Tools and materials
You will need equipment, scaffolding and tools:
- construction trowel;
- a set of spatulas, preferably with rubberized handles (steel, rubber, plastic of different sizes);
- rule or rod with level;
- trowel;
- grater;
- paint brush;
- cord;
- mixer or mortar mixer;
- roller;
- square or rectangular containers for solution (large volume 15-20 l);
- serpyanka;
- sandpaper;
- gloves, mask or goggles, possibly a respirator, overalls.
Let's move on to the next question, no less important for a beginner.