Required Tools
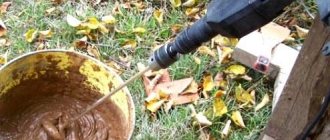
The process of applying putty is simple, but it requires the use of special tools. A drill with a mixer attachment is required for mixing. It will come in handy when the master dilutes the dry powder with water. While it is mixed with water, lumps will form in the container. To get rid of them and make a homogeneous mixture, you need a professional nozzle.
The second tool required is one spatula or a whole set. Experts recommend using at least two spatulas during the puttying process. A wide tool of 40-50 cm will be useful for applying the main coating and a small spatula for correcting small irregularities. The smaller the spatula, the more hard-to-reach places you can treat with the building mixture. If you have experience in construction work, you can use a trowel to putty walls - a construction accessory that allows you to smooth the surface.
In order for the paint layer to adhere firmly to the surface, it must be primed after puttying. After priming, the wall will be covered with a thin film. For this you need rollers and brushes.
You need a small spatula like this Source allremont59.ru
In order for the mixture to lie evenly, it is necessary to apply test beacons to the surface before starting work. They are made using a laser or spirit level. But sometimes even after applying the coating, the wall turns out to be uneven. Then a rule will be needed. Preferably a long metal one, because it is convenient for them to level thick layers.
Dried wall putty can be rubbed down if you want to get a spectacular and beautiful coating. To obtain a textured finish, sandpaper or fine sandpaper is needed. 240-grit sandpaper is suitable for grouting the finishing putty. If the farm has a manual skinner, then it is worth using it. The tool is a device that has a handle with special clamps for attaching the skin. It makes the process of processing the wall easier.
Be sure to have special clothing for work. It is necessary to protect your hair with a headscarf and your hands with gloves. To prevent dust or small particles of the dry mixture from entering the respiratory tract, you need to work in a mask.
Performing operations independently
Beginners starting to putty with their own hands can find many recommendations on the Internet, many of which are presented in the video.
Each stage of work consists of two steps:
- checking the evenness of the wall;
- applying a leveling layer.
Using a broad rule, the size of the gaps is checked. These holes will need to be filled with the starting putty mixture, so you need to mark them with a pencil. The rule must be applied in different directions - vertically, horizontally and diagonally.
Note! If most of the protrusions are located horizontally, then the movements during puttying should be horizontal, if vertical, the spatula at the first stage must be moved from bottom to top.
What is the best way to level a wall with putty?
- Using a small spatula, apply the mixture onto a large one and distribute it evenly and forcefully. Professionals often recommend using a tool at least 45 cm wide to quickly and accurately level walls.
Attention! You need to start putting putty from the corner. To create neat corners, it is convenient to use a special corner spatula.
- Movements are carried out in two directions: vertically and horizontally.
- Sometimes experts advise applying one layer strictly from top to bottom, the other from left to right. Moreover, when explaining to beginners how to level walls, experts recommend creating two or three rough layers and the same amount for finishing. Whether it is necessary to strictly adhere to such rules, everyone can determine from their own experience, however, when performing work for the first time, it is better to follow the recommendations.
- Having distributed the putty over the wall, the remaining material is removed from the spatula. After each movement vertically or horizontally, a little solution is added.
- Each new movement is made overlapping with the previously applied solution.
- After processing an area of about 0.5 square meters. m, you need to apply the rule to the surface and pull it from top to bottom to remove excess material.
- You need to wait until the wall leveled with the first layer dries well. This may take up to 2 days.
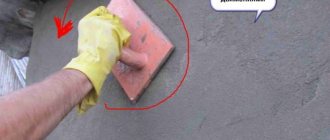
- Then a clean spatula or block wrapped in sandpaper is passed along the wall, removing the formed tubercles and grouting the surface. This can also be done with a special grater.
- Next, the evenness of the surface is checked again.
- Leveling the walls with a special finishing putty is the final stage. It is carried out when an almost ideal flat surface is achieved according to the principles described earlier.
USEFUL INFORMATION: Room renovation: where to start?
How to choose putty
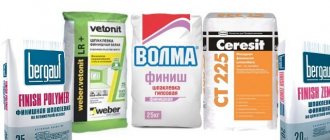
The most difficult thing at the first stage is deciding what to putty on the walls with. Building materials differ in components:
- gypsum;
- polymer;
- cement.
Varieties of mixtures Source stroyfora.ru
Each variety has its own characteristics, pros and cons. Gypsum mixtures are usually chosen for reasons of economy: the cost of the compositions is lower compared to other types. Gypsum putty does not shrink and is perfectly leveled. There is also a drawback: putty is negatively affected by moisture, so it is better not to use gypsum mixtures in the kitchen, bathroom or other rooms with high humidity levels. Cement putties do not have this disadvantage. They can be used in any room. But you need to be prepared for shrinkage.
Polymer putties are the most preferred material to prepare the surface for further finishing. They are not afraid of humidity, they do not shrink. After applying the putty, the surface is completely ready for further finishing. However, polymer mixtures are much more expensive.
Another method of classifying putties is based on the purpose of the mixture. All compositions are divided into three groups:
- leveling , which are applied at the very beginning of finishing work;
- decorative - the walls are covered with putty at the finish, the coating is final;
- universal , which can be used at any stage of wall redecoration.
Decorative putty Source yandex.net
All starting coatings have similar characteristics. They are characterized by high strength and large grain size. Apply after plastering in a thick layer of 3-20 mm. The finishing coating, on the contrary, is applied to the wall in a thin layer of up to 4 mm. Using the finishing mixture, you can hide minor defects in the wall. However, the main disadvantage of decorative putty is its low strength.
If you need a product that combines the properties of both decorative and finishing mixtures, then it is better to choose a universal putty. They are a little more expensive, but they are durable and have a perfectly smooth coating. It is recommended to use universal putties for those walls where there are no large flaws.
Regardless of the purpose of the composition, the putty can be dry and already diluted. It is better to choose dry if you need to store the composition for a long time. In addition, dry putty allows you to save money: it costs less than ready-made putty. If you purchased a liquid mixture, you will not need a special mixer. The putty already has the required consistency. It produces less dust. Ready-made formulations have their drawbacks:
- high price;
- more shrinkage;
- cannot be stored for a long time, the purchased mixture must be used as soon as possible;
- Suitable only for applying a thin layer of putty.
Preparation of dry mixture Source pol-exp.com
See also: Catalog of companies that specialize in finishing and facade materials and related work
Features of putty and its necessity
Why do you need wall putty? This is a common question from people not involved in repair and construction. It is easy to understand them, because at first glance, puttying is no different from plastering walls, but in fact there is a difference and it is big.
The need to use putty is determined by several reasons:
- Painting and pasting - in a dry room, not affected by fungus and not flooded with water, putty makes it possible to level the walls to the required accuracy, without resorting to expensive and complex replastering.
- Walls after puttying can be finished, remade several times, and any errors can be eliminated without reducing the overall final result and the quality of the coating.
- The materials for the work are inexpensive, their consumption is low and they are not difficult to use.
- Puttying the curved parts of the interior is quite simple, which distinguishes it from complex and expensive plastering, which is very difficult to do yourself.
- The cost of work performed by a hired team is quite affordable, and doing it yourself is free.
Related article: Do-it-yourself insulation of garage walls from the inside
Preparing the wall: removing the old coating
Preparing the room involves removing furniture or protecting things from dust. It is better to cover the floor with newspapers or transparent film.
Before you putty the walls for painting, you need to prepare the surface. It must be clean. These coatings are removed:
- leftover paint;
- scraps of plaster;
- wax;
- formwork;
- old whitewash.
Preparing the wall Source msgo.com
If there are grease stains, you need to remove them. Old wallpaper (especially if it is poorly glued or has swelling) is removed. If you have difficulty removing the wallpaper, you can moisten it with water. When dirt and remnants of old repairs have been removed, you need to apply a primer. This is necessary to ensure good adhesion, that is, a good connection of the putty with the wall surface.
One layer of primer of small thickness is enough. To ensure that the coating is applied evenly, it is necessary to use construction rollers.
Types of putty for walls
And how to make the right choice when purchasing. First, let's figure out what types there are. Let us roughly divide the types of putties into 4 types. For convenience, we will consider them in this form:
- Starting
- Finishing
- Putties for special applications
- Facade
To understand what kind of putty you need and in what quantity, you need to start from two factors:
- What kind of surface is there
- What kind of finish will there be at the finish?
We will consider all possible options below, but for now let’s talk about the types of putty
Starting putty
Designed for rough leveling of small defects indoors with moderate humidity. The starting putty fills small and deep cracks well and does not shrink much when drying. The composition mainly includes gypsum and acrylic additives. It covers plastered surfaces well, and is well suited for preparing under wallpaper or fiberglass (cobwebs).
Finishing putty
Designed for final leveling of small defects indoors with moderate humidity. B consists mainly of polymers, so it does not have coarse grains. When filling deep scratches, it shrinks significantly after drying. It is used mainly on final layers in preparation for painting, decorative fine coatings. Well suited for fiberglass mesh reinforcement.
Putties for special applications
To this type we include all other varieties that will be useful to us in repairs. These are putties for sealing factory and non-factory drywall seams, for reinforcing and filling various joints and cracks. They dry quickly for ease of use, practically do not shrink, and have increased strength.
Facade putty
The scope of their application is clear from the name. It contains cement, so it has a greenish tint and is often called cement putty. It is used in damp rooms, loggias, basements and on facades. Frost-resistant when dried and has increased strength.
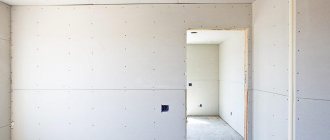
Main stages
The methods of applying putty depend on its type - starting, finishing, lighthouse. When working with starting putty, you will need to stretch a construction mesh onto the wall. This will allow you to apply the mixture in a thin layer. The walls must be covered completely, evenly distributing the material over the surface. This will help achieve perfect smoothness. Experienced craftsmen give this advice: ideal evenness can be achieved only with the help of a coarse mesh.
Two spatulas are often used in work Source remontdoma24.ru
Putty or putty, which is correct?
Especially for those who argue over correct spelling. In dictionaries, the words putty and putty have the same lexical meanings, so both options are correct. But there is one thing, but... Most construction literature and official information sources use the option (putty). It’s up to you to decide which option is more convenient for use, but still, it’s more fair to say – putty! But in this article, for certain reasons, I will use two options.
Video description
Useful video about finishing putty:
If you know how to properly putty a wall with a finishing coat, you can achieve perfect smoothness. Special finishing mixtures are used: only they can eliminate scratches and gaps.
Since the wall has already been pre-prepared, the finishing coating will coincide with the main one. Therefore, a thin layer of the mixture is sufficient. However, before finishing, you need to make sure that the previous layers are applied correctly. The finish will not save you from remaining bumps or cracks. It is necessary to provide good lighting to see all small irregularities.
Treatment of cracks in walls
If the wall surface is not initially ideal, there are cracks, then there are special tricks on how to properly putty the walls for painting. Gypsum mixtures or santegypsum are best suited for this. The latter feels more elastic, but takes longer to harden.
Artificial crack expansion Source archidea.com.ua
First, you need to prepare the wall in the usual way - remove dirt and stains. Algorithm for working with cracks:
- Slightly expand the crack in width and depth.
- Lightly scratch the crack along its entire length with a sharp object to make it easier for the gypsum putty to cling to the wall.
- Treat the crack with a primer.
- Apply putty.
Beacon system
The beacons are attached to the base using a putty solution.
If the wall has significant defects, you should resort to a system of putty using the beacons. In this case, the layer of plaster can be quite thick, but it must be applied in compliance with technology. The galvanized profile of the beacons is fixed to the wall surface using a putty solution. The profile height can be different depending on the need.
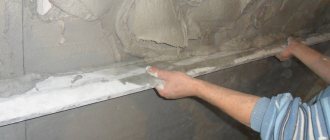
The starting layer is thrown between the beacons and leveled with the rule. Do not install beacons at too wide a distance. When applying a thick layer, work begins from the bottom corner.
The solution is applied 0.5 m from the floor. After drying, the height increases. This way, the putty will not slip, and the layer will be even.
After the layer has hardened, the metal profiles of the beacons are removed, and the cracks are filled with a solution and leveled.
This is done in order to avoid yellowing of the coating as a result of metal oxidation.
This method of carrying out work is carried out quite rarely and certain skills and abilities are required to perform it.
Procedure for applying putty
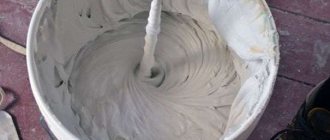
The first step in wall putty is preparing the mixture. If you use dry putty, you will need a container of sufficient size to mix the composition. A small amount of water is poured there and powder is added. First, you can mix the mixture with a regular spatula. But to get rid of lumps, you still need a drill with an attachment. It is necessary to knead the putty until it has a homogeneous consistency. The main sign of the mixture’s readiness is elasticity and thickness. Properly prepared putty sticks to the nozzle and spatula.
Mixture application techniques
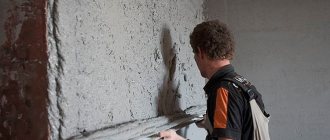
Despite the fact that the method of applying the mixture was indicated above, the home craftsman should know what types of finishing work exist. There are three main techniques for plastering walls. The first is the classic one, during which the putty is applied to the wall manually. Its main advantage is the ease of processing wall joints and hard-to-reach places. The master feels the small irregularities better and eliminates them with the help of additional layers of putty. The main disadvantage of the method is that processing walls takes a lot of time and physical effort.
Manual application and leveling Source obzorkuhni.ru
Wall treatment for painting and wallpaper
Puttying walls for painting has its own nuances. The final coating of paint does not hide a single flaw. Therefore, for high-quality painting it is necessary to carefully level the walls. The following operating procedure is recommended:
- Apply the first layer of leveling putty.
- Leave the putty until completely dry. It’s better to spend at least 12 hours on this.
- If there are noticeable unevenness, you can apply a couple more layers.
- Leave each layer to dry.
- Apply a layer of finishing putty to remove cracks, irregularities, and other minor defects.
- A smooth surface is achieved by finishing the wall with sandpaper.
The amount of mixture used and the number of layers applied depend on the density of the wallpaper. If you plan to glue thin wallpaper, it is enough to apply the preparatory mixture in three layers. If the wallpaper is thick, then you can reduce the number of layers to two. This way you can paste the wallpaper without blistering.
What is putty
Putty is a finishing material that is used to smooth out minor defects and create a uniform surface structure. Mainly consists of gypsum, acrylic and polymer materials.
Why putty the walls?
The walls are puttied in order to remove and level out minor surface defects and improve adhesion. Putty performs very well the function of preparation for finishing. In addition to its leveling qualities, the putty is environmentally friendly, vapor-permeable and can be easily processed or sanded.