Varnish for working with concrete and wooden bases is made from polystyrene foam (expanded polystyrene) and solvent.
In the role of the latter, you can use, for example, acetone, xylene, butyl acetate and more.
If you wish, you can find recipes that contain gasoline.
In addition, you should acquire:
- Container (for mixing the mixture).
- With a wooden stick.
- A piece of gauze (to strain the composition from the foam when finished).
Although any material can be used as a solvent for varnish, xylene or orthoxylene will be the most suitable; unlike analogues, the material will dissolve in them faster and easier. If the varnish is made on the basis of gasoline, then the composition will be similar to jelly, and it should be applied in thick layers. Therefore, it is recommended to use it as an adhesive and not for painting surfaces or products.
DIY foam and solvent glue
The first option for obtaining an adhesive solution is to dissolve pieces of foam in a thinner. Gasoline can be used as a thinner. There are several methods for making an adhesive solution, the difference is mainly in the types of materials that will be used as components of the composition.
Do-it-yourself foam glue of this kind allows you to obtain a strong connection during repair work on the roof; it can also be used as a connecting substance for connecting points during roofing work. Once dry, the composition becomes like glass.
Before gluing, you need to check the consistency of the resulting mixture; if it is too liquid, you will not be able to obtain reliable adhesion.
The second method of creating a foam substance for gluing materials is to distribute small parts of foam at the place where the parts need to be glued, after which the foam parts are poured with a solvent, as a result the parts begin to dissolve, the material fills all the cracks and evenly closes the existing gaps.
Do-it-yourself foam glue like this allows you to get a strong connection during repair work.
Features of homemade glue, where it can be used
Before dissolving the foam to a liquid state, you need to study the features of working with the components, otherwise you may get an unsatisfactory result. The following rules are noted:
- It is necessary to work while observing safety measures to avoid health problems;
- You can’t do manufacturing and gluing near open sources of fire, the substances are flammable, so such a neighborhood is dangerous;
- The resulting product should be stirred well to ensure reliable adhesive properties;
- The product can be used as a protective coating, then a more liquid solution is prepared;
- Hardening of the coating occurs after a few days, the number of days depends on the thickness of the layer.
If you dissolve the foam in acetone, it will take less time to harden. The coating will also withstand low and high temperatures.
In domestic conditions, the composition can be used for various purposes. Among them, gluing cornices on the ceiling, fixing floor skirting boards, repairing various furniture parts, and installing extruded polystyrene foam stand out. Can be used instead of casein and wood glue mortar. The resulting seam retains its properties for about one and a half years.
The resulting product should be stirred well to ensure reliable adhesive properties.
Algorithm for making varnish mixture
To begin with, xylene is poured into the container in an amount of 70 - 100 ml (this is about 1/3 of the volume of the container).
If there is a need to save money, then xylene should be mixed with acetone (gasoline) in a 1:1 ratio and then dilute the varnish solution using an inexpensive solvent.
Next you should follow these instructions:
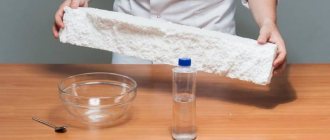
- The foam is broken into small pieces (the smaller the better). The larger they are, the slower they will dissolve, and vice versa. The approximate amount of polystyrene foam is 0.3 cubic meters. dm.
- The foam is pressed down with a wooden stick so that it is completely immersed in the liquid mixture. During dissolution, bubbles form on the surface.
- If necessary, you can add more foam, then the consistency will resemble sour cream. If everything is done correctly, the varnish mixture should flow from the stick like a thread, and not drip.
- Next, the foam varnish is covered with a lid and left for 20 - 60 minutes. After it has brewed, you need to check its color. The solution should be clear.
- The liquid is filtered independently through cheesecloth and then placed in another, clean and dry container, which can be closed with a stopper or lid.
It is most convenient to varnish a surface (or product) using a brush or spatula. Or you can simplify the process, take the composition and pour it into the base, then spread the mixture over the entire area.
The varnish dries very quickly (about five minutes) at room temperature.
The surface (or structure) can be used after 60 minutes, when the mixture has completely hardened.
This varnish composition can be used for application to:
- Various wooden surfaces and products.
- For concrete structures (or planes) that are operated in conditions of high humidity.
- On any pre-painted objects, products and substrates.
Using foam-based varnish, you can independently produce other paints and varnishes. For example, if you add small wood shavings to such a composition, you will get a composition that well masks chips, cracks, depressions, etc. etc.
Or you can make your own conductive varnish mixture.
You need to independently add special fine-grained additives to the base, which, after polymerization is completed, form a coating in the form of a film with electrical conductivity.
They are used when working with metal, wood, glass or plastic.
Add 100 grams of powdered silver and fine-grained graphite to the foam varnish yourself. Next, you need to thoroughly mix the mixture yourself until a thick, dark-colored consistency is formed. Before use, shake the solution well so that the particles that settle to the bottom are evenly distributed throughout the entire consistency.
Gasoline and foam
I'll start by dissolving the foam in gasoline. I should also check it in acetone and solvent, but I think that acetone dries too quickly. I pour 92 gasoline into a clean, empty metal can. You will need a little more than half the can of gasoline.
I cut a piece of polystyrene foam approximately 1500 mm long and 40 mm thick into strips and lower them one by one into a jar of gasoline. The width of the strip should be chosen according to the size of the can. My goal is to see how the resulting composition will behave on concrete (I don’t need a lot of varnish). The foam easily fits into the jar, melts and compresses into a fairly dense lump at the bottom.
Note: This will cause the gasoline to bubble and splash out of the can.
The resulting composition has the appearance of a gel and is similar to napalm (when ignited, it immediately flares up, burns for a long time, and the flame is high). It is not possible to regulate the viscosity of the composition by adding gasoline - it reaches a certain thickness and the process stops there. I leave the jar for a while so that the air bubbles come out and all the pieces of foam dissolve.
Necessary materials
To prepare coatings, you will need two main components: polystyrene foam (expanded polystyrene) and solvent. The latter can be acetone, xylene, orthoxylene, butyl acetate, and there are also recipes based on gasoline. Additionally you should take:
- unnecessary capacity;
- wooden stick;
- a piece of gauze.
The easiest way to dissolve polystyrene foam is in xylene, orthoxylene; it is much more difficult to do this in other solvents. In addition, homemade gasoline-based varnish turns out to be jelly-like and is only suitable for applying a fairly thick layer to surfaces. It is better to use it not for painting products, but as glue.
What can be made from foam plastic
Various toys, Christmas tree decorations and other crafts are made from polystyrene foam. Dense hard foam is most often used to make floats.
Today the challenge is to be able to quickly replicate small products from waste foam of any density.
But at the same time it is necessary to make durable foam plastic that floats in water.
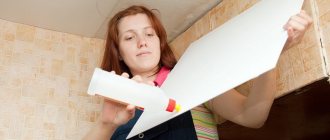
Painting foam ceiling tiles: how and with what
One of the inexpensive, but at the same time aesthetically attractive methods of finishing the ceiling is the installation and painting of foam ceiling tiles. Foam tiles are available for any budget, and using this material requires virtually no special experience.
There are two types of such tiles available - laminated and with a surface suitable for painting. The laminated coating may gradually lose its original color, the tiles turn pale, and stains of various origins appear on it.
Painting foam ceiling tiles solves several problems related to maintaining the interior in proper condition:
- a layer of paint protects the coating from damage and moisture penetration, which helps extend the life of the finish, strengthening its structure;
- ease of wet cleaning - ceiling tiles without painting or laminated coating cannot be properly cleaned due to the penetration of dirt into the porous surface;
- When painting, you can choose any color that best matches the chosen room design.
What type of foam can be used to create glue?
Polystyrene foam is a room insulation material that has a foam structure. There are three types of material:
- Unpressed. The structure of such a sheet is represented by interlocking balls, which are easily detached under mechanical influence. This type is used to prepare adhesive. It is easy to melt in gasoline and acetone until a sticky mass appears.
- Compressed. This type has a strong structure and does not crumble when exposed to impact, since sheet pressing is used in production.
- Extrusion. In this form, the homogeneity of the raw material can be traced, since the production method uses the method of elevated temperatures.
Do I need to insulate the floor in the garage?
There is an opinion among experts that the optimal temperature in a private garage in winter should not exceed +5⁰ C. If a car is driven from the cold into a room with a higher temperature, condensation forms on the body, and air humidity rises sharply. This negatively affects the anti-corrosion properties of the car and shortens its service life.
Many drivers consider the thermal insulation of the garage floor unnecessary, limiting themselves to insulating the doors, walls and ceiling. In such a situation, the owner of the building will experience constant heat loss through the floor covering. Maintaining the optimal temperature in the room will require a lot of energy. In addition, during severe frosts, condensation may form at the point of contact of the cold floor with warm air.
It is important! SNiP 21-02-99 “Car Parking” states that the minimum recommended temperature of a car storage room should be +15⁰ C. In this case, it is taken into account that there is forced ventilation in the garage and maintenance and repair work is being carried out on the vehicle.
By insulating the floor, the owner creates favorable conditions not only for storage, but also for servicing his car.
Floor insulation is an important stage in arranging a garage.
Foam glue
Living in the countryside, you can often get into such problems that you don’t have this or that at hand, and going to the store for such a trifle is simply not profitable, and you don’t even want to. This is why sometimes you need to know how you can create one or another necessary product from waste.
Among such waste, most of all are probably polystyrene foam packaging, but it is from this that glue can be made. Yes, yes, it is polystyrene glue. But the most important thing is that to make it you only need one more component - gasoline.
It is in gasoline that the foam dissolves, forming an adhesive mass. This glue can be widely used in the household. They can be used to seal slate or tiles. Tape the seams of the joints on the roof and adjacent parts of the roof. In general, there would be glue, and there would be no use for it.
After hardening, the glue resembles liquid glass and tolerates both scorching heat and winter cold with frost and snow. In general, everything ingenious is simple. We convert waste into the required glue. In conclusion, I would like to note that acetone solvents can also be used as a solvent, which will dry and harden faster.
In this case, there is no need to dissolve the foam in acetone; just crumble the foam into the place that needs repair and sprinkle it with acetone. After the foam begins to melt, press the surfaces to be glued and they will stick together.
Posted from: 7-10-2016
Friends, good Sunday to you! It’s summer now, and when it rains, it’s especially heavy, although it doesn’t last long, so the roof can withstand such tests, although it can reveal weak areas. It is better to start repairing those places where the roof is leaking now, without waiting for prolonged autumn rains. Today we will talk about how to repair the roof yourself. I will share with you tips from professional roofers.
When I worked as a designer, in my line of work I often had to communicate with builders and read relevant literature, so the recommendations will be first-hand.
Precipitation always helps identify roof problems in the early stages. It often happens that visually everything seems durable, solid, without any problems. And the passing rain will clearly indicate where the leak has appeared in the room and which place on the roof should be given special attention.
It is imperative to repair the roof before winter, otherwise frost and moisture will destroy the roofing material throughout the winter. Now thaws alternate with frosts, and this is the most aggressive effect on the roof. The ice expands, tears the roofing material, then thaws, and now there is an even larger hole, which means that subsequent freezing of the ice will further increase the size of the hole.
If your roof is multi-purpose, then the most reasonable solution is to call professionals and delegate the repair to them. If the roof is simpler, the most common is gable, then you can solve the leak problem with your own hands.
The most common places for roof leaks
According to roofers, leaks most often occur at the outlets of chimney and ventilation pipes, at the joints with walls, and with windows if they face the roof. Leaks can also occur anywhere if your roof is old slate. A crack, chip, rusted nail - anything can affect the integrity of the structure.
Visual inspection of the roof from the attic
Without waiting for the leak to intensify, visually examine the roof from the attic, pay attention to the change in color of the sheathing; if darkening or rotting areas are visible, then the roof needs to be repaired. Of course, you shouldn’t climb onto the roof in rainy weather, but it’s in the rain that it’s best to study places with leaks, somehow mark them, so that you can then repair them dry.
Safety precautions when working on the roof
Any roof slides, even those that don't slide! This is important to understand. You can only work without insurance on flat roofs or roofs with a slight slope. In all other cases, it is recommended to tie yourself with a safety rope attached to the roof ridge. In modern houses, fastenings for such a cable are provided in the roof structure.
If your roof is simple, then the safety rope can be attached to the roof ladder. It has a mount that is mounted on the skate and will support you if something happens. The simplest staircase for the roof looks like this:
Such a staircase can be made from bars immediately before roofing work. After work, it can either be removed and stored for the future, or disassembled. It is not advisable to leave it on the roof after work, since exposure to the external environment will render the wood unusable within a couple of years.
Wear shoes with rubber soles; experienced roofers work in sneakers, simple rubber sneakers. They say that this way you feel the roof best, and there is practically no sliding.
Work often requires a partner, it’s good if you have a son, or someone from your family, if only your wife is available, then in this case, assign her to help on the ground. You can work alone, but you will have to get down and climb up more often. Well, this is a kind of work, to some extent creative, as my father says, who, by the way, always does everything himself, without anyone’s help. Including work on the roof.
Seal small cracks
Small cracks can be repaired with waterproof glue, putty, or epoxy. This applies to slate, tile or metal roofs. It is better to immediately cover the roofing felt with a new sheet instead of the damaged one. In general, it is optimal to use roofing felt for roofs only as a rough material, similar to metal or slate. By itself, it very quickly, within three seasons, becomes unusable.
My husband’s house in the village has to be completely rebuilt almost every 5 years. The situation there is such that there is no point in investing in a new roof; the house is already nearly 80 years old and, one might say, it is living out its years. Therefore, with enviable consistency we have to reanimate the roof.
Bituminous mastic is used to seal large damage and cracks. Mastic seals seams well and fills spaces and voids. Ideal for waterproofing roofs.
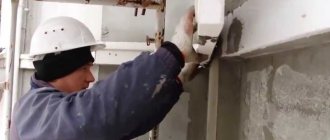
The damaged area should be cleaned of dirt, treated with white spirit, allowed to dry, and then repaired. Read more about the embedding technology in the instructions for the specific material you will purchase.
Foam roof repair adhesive
A very informative video from Andrey Konovalov. A man shares a recipe for high-quality foam glue dissolved in gasoline and applied to fiberglass mesh.
Using black screws on the roof
Separately, I would like to tell the story of one summer resident who attached his metal roof to black self-tapping screws. At this point, experienced builders will probably have their faces distorted into a grimace. However, there was such a case. So, these black screws literally rotted in two seasons. As a result, on the third spring, a vigorous gust of wind carefully removed half of the corrugated sheet and carried it to the neighbor’s property.
Here is an example of what you should definitely not use to secure your roof! For roofing, buy only roofing screws, with rubber washers, or stainless steel roofing nails. Don’t skimp on the roof, since you’re making it from corrugated sheets, then use the right fasteners, and certainly not black self-tapping screws...
This was my topic today. By the way, we laid our roof on a wooden sheathing, and our roof itself is made of metal. We took cherry color, but now we are convinced that it would be better to take shiny stainless steel. In hot weather, the attic warms up so much that you can steam! But if it had been shiny, the temperature would probably have been lower. Of course, we wanted beauty, and now we are reaping the fruits of our passion for dark colors...
Okay, that's all for me! All the best to you and may your roof never leak!
Types of foam plastics
If we limit the topic of using foam plastic products to the sphere of construction and renovation of our apartment or house, then the main types used are the following:
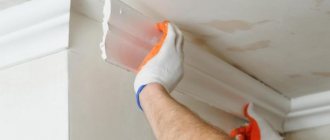
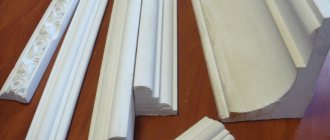
- Expanded polystyrene is the most common, cheapest and easiest to use. It is he who is known to everyone by his commercial packaging and it is he who is given the general name of the entire group by the population. It is a good insulation and sound insulator, therefore it is widely used for thermal insulation of building structures - walls, ceilings, facades, basements, but mainly as a middle layer due to the increased fire hazard. Another area of application of expanded polystyrene is decorative and design, which includes the production of baguettes and cornices for the interior of premises, the design of facades and shop windows, decorative elements of furniture and toys.
- Polyurethane foam has a wider range of applications compared to polystyrene foam. The field of thermal insulation, in addition to construction, includes pipelines and equipment, not only with finished slabs and shells, but also with foam-forming materials at the work site. Well-known examples of polyurethane are polyurethane foam and foam rubber, and for many car owners it will be interesting to know that many cladding parts - panels, bumpers, various linings - are polyurethane.
- Polyvinyl chloride foam thermal insulation, baseboards, baguettes, decorative tiles, furniture - a common area of application for all foam plastics. Specific in comparison with other types are signaling and rescue equipment (floats, buoys, rafts, vests), elements of shock absorption, damping, noise and vibration damping devices (for example, a vibration dampening mat or a protective helmet for industries with relevant factors).
What you need to pour a marble floor
- Two liters of acetone for 250 rubles.
- A liter of xylene for 200 rubles.
- Black and blue colors for 40 rubles each. In principle, you can do without color scheme. Here you need to think creatively.
- It is not necessary to buy polystyrene foam. After all, it, being a packaging material, is available to any motorist.
- Plastic container for dissolving foam. The main condition is resistance to chemical environments.
- Stirring tool. Simply a small stick.
- Paint brush.
Advantages of Acetone Foam Marble Flooring
An alternative to the proposed composition is liquid glass. But it shows much worse performance characteristics. When marble is poured from acetone and polystyrene foam dissolved in it, it has a number of advantages:
- The surface is so strong that it cannot be scratched with a nail.
- The glossy sheen creates volume of space.
- Almost any color range is available.
- Quality at minimal cost.
- The protective layer is easy to clean with wet cleaning.
Convenience of applying liquid foam is not a problem. After all, the thickness of the consistency allows you to work with a paint brush. The main thing is that polystyrene foam, as a consumable material, is available everywhere. Therefore, it remains up to the design abilities of the garage owner.
What tools and equipment will be required?
To prepare polystyrene foam varnish, you will need the following raw materials and equipment:
- polystyrene foam (there should be a lot of it);
- dissolving liquid (one of the types or a combination of them);
- dishes for dissolving (any large glass, tin or polyethylene container with a wide neck will do);
- wooden stick for stirring;
- filter for straining (you can use a plastic strainer, gauze, a piece of tulle or old nylon tights);
- storage container with a hermetically sealed lid.
In addition to equipment, you need to stock up on a respirator, safety glasses, rubber gloves and long sleeves. Contact of solvents on the skin, and their vapors on mucous membranes and lungs, is undesirable, since they contain toxic substances. When foam bubbles collapse, they also release gases, the inhalation of which can cause poisoning. Work should be carried out in a well-ventilated non-residential area (garage, workshop) or outdoors. If this is not possible, then the solution is prepared on an open balcony.
Solvents: gasoline, acetone, xylene and others
Gasoline is not only a fuel, but also a universal solvent for many substances, including polystyrene. Not all types of gasoline are suitable for making glue. Optimal options:
- purified gasoline from a construction market (its approximate cost is 94 rubles per liter);
- Vietnamese gasoline (a mixture of gasoline and acetone);
- automobile gasoline fuel grade 95 (must not contain additives).
Xylene, or dimethylbenzene, is an organic solvent obtained from the processing of gasoline. This is a transparent volatile substance with a pungent odor. One liter of reagent costs approximately 125 rubles. and is sold in hardware stores. It is used to dilute paints, glues and mounting mixtures.
Xylene is flammable and explosive. It is able to penetrate the body through intact skin and through inhalation of vapors. In high concentrations it has a narcotic effect, leading to convulsions and death. Repeated exposure of small amounts of solvent and its vapors to the skin or respiratory tract is no less dangerous, as it causes chronic poisoning.
This substance is called blood poison because of its selective effect on blood cells and hematopoietic organs. In a person constantly in contact with it without protective equipment, hemoglobin loses its ability to carry oxygen, which leads to hypoxia.
Acetone belongs to a group of organic substances called ketones. It is a volatile and pungent-smelling colorless liquid. Acetone and its vapors are explosive, which should be taken into account when working with the material. Prolonged inhalation of acetone vapor causes drug intoxication. This substance is dangerous even in small doses, because it can accumulate in the body. A liter of acetone in construction stores costs approximately 76 rubles. It is used for cleaning and degreasing surfaces before gluing or painting, and also as a solvent.
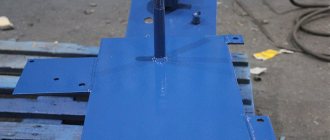
Covering the concrete floor
I take out the gel-like mass from the bottom of the jar and transfer it to another container. I clean the area of the concrete slab with a wire brush and blow off dust with a spray gun. I prepared a brush and a spatula for work, which I lightly greased with oil. This will prevent the varnish from sticking.
It turned out to be more convenient to work with a spatula.
I pour the varnish onto the concrete and use a spatula to apply it to the surface using movements in different directions. After finishing the job, there is practically nothing left on the spatula. When applying the varnish you immediately smell the smell of gasoline. I leave this area for about an hour to dry.
How to insulate
The main function of any insulation is to retain heat for a long period of time. Therefore, he must have the following qualities:
- Low thermal conductivity;
- Durability;
- Maintain effectiveness at low temperatures;
- Moisture resistance;
- Resistance to aggressive environments and fire;
- Environmental friendliness;
- Ease of installation.
The most popular options for thermal insulation of garage floors are:
- Expanded clay;
- Styrofoam;
- Expanded polystyrene;
- Mineral wool.
When choosing insulation, it is necessary to take into account its characteristics, type and condition of the floor covering.
| Material | Thermal conductivity coefficient, W/(m K) | Density, kg/m3 | Advantages | Flaws |
| Expanded clay | 0.07–0.16 (depending on porosity) | 250–600 (depending on faction) | Good heat and sound insulation, durability, environmental friendliness, non-toxicity, resistance to temperature changes and aggressive environments | Large dust emission during installation, when wet, thermal conductivity increases, dries slowly |
| Styrofoam | 0,039 | 35–50 | Low thermal conductivity, waterproof, light weight, cheapest | Fragility, poor resistance to stress, low melting point with the release of toxic gases |
| Expanded polystyrene | 0,028 | 30–40 | The highest heat and sound insulation characteristics, durability, resistance to compression, temperature changes, mold and mildew, water resistance | Fragile, releases toxic gases when burned, high price |
| Mineral wool | 0.028–0.04 (depending on type and thickness) | 150–200 | Low thermal conductivity, resistance to fire, mold and mildew, low price | Low thermal conductivity, resistance to fire, mold and mildew, low price |
Practical guide to preparing glue (instructions)
To make polystyrene foam glue with your own hands, you need to follow the following steps:
- The selected solvent fills the container in a ratio of 1:10 of the total amount of glue being prepared.
- Place polystyrene foam in small (crushed) pieces.
- The resulting mixture is stirred until a viscous, homogeneous state is formed.
If the mass turns out to be very thick, then the solvent is gradually added until the desired consistency is obtained.
During work, safety measures are strictly observed; dissolution should not be carried out near an open flame source.
Interesting video on the topic:
Problems with gluing linoleum
The floor in the room was, of course, not perfectly level. So the factory smooth edges of the linoleum still did not match exactly. I had to cut it. It was definitely not possible to cut it. Maybe there are seasoned professionals who can do this with one continuous movement of the hand. But I assure you, most people will not be able to cut two pieces of linoleum with an accuracy of tenths of a millimeter. I cut it quite carefully, but still here and there a very small gap, no more than half a millimeter, formed. When gluing, a sufficient amount of glue did not flow into this gap, since it was covered with masking tape.
The masking tape had peeled off in some places and the glue had flowed underneath it. The excess glue was then removed with a knife.
The linoleum along the joint lay unevenly, with a very small, but still noticeable wave. This is due to the curvature of the floor. This wave stuck him together. The view turned out to be monstrous.