Gluing foam tiles is a simple and inexpensive way to cover the ceiling. Anyone can do the repair, since no special tools or skills are required. Therefore, the work is most often done independently. But even such a simple process has nuances that are worth familiarizing yourself with if you have no experience. Let's take a closer look at how to properly glue ceiling tiles. If the recommendations are followed, the finish will last more than 10 years.
Types of ceiling tiles
Expanded polystyrene products can be glued to concrete, brick, and wood. The cladding hides minor surface imperfections. Another advantage is the thermal and sound insulation of the room. If an individual element is damaged, it is simply replaced without resorting to repairing the entire coating. The tiles are easy to care for. It can be cleaned with a dry cloth and a vacuum cleaner. Dirt is removed from laminated products using detergents; this does not cause them to become deformed.
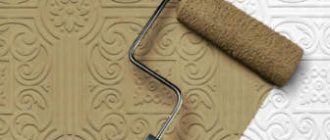
Mostly white slabs are produced with various relief patterns that imitate stucco or decorative textured coating. Such products are intended for painting, but there are also colored laminated panels coated with a protective layer.
According to the production method, tiles are:
- Extruded - made by pressing polystyrene. It has a smooth surface, without grain. They produce laminated material of different colors, with imitation of marble and wood. This is the most expensive option for ceiling tiles. It has high strength and noise absorption, is easy to clean and recovers from deformation.
- Stamped - made of polystyrene foam. The surface is looser, grainier, polystyrene granules are clearly visible. It is cheaper than its analogues. The design is created using the stamping method. The tile does not tolerate moisture well and is not suitable for the bathroom and kitchen. Due to the wide pores, dirt gets clogged into it. It is inconvenient to work with stamped polystyrene foam because it is brittle and wrinkles a lot. To make the cladding last longer, it is painted.
- Injection - made by sintering polystyrene foam in a special form. Features a clear pattern. This is an intermediate option between extruded and pressed products. The product is characterized by good noise absorption. The product is relatively resistant to moisture and tolerates painting well.
According to the method of edge design, they are distinguished:
- Seamless tiles . It received this name because there are no seams during installation. It creates the feeling of a monolithic surface, as if the ceiling was painted or bleached.
- With decorative edging . On panels of this type, a chamfer of various shapes and sizes is cast around the perimeter. When gluing, a small seam remains between the elements, which is intended solely for decorative purposes.
Seamless polystyrene tiles come in two types:
- With curly edges (zigzag or wavy) - this way the joints are less visible to the eye.
- With a calibrated edge - the edges of the tile are so smooth and perfectly sized that the joints between them are barely visible. Often such products are made with decorative filling - the front side is decorated with an ornament (leaves, flowers, waves), which visually distracts attention from the seams and makes them less noticeable.
Note! On an uneven surface it is difficult to lay tiles so that the joints are invisible. If you choose a seamless coating, you will need to first level the base.
Typically, square-shaped ceiling tiles measuring 50x50 cm are on sale. But other formats are also available: 30x60, 30x70, 40x40, 40x70 and 60x60 cm. The shape visually enlarges or reduces the room. The smaller the square, the larger the room appears.
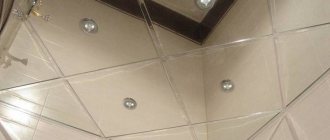
One of the disadvantages of the material is that it fades or turns yellow when exposed to sunlight. Also, tiles can become deformed at temperatures above 80°C, so you should choose lighting fixtures that do not heat up, or place them at a sufficient distance from the ceiling.
When choosing tiles, consider:
- correct shape of the products (straight edges, no broken corners, same size);
- clarity of embossing;
- quality of coloring, lamination;
- homogeneity of the material, absence of voids, defects and irregularities.
It is better to purchase polystyrene foam tiles with a reserve. Different batches may differ in shade or design. For convenience, some models with decorative filling have markings in the form of arrows on the back side - these tips will help you perform installation in the right direction.
Layout schemes
Ceiling tiles are glued in three ways: in even rows, offset to the floor of the element, and diagonally. Depending on the layout scheme, a different visual effect and perception of the room is obtained. Let's consider each option in more detail.
In straight rows
This is a classic layout when the edges are parallel to the walls (in a rectangular or square room). This method allows you to hide small unevenness in the ceiling if you lay tiles of two shades in a checkerboard pattern.
With offset
The option resembles the classic cladding method, but the tiles are shifted by half an element relative to the previous row. This requires more precise marking. The original design gives the room some lightness, but the products must be chosen with a chamfer, since it makes no sense to glue tiles in this way without seams.
Diagonally
The main advantage of the layout is the visual increase in space. The circuit requires the most effort because it requires a more precise fit. In addition, material consumption increases. The diagonal laying method allows you to hide the slight curvature of the walls.
Drywall training
A big advantage for beginners mastering the intricacies of repair is that the tiles are easy to install and do not require great professional skills, and what is important, preparatory finishing of the ceiling with expensive materials is excluded. You just need to clean the ceiling and eliminate obvious defects. If the lamp is offset from the center, then through the point where it is located, draw two lines perpendicular to each other, but parallel to the walls. In the right corners of the resulting square, draw other lines into the corners at an angle of 45 degrees. You can glue tiles in different ways
Straightforward, diagonally, in a run, in a spiral, changing tiles of different colors according to the intended pattern
In the right corners of the resulting square, draw other lines into the corners at an angle of 45 degrees. You can glue the tiles in different ways. Straightforward, diagonally, in a run, in a spiral, changing tiles of different colors according to the intended pattern.
If the lamp is in the center, it is better to stick tiles on four sides of the wire, and continue moving from them to the sides. In this case, straightness will be maintained and the base of the lamp will not end up somewhere in the corner of the tile if it is glued starting from the wall
Pay special attention to the corners of the tiles so that they stick tightly and do not come off
There should be no gaps between the tiles. Have a clean white rag nearby to remove excess glue when squeezing. Cut the end tiles adjacent to the wall to size with a sharp blade. When the light is in the center of the ceiling, pull the cords diagonally from corner to corner.
In this case, the lamp wire should be at the intersection of the cords. Apply markings.
Where to start gluing tiles
There are several layout options, which depend on the size, shape of the room and the location of the chandelier. Let's look at where it's best to start gluing tiles.
From the center of the room
This method is used most often. Its popularity is explained by its neat appearance and symmetrical arrangement of finishes. Installation begins by finding the center of the ceiling and applying markings to the surface. The first four tiles are laid so that their corners meet at this point. If there is a chandelier, its position should coincide with the center of the room.
From the center tile
With this scheme, the first element is glued in the center of the ceiling. Then the installation continues from there. The marking is carried out so that the middle of the tile coincides with the center of the room. The inconvenience of this method is that you will have to remove the chandelier. You will also need to make a neat hole in the middle of the tile.
From the chandelier
If the chandelier is not in the center of the ceiling, the design using the two previous methods may not look aesthetically pleasing. Therefore, the light source acts as a reference point from which gluing begins. The first four tiles will converge at the fixture's mounting point. A hole for the chandelier is cut out at the joining corners. You can also make a hole in the middle of the tile and start laying from there, as in the previous method.
From the corner
In small rooms, gluing of tiles begins from the corner that is most visible from the door. This avoids wastage of material. Otherwise you need to cut a lot of panels.
Pasting material
Before gluing the boards, you can watch a video on how to do it yourself. But usually the process is not difficult even for a novice master. To work you will need a minimum of tools and consumables:
- pencil or cord for marking;
- sharp construction knife;
- ruler;
- glue, if necessary - a glue gun;
- level.
Problems during operation may arise due to mismatched slab sizes. Low-quality products may have a slight discrepancy in size, which will result in a big nuisance on the ceiling. This is especially true for tiles with a pattern that needs to be adjusted.
It is better to measure all the material yourself in advance and cut off the extra millimeters with a knife. This should be done along a ruler, placing it on a sheet of corrugated cardboard. The gaps between the walls and the outer slabs should not be more than 1.5 cm, so they can easily be covered with a plinth.
Beginning of work
Where to start the process of covering the ceiling? This can be done from different places, which will depend on the chosen method of fastening the products. If you decide to paste over with simple stripes, you can choose any place (near a wall, door, etc.), and fix the first tile strictly parallel to the wall. Next, the remaining squares are attached, the evenness of the lines is determined by the level or by lines drawn in advance. How to start gluing if you decide to create a complex pattern? To paste in diamonds or diagonally, work begins from the center of the room.
Gluing to a flat ceiling
Tiling a flat ceiling is as easy as shelling pears. To do this, take glue and apply a strip along the perimeter, diagonally, to the back of the square. The material should not be lubricated close to the edges, as the glue may come out from under the seam. The next sequence of actions is as follows:
- hold the tile in the air for about a minute to air the glue;
- place the square in the desired place;
- smooth with your hand;
- hold a little for initial fixation;
- Do the same with the second square.
It is important that the final drawing is correct. To do this, you do not need to lay tile on tile, allowing the edges to overlap
You should not leave gaps, make the squares end to end. The joining is carried out accurately, neatly and beautifully, aligning the edges to the nearest millimeter. The slabs farthest from the wall most often have to be trimmed.
Gluing to uneven surfaces
For uneven surfaces, using regular glue will not be enough. For this purpose, purchase drywall glue or work with putty. After diluting the mixture according to the instructions, take it on a spatula and form a layer on the ceiling. It is advisable to use a small amount of mass, but this will depend on the curvature of the ceiling.
The composition is applied to an area for about 4 tiles, glue them, then repeat with the others. The edges are adjusted to the level, knocking out the squares that have come out.
Cleaning and sealing seams
Often the glue remains in the form of stains on the front side of the material.
It is important to remove stains immediately, before they harden. To do this, use a cloth, sponge, water.
For operational work, these materials should always be at hand.
Small seams between the squares can be sealed with mastic, putty, sealant, choosing the mixture of the desired color. The excess is removed with a spatula. Additional processing of gaps will give a more beautiful look, you should not neglect it
It is important to do this stage of work after the glue has completely dried.
Seamless tiles
The procedure for gluing such material will be similar. First, they make markings, identify the center, and then begin gluing. This can be done either diagonally or parallel to the wall. It is better to start gluing with seamless material from the wall opposite the window. This way the seams between the squares will be less noticeable. It is better to smooth softer seamless products not with your hands, but with a cloth.
Methods for gluing ceiling tiles
So, we have determined where to start laying tiles, now we will look at what gluing methods exist. Everyone chooses the most convenient for themselves.
Snake
For this method, each subsequent row is laid around the previous one, as if entwining the central elements. The first fragments are glued in the center.
Crisscross
In this case, the panels begin to be laid crosswise. First, glue the first four squares in the center. Then straight lines are formed perpendicular to each of the walls. At the last stage, the resulting quarters are filled.
Rows from the corner
The first tile is placed in the far corner from the door. Next they move along the wall. After this, glue the next row parallel to the first. Work begins from the place that is best viewed upon entering the room. If you start working from the doors, you may find that in the most visible part of the room there will be an unsightly thin strip of scraps.
Glue selection
To attach tiles to the ceiling, several types of glue are used:
- Universal compositions . Elitance glue is suitable for working with wood, plaster, and concrete. It is convenient because it forms an elastic seam, however, the composition takes a long time to dry. Titan glue is more common; it has a viscous consistency and sets quickly. The composition of Master glue is similar, but the strong smell and longer drying time are the main disadvantages. The advantage over Titan is its affordable price. “Moment” is an expensive but high-quality glue. It grips quickly, but the consumption is higher than its analogues. The packaging is in the form of a syringe, so it requires a gun. Universal adhesives also include “Dragon”, “Power”, “Anserglob”.
- Liquid Nails . This type of glue is often used by professionals. Liquid nails are thick, so they are placed in a thick layer on uneven areas. For tiles, choose a white adhesive, without solvents, especially when working with thin materials. It is also used to decorate seams. The most famous brands are “Moment Montage” and “Tytan”. For application you will need a construction syringe.
- Polyvinyl acetate glue . PVA and Bustilat practically do not give off an unpleasant odor, but they take longer to set, and the consumption can be quite large, since the glue is applied both to the tile itself and to the ceiling.
- Finishing acrylic putty . This is a non-standard, but effective use of a product that has the desired viscosity. When glued to putty, the seams turn out white and no gaps are formed. The surface can be painted. To work you will need a spatula.
Advantages
The main advantage of such a ceiling covering is that it is very easy to glue foam tiles to the ceiling, and even an untrained person can handle it.
In addition, the following advantages can be noted:
- Light weight allows the tiles to be used on ceilings of any design.
- The tile has sound and heat insulating qualities, and is not afraid of changes in temperature and humidity.
- The light weight of the tiles makes it possible to use simple glue that does not have ultra-high strength, and, therefore, a high price.
- This ceiling covering will allow you to save not only on material, but also on work - because it can be done independently.
ATTENTION! Foam ceiling tiles can change their physical properties (melt) when exposed to high temperatures, so installing powerful lamps in close proximity to them is not recommended. It is better to use pendant lamps and place them at a distance of at least 20 cm from the surface of the tile. The tile can withstand the temperature of hot water without changing its shape, so it can come into contact with the pipes through which heating occurs.
List of tools and calculation of materials
For pasting you will need the following tools:
- roller;
- stationery knife;
- pencil;
- brush, spatula or construction syringe (depending on the type of glue);
- masking tape;
- roulette;
- chop cord;
- soft cloth napkins;
- ladder.
The number of tiles is calculated based on the area of the ceiling. First, use a tape measure to measure the length and width of the room, multiply, and get the desired value. If the room has a complex non-standard shape, measure all sides and draw up a plan. The drawing is divided into squares or rectangles and their area is calculated, then the results are added up.
Next, determine the area of one tile by multiplying the length by the width. Then the area of the room is divided by the resulting number. 10% is added to it when installing in straight rows, and 20% when laying obliquely and in the case of a complex room shape.
Glue consumption per 1 m² is indicated on the packaging. The required number of tubes is calculated by dividing the area of the room by the number from the instructions. It's better to take one more bottle. For example, “Titan” glue will need about 50 g per 1 square meter, “Moment Installation” or PVA - 200-300 g. It must be taken into account that the heavier the coating, the greater the glue consumption.
Technological process
To properly glue foam tiles, you need to follow the following algorithm:
Calculation of basic materials
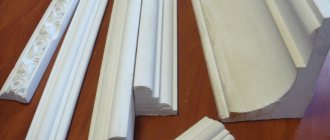
The main materials for this type of finishing will be: foam tiles, ceiling plinth and glue.
Calculation of the required amount of materials is carried out using a simple method:
- It is necessary to measure the linear parameters of the room (length and width), then multiply them together. This determines the area of the room in square meters. For example, a room has the following dimensions: length – 3 meters, width – 2.5 meters. The total area will be 7.5 square meters.
- The area of one standard ceiling tile measuring 50x50 centimeters corresponds to 0.25 square meters. To obtain the required quantity, you should divide the total area of the ceiling by the area of one tile, which in the example is 30 pieces. To this amount you need to add 10 percent - 3 pieces - in case of scrap or damage to the material.
Material selection
When purchasing the necessary materials in a store, you should pay attention to the following details:
- The edges of the ceiling tiles should be smooth, without sagging. Otherwise, it will not be possible to align the tiles evenly, and the resulting gaps between the tiles will look unaesthetic and will cause additional difficulties in eliminating them;
- Since the pattern of the tiles can visually enlarge or reduce the room, when selecting the material you need to make a preliminary layout of at least four tiles;
- When choosing an adhesive or special mastic for gluing tiles, it is worth looking at the adhesion time of the adhesive to the surface. Otherwise, you will have to press the material against the ceiling for a long time, and this can lead to mechanical damage to the tiles.
Selecting the necessary tools and accessories
To quickly and easily cover the ceiling base with foam tiles, you will need the following tools and accessories:
- tape measure 5 meters;
- cutter;
- putty knife;
- ruler;
- roller;
- pencil or marker;
- ladder;
- table.
Surface preparation
Preparing the ceiling surface before decorating it is a mandatory technological condition.
To do this, perform the following actions:
- cleaning the surface from old finishes. It is imperative to remove blisters of old paint or peeling whitewash with a spatula, and then wash the ceiling;
- if the ceiling surface has a curvature, for example, due to a difference in floor slabs, then it is necessary to level the surface or repair potholes and chips with putty;
- For better adhesion between the ceiling base and the adhesive composition, the ceiling surface must be treated with a primer.
Tile gluing technology
Before you start gluing tiles, you should first draw a ceiling marking diagram and tile layout.
There are two main options for covering the ceiling surface: parallel and diagonal. With the parallel method, the tiles are laid square from the center, parallel to the walls. With the diagonal method - from the center diagonally at an angle of 45 degrees.
After determining the method of laying the tiles, it is necessary to determine the starting point for work. Using a ruler and pencil, the center is determined on the ceiling: a cross - if the layout of the slabs is parallel, an x - if the layout of the slabs is diagonal
It is important to draw this designation correctly, because the entire design of the finish and the composition of the drawing will depend on it
Gluing the tiles is done as follows:
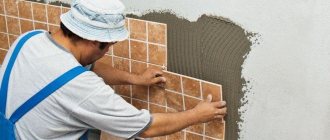
- An adhesive composition is applied to each panel in the center and along the edges, pointwise or continuously. It is better to apply the glue at a short distance from the edge of the tile to avoid contact with the front side of the material;
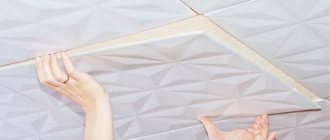
- The foam panel is pressed tightly against the markings drawn on the ceiling surface and held for 20-30 seconds. It is advisable to calculate the clamping force so as not to damage the fragile product;
- At the beginning of the work, it would be more correct to glue the center of four tiles, so later it will be easier to navigate the surface, making sequential pasting of the tiles according to the intended pattern;
- Tiles that will be laid close to the wall must first be cut with a sharp blade on a flat surface so as not to spoil the facing material. If the cutting edge is not completely smooth, do not be upset, because along the perimeter of the room all the unevenness will be covered by the ceiling plinth;
- If gaps have formed between the tiles, you can seal them with acrylic sealant;
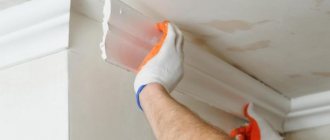
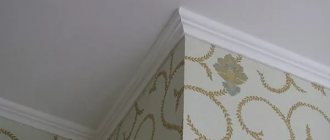
- To give the finishing a complete look, you need to glue the ceiling plinth around the perimeter of the room.
To learn how to quickly and efficiently glue ceiling tiles, see below.
Preparing the ceiling for gluing
Installation of tiles begins only after cleaning the surface.
- Remove old finishes from the ceiling - oil paint, whitewash, wallpaper.
- Dents, wide and deep cracks, and significant irregularities are removed using putty.
- Prime the surface for better adhesion to the material.
It is also recommended to prepare the tiles. 2-3 days before work, it is left in a warm, dry room. During this time, excess moisture evaporates and after gluing, no gaps form between the elements.
Immediately before starting work, the room is de-energized. Ceiling lamps are removed, the chandelier shade is protected with film or paper. Close all doors and windows to eliminate drafts.
If the tiles are too transparent, dark spots may show through the tiles and through the grout lines. In such cases, it is advised to first coat the ceiling with water-based paint or choose a white primer.
Ceiling markings
Marking begins by determining the center of the room by pulling two tapping threads from one corner to the other diagonally. The intersection of the lines will be the desired point. After the center of the room has been found (can be shifted to where the chandelier is located), it is set aside and perpendiculars to the walls are applied to the surface.
Then, based on the size of the tiles and the selected layout scheme, you can draw the entire ceiling in fragments. This will help work out possible mistakes before the finish sticks tightly. For beginners, experts recommend transferring the room plan onto paper and drawing up a preliminary drawing.
Gluing technology
Windows and doors are closed to prevent drafts - then there is less chance that the coating will peel off. Before gluing, each tile is inspected and the material is rejected - specimens with uneven edges, dents and other defects are set aside, they will be useful for trimming. The furniture is taken out or covered with film.
The gluing of ceiling tiles is carried out in the following sequence:
- Apply glue to the back of the panel.
- Press the tile to the ceiling. To prevent thin foam from cracking under hand pressure, use a wide wooden plank.
- Based on the markings, the remaining slabs are glued. The glue is removed with a damp sponge or cloth.
- The panels are trimmed against the wall with a sharp knife.
- The last step is to glue the ceiling plinth.
Sometimes you come across tiles that are slightly larger or smaller in size; such a defect is not always noticeable during rejection. To avoid the formation of unsightly gaps or inconsistencies in the pattern, first try dry tiles on the ceiling and only then apply glue.
How to properly apply adhesive to ceiling tiles
The adhesive mixture is applied in one of two ways:
- On the protrusions on the underside of the panel.
- In the middle of each tile and at touching corners.
If the ceiling has a porous texture, the layer should be thick. Some types of glue (for example, “Moment”) require preliminary curing before gluing. The conditions for use of each product are indicated in the instructions on the package. Sometimes the glue sticks out on the sides. To prevent this from happening, it is applied 1 cm short of the edge of the tile. Any excess that appears is carefully wiped off with a clean damp rag or sponge.
How to glue tiles near a chandelier
If there is a chandelier in the center, a hole is first made in the panels. To do this, each of the four squares is applied to the attachment point and the excess part is cut out. If installation is carried out from the central tile, then a hole is made in the middle of the panel.
Polystyrene foam is easily cut with a utility knife. The main thing here is not to overdo it, so that the decorative cap of the chandelier subsequently hides the hole.
How to seal gaps between ceiling tiles
Often, after gluing the tiles, gaps remain between the elements. This defect often appears on a crooked ceiling. The tile joints are filled with white acrylic sealant. The extended nozzle is very convenient for covering narrow cracks, and the white color will not stand out on the finishing surface. You can use finishing gypsum putty. In this case, it is better to make a thick solution and fill the seams, rubbing the mixture with your finger, then remove the excess with a foam sponge.
After installation, the tiles are coated with acrylic, latex or water-based paint in 1-2 layers. Since the surface, as a rule, has a relief pattern, use a brush or spray. The ceiling must first be primed to improve adhesion. The second time they paint perpendicular to the first layer. Laminated panels are not painted, so they are handled with extreme caution.
Features of diagonal laying
Foam tiles come in three types, any of which is suitable for installation:
- Pressed. It has an affordable price, a variety of textures and colors.
- Injection or seamless. You need to glue it in accordance with the arrows on the wrong side. More expensive and dense. It is difficult for a beginner to use for diamond design, because even the slightest deviation in the calculation will immediately affect the design of the ceiling.
- Extruded. An expensive option with a smooth surface and a wide range of colors. More suitable for rooms with high humidity.
Gluing ceiling tiles diagonally or in a diamond pattern has a number of features that must be taken into account when choosing an installation method:
- This placement requires precise marking of the ceiling and careful cutting of the material. The diagonal laying process will require patience and a lot of time.
- During installation, you can easily hide unevenness and other surface imperfections, which will be more noticeable with parallel gluing.
- When choosing, you must take into account that for diagonal laying it is better to use slabs with seams. Seamless models are more suitable for the option when the fragments are laid parallel in a row.
- Diamond layout requires cutting out a significant part of the material, the trimmings of which may be unsuitable for further use. Often accidental damage to tiles occurs, which increases consumption and material costs accordingly.
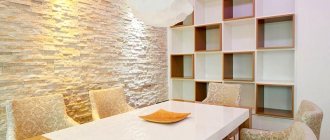
- Combining materials of different colors and textures can create a bright and unusual interior.
How to stick ceiling tiles to an uneven ceiling
If the differences are insignificant, then gypsum putty is used for gluing. The building material performs two functions - fastening and leveling. The step-by-step installation process looks like this:
- Dilute the dry mixture with water in the proportions specified by the manufacturer.
- The putty is applied in a layer of 3–5 mm to an area of the ceiling equal to four tiles.
- Using a notched trowel, run over the putty to leave grooves on the surface.
- Apply the panels.
- Use a building level or rule to gently press down the tiles, creating an even finish.
- The remaining elements are glued in the same way.
If the differences between the ceilings are strong, it is recommended to first level the ceiling with starting putty or using plasterboard sheets.
What to glue on: effective brands
To ensure that the tiles last a long time, it is better to glue them with special compounds. For example, adhesives such as “Titan” and its analogues.
- Moment. Sets in 3 s. After applying the glue to the surface, you need to allow time to dry slightly in the air, only after that the tile is pressed to the ceiling. Has high consumption. High price.
- Titanium. Universal polymer adhesive. Ceiling plinths and tiles, linoleum, and parquet are glued onto it. After drying, a transparent adhesive seam is formed, preserving the appearance of the material. It takes longer to set than the previous one, so during gluing the tile fragments need to be held longer.
- Eco-net. Analogue of Titan. A longer period of coupling allows for correction of the position of the glued fragment. The polymerization process takes a long time.
- Liquid nails (for example, Moment Installation). They fix well and are used for reconstruction of ceilings.
- PVA based adhesive mastic. It has a pasty texture. Quickly, easily fixes and applies, does not require long-term holding of the tile.
Tiles can be glued to flat surfaces using adhesives and mastics. In other cases, gypsum putty is used. If the differences in height do not exceed 5 mm, Knauf adhesive is used. A more crooked ceiling is pre-leveled.
Is it possible to glue ceiling tiles in the bathroom?
It must be taken into account that there is always a high level of humidity in the room. Therefore, it is impossible to cover the ceiling with stamped tiles here - they do not tolerate such an environment. After installation, you can paint the surface with waterproof paint, but there is a more practical option.
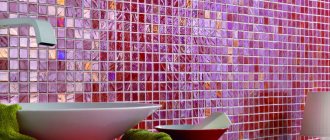
Extruded laminated tiles are suitable for bathrooms and bathrooms. But the packaging must indicate that the product is resistant to humid environments. To do this, the manufacturer coats it with compounds with hydrophobic properties.
A selection of beautiful photos of ceiling tiles in the interior
Foam ceiling cassettes are a simple way to give your apartment comfort and beauty. Even a novice home craftsman can do the job with his own hands without outside help.