In this article we will tell you how and how to paint foam ceiling tiles, what tools and materials you will need for this, and show several photo and video materials on this topic. What you have written will be of interest to you if you:
- you are doing or planning renovations and intend to use ceiling tiles made of polystyrene foam (expanded polystyrene);
- Are you thinking of giving your existing ceiling tiles a fresher look?
Finding out what you can use to paint old or new ceiling tiles is quite simple, based on the characteristics of the foam itself. This material is resistant to water, but quickly degrades under the influence of acetone, benzene, toluene, white spirit and other solvents, dichloroethane and ketones, as well as their fumes.
Therefore, firstly, any water-based paint will suit you for painting. And secondly, no matter what substances you use in your work, they should not contain materials harmful to the foam and, accordingly, to your ceiling.
Is it possible to paint polystyrene foam?
Foam ceiling tiles are becoming increasingly popular. It weighs little and is not afraid of water, it can be hung in the bathroom, kitchen and toilet; in addition, foam plastic is easy to install - no special skills are required for this.
The panels are usually made in the form of squares with sides of 30 or 50 cm; designer options with decorations are less common. The tiles are available in 2 types:
- Laminated. These tiles are covered with a thin protective layer that protects them. The material will retain its color for several years and can be washed periodically with a soft cloth. You can paint laminated foam only after a few years, when it becomes pale. It is not recommended to paint it immediately after installation - there is a high probability that the paint will not stick.
- For coloring. This tile must be painted immediately after installation. A layer of paint will protect it from damage and moisture, extend its service life and strengthen the structure.
Once you have chosen a tile to paint, you need to paint it as soon as possible. Without a protective layer, dirt and moisture easily penetrate into it, which greatly damages the material.
Coloring option Source designx.disacode.net
See also: Catalog of companies that specialize in paints and varnishes and related work
Refresh old tiles
Procedure: clean → primer → (repeat) → paint → (repeat).
If you want to refresh your existing and perhaps tired ceiling tiles by painting them an unusual color, you first need to clean and degrease them as much as possible. You can go over it with a vacuum cleaner with a soft attachment and a low power level, and then gently wipe with a damp cloth and detergent.
But this may not be enough if dirt, soot or grease has long been deeply embedded in the surface. Moreover, stains of this kind can appear through the paint, so after the surface has dried, 1-2 layers of a special water-based insulating primer must be applied to it. There is a need for a second layer if, after the first layer has dried, the stains continue to show through.
Please note that the primer must be compatible with the paint - the quality of the final coating and the required amount (consumption) of paint depend on this.
If laminated tiles need updating, they must first be cleaned with very fine sandpaper, because both primer and paint adhere much better to a rough surface. It is generally accepted that this type of tile does not like paint. But nothing stops you from experimenting, especially since you don’t have many options - admire yellowed or cracked tiles, remove them or repaint them.
In this case, it would be very good to conduct research on a small piece of tile left after installation, purchase the same copy at a hardware store, or try painting a fragment that is not visible behind the furniture in order to avoid regrets and wasted time and money.
So, while the primer dries - and it takes about 1 hour to dry - we'll look at preparing to paint brand new tiles.
Paint selection
Painting the ceiling is not difficult, but it is important to immediately understand what paint can be used to paint foam ceiling tiles. It is important to remember that not all paints adhere well, and most importantly, safely to the material. Some compounds can dissolve polystyrene foam.
The following types of paints are safe:
- Acrylic. It is odorless and does not harm health, is resistant to high temperatures and humidity, is resistant to fading, has a glossy shine, rich color and quick drying. It is easy to apply and the surface can be washed. The only drawback is the high price.
- Water-based. Creates a matte film, spreads evenly and covers the seams between the slabs well. It has good vapor permeability and low price. The mixture has more disadvantages: it cracks more often than others, can begin to peel off and does not tolerate washing. In rooms with high humidity, white paint quickly takes on a grayish tint.
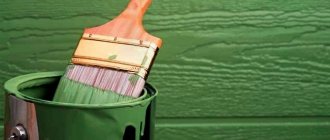
Example of paint used Source kraski-net.ru
- Latex. Waterproof, elastic, tolerates ultraviolet light, easy to apply and dries quickly. The surface can be glossy or matte. The disadvantages include poor resistance to fungus. If the mixture is applied too thickly, the paint may peel off.
All these types are water-emulsion and differ in composition. All other colors are not suitable.
Application
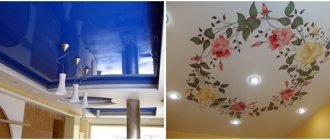
Finishing the surface with tiles allows you to quickly, inexpensively and effortlessly update the ceiling. It makes it possible to hide various defects without leveling or putty. The tiles are suitable for living rooms, bedrooms, offices and other rooms with acceptable air humidity.
Figure 2 Use in the kitchen.
This material should be used in kitchens and bathrooms with caution, as tiles in the kitchen quickly become stained and lose their original appearance, and in the bathroom they may become unusable due to high humidity. Only painting can prevent this from happening.
If you don't know whether ceiling tiles can be painted, pay attention to their color - if it's white, feel free to get to work
Necessary tools and preparation
Determining whether foam ceiling tiles can be painted is not difficult. Before starting work, the surface and the entire room must be prepared. You will also need to take care of the necessary tools and paint in advance. The latter must be diluted or mixed to obtain the desired shade, if necessary.
The tools you will need are the following:
- A roller with natural bristles: it is convenient to apply the mixture onto a flat surface of a large area.
- Narrow brush: this will be needed for painting corners, edges and seams between plates. It will also be required if the tiles have voluminous decorations.
- Roller tray and brush container. You can also use a spray gun.
- A stable ladder to reach the floor.
Painting with a roller Source ufa.kraskinadom.ru
Preparatory work
Without properly preparing the ceiling for repairs, it is impossible to achieve a good result. Before you begin the painting process, you should remove the furniture from the room. Despite the simple methods of painting tiles, the floor and walls of the room must be protected from paint splashes.
Preparation for work begins with removing dust from the tiles. This can be done with a vacuum cleaner, brush, broom, etc. The ceiling in the kitchen often needs to remove greasy stains. The surface of laminated tiles should be lightly sanded to improve contact with the paint.
Sometimes it becomes necessary to seal tile joints. The joints between the slabs are puttied. The use of metal spatulas when leveling the composition is excluded, as they can damage the tiles. The adhesive properties of the surface will be improved by priming it with a composition appropriate for the type of paint. The paint and varnish material will lie more evenly on a primed ceiling.
Materials and tools
To update the design of the apartment you will need the following materials and tools:
- dye;
- primer;
- putty or acrylic sealant;
- color (pigment is added to paint in a ratio of no more than 1:10);
- rubber spatula;
- foam sponge;
- brush;
- roller (spray, etc.);
- stepladder (horses, table);
- cuvette.
It is necessary to wear protective clothing and use eye and respiratory protection.
Coloring
It is easy to determine whether foam ceiling tiles can be painted prior to installation. This is easy to do; the option may seem simpler and more affordable. But it has a significant disadvantage: the joints between the tiles will remain unpainted and will look ugly.
Painting takes place in several stages:
- The paint is prepared: shaken, mixed, poured into a suitable container.
- First of all, the edges of the plates and the corners formed near the walls are painted with a brush. They are painted with a strip 3-5 cm wide.
- The paint is applied to the main flat surface with a roller or wide brush. If the tiles have voluminous decorations, they are carefully painted over with a brush.
- It is necessary to be careful: the paint should lie evenly, without smudges or gaps. It must be applied in a thin layer so that the paint does not start to fall off and crack. This is especially true for water-based types. There is no need to run the roller or brush all the way to the wall so as not to touch it.
Types of ceiling tiles
All modern ceiling tiles are made from expanded polystyrene, a type of foam made by extrusion. But this method has its own characteristics, which make it possible to obtain ceiling tiles of different configurations and properties.
There are 3 types of products in total:
- Stamped - made by pressing after laying sheets of expanded polystyrene in a special form. This is the simplest and cheapest type of finishing, which does not differ in the variety of decor. The surface of the tile turns out to be porous and rough, and during the gluing process the joints may turn out uneven.
- Cast - sheets of base material are exposed to steam and sintered in molds. The geometry of the finished pressed product is more pretentious, with strict adherence to dimensions. This is the highest quality and most wear-resistant type of tile. Cast products are glued without visible seams and are characterized by increased strength and clarity of the pattern.
- Laminated - tiles are made by vacuum molding and covered with a layer of lamination. Due to its moisture resistance, it is suitable for use in rooms with high humidity. It has the minimum thickness of all varieties and a clear decor with a three-dimensional effect.
Video description
You can watch the video on how to paint uneven tiles:
- It is better to apply the first layer perpendicular to the incident light. This will make it easy to see the shortcomings made during painting and eliminate them.
- When the paint dries (this will take 8-12 hours), apply a second layer, but this time parallel to the incident light.
- When using water-based paint, it is better to apply a third coat after drying. It is applied like the first one - perpendicular to the light.
- After each layer, the roller and brushes must be thoroughly washed so that pieces of dried paint do not spoil the ceiling.
While the paint dries, the room should be closed. It should not receive fresh air or sunlight.
Helpful tips and further care
It is better to dilute the paint for the first layer slightly with water: a more liquid composition will lie more evenly on the surface and be absorbed into it.
Caring for ceiling tiles after painting is not difficult. The waterproof coating can be washed with a sponge or soft cloth soaked in a lukewarm soapy solution and wrung out. The moistened surface is lightly wiped with a napkin.
It is better to care for tiles coated with water-based paint using a vacuum cleaner. To remove dirt from a corrugated surface, it is better to use a soft brush or a brush with long bristles.
Useful tips
There is nothing complicated about painting the ceiling. However, the experts give some useful tips that will make the job easier.
When working, it is recommended to follow them:
- Before starting work, you need to test the paint on unnecessary tiles: whether the shade is suitable, whether it fits well. Several layers are also applied to check. This will help you evaluate the final color.
- If necessary, the color can be diluted with water or the desired shade can be mixed from 2 or more colors.
Using a spray gun Source kraski-net.ru
- It is best to paint three-dimensional elements with a brush; you can also use a dishwashing sponge or a spray gun. The latter will not only save time, but will also allow you to complete the job with the highest quality possible.
- It is necessary to apply at least 2 layers of paint, if it is water-based, then 3 layers.
- When the last layer has dried, the work must be checked using a bright lamp or powerful flashlight. The entire ceiling should be evenly painted, without bald spots or excess paint.
- Waterproof paint can subsequently be washed with a damp cloth, non-waterproof paint can be cleaned with a vacuum cleaner or soft brush.
- If paint accidentally gets on clothes or a surface, it can be removed with warm water in the first half hour. If it has dried out, you will need a brush and chemicals.
Otherwise, there are no difficulties in painting the ceiling.
Ceiling tile painting technology
The ceiling is a fairly noticeable part of the room, so its finishing must be approached no less carefully than everything else. Regardless of the type and characteristics of the lighting, all defects in the ceiling tiles will be noticeable - and it is for this reason that the paint must be applied so that there are no noticeable streaks or tool marks left on the ceiling.
The algorithm for painting ceiling tiles consists of the following steps:
- Before you renew the tiles on the ceiling, you need to completely remove all dirt and dust from the surface of the tile. A regular vacuum cleaner equipped with a long-pile attachment is quite suitable for this job. Dust must be removed before the ceiling is washed, otherwise lumps of dirt will clog the pores. To ensure that the cleaning is as complete as possible, you should walk over the surface of the tiles with a damp brush and a non-aggressive detergent, and then wipe the ceiling with dry cloths.
- For high-quality adhesion of paint and tiles, the latter must be coated with a primer before work. If we are talking about foam tiles, then a nap roller is quite suitable for priming. Once the primer has dried (this usually takes about 12 hours), you can begin painting directly.
- Painting can be done using a variety of tools. For example, a spray gun is perfect for final finishing, as it allows you to achieve the highest quality of paint. A roller is suitable for applying colored paints to a simple surface, but if there is a large amount of relief, it is best to use a paint brush. The main thing you need to do when working is to constantly make sure that the paint lies evenly and does not cause shading.
- The tiles must be coated with at least two layers of paint, with the second layer necessarily positioned perpendicular to the first. This arrangement of layers allows you to balance the color tone and make the coating as uniform as possible.
Briefly about the main thing
Foam ceiling tiles are increasingly being used in renovations. It is available in 2 types - laminated (it can be painted only after a few years) and for painting (it must be painted immediately).
Polystyrene foam can only be painted with water-emulsion paints. The rest may damage the material or burn it.
Painting the slabs is easy: a roller is suitable for large and straight surfaces, and a brush or spray gun is suitable for corners, crevices and volumetric elements.
It is recommended to prime the surface before painting. This will improve the quality of the color layer and enhance adhesion to the plates. The paint itself is applied in several layers.
Ratings 0
Preparing the ceiling for painting
The preparatory stage includes the following actions:
- Surface cleaning. Remove dust and dirt from the ceiling. If necessary, the surface is washed and dried.
- Inspection of the tiles. Loosely fitting elements are glued, and then wait until the glue dries.
- Eliminate gaps. This can be done with acrylic sealant. The quality of work is assessed by examining the joints in bright light from different angles. Detected defects are eliminated.
- Grinding. Laminated tiles are sanded over the entire surface. This way the paint adheres better to the base without forming smudges or stains.
- Primer. The acrylic composition is applied with a roller once. You cannot save on material. The primer reduces the consumption of the coloring agent and increases the durability of the resulting layer. If you skip this step, the paint will quickly crack or peel.