How to glue mosaic tiles on a mesh - expert advice
The bathroom is the face of the whole house; guests inevitably end up there.
Therefore, it should look presentable. There are no trifles in this matter: the floor, ceiling, walls must be covered not only with practical, but also with beautiful material that is easy to maintain and maintain. As an option, along with large-sized ceramic tiles, builders began to use mosaic tiles. Traditionally, mosaic is considered a high-class material, and previously not many could afford to use it for renovation. The main difficulty was laying many small tiles, but now this problem has been solved. Mosaic on a mesh that combines individual particles into easy-to-install blocks allows you to attach the material quickly and without much effort. But before you go to the store, it’s worth learning more about the types of mosaic tiles, their purpose and the nuances of installation.
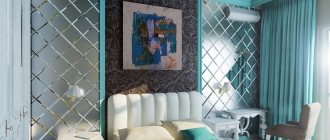
Mosaic tiles in the interior
How to glue on the mesh
Mosaic on a grid looks aesthetically pleasing and fits into any decor. It does not only lie on flat surfaces, so it can be used to create original design solutions. Contrary to popular belief, laying mosaics on a grid is quite simple. Work algorithm:
- preparing the base (you need to use a grinding machine if the walls are not smooth);
- clean the wall from dust, dirt, moisture;
- make a layout plan (lay out the sheets on the floor so that there are no gaps, transfer the diagram to paper, and then to the wall);
- make markings on the wall (control is carried out by level in both coordinates);
- preparation of the adhesive composition (selected depending on the type of mosaic);
- applying glue (with a notched trowel up to 3 mm, on one or two mosaic plates);
- laying with a mesh base on glue;
- leveling the sheets with a dry cloth and hands;
- repeating the steps for all tiles.
After 24 hours, grouting is carried out. Excess glue is removed with a special grater, and then the surface of the new mosaic is polished with a felt rag.
In the absence of the opportunity to use natural materials for finishing, you can always find a worthy replacement in the form of modern polymers. Polyvinyl chloride is a hard and durable structure that is renowned for its excellent resistance to water and temperature fluctuations.
Modern mosaic panels made from foamed PVC are able to successfully hide all the imperfections and imperfections of the surface.
You can glue PVC mosaic panels directly onto the wall as in previous cases. Before gluing a decorative mosaic panel, it is necessary to clean the surface of grease and dirt stains, remove previously used material, and eliminate depressions. Fix the sheet panels to the surface using hot glue and liquid nails.
Tools for laying mosaics
To lay mosaic tiles you will need the following materials and tools:
- styling adhesive;
- mosaic tiles;
- grout for seams;
- tape measure, pencil, building level;
- small grinder with speed controller + discs for stone/ceramics, pliers for cutting mosaics;
- container for mixing glue;
- drill mixer;
- serrated (corrugated) spatula with a tooth stroke of up to 5 mm;
- graters up to 30 centimeters;
- rubber spatula;
- regular spatula;
- water container + sponge with soft and rough sides;
- felt or flannelette rag.
The difference between mosaics on paper and on mesh
Mosaic tiles on mesh and paper backing are the most popular types of finishes. The second option is cheaper, but it does not allow you to control the seams between individual elements.
Each type has its own rules. The mosaic on the mesh is glued face down, and after the glue has dried, you can immediately proceed to grouting the joints. To install paper-based mosaics, the sheets are applied to the surface with the paper side up, after which you must wait at least a day to continue the process.
Applying adhesive to mosaic tiles
After treating the wall with glue, you need to coat the tile itself on the back side. It is best to carry out this procedure using a smooth, non-notched spatula. When laying mosaic tiles, you can use the double application method of adhesive. This method of applying adhesive is ideal for mosaic tiles. It is especially suitable for laying translucent or transparent mosaics.
If you glue such a tile onto a layer of adhesive already applied to the surface of the walls, then the adhesive strips from the notched trowel will not be visible through it.
What should the surface be coated with?
Unlike ordinary tiles, mosaics are placed not just on a flat, but on a perfectly smooth surface, otherwise, due to the flexible mesh base that follows any unevenness, the pattern will be spoiled and the edges will not meet. Therefore, the technology for laying mosaic tiles requires careful preparation of the base.
Filling small irregularities on walls
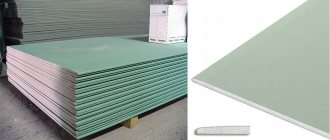
First, the walls or floor are cleaned of old coating and dust. Then they are checked by level for the presence of height differences. To make it easier to eliminate unevenness, use the following technique - thickly rub chalk on an even strip of suitable size and, pressing well, move it along the walls or floor. In places where there is no chalk left, there are depressions that need to be filled with plaster or concrete mixture (if mosaics are being laid on the floor). In case of serious flaws and cracks, it is more rational and easier to level the walls with plasterboard, not forgetting to sand the joints and screw heads.
The prepared surface is dust-free and treated with a deep penetration primer. This will improve adhesion, providing better adhesion between the materials. After the composition has dried, you can proceed to the installation of the mosaic.
TOP manufacturers
- Axton mosaic adhesive. It is used for interior decoration with mosaics in bathrooms, showers, and kitchens. Axton glue is available in the form of a dry mixture for mixing. Has high adhesion to concrete, brick and plaster.
The diluted mixture is viable for 2 hours. Economical consumption, allows you to apply glue in a layer of up to 5 mm. Axton provides reliable fastening without loosening or falling out of mosaic chips.
You can adjust the position of the tile within 15 minutes. Complete curing and drying occurs within a day. A package of 5 kg costs from 125 rubles.
- LITOACRIL PLUS glue is a dispersion solution, accelerated curing in the form of a thick white paste. Suitable for use on plastic, wood, glass surfaces. It is resistant to slipping on vertical and smooth planes.
LITOACRIL PLUS can be applied in a layer of 2 mm. Withstands temperature changes from -30 to +90˚С. With rapid hardening, the adhesive has an increased open layer life. That is, adjustments are possible within 30 minutes. A package weighing 1 kg costs from 500 rubles.
- Tile adhesive PLITONIT C is a dry cement mixture for dilution with water. Suitable for indoor and outdoor use. It is used for tiles and mosaics of any size when installed on complex substrates: painted, on old tile coverings, in swimming pools, on the “Warm Floor” system.
Complete drying time - 24 hours, adjustments - 30 minutes. To level walls with defects, the height of the adhesive layer is allowed to be up to 10 mm. After mixing, the PLITONIT C mixture retains its qualities for 4 hours. Packaging 25 kg. costs from 650 rub.
What tiles can be glued to drywall in the bathroom
- Blurring and displacement of the drawings printed on it are not allowed.
- On the back of each tile, its brand and name of the collection must be indicated, otherwise the chosen option is a low-quality fake.
- The tile should not slide much.
- After heat treatment, clay products have good moisture protection and become resistant to chemical influences.
- Its shape should be solid without chips or scratches.
- The surface of the tiles will be checked for hardness by simply tapping it lightly.
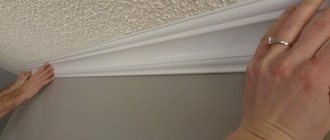
Mosaic tiles . It is very convenient for the bathroom, it consists of small squares with a glossy surface, which can be laid even on uneven surfaces, and even more so it will look beautiful on a flat surface of drywall. One corner becomes a control, there is a point in it and it is projected onto other corners . After marking the corners, horizontal lines are drawn using a cord, all subsequent lines run parallel to the zero level.
Mark the bottommost row of tiles, which will go immediately from the floor, and install wooden tiles to it. It will act as a support until the glue dries. It will also be interesting to see what colors exist in ceresit ce 40 tile grout.
To do this, follow the link and look at the photo.
Required Tools
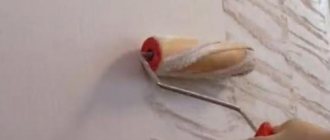
The choice of tool depends on the thickness of the selected mosaic tile. Usually the standard list includes a spatula and a trowel for applying glue. Experts often use a notched trowel in their work. It allows you to distribute the glue in a more even layer, removing its excess. In addition, you will need a building level and a special tool so that you can later smooth the tiles.
For such equipment, you can take a regular roller.
How to glue tiles onto drywall in a bathroom: selection of materials and installation instructions
Adhesive in tubes can also be used for installing tiles. But if you need to glue a lot of tiles, then the cost of such finishing will be very high. Therefore, this option is acceptable if you need to make minor repairs, for example, gluing damaged tiles that have fallen off the base. If you do not have the skills to work with gypsum fiber, then to do the wall cladding in the bathroom with your own hands, it is better to use moisture-resistant plasterboard (GKLV). This material is easy to work with, and when sealed with moisture-resistant grout, it can last for a very long time.
- The glue is applied in a continuous layer to a small area of the wall, after which it is smoothed with a spatula with 6 mm teeth. You get uniform strips of glue.
Plastic spacer crosses are inserted between the tiles. Subsequent tiles are laid in a similar manner. If necessary, the outermost tiles in a row are cut with a tile cutter or grinder. To prepare tile adhesive from a dry mixture, you will need a clean container and a construction mixer or an attachment for a hammer drill. A measured amount of water is poured into the container, into which the dry mixture is gradually added (mixing with a mixer must be continuous).
Stirring is carried out until a homogeneous mass is obtained, but not less than 3 minutes. Then there is a technological break (about 5 minutes), after which the mixture is kneaded again for 1.5–2 minutes.
Mosaic adhesive - dispersion, cement or reactive?
There are three types of compounds that can be used to glue tiles onto the mesh. They are given below:
- dispersive;
- cement (otherwise called dry);
- reactive (consisting of two components).
Cement tile adhesive
Dispersion adhesive is considered acceptable in cost and quite easy to use. It consists of one component. You do not need to stir the composition, add water or any other solvents to it. The glue is ready for use immediately after purchase from a hardware store. The undoubted advantage of dispersion compositions is that they do not lose their properties during storage. You can open the glue, use a certain amount of it, and then close the lid tightly and leave the jar until the next repair. Another advantage of working with such a composition is the absence of dust and dirt. Gluing tiles with a dispersion compound is a pleasure! But only on condition that the amount of finishing work is quite modest.
If you need to veneer not one small wall, but several large surfaces, it is better to use cement glue. It can be made on the basis of gray or white cement. Such compositions are elastic, rigid and deformable (with a very high level of elasticity). To install tiles on a clean and smooth plastered or brick wall, it is recommended to use rigid compounds. But elastic variations of glue are used for cladding complex surfaces. For example, those that are susceptible to temperature changes or vibrations.
Flexible adhesives are commonly used in kitchens and bathrooms. It is also indispensable for finishing uneven walls in other rooms. Elastic compounds are also used for surfaces made of foam and aerated concrete blocks. They can be used for installing mosaic tiles on a grid on a concrete screed. In terms of price, cement adhesive is cheaper than dispersion adhesive. But it must be mixed with water or latex immediately before use. This operation should be performed using a construction mixer. Naturally, when stirring the composition, you will not be able to avoid dirt and dust in the room. For this reason, few home craftsmen buy cement mixtures in order to glue mosaics themselves.
The most expensive is reactive glue. It consists of two components - a hardener and a base, which can be epoxy and polyurethane. It makes sense to purchase such a composition in cases where you plan to glue mosaic tiles to a wall made of natural stone, to a plastic, wooden, metal or glass surface. Before use, the adhesive components are mixed. They enter into a chemical reaction and in just a couple of minutes we get the finished composition.
It is necessary to use mixed reactive glue as quickly as possible. It dries out very quickly. And after hardening it becomes unsuitable for finishing work.
Glue selection
The quality of attachment of the material to the surface, as well as the final result of the work itself, depends on the correct choice of glue. When choosing an adhesive, you should consider the material from which the tiles are made. An important role is played by the thickness of the facing material and its transparency. You can choose a special glue, which is sold in every hardware store and is intended for all types of mosaics.
As a rule, this glue contains sand, which is why it has a gray tint. This type of glue is suitable if the material is opaque and is glued to a familiar surface (floor or wall). If the mosaic is transparent, it is better to pay attention to glue with a similar composition and white color.
This glue can be used during installation of glass material.
Epoxy glue is one of the more reliable. It can be used for cladding those surfaces that will be subject to frequent use. For example, this glue is often used for laying floors.
You can pay attention to the hard or deformable composition:
- The first option can be used for concrete or brick surfaces. As a rule, this glue is chosen for walls.
- Deformation will be needed if the house is subject to frequent vibrations (for example, if a railway passes nearby). This type is suitable for finishing surfaces that are subject to temperature changes.
Joining mosaics
The final stage of laying mosaic panels is jointing or applying a layer of grout. This is required to protect the space between the tiles from moisture, preventing the destruction of the bottom layer. It also creates an aesthetically pleasing finish to the decor. When applying the grout mixture, it is important to take into account the difference in cell depth between individual elements and entire sheets. Excess grout can be easily removed with soapy water.
Mosaic on a building mesh is a good option for quick, beautiful and durable repairs. See many design options on the TILES FROM FACTORY website. We also invite you to visit the comfortable Kerama Marazzi store in Moscow at Budyonny Ave., 27.
Proper care of mosaics
- Bathroom cladding requires periodic treatment with fungicidal compounds. They will help protect the surface from fungus and mold. This is especially important for bathrooms where ventilation is poor.
- Cleaning products should not contain abrasive substances, only in the form of a gel without solid particles.
- Dirty places are wiped with a soft sponge. It is soaked in a soap solution. All that remains is to rinse the surface and wipe it dry.
- It is not allowed to rub the tiles with wax, oil-based substances or compounds containing phosphoric acid.
These tips will help you care for and extend the life of the cladding after you have successfully glued the mosaic tiles.
Cladding stages
The use of mosaic tiles is quite common: they are used both for finishing a room and for decorating individual elements. In this case, the tiles can be laid on the floor, on the wall, on the ceiling, on the windowsill and on the countertop.
The technology of laying mosaics is not very different from laying tiles, but requires more responsibility. A convenient point when gluing mosaic tiles is their flexibility, which allows you to stretch or narrow the seams.
Glass mosaic is most often used for swimming pools, although it can also be found quite often on walls and floors as panels. The installation of glass mosaics should be planned taking into account lighting, because... horizontal backlight will display all errors.
Tools required for installation:
- 2 spatulas (smooth and serrated edge);
- roller or rubber grater;
- building level;
- knife;
- pencil and ruler.
To lay tiles on the floor, it is better to use a more durable material: stone, marble or porcelain stoneware. Laying marble mosaics is an ideal option for a bathroom interior. This is the most durable material used for flooring. In this case, it is necessary to monitor the color of the selected glue: it should be white, not gray. This is due to the fact that marble quickly absorbs everything and changes its color shade forever.
When arranging a kitchen, bathhouse, or cafe, wooden mosaic cladding is used. This option has a lot of positive properties: strength, soundproofing, durability and uniqueness.
Preparing the foundation
Mosaic tiles should only be laid on a prepared base. After removing the remnants of wallpaper, paint and other coatings, you need to check the plaster. A prerequisite when preparing to lay tiles is to apply a primer to hide traces of dust and improve adhesive properties. After priming and checking the walls using a level, you can proceed to the next stage.
We carry out the markings
After the primer has completely dried, the surface is marked. First of all, you need to decide how the mosaic will be laid. The choice will depend on your imagination and preferences. In addition to the classic one, there are other options for laying out mosaic tiles:
- alternating matte and glossy types;
- combining mosaics with tiles;
- pixel mosaic;
- panels and paintings;
- use of hexagonal mosaic.
The location of the mosaic pieces must be carefully marked. When drawing up a sketch, pay attention to the following points:
- if there are slopes and boxes in the room, the drawing begins to be laid out from them;
- if there is a decorative element in the room, then it is a priority;
- Try to hide all possible undercuts in a corner or at the bottom of the floor.
After the sketch is drawn up, it is transferred to the wall.
Apply glue
Gluing mosaic tiles is not difficult, but you need to choose the right glue. When choosing an adhesive composition, the surface material on which the tiles are laid matters. To prevent the appearance of an unwanted shade, it is better to choose white glue for glass mosaics.
As for the preparation of the glue, the solution is prepared in accordance with the requirements specified on the packaging. After studying the instructions, apply the glue to the surface using a rubber spatula.
It is undesirable to apply glue directly to a surface with a large area, because... it dries quickly and forms a film on the wall. It is better to dilute the amount of glue that will be used immediately.
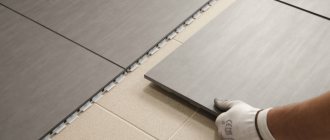
Laying on floors and walls
Laying mosaics with your own hands should begin with those places that catch your eye the most. Unlike the technology for laying ceramic tiles, in this case there is no need for additional support - if the work is done evenly, the mosaic will not slip or fall off. Given the high flexibility of the material, you should not press it with your hands - because of this, the sheets may lie unevenly. The optimal tool in this case would be a silicone roller.
Laying mosaic tiles on a grid:
- In this embodiment, the sheet is turned with its front side towards itself, and its back side is completely immersed in the glue.
- The sheet is gently pressed with a rubber spatula.
- The distance between the mosaic pieces is checked (it should be the same).
- The remaining adhesive is removed from the tiles, which are left to dry completely.
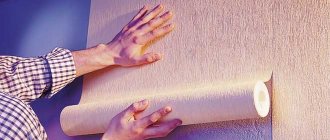
Laying on paper base:
- Turning the sheet of paper with the paper side towards you, glue it to the wall and tap it with a spatula to distribute it evenly.
- After laying the second line, we return to the first and blot the paper with a damp sponge until it begins to easily peel away from the surface. Remove paper from the mosaic from the top corner, getting as close to the surface as possible.
- After removing the paper backing, the seams and tiles are leveled with a small spatula.
- Before applying grout, the tiles are left to dry for 24 hours.
We produce grout
Grouting is carried out only after the solution has completely dried, and for this a minimum of 2 days must pass. The facing surface is cleaned with a brush and warm water. If there are smudges of glue at the joints, remove any remaining glue with a knife or sharp blade.
The mixture is diluted according to the instructions and applied at an angle of 45°. The grout is left to dry for 20 minutes, after which it is cleaned with a dry cloth to remove any remaining mixture. It is then washed with water and polished after drying.
Mapei grout is a win-win option from the Italian manufacturer. Its only disadvantage is that it quickly sets to the surface.
Peculiarities
Mosaic is a special type of facing material. This tile consists of small elements, which is why it looks special in the interior. In appearance, this is an ordinary rectangular tile, which has a different base, thanks to which all the small segments stick together. The base can be made of mesh, paper or silicone. Thanks to it, you can easily install tiles.
The main feature of this material is that it can be used independently (create a continuous installation over the entire surface). In addition, it is suitable for partially decorating surfaces. It can be used as decorative fragments, combining mosaics with regular tiles or some other finishing material. Often, mosaic slabs are used for cladding bathtubs or sinks, after which boring plumbing items begin to play with new colors, becoming the center of attention in the interior.
This type of tile is durable and easy to maintain.
Today, global manufacturers and well-known brands offer a very wide selection of mosaic tiles.
There are different tiles on sale (tile, decorative, marble, glass, mirror, gold) :
- The most popular type is tile or ceramic tile . Like regular facing tiles, the mosaic surface can be different. It can be matte, glossy, rough, pearlescent surface. The color palette pleasantly surprises, allowing you to choose not only classic shades, but also interesting color combinations. This type of tile can be used in a variety of rooms. It is used for finishing ceilings, walls or floors, decorating facades, and fireplaces. The material is very versatile, which is why it is in great demand.
- Glass mosaic has been very popular since ancient times. This finishing material is durable and impact resistant. The color of this tile may vary. During its production, glass melt is painted in different shades. This material will look great in the bathroom.
- Today, stone It can be granite, marble. The uniqueness of this material lies in its texture, thanks to which you can create unique decorative elements. This type of tile is often used to decorate the floor; it can even create a stone carpet.
- Mirror mosaics are used when they want to not only add some zest to the room, but visually expand it. This material is completely safe for health, like all others. In addition, such tiles are easy to install.
It is easy to care for it using modern means. It looks very original in the interior.
Choosing a mosaic
Today there are many varieties of mosaics. The differences are in shape, material, size. Manufacturers every time try to make their products unique and unique. But still, the installation technique for all types of mosaics is the same. If budget is not important to you, then it is recommended to purchase products from the following companies: Trend, Bisazza and Sicis. Each of these companies has its own feature. They differ in size, color and technology.
Chinese manufacturers are gaining enormous popularity. They have a low cost, but this does not affect the quality of the material. “Chinese” mosaics have a beautiful appearance and a long service life. Gluing it is quite simple.
Where to use mosaic?
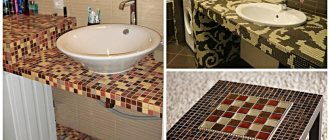
Apron. By apron we mean a part of the wall located above the working surfaces of the set in the part where splashes of grease and droplets are most likely to penetrate: above the sink, table and panel. You can completely lay out this area with a mosaic in the form of some ordinary pattern or a whole picture of small parts. Or you can only part of the wall, connecting it with simple tiles.
Tabletop – Surprisingly, this is great for decorating tabletops. A surface made from this material is not afraid of temperature changes, humidity, or chemicals included in detergents.
The mosaic floor also looks very unusual. You can lay out the pattern in the very center, you can cover it entirely with multi-colored squares, or you can make a simple pattern.
Walls and furniture. A kitchen room completely covered with mosaics will look quite colorful, but using it to mark some area or part of the wall will be acceptable. They also make window sills, bar counters and furniture facades from mosaics with their own hands.
Laying mosaic tiles on the floor
Laying tiles on the floor does not require special knowledge and skills. Working with floors has the same principles as working with walls. A cement screed is desirable. Laying mosaics on the floor is a simple process:
- mix glue;
- apply to the surface;
- attach module;
- clean and sand the seams.
Mixing tile adhesive
Tips on how to lay mosaic tiles:
- Install the tiles with a suitable adhesive.
- To achieve maximum strength and durability, experts recommend laying tiles in the cold (ideally +5 degrees).
- Mosaic tiles are cut. To cut, you will need wire cutters. When working with them, you should wear a mask and goggles: fragments fly off and hit your face.
- It is advisable to apply waterproofing or a special seam protectant to the seams, even if the materials themselves are moisture resistant.
- If the mosaic tile parts are glass or metal, you should refrain from using hard sponges: they can leave scratches.
- In addition to the tools mentioned above, you will need a ruler, level, and crosses. Before starting work, you need to make markings.
The glue must be latex based. A good choice is an adhesive that matches the color of the tile. You need to look at the expiration date and quality of the material. Not every expensive glue is good, but high-quality glue is never cheap.
The answer to the question of how to lay mosaic tiles correctly so that the result pleases the eye for a long time is simple: you need to follow a few simple rules and select high-quality consumables.
Installation technology
Laying should be done from below. First, apply glue to the primed and dried area. Level it using a notched trowel.
To fix a fragment of a mesh mosaic, take it in your hands and bring it to the area that has been treated with glue. We expose it in the condition as indicated in the diagram and carefully lean it against the mixture.
Using a flat spatula, smooth the area evenly.
Types of glue
Which mosaic glue to choose? It is important that the composition is resistant to moisture, has good adhesion, and dries quickly. Depending on the degree of transparency of the tile, the color of the solution is also relevant. If the base has slight differences, then attention is paid to elasticity, leveling ability and degree of shrinkage.
What to glue the mosaic onto? The main criterion for a material is the binder (base). So, there are 3 main types:
- cement (sold dry);
- dispersion (ready-made mosaic adhesive with the addition of acrylic);
- two-component adhesive or reactive (epoxy or polyurethane based, prepared before use).
The dry mixture is made on the basis of white or gray cement. The glue is diluted to the finished consistency using water or latex. If the tiles are laid on a static base (concrete, brick), then the mortar is brought to a thick state. For dynamic surfaces (with temperature fluctuations), a more elastic adhesive is recommended.
Dispersion adhesive for laying mosaics is sold in sealed plastic containers. The paste mixture is ready for use and hardens within 40 minutes. This composition is recommended for use for complex work regarding shapes (architectural structural elements) and adhesion (has high performance).
The reactive composition is waterproof. Therefore, it is used for cladding rooms with high humidity (in the bathroom or swimming pool). A smooth base made of metal, glass or plastic is allowed. This material is also suitable for gluing natural stone mosaics. Setting time is limited to approximately 3-5 minutes.
If you need to glue transparent glass tiles, you can use an epoxy or polymer compound. They are distinguished by an almost colorless base.
Types of mosaics
Today, mosaic is not only small-format tiles, but also a larger material with a corresponding relief. This also includes certain tile layouts and patterns on it. We will talk about all this in this article. Along the way, we will present you with interesting photographs with options for ready-made design solutions, so that you better understand the beauty and elegance of such finishing. We will also list the materials from which mosaics are made today.
Glass mosaic with metallized base
Expert opinion: Masalsky A.V.
Editor of the “construction” category on the Stroyday.ru portal. Specialist in engineering systems and drainage.
In general, the term mosaic refers to a type of applied art in which the resulting image is composed of small multi-colored parts. For these purposes, they use pieces of wood, fragments of ceramics and decorative glass, as well as small pebbles, which, if necessary, can be painted in different shades. Not all masters mastered this art, so handmade work has always been worth its weight in gold.
As we have already written, today manufacturers offer many solutions that help to significantly simplify the task.
Table 1. Varieties of mosaic masonry
| Types of mosaic masonry | Description |
| The classic version is a placer mosaic. They make it from any materials, which we will talk about in the next chapter. To simplify the set, today for such a mosaic you can purchase special stencils that are pre-mounted on the walls. Laying is mainly done using polymer, elastic adhesive compositions. |
| This option consists of small canvases of a certain format (usually 30*30 cm) made of fiberglass mesh, on top of which mosaic tiles are glued. A huge advantage of this arrangement is the high installation speed, comparable to laying conventional tiles. The seams between the elements are perfectly aligned, which allows you to create an even geometric pattern without moving the seams without unnecessary problems. Such a mosaic costs more than a loose mosaic, but the savings on the craftsman’s work more than justifies this difference. The standardized size of such a mosaic can also be considered a disadvantage, since it becomes difficult to join it in the corners of the room - special cutters are required, which we will show you a little later. Advice! If the size of the wall matches the size of the seam of such a canvas, then it can be shortened without any problems with a stationery knife. |
| This mosaic can also be loose or mounted on a fiberglass mesh. In the second case, you will need copious grouting after laying the material, and in the first, it is simply embedded in cement mortar. Such mosaics can be produced in different formats - geometric shapes, abstraction, imitation of leaves and petals, etc. This finish looks very beautiful and rich, but the master must be able to beautifully and accurately fill in the gaps between the elements, which, as you can see, are quite large. |
| A very convenient solution to use would be glazed ceramic or porcelain tiles, the front side of which has the appearance of a mosaic grid with the appropriate colors. Such tiles are laid in exactly the same way as the most ordinary ones. The only peculiarity that can be noted is the precise alignment of the tile joints so that their thickness matches the pattern. This solution also has disadvantages when compared with classic mosaics - it cannot be used for cladding curved planes and it is necessary to accurately select the color of the grout, which is sometimes very difficult to do. |
| The mosaic effect can also be achieved by arranging larger elements. Here is the most ordinary ceramic tile with glaze of different colors. The masonry is ordinary, but the chaotic alternation of colors gives the finished surfaces a special charm and expressiveness. A room with such decoration will not leave anyone indifferent; visitors will always be in a good mood. |
| A mosaic pattern can be made from elements of different shapes. The photo on the left shows a variant of volumetric masonry made of rounded parts on a mesh backing. |
| A tile can become a mosaic if a pattern of the appropriate format is applied to it. Here is a vivid example - the wall on the left looks like it is simply lined with small tiles, and on the right it has already turned out to be a real mosaic composition. |
| The shape of the tile will also influence the appropriate perception of the finish. The photo shows products from Italy - the tiles have the shape of scales, which allows you to create very beautiful and original compositions from them. Working with such material requires a certain amount of experience from the craftsman - it is difficult to cut and align rows. Due to its large size, it is also not suitable for curved planes. The material can have any other shape - we have given this one as an illustrative example. Hexagons, arabesques, triangles, rhombuses and other options look very nice. Sometimes a very interesting effect is achieved when an unusual tile shape is combined with a geometric pattern applied to it. |
| Some semblance of a mosaic effect can be achieved by varying the tile layout. Of course, you need to have at least small multi-colored accent spots on the surface, as shown in the photo on the left. In general, there are a lot of options, you will definitely find one that suits you. |
Mosaic materials
The appearance of the mosaic largely depends on the material from which it is made. This parameter affects both the price of the material and the complexity of its processing.
- The most inexpensive and unpretentious-looking mosaic is the option from the usual ceramics. It is ideal for finishing bathroom walls, as the glazed surface is non-hygroscopic. The surface of the material can have different designs - colors, texture, surface type. This solution is used very often when lining swimming pools, as it is convenient (tanks can have a round shape), safe and reliable. It is perfect for columns and semi-columns.
Ceramic mosaic - Incredibly beautiful glass mosaic. It costs much more than ceramic due to the increased complexity of processing the material. It is beneficial to use such elements as decoration, combining them with large-format tiles. Glass reflects light very beautifully and makes the room visually larger, especially when the panel has mirror inserts. This effect helps to hide surface unevenness, if any. There are a lot of options for making such a mosaic - interesting effects are achieved due to the base on which the glass is poured. The edges of the glass parts are rounded by grinding. The absence of sharp edges means safe operation.
Glass mosaic set - Smalt mosaic is a classic material for the work of professional artists. We can also use it in the interior in the form of small drawings to decorate surfaces. Smalt is also glass, but an unusual one. During the production process, the molten mass is brought to a certain temperature, after which it undergoes special treatment. This gives the structure of the material high strength, immunity to temperature changes and unique beauty - the material has a unique matte gloss while being opaque.
Smalt mosaic - There is another type of glass - Venetian, from which the mosaic is made. They definitely don’t use it for bathrooms because of its high cost - professional artists work with the material, and they make paintings, frescoes, panels, etc. from it.
Venetian mosaic - Materials made from natural stone. You get a unique pattern and unique strength. If installed correctly, such a mosaic will last for many decades. For the production of such mosaics, the following rocks are mainly used: tuff, jasper, marble, sandstone, mica, amber, etc. It is clear that the cost of the material will largely depend on the breed.
Natural stone mosaic - Also popular are options from artificial stone and porcelain stoneware. These materials have a wide range of colors, textures and shapes, which allows you to create unique interiors. They cost much less than their natural counterparts, but they don’t look much worse.
Fake diamond
Even wood can be used as a manufacturing material, but it is more often used for residential premises, for obvious reasons.
Building tools
Before work, be sure to make sure you have the following construction tools:
- A spatula, which should have two surfaces: smooth and ribbed
- Drill to stir glue
- Level
- Tile cutter
- Specially formulated adhesive for installing tiles
- Remote crosses
Using an electric tile cutter
This is the highest quality and most effective necessary method for cutting mosaic tiles. There will be no dust, and you won’t have to waste your energy on cutting, and the cut will be of high quality.
The use of this tool is especially relevant when the scope of work is huge, because in the construction market an electric tile cutter has a high cost. The minimum price for it is two hundred dollars.
Using a manual stationary tile cutter
This construction tool is great for cutting both ceramic and mosaic tiles. A manual stationary tile cutter can be used by both mosaicists and ordinary people in their work. First, you need to make markings on the tile, then cut along the markings away from you. Apply markings using a marker. Next, the mosaic or ceramic material must be placed on the base of the instrument. You need to hold the material with one hand, and the handle with the wheel with the other.
If your work is of medium volume, then a manual stationary tile cutter is perfect. The cost of tools in the construction market depends on the quality. Minimum price: $40. A high quality tile cutter will cost $300.