General characteristics of the bas-relief on the wall
Stone or wood carving, as an element of interior decoration, appeared many centuries ago. The protruding half-volume decor can depict any animate or inanimate object.
In the art of creating sculptures, there are two concepts: bas-relief and high relief. Their main difference is in the height of the figures. For example, if a fragment protrudes from the surface a little more than half of its volume, this is a high relief. In addition, the high relief elements are much higher, and some of them can be free-standing.
The bas-relief fits organically into the interior in any lighting (except very dim). High relief, on the contrary, requires only diffused light.
Advantages and disadvantages of bas-relief on the wall
Like other types of finishing work, the relief on the wall has its advantages and disadvantages. Among the special advantages is the ability to create images in almost any room. If all standards are observed in the process of drawing up and applying decorative ornaments, you can:
- Mask errors in the wall, including significant differences;
- You can create a whole panel and thereby occupy an empty wall;
- Visually zone the room;
- The ability to create unique compositions;
- Individual interior with special charm;
- If desired, the entire process can be carried out independently, without resorting to the services of a specialist.
Among the main disadvantages:
- Having some experience, creativity and at least basic skills as an artist;
- The process is labor-intensive, meticulous in drawing and performing the smallest details, which is why most often all work is entrusted to craftsmen. The cost of such work is quite high.
But still, if you have a lot of information with step-by-step instructions, you can create a high relief on the wall yourself. There would be desire and time.
Useful tips
If the sculptor plans to create large bas-relief details, then for additional stability it is better to use wire. The frame will also simplify the sculpting process. The top of the bas-relief can be coated with a layer of primer or water-based paint. For alabaster, such a coating will only add gloss, but for more fragile plaster or sensitive plaster it will provide additional protection. While working, it is better to use a professional set of stacks that will help you create even the smallest details.
Choose the bas-relief not only to the style, but also to the character of the room. Culinary themes are suitable for the kitchen: voluminous still lifes, flower arrangements or panoramas of ancient cities. Stylish images of natural elements will look organic in the bedroom: bouquets, trees, animals. In a children's room, with the help of relief, you can create a real fairy tale, and its scenes decorate the entire perimeter of the room.
Professional decorators recommend not using false walls, arches or furniture to zone small studios. Bas-reliefs are perfect for these purposes; in combination with color differentiation, without further ado, they will make it clear where the functional zones are divided.
Bas-reliefs are not very often used in design. It is much easier to cover a wall with photo wallpaper with the desired image. Many people are intimidated by the complexity of the process. If you have patience, you can find hidden talents in yourself and decorate every room of your apartment with three-dimensional paintings, making its design original and unique. To get inspired, you can study the magnificent sculptures decorating Moscow's Bolshoi Theater or the numerous houses on the streets of St. Petersburg.
The main types of materials from which the bas-relief is made
Initially, only stone or wood were used to create compositions. The modern choice of materials is much wider. Today's elements can be built by hand or by casting. For a bas-relief on the wall with your own hands, almost any material that can be cut or sculpted is suitable; it can be suitable for pouring into the appropriate form:
- Gypsum;
- Limestone;
- Clay;
- Polymer compounds;
- Stone;
- Tree;
- Decorative and other similar compositions.
To artificially add age to elements, patina is applied to them. To give additional volume, they are coated with bronze or gold plated. At the same time, the bas-relief looks harmonious with forged iron and stone. That’s why fireplaces are often decorated with such decor.
How to make alabaster mixture for bas-reliefs
If you are using silicone molds, you do not need to lubricate them with anything. But if you pour gypsum into a plastic bag, then you need to thoroughly lubricate it with sunflower oil.
We make the filling mixture like this:
- 2 parts plaster
- 1 part water
Pour the powder into the water gradually, stirring constantly, avoiding the formation of lumps.
There is no need to stir too intensively, there is no point, you will only oversaturate the substance with oxygen and the finished figurine may be covered with bubbles.
Then pour it into the chosen form, flush with its edge. And you rest for about a day.
In general, plaster sets much earlier. But the longer the figurine stays in shape, the stronger it will be and the chance of damaging it when removing it will be zero.
Main types of designs for bas-relief
The first images of the bas-relief had to contain a human figure in their composition. This attribute is currently optional. The thematic focus, as well as the number of panels, dimensions depend on the total area of the room.
These can be subject compositions that occupy an entire wall or only a small corner. Previously, it was assumed that relief three-dimensional images were relevant only for classical styles with their inherent soft lines and elaborate details. Several types of images are popular.
Nature (landscape)
This type of bas-relief is relevant not only for classics, art nouveau, modern, empire or rococo, but also for modern design trends. You can depict a small area of forest or think over a seascape. These include coral fields, schools of fish, algae, and the image of a newt.
Sakura
The bas-reliefs of sakura on the wall belong to the Japanese flavor, which can be complemented by images of dragons. A branch of cherry blossoms looks organically on the hallway and kitchen floors. The whole tree has a bright personality. The living room especially benefits from this composition.
Rose
The association with flowers is immediately evoked by the bas-reliefs of roses on the wall. There are a great many options for its use, as well as varieties of flowers. In a bedroom with a classic design, relief panels with lush tea roses would be appropriate, not forgetting to paint them in the appropriate color. A scattering of small little roses will suit any room. Having chosen the right shade, such an ornament looks good with materials such as stone or textured brick.
Vine
The vine ornament will emphasize the sophistication of the Italian style. It can be used to decorate columns or empty niches. A white vine looks good on painted walls, and vice versa, a colored vine will serve as an accent on a white surface.
Apple trees
A bas-relief tree on the wall is equally suitable for any room. However, given its size, you need to treat the hallway with special care. A volumetric bas-relief in this part of the house can visually reduce the already small area of the room.
And other possible options
The application of three-dimensional drawings on walls can have different themes. It all depends on the skills and practical experience of the master. The larger the panel with small details, the more complex and painstaking the work.
Backlight installation
Even if the bas-relief is painted in bright colors, without properly arranged lighting, the depth of the stroke is lost, the texture becomes inexpressive, and the volume disappears. The turned on light enlivens the panorama and highlights the protuberances in contrast.
Before starting to create the object, wiring is installed in the wall, designing the contact output in advance. The design of the lamp should not stand out or interrupt the theme of the sculpture. It is better if it is invisible in the general background or be in the same style as the relief.
Ideal interior design Source topsten.ru
Light directed from below creates the impression of large volume. Top – highlights the main parts. An LED strip hidden inside the relief softly illuminates all the details.
Bas-relief option in the bedroom Source modernplace.ru
Backlight examples:
- Chinese theme – square lanterns;
- Bas-relief in Arabic style - Moroccan lamp;
- Lilies - dotted bulbs in each cup;
- Floral ornament covering the entire wall - framed with LED strip around the perimeter.
Lighting that matches the theme will make the object even more elegant.
Fine work disguised as simplicity of execution Source decorstudia.com.ua
Necessary materials and tools for creating a bas-relief on the wall
To sculpt the walls in an apartment with your own hands, you will need specialized tools, which can be purchased at art stores or construction markets. Experts advise choosing a ball, or rather half of it, as a container for mixing the solution. By turning it inside out, you can save time scraping and cleaning up the previous batch and preparing the next batch. In addition, it is very convenient to collect the solution from such a container, since it has no corners.
Palette knives are special spatulas in the form of spatulas of different shapes. To create some bas-relief elements, for example, a vine, you will need convex and concave palette knives. They cost more, so craftsmen often replace them with ordinary spoons of different configurations and volumes (coffee, tea, dessert, tablespoons).
Plastic spoons are easy to use. A little heat will help give the handle holder the desired shape.
As a rule, an aluminum spoon serves as the main tool, and a plastic spoon serves as an auxiliary one. An artist's knife is used to create fine texture in the image. Its analogue can be a regular shoe knife.
A pastry syringe with attachments, as well as a medical syringe that helps create very fine lines. Additionally, you will need 2 flat brushes and 2 round brushes. Before each intake of the next portion of the mixture, instruments (except syringes) are first dipped in water.
Briefly about the main thing
Do-it-yourself bas-relief is not science fiction! All it takes is a little artistic flair and diligence. You will end up with an exquisite masterpiece that friends and relatives will be happy to appreciate.
Decorating the walls with bas-relief will make your home truly original and elegant. Aerobatics is the competent framing of the scenery with lighting.
The painting can be used to zone the space of a room. Decorate the headboard in the bedroom, come up with funny scenes in the nursery, and decorate the living room with floral patterns or lilies.
Construction stores offer tools and ready-made mixtures that make it easy to start sculpting.
Ratings 0
Preparatory work before creating a bas-relief on the wall
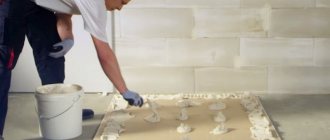
At the preliminary stage, it is important to prepare the surface for the process. The wall should be cleaned of the previous coating. Leaving a layer of putty, prime and let dry thoroughly. In order to give additional strength to the bas-reliefs, self-tapping screws are inserted two-thirds in thicker places. Flower petals and other similar parts are prepared from foam plastic (cardboard or salt dough) in advance, after which they are carefully treated with a primer.
Make the solution according to the included instructions. At this stage, it is very important to know the characteristics of a particular mixture. How long does it take for it to set, can dyes be added to it, and so on. If the bas-relief contains elements with a convexity of 10 millimeters or more, you need to make a wire frame (reinforcement). Ready-made molds are used to manufacture various elements. If they are not commercially available, you can make them yourself.
Designing a mobile form
To make a removable bas-relief form, take a wooden box with a plywood back wall. The size of the box matches the dimensions of the intended part. Plastic film or parchment paper is laid on the plywood. Make sure that there are no folds or wrinkles that will be imprinted on the finished product.
Heavenly motifs in plaster Source couo.ru
Option 1.
Vegetable oil is slightly thickened with grease and the substrate is lubricated. Place a piece of soft plasticine and form an object that should become a bas-relief.
Corner bas-relief – butterfly Source mr-build.ru
The plasticine blank is greased with oil and filled with a mixture of acrylic plaster. Leave for at least a day until completely hardened. Then they remove it and get a mold for filling.
Options for colored bas-relief Source modernplace.ru
Stages of creating a bas-relief on the wall with your own hands
Craftsmen advise beginners to use ready-made cast parts, which only need to be attached to the surface. You can also form a convex pattern using a template.
- A drawing is applied to the surface with a simple pencil. Without any special creative skills, you can use ready-made stencils, drawings applied to tracing paper, after which it is drawn on the surface with a marker. You can also outline the contours with a toothpick;
- After the mixture has set, it is necessary to apply the outline of the ornament. Only after this is the volume increased. The putty should be applied to individual areas. Each subsequent layer is applied only after the previous one has completely dried;
In some cases, it is necessary to create an in-depth image. It can be done in two ways:
- Add a background layer around the image. At the end the background is sanded.
- Make recesses corresponding to the image using a chisel or chisel.
- Covering the surface with ordinary transparent film, if necessary, draw details;
- After the finished relief image has dried, it is painted in the desired shades;
- Use sandpaper to remove unnecessary irregularities.
Preparing for work
The bas-reliefs are made by hand. Of course, on the market for cheap decorative elements you can buy ready-made plaster stampings, but this will not add uniqueness to the design. Before you start working on your first full-fledged composition, you need to train your hand. It is most convenient to practice on clay, plaster or plaster. The materials are plastic and allow you to correct mistakes before they dry completely. The canvas will be plywood with a low wood frame. In rare cases, you can create a composition directly on a section of the wall. This option is suitable only for those sculptors who are firmly confident in their abilities. They also create large-scale panoramas directly on the wall, which would be simply inconvenient to hang after production on separate canvases. You also need to make standard forms for repeating elements ahead of time to reduce the labor intensity of the process.
For example, it is much easier to produce each berry of a grapevine in molds. These elements are often made of gypsum, but alabaster is considered the optimal material. We'll talk about where to get molds a little later. Instead of a stencil, regular cling film will be used. First, it is placed on a hard surface and the outline of the individual elements is drawn. Then the stencil will be applied to the composition and the same outlines will be transferred to a still soft and pliable base. Now let’s begin a short, general master class on creating a bas-relief for interior decoration.
Features of creating bas-relief from different materials
Each material has its own processing characteristics. In interiors, plaster or wood is most often used.
Made of wood
To create a bas-relief from wood, in addition to the source material, you will need slightly other materials. Conical and end cutters. The first cutter is used for finishing the blade, the second - for rough work. For dimensional panels, high-precision equipment is used, including special programs.
From plaster
Gypsum is a very malleable material with good technical characteristics. Masters advise beginners to start with plaster. With the correct proportions, the solution is homogeneous with good adhesion.
Bas-relief technologies
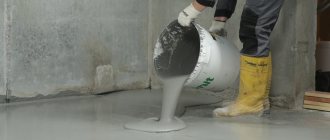
Creating a bas-relief on the walls in an apartment (or on plasterboard sheets, if the bas-relief is prefabricated) is carried out in stages as follows:
- The base surface is cleaned of old finishing, leveled with an accuracy of no worse than 2 mm/m, primed and covered with a base compound or any decorative plaster (see also below). GKL for prefabricated bas-relief does not require leveling;
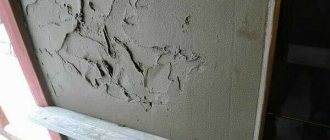
- The background texture is applied to the base coating: with a foam rubber or fleecy roller, by “slapping” with foam rubber or felt, etc. At the same stage, the base is tinted, see below. If the base coating is decorative plaster, texture creation and tinting are not required;
- In one way or another (from those indicated above and described below), the relief is formed. During the formation of the relief, tinting is possible similar to that for the base;
- If necessary, the relief is painted over the top when completely dry. It is convenient to do surface painting with special paints for gypsum stucco molding - they are immediately shaded into very subtle halftones with a damp sponge. Acrylic paints will give sharper color transitions;
- The completely dried relief is covered with styrene-butadiene latex (sold in construction stores). The colors on dried gypsum stucco fade, like on frescoes, and latex treatment restores their color;
- After 1-2 weeks, so that the excess latex is completely absorbed and evaporated, the finished relief is varnished with acrylic varnish as needed.
How to tint stucco?
From the video above it is clear that the stucco bas-relief needs to be formed in layers. To tint the base for the relief and, if necessary, its details, apply thin layers, 1-2 mm each. Typically, layers of thick, low-fat sour cream are applied with a brush and smoothed with a palette knife. The batch for each layer is tinted with a color (pigment) for plaster; the deeper, the darker, or vice versa. For example, for the bark of a tree they take a brown pigment of ever-decreasing concentration, and for leaves they add green pigment as they move outward. The next layer is applied to the set but still wet previous one. The texture with shades can be applied right there with a brush or then rubbed with zero-grit sandpaper or, coarsely over large areas, with a metal brush. For more information on tinting gypsum stucco, see the following video.
Video: how to cover a bas-relief on a wall
"Free" plastering
This method is used to create tall floral bas-reliefs or low patterned overlays from disposable paper napkins. From the latter, using an inverted plate or bowl greased with lanolin as a model, you can get a plaster vase, but its practical meaning is more than doubtful. The base solution described above is not used. It is durable, holds its shape well, but its color is not pure white. Also, tinting is not used due to excessive consumption of material; finished elements are painted.
For plastering, a liquid, almost watery solution of architectural plaster is prepared. A model (an artificial flower, a napkin) is dipped into it and placed on a board covered with plastic film. Flowers are placed in the position in which they will be in the finished composition, see fig. When the solution has set, dip it again, then again, until the model is plastered with a layer 1-1.5 mm thick.
Drying artificial flowers during the gypsum process
Flowers for drying are placed in the same position each time. In this way, flat areas are formed on them, allowing them to be firmly glued to the base. Glue with acrylic plaster of sour cream thickness or acrylic glue. You can also glue PVA.
Plastering on site
This is perhaps the most accessible way to make, say, a molded lampshade for a chandelier (see figure) without experience. Plastering the model in place differs from the previous method in that the model is first glued in place and then plastered with a brush. The plaster solution is made thicker, like sour cream. If the stucco is on the ceiling, the layers are applied very thin, translucent, so that there are no drips. Accordingly, up to 10-15 or more layers will be required.
Stucco lampshade for chandelier
The main problem here is the material of the model. They are usually made from polystyrene foam, polystyrene foam, polyurethane and other soft plastics. But over time they all decompose. This happens very slowly, but still, after 3-7 years, dirty gray or yellow-brown irremovable stains begin to appear on the stucco. Therefore, it is best to sculpt models for on-site plastering from salted dough, the same dough from which you make your own Christmas tree decorations. Salt dough is glued to plaster, stone and other mineral building materials with acrylic glue or any mounting glue. Stucco molding based on non-removable salt dough models retains its appearance for 30-50 years or more.
Reverse casting...
This is the most common way to create stucco with your own hands, allowing you to obtain results of a completely professional appearance and quality without excessive work and skill. The classic procedure for reverse casting from plaster is shown step by step on the left in the figure, pos. a-e. Model 1 made of plaster, plasticine, plastic, etc., or an exemplary product that it is desirable to repeat/replicate, is placed on a flat board 2. Now, in order to facilitate the removal of the mold with the model, the board is covered with film.
Reverse casting from plaster
Then the model is coated with a thin layer of lanolin. It is not advisable to use medical Vaseline; the model may stick to the mold. A plaster and any other porous (wooden, salt dough, stone, etc.) model is coated several times, allowing the lanolin to soak in for an hour or two, until a solid greasy sheen appears on the surface.
Next, the model is coated with a layer of gypsum or alabaster mortar of 3 dough thickness, approx. 1 cm, immediately forming protrusions-anchors 4 and stiffening ribs 5. The set and almost hardened, but still slightly pliable coating is tied with a frame made of soft (annealed) steel wire 6. The branches of the frame are fastened with ties 7 made of thin copper wire.
The next step is coating 9 with a thick cement-sand mortar from M150 in a layer up to 5 or more cm thick, this is already a casting mold. Here you need to remember to form the supporting surface of the mold 8. After a time of gaining 3/4 of the strength with cement-sand mortar (7-20 days, depending on external conditions), the finished mold 10 is separated from the shield using a wedge 11. Well, what if the shield was covered film, the mold is simply removed.
Finally, the inner surface of the mold is cleaned with a copper brush 12 and, if necessary, defects are corrected with gypsum or alabaster mortar. The burr is removed from the side of the mold 13 and, from its internal edge, a chamfer of approx. 0.7 mm. In a mold without a chamfer, the casting will almost certainly get stuck. Before casting, the inner surface of the mold is coated with lanolin, like a model. The mold is filled with the casting mass layer by layer. As soon as its penultimate layer begins to set, eyes with mustaches are inserted into it (upper right in the figure), by which the casting is then pulled out. For small ebbs, the eyes can be made from paper clips. The last layer is poured when the eyes are already firmly seated in the penultimate layer, i.e. when it is completely hard, but still slightly damp. It is unacceptable to test the firmness of the lugs by shaking them!
Currently for runs up to 15-20 pcs. in the old fashioned way they do not cast from plaster; the mold for such cases is cast from silicone (bottom right). Model prepared as before. case, pour silicone layer by layer, in layers 1-2 mm thick, until a mold thickness of approx. 1.5-2 cm. In addition to technological simplicity, the silicone mold allows you to produce castings with shallow recesses, because it is elastic and stretchable.
Mini gypsum reverse casting
Also, small rounded plaster parts are poured into silicone molds: berries (see figure), acorns, mushrooms, etc., even small fish. In this case, a flask tray is sculpted from plasticine, and the model is also sculpted from plasticine. The silicone is poured into the flask all at once; The flask and the model are not coated with anything. Once the silicone has hardened, the mold is simply torn off and the model is picked out. This is the so-called. mini – reverse casting of plaster.
...and not the other way around
In plaster mini-casting, a removable model is already used; I mean, the model disappears and needs to be made again for the next batch of castings. A silicone mold can also be made for plaster casting using a lost wax model, then from it it will be possible to obtain up to 100-200 or more castings, but convex ones, without depressions. In this case, the flask is made in the form of a box without a bottom made of plywood with a height 2-3 cm greater than the height of the model and a size such that the gap between the flask and the model is at least 1-1.5 cm.
The model is formed from wax on a board covered with film. Then they place the flask and cover the gap at the bottom with plasticine. Next, the model is doused with silicone in layers, as in the previous one. case, and when its last layer hardens, silicone is also added layer by layer along the contour until the mold is filled to the top. As soon as the last layer is poured, fill the plywood bottom. The model is melted with a household hairdryer: the lousiest silicone holds 140 degrees, which a hair dryer does not provide.
Modeling
Sculpting a bas-relief in place allows, as mentioned above, to achieve maximum artistic effect, but requires certain skills. You can purchase them without enrolling in an evening department at an art university or courses. Just practice with plasticine; The technique is the same, only when working with plaster the time is limited - work with the next section must be completed before it begins to set. Technically, plaster modeling is distinguished between low (flat) and high (round).
Flat
The technique of flat plaster modeling is shown in the selection of photos below. The rules here are like this. First, the material of thick dough or rich sour cream is applied in layers. Second, each layer is first smoothed, forming a relief at the same time, and then its contour is trimmed. The third, next layer, as in general in layer-by-layer filling with gypsum, is applied to the set but still wet previous one. Fourth, as the layers build up, they switch to smaller tools. And fifth, in each layer the work is carried out from the thinnest and smallest details to the thickest and roughest. In this case, from the leaf teeth to its petiole.
Low plaster casting
About branches
It is best to remove branches on bas-reliefs with a pastry syringe or, very thin ones, with a medical syringe. The thickness of the branches is adjusted by pressing harder and weaker on the piston (item 1 in the figure). In this case, the texture is applied with a brush, and the kinks are formed with the tip of a palette knife. The syringe is filled with the base solution, and for painting and for snow-white it is plaster, like a non-removable model in place.
Branches on bas-reliefs made of plaster
Strongly twisting branches (item 2) can be obtained by soaking a cord or twine in a gypsum solution of sour cream thickness, laying it on a board covered with film along the contour, and when dry, gluing it to the wall. If the bas-relief is prefabricated, lay out the cord immediately, it will dry firmly. To obtain branches of decreasing thickness, some of the strands are removed or, conversely, 3-5 branches of twine are twisted at the butt, then 2-3, then left alone. If the cord is visible through the plaster, the branch is gypsumed in place, applying the solution with a brush
Note: branches for bas-relief made of gypsum cord can be soaked several times in tinted mixtures. The desired color is obtained by grouting with sandpaper.
Sharp ribs
You've probably seen sharp ribs in pictures with bas-reliefs. They are formed by folding the thumb and forefinger, and the thumbs by folding the fingers of both palms bent back. The height and thickness of the rib is changed by smoothly moving/spreading the fingers (palms) in motion as the rib is formed. Fingers, as in general for hand sculpting, should be slightly damp.
Round
The basis of the round molding is a wire frame anatomically similar to the object, i.e. with the proportions of the object and the location of the branches where the main bones of the skeleton are. The frame in a round figure works in the same way as the skeleton of a living creature. Information about skeletons can be gleaned from any course on the plastic anatomy of humans, animals and birds. Plastic anatomy is a discipline not of medical, but of artistic education. The material there is presented from the point of view of how to sculpt, and not how to treat, and is designed for listeners who are not inclined to the subtleties and rigors of science.
The figure is approx. from 30-40 cm is molded onto the frame as shown in pos. 1 pic. For smaller figures, the frame is simplified (item 2), but respecting the principle of anatomical similarity. In humans, by the way, it is not so complicated: we divide height by 8; 1/8 of it will be the dimensional module of a harmonious human body, pos. 3.
Plaster molding on the frame
The frames of small animal figurines are made in a similar way (items 4a and 4b). It is advisable to reduce the weight of larger figures so that there is less fuss with securing the bas-relief (see below). In this case:
- The basic frame (pos. 5a) is made voluminous approximately along the contours of the body minus 1-3 cm for modeling, with the help of additional. branches from the same wire (pos. 5b). Auxiliary branches are attached to the main ones and fastened together by winding thin copper wire, or even better - by soldering.
- In a liquid plaster solution, like low-fat kefir, rolls of medical bandage are soaked, as for plaster casting broken limbs (see, for example, the film “The Diamond Arm”), and the frame is wrapped with a plaster bandage, pos. 5th century It is the rolls that need to be soaked: as soon as the bandage begins to peel off poorly from the skein, it means that the plaster has begun to harden and the rest of the roll goes to waste.
- Once the plaster frame has completely dried, it is covered in layers with a base solution (tinting can be used), the shape and texture are adjusted with tools and sandpaper, and it is plastered to pure white (if necessary) with a solution of architectural plaster.
Note: for frames of unfolded wings of birds, butterflies, elves, bats, ghouls, dragons, etc. It is convenient to use thin and fine metal mesh. Another option is branches of the main branches, covered with paper or scraps of nylon tights.
Attaching the finished bas-relief to the wall
If you use a ready-made bas-relief, it must be attached to the wall or to a sheet of drywall. The second option is applicable if you plan to make the bas-relief removable.
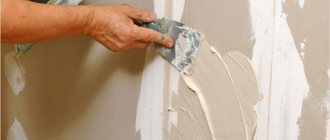
It is necessary to create a single conglomerate between the image and the base, removing any errors. To attach a separate picture, you will need a special tile adhesive. If the image is large, then it is fixed using self-tapping screws and nails. The finished panel should be sanded using sandpaper. After cleaning all seams and depressions, the surface is primed and painted with water-based paint.
Creating such decor is initially difficult. It requires skill, patience and perseverance. To ensure high-quality images, you need to strictly follow the application technology. Otherwise, the structure will not be able to dry completely and will soon collapse.
Use of material
Bas-relief compositions will go well with stone, forging, along with wood and other natural materials. They are often used in the decoration of fireplaces. If there is a clock in the hallway, then you can make modeling around it. In small rooms you should not make large panels.
Choose panels according to the size of the room
Tip The attention of guests will be attracted by the illuminated bas-relief. If the room is in a classic style, then using stucco molding you can fill the arch opening, the free space between the doorway and the ceiling.
It can be used in the kitchen. These can be cast parts of the decor in the form of shelves, these are antique-made designs for tableware. You can make windows that look out into another world, space. Stucco molding can be used in the dining area or on a kitchen apron.
If there is a plasma in the middle of the wall in the living room, then you can create this kind of relief decor around it. It can also be used in the bedroom, especially if there are forged objects and elements there. You can place a large panel above the head of the bed.
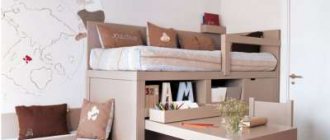
Placement above the head of the bed
With the help of bas-relief you can hide unevenness on the wall and turn imperfections into decorative elements . Also, engineering communications can be hidden behind the molding. On a bare wall you can create a complete picture, a landscape, which will flow into beautiful decorative plaster.