- We take measurements of the ring: outer diameter, wall thickness, height above ground level. Using the obtained dimensions, we assemble a frame of four boards, which we put on the ring. We drill holes in the boards, pass the ring itself through them and secure the frame to the ring with an anchor and nuts;
You can cover the well with wood yourself. A beautiful well on the site is always pleasing to the eye. Today, it has become fashionable to decorate a well with wood, decorate it with stone, and also build heads in different styles. I will tell you about the simplest and most affordable ways to equip your own source of drinking water.
The primary purpose of well houses is to protect water from various pollutants. To do this, it is better to build a tight-fitting lid. Open wells are recommended for technical use only.
This option for finishing the water intake shaft has certain advantages. These include high structural strength, which allows you to mount any protective decorative house on it. An important factor is the durability of natural stone, because its service life is almost immeasurable. In addition, the stone does not react to natural phenomena and climatic conditions.
All you need is a little preparation, and finishing a well with your own hands will not be difficult even for a novice craftsman. Any natural stone can be used as a decorative coating. Therefore, it is not at all necessary to buy it in a store, but you can assemble it yourself. When collecting stones, give preference to flat samples measuring from 7 to 12 centimeters. Finishing a well with stone with your own hands begins with preparing the necessary building and consumable materials:
- cement;
- special glue (PVA 10% can be used);
- fine mesh plaster mesh;
- sand;
- perforator;
- dowels 6*40;
- betocontact;
- a natural stone.
You need to start finishing the well with stone in dry, clear weather, at a temperature of at least 5 degrees above zero. In such weather conditions, less dust will settle on the prepared surface and stones, and the adhesion (coupling) of materials will be of better quality. Before starting work, the stone will need to be washed, and a similar procedure will need to be carried out with the well itself.
Wait until the stones and well shaft are completely dry. After all, the next step is the plaster, which will need to dry well. It is advisable to protect it from moisture, sun and dust. Polyethylene film is suitable for these purposes. The dried plastered surface will need to be covered with a layer of concrete contact. After waiting for it to dry, we attach the previously prepared plaster mesh using dowels and a hammer drill. Having fixed the mesh, we proceed to laying the stone. The solution for this is prepared from sand and cement in a ratio of 1: 3. For better adhesion, PVA glue can be added to the water. The solution should not dry out, so prepare it in small portions. The solution is applied to the flat side of the stone in a generous layer. Laying the stone should begin from the bottom up, taking breaks, they are needed so that the bottom row is fixed a little. Otherwise, the cladding may “float”. When laying stone, you can use a wooden or rubber mallet.
After finishing working with the stone, immediately remove the remaining mortar. To do this, you can use a narrow spatula or a special sponge; in extreme cases, put on rubber gloves and remove the solution with your finger. If this is not done immediately, it will dry out and be quite difficult to remove. As a final touch, a well decorated with stone can be varnished, giving the coating additional protection and shine.
Important! Before laying the stone, it must first be laid out on the ground. This way you can appreciate the beauty of the pattern being created and, if necessary, adjust it.
- For such work, you need to use only a concrete solution that does not react to the effects of weather or climatic phenomena.
- The solution is applied only to the surface of the structure in a small layer. If there is a very thick layer of concrete mortar, then there is an option for the stone to peel off from the surface.
Do-it-yourself finishing of a well at the dacha
To correctly determine the material for lining a well, you need to know what qualities it should have.
Anyone with basic construction skills can finish a well with their own hands. Most often, the cladding is brick, wood, natural or artificial stone, plaster and paint.
Brick
This material is used as a decorative finish or to form the correct geometric shape. If it is red silicate or ceramic brick, then the masonry under the jointing will become a decoration. If desired, it can be plastered. In order not to overload the structure, hollow bricks are used, and they can be laid flat or on an edge.
The advantage of this type of well finishing is its long service life (more than half a century). Disadvantage: heavy weight. This means that the masonry must rest on a rigid base, and a soft blind area will not be suitable for these purposes. Reinforced concrete is what you need, but when pouring it, you need to ensure that the plane under the brick is horizontal.
Tree
Finishing a well with clapboard is an inexpensive way to improve it. The main thing is that the wood is impregnated with a waterproofing compound. The type of wood also matters. The most common is aspen.
The impregnation must be antiseptic so that the wood fibers do not become food for parasites (insects, bacteria, fungus, mold). It is recommended to install a canopy to protect the wooden cladding from rain and scorching sun.
Stone
To cover it with cobblestones means to make the well eternal. This natural material takes centuries to deteriorate. Restriction - masonry cannot be laid on a soft blind area. Conventional masonry sand-cement mortar of grade M100 is used as a binder.
An alternative is to line the well with stone. This refers to a flat stone that is glued to concrete rings, like ceramic tiles on a wall.
Plastering and painting
These are inexpensive methods, but you need to choose the right materials. The plaster will be a cement-sand mortar or a ready-made composition that can withstand conditions of high humidity. The paint cannot be oil-based. It should be a penetrating exterior compound that will not fall off after seasonal temperature changes.
Applying plaster involves installing a reinforced mesh. It is attached to the brick or directly to the reinforced concrete ring with dowels. Plastering work is carried out in two stages:
- Rough plaster. The main thing is to fill the cavities by tying the reinforced mesh to the concrete.
- Finish plaster. The final stage is when you need to apply another layer and level it out.
The base surface must first be prepared. Otherwise, a cavity will form between the plaster layer and the ring (brick), into which water will enter. When ice freezes, it will expand in volume, causing the plaster to fall off.
Methods for finishing wells
Well construction
Do-it-yourself finishing of a well ring with stone.
Almost any modern well consists of three main elements:
- Top ring. Here, as a rule, there is a reinforced concrete product with a diameter (D) of 1000 mm and a height (H) of 890 mm, the wall thickness (B) is 80 mm. Let's assume that we have just such a ring;
Typical well ring KS10-9.
- Header. These are two beams located opposite each other along the ring diameter line. They support the canopy and the mechanism for lifting buckets of water. Most often, the head refers to everything above the ring. And this can be not just a shed, but also a house;
The side beams support the canopy and the lifting drum.
- Lifting mechanism. To make it more convenient to extract water from the bottom of the well, the head is equipped with a mechanism for lifting buckets. In most cases, this is a regular winch, by rotating which you wind the chain and lift the bucket suspended on it.
Gate for lifting buckets of water.
A lid is installed on the top ring to close the shaft. Otherwise, garbage, small animals and even curious children will fall into the water.
The photo shows the cover for the top ring.
Modern wells are often equipped with pumps. This not only increases the comfort of use, but also allows you to open the lid much less often, increasing the hygiene of the structure.
Surface pump for a shallow well.
A concrete or asphalt blind area is made around the well ring. It is enough that its width is 100 - 120 cm. The thickness of the concrete is about 10 - 15 cm using road reinforcement mesh.
An example of a concrete blind area.
For convenience, a bench is dug near the well. You can place buckets or other containers on it to collect water. Here it is important to correctly guess the height so that pouring is as convenient as possible.
If the head is a house, the bench is placed on the side where the door is located.
Decorative finishing can be done over each of the listed parts. As a result, the most inconspicuous well will turn into a pleasant place not only for collecting water, but also for relaxation.
Ring finishing
Decoration options with artificial stone and wood.
The appearance of the concrete ring is not attractive. This part just needs to be transformed. To do this, the following methods are most often used:
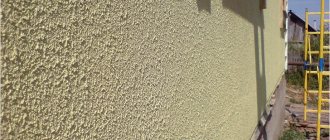
- Plaster . Both cement plaster for painting or whitewashing, and a decorative mixture are suitable. This is a quick and easy finishing method;
Plastered and whitewashed ring.
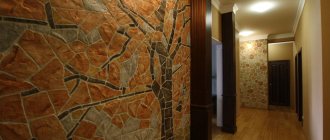
- A natural stone . Often the well ring is lined with large pebbles or sandstone. It looks impressive, but requires certain skills, and is not the best option for a beginner;
The stone looks great, but is not easy to place.
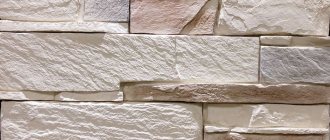
- Tile or artificial stone . A much simpler method than in the case of pebbles or sandstone. However, if you have never dealt with tiles, it will also be difficult to cover a cylindrical surface beautifully;
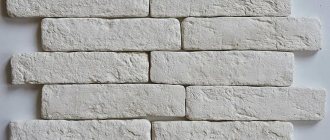
Cladding with artificial stone and tiles will also require skill.
- Tree . Many people build a structure in the form of a log house around a concrete ring. This greatly enhances the appearance of the well; wood is well suited for decoration.
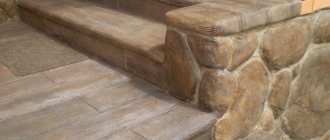
The cut around the ring creates a magnificent effect.
It is advisable to immediately decide on the idea of finishing the well. Here you need to take into account the level of your skill, since novice masters should not take on complex methods. I believe that for a beginner it is better to start with plaster.
Heading
The well of a real wizard when it comes to working with wood.
Finishing wells in the country or in the private sector is not limited to working on the upper ring. No less important is the head – the part that is located above.
Of course, I understand that not every professional can do this with their own hands. These photos are for example and inspiration. We will look at much simpler and more practical ways to finish the head.
You can go two ways:
- Make an open head in the form of a gable canopy on two beams, which will be dug in and additionally screwed to the ring with anchors;
The beams support not only the canopy, but also the gate.
- Make a structure in the form of a house over the well with a closing door. The house can be sheathed with wood or, if at the dacha, with plastic. This is more practical, as the wood deteriorates faster.
“House” covered with a blockhouse.
Making a “house” is much easier. It does not look as impressive, but it is more practical, since access to the well cover is limited. The price of the material will also be lower.
You can buy a finished product.
To make the head last longer, it is better to construct the frame for the house from a square steel pipe coated with anti-corrosion paint. The gate can be made from a log or a round pipe of a similar diameter, closed on the sides with plugs. Holes are made in the plugs in the center, into which the gate axle and handle are threaded.
Gate made of steel pipe.
It should be borne in mind that wells are characterized by high humidity and constant contact with water. Therefore, all parts should be treated with anti-corrosion coatings and impregnations as responsibly as possible.
Recommendations for finishing and video tutorials
Before lining the well, the surfaces need to be prepared.
To do this, all dirt and dust are removed. You can apply a primer. The main thing is that it is an antiseptic. Mold, mildew, and microorganisms will ruin not only the appearance of the well, but also the water if they get inside the shaft. It is better to think about how to line the well before the blind area is laid. Dismantling soft and pouring concrete will require additional costs. Those who veneer with wood should understand that within a few years the lining will have to be replaced. Paint doesn't last forever either. And lovers of sophistication should consider the option of lining with fresh flowers.
Everyone who has a garden plot wants to see it beautiful and well-groomed. Many people put a lot of effort and time into this, but the result is worth it. If there is a well on the territory, then it is always a source of pride for a good owner. To make it look attractive, it can be decorated with wood, siding or natural stone (read about various design options for a well here). The last option is the most preferable, as it has a number of advantages.
Interesting finishing ideas
In addition to classic cladding techniques (brick, stone, wood, painting), you can create an entire design structure using various styles:
Finishing a well in the Chalet style.
Chalet style
This design involves the use of stone. An inexpensive option is artificial stone with an imitation of the same type as finishing stone for a home. To complete the landscape, you can lay out a path from the house to the well.
Country style
This is the most common design, consisting of a shaft, a rotor and a canopy. It has the shape of a log house, can be laid out in the form of a rectangle or a five-, six- and octagon, with corners linked with or without a remainder. When lining a concrete well with wood, it is recommended to leave a gap between the finishing and the rings, which is subsequently filled with crushed stone, fine pebbles or expanded clay and serves as additional insulation. Additional decorative elements are suitable for this design:
- carved cornice and roof posts;
- shingle roofing;
- a tub with a metal hoop instead of a simple bucket.
Also, instead of the usual lifting mechanism, you can install a cart wheel.
Oriental style
The “Eastern” well will be an excellent completion of the landscape design for a summer cottage, decorated in the same style. An obligatory element of the structure is a pagoda made of a soft roof, with the ends of the corners raised upward.
In addition, the well must be equipped with a wooden bucket. And the carvings - in most cases this is the head of a dragon - are not only a decoration for the roof, but also ward off evil spirits, according to the teachings of Feng Shui. Well in oriental style.
All work on attaching decorative stone to any surface can be easily and quickly done with your own hands and for this you will need:
Why do you need a house?
A well containing a shaft is a structure under which a hole of a certain depth is dug. Usually she is not distinguished by external attractiveness. The houses must be built to create the necessary protection for the mine from dirt and debris.
When choosing a material for a well, you should pay attention to the following materials:
- Brick.
- Aerated concrete. Also, for the construction of a well house, you can use similar materials with similar properties.
- Foam blocks.
- Tree. This material is often used in the construction of well houses. When using wood, additional cladding of the house is not needed.
- Stone wells are very popular today. They are characterized by great durability and strength.
When choosing stone finishing, you should pay attention to the following materials: shell rock, quartzite and slate.
You can line the well with various materials:
- siding or plastic - this solution will make the house modern and original;
- artificial or natural stone - this finishing option is becoming more popular;
- Decorative plaster is an excellent solution when choosing a finishing material.
Finishing a well with stone is considered one of the most common in recent times.
Do-it-yourself indoor well house
An ordinary well may only have a canopy attached to support posts, but a shaft with a full-fledged house will become more than just a decoration for the site. It will help keep the water cool in the summer and prevent it from freezing in the winter.
The house can be purchased ready-made, or you can build it yourself - there are many ideas for finishing.
How to make a completely closed frame
In most cases, wood is used, but there are also budget options - for example, creating a frame from metal profiles with plastic sheathing.
To work you will need:
- galvanized metal profile;
- material for sheathing (lining or vinyl siding) and roofing (in this case it is corrugated sheeting);
- fasteners (bolts, screws);
- screwdriver, building level;
- hacksaw for metal;
- metal marker.
The assembly steps are as follows:
- The soil around the well ring should be leveled, fine crushed stone should be poured onto it to a layer height of 40-50 mm, thoroughly compacted and well watered - this will be the foundation of the house.
- From the guide profile, 2 frames of the same size are made - the “floor” and “ceiling” of the house. The frames are connected by support posts at the corners from the same profile; to strengthen the structure, you can add stiffeners, securing them diagonally. The finished structure should resemble a cube, the sides of which are fastened with additional profile posts.
- On the “ceiling” frame, the sidewalls of the guide profiles are trimmed and set at an angle to each other so that a triangle is formed, the “back” is not touched. The resulting gable triangles are connected by another profile, which will serve as the roof ridge. The height of the ridge is 200-300 mm more than human height, so that it is convenient to get water.
- On one of the roof slopes you need to leave a hole for access to water. Therefore, a frame under the door is additionally attached to the rafter system. The door itself can be made in the form of a hatch cover.
A well with a closed house.
After installing the finished frame on the well, you need to cover it with siding or PVC panels with imitation stone, brick or lining. And cover the roof with the door with corrugated sheeting and a backing made of plywood sheet. The door is mounted on hinges and a handle is screwed to it. The fastening points must be treated with an anti-corrosion compound.
Features and properties of the material
Stones, regardless of whether they are artificial or natural, have similar characteristics. However, it is worth considering that the mass of such products differs. Natural agglomerate is the heaviest. In addition, it costs much more than decorative stone.
Advantages of artificial slabs:
- The material is highly durable, which allows it to withstand various impacts and the weight of additional decorative elements (for example, forged products).
- The durability of the material ensures its serviceability for at least 10 years. An important role is played by the correct installation of the material.
- High moisture resistance. Natural stone has a surface that is not able to absorb moisture and change its appearance. When liquid gets on it, the material may darken a little, but after drying the original color returns. You can protect decorative stone using a special product.
- The material is easy to use. It does not require careful maintenance.
Artificial products can be made in tiled form, so you should not build house structures from them, because it will turn out to be quite fragile. Due to the external finishing, the building can be well insulated. To line a well with stone, you will need to know the specifics of the installation process.
Material selection
A variety of materials are used for cladding. The main requirement for them is to withstand temperature changes and be moisture resistant. Materials meet these requirements to varying degrees. Some require additional protection, others do without it.
For the lined well to fit harmoniously into the design of the site, it is important that the design of it and the house be in the same style. This concerns primarily the choice of materials. If the house is wooden, then the lining of the well should be the same. It is not always possible to fully comply with the requirement, but a striking contrast should not be allowed.
Tree
For cladding, different types of wood are used: logs after rounding, edged boards, slabs, beams. The highest quality material is logs, but well-treated boards and beams will last no less. The most moisture-resistant are larch, cedar, birch, oak, aspen. Nevertheless, these species and others are treated with preparations against rot and insects before installation. The advantage of wooden structures is that it is not necessary to repeat the configuration of a round well. You can make a square or polygonal cladding. It harmoniously combines with elements of wood carving, which gives the design an expressive Russian style.
A well lined with wood.
Stone
Stone finishing is a spectacular but expensive option. For cladding, granite, sandstone, and pebbles are used, laid on cement mortar. If there is wild stone in the area, you can collect cobblestones. The best material is flat, medium in size (10 cm). Properly laid walls around a well will last for decades, because the stone is not afraid of heat or cold, rain and snow. Installation may seem difficult for masons without experience, so it is better to hire a professional.
Plaster
A simple option with minimal financial costs. You will need sand and cement.
Concrete rings are plastered if the surface is of poor quality. After drying, finishing is carried out. This can be whitewashing, painting or decorative plaster. The disadvantage of this option is that it is not durable. After some time, defects will appear and you will have to update or redo them. An almost free method, the implementation of which will require used car or tractor tires. Tires with a larger diameter are difficult to find, so in most situations they are limited to a maximum size of 17″. This is enough for a well made of a narrow pipe.
Finishing the well with tires.
Ceramic tile
The original surface is created using ceramics. Mosaics are glued onto concrete rings; tiles can be used for rectangular wells. A variety of surfaces allows you to choose an acceptable option. The tiles can be smooth and corrugated, shiny and matte, with patterns, imitation of natural stone. It can decorate any surface.
Siding and plastic panels
Plastic materials are fixed to a frame made of metal profiles or wooden slats. Installation is simple, you just need to cut the material to size and connect it using the locks available at the ends. The elements are fastened to wooden sheathing with staples using a stapler, and to metal sheathing - with self-tapping screws. The option is inexpensive and installation takes little time. Installation with glue on a thoroughly leveled and primed surface is possible.
Lining
The lining looks good when finishing a well. Installation is no different from installing plastic panels. You will also need to build a frame and secure each element with screws. They are connected to each other by locks: the tenon is inserted into the groove. The correct technology requires that before installation the lining is treated with anti-rot and anti-beetle agents and is varnished. If the last operation is performed after installation, the locks will remain unprotected on the inside, which will soon begin to deteriorate.
About the carved house for a well in the following video:
A natural stone
Natural stone has long been used for finishing wells of any design. It can have any size and shape. For example, rubble stone is used to decorate the walls of a structure. There are also tile products, the installation of which on the surface is quite simple.
Selection tips:
- To install rubble stone, you need to make a base for it. It is built around the perimeter of the well at some distance from the pit. It is better to make the base at a distance of 30 cm from the well.
- The foundation is made of monolithic or columnar type. The choice is made in accordance with the characteristics of the soil.
Quite often, sandstone, granite and shell rock are used for the external decoration of a well. It is better to install such materials on a brick or concrete wall. They are made in the form of slabs. The surface of the walls must be thoroughly prepared before installation.
Options for finishing wells at the dacha: design ideas, house and do-it-yourself stone cladding
At a summer cottage, in addition to the main water supply, there must also be an autonomous one. A simple option is to install a well. However, such a building can also be turned into a decoration of the site - this requires a complete finishing of the well. A well, with proper finishing, can become a decoration of the site.
Material requirements
Since the well is located on the street, the finishing material must have the following properties:
- frost resistance - types of wood and stone must withstand temperature changes;
- wear resistance - the material must be resistant to mechanical damage;
- moisture resistance.
Types of finishing of a well in the country
Brick, wood, stone, plaster and painting are used as decoration. As a budget option, frame the well with flowers. In addition, it is necessary to take into account the type of construction - closed or open. Any well must have a blind area made of concrete or stone. Each type of finishing has its own nuances. Framing with flowers is used as a budget option for finishing a well.
Brick
Used for laying around the walls of the well. The advantage is that you can use any type of brick for cladding; white or red silicate is common. Ceramic brick cladding will last a long time, but its main drawback is its high cost. To increase the service life, the brick must be treated with moisture-resistant compounds to avoid destruction of the material, and the masonry itself must be additionally cemented and plastered. A well with brick finishing. The simplest masonry is rectangular, aesthetically pleasing a well with masonry of a round or polygonal shape will also look like. In this case, the coupling of subsequent rows should be performed with a slight offset relative to the previous ones.
Tree
This type of cladding is not inferior in strength to brick and has the following advantages:
- strength;
- ease of processing;
- aesthetics.
In addition, the walls can be made carved - the design will look more interesting. Before work, the wood must be treated with antiseptic and moisture-resistant compounds to prevent the material from being damaged by rot and harmful insects. It is recommended to install canopy roofs over the mines - they will protect the water from debris and precipitation and add completeness to the structure. The following are considered as finishing:
- rounded log;
- profiled timber;
- edged board;
- croaker
A well with wooden trim. Logs are considered the most expensive (but also the highest quality) material, but after good processing, both beams and boards will last as long as log trim. The choice of one or another lumber will depend on the design of the well - for example, a simple rectangular structure can be sheathed with boards, but to build a full-fledged house in the Russian style you will need a log. In some cases, cladding with either clapboard or siding may be suitable; For such cladding, a frame is installed on which the finishing material will be attached.
Stone
Finishing stone is far from a budget option, and this applies to both natural and artificial materials, but it is worth it: the appearance of the well will be impressive. For a house with stone cladding, it is also advisable to line the well with stone. A simple option is large pebbles, sandstone, even rubble stone or imitation, cobblestones of different sizes and shades.
Flowers
They decorate the building with flowers, hiding flaws. So, a budget option is to plant perennial plants weaving around the walls that will hide the concrete walls. At the foot of the well, flowerpots with annual primroses can be placed as a frame. Some summer residents install additional architectural elements: slides, a roof over the shaft, ledges on the walls of the well. Thin ropes are fixed near the roof along which plants are woven, stands are placed around the well - in the summer the structure will be buried in flowers. A well with stone trim. By pouring soil, sand or pebbles in uneven layers, you can build an alpine slide. However, do not forget about access to water.
Plastering and painting
These works are final: if the well is lined with brick or stone, the seams between the individual elements must be cemented, but if the well walls are lined with wood, it is recommended to varnish the finish. If the well is decorated with flowers, then the concrete rings are plastered and painted in the desired color. Plastering also has its own nuances:
- Cement mortar begins to be applied from the top row.
- To level the surface, beacons are installed on the entire row. After applying the solution, the beacons are moved to the lower stripes.
- After plastering, they begin painting using special paint mixtures for concrete.
When painting wooden surfaces, adhere to the following recommendations:
- Before applying paint, the wood is impregnated with an antiseptic.
- Then a wood primer is applied to set the paint to the surface.
- After the primer has dried, the walls are painted in the chosen color or varnished if it is necessary to preserve the natural color of the wooden cladding - for example, for well log houses.
Which material is better to choose
The appearance of the finished structure must be in harmony with the overall design of the architecture on the site. So, with a country house made of brick there should be a well with brick trim, and with a wooden one - with lining made of clapboard, edged boards or timber. You can even build something like a log house - the main thing is that the architecture of the finished well echoes the house. For houses made of brick with a stone foundation, the well is lined with cobblestones or artificial stone and can be additionally decorated with flowerpots.
Interesting finishing ideas
In addition to classic cladding techniques (brick, stone, wood, painting), you can create an entire design structure using various styles:
- chalet;
- rustic;
- Oriental.
Finishing a well in the Chalet style.
Chalet style
This design involves the use of stone. An inexpensive option is artificial stone with an imitation of the same type as finishing stone for a home. To complete the landscape, you can lay out a path from the house to the well.
Country style
This is the most common design, consisting of a shaft, a rotor and a canopy. It has the shape of a log house, can be laid out in the form of a rectangle or a five-, six- and octagon, with corners linked with or without a remainder. When lining a concrete well with wood, it is recommended to leave a gap between the finishing and the rings, which is subsequently filled with crushed stone, fine pebbles or expanded clay and serves as additional insulation. Additional decorative elements are suitable for this design:
- carved cornice and roof posts;
- shingle roofing;
- a tub with a metal hoop instead of a simple bucket.
Also, instead of the usual lifting mechanism, you can install a cart wheel.
Oriental style
The “Eastern” well will be an excellent completion of the landscape design for a summer cottage, decorated in the same style. An obligatory element of the structure is a pagoda made of a soft roof, with the ends of the corners raised upward. In addition, the well must be equipped with a wooden bucket. And the carved figures - in most cases this is the head of a dragon - are not only a decoration for the roof, but also ward off evil spirits, according to the teachings of Feng Shui. Oriental style well.
Do-it-yourself indoor well house
An ordinary well may only have a canopy attached to support posts, but a shaft with a full-fledged house will become more than just a decoration for the site. It will help keep the water cool in the summer and prevent it from freezing in the winter. The house can be purchased ready-made, or you can build it yourself - there are many ideas for finishing.
How to make a completely closed frame
In most cases, wood is used, but there are also budget options - for example, creating a frame from metal profiles with plastic sheathing. To work you will need:
- galvanized metal profile;
- material for sheathing (lining or vinyl siding) and roofing (in this case it is corrugated sheeting);
- fasteners (bolts, screws);
- screwdriver, building level;
- hacksaw for metal;
- metal marker.
The assembly steps are as follows:
- The soil around the well ring should be leveled, fine crushed stone should be poured onto it to a layer height of 40-50 mm, thoroughly compacted and well watered - this will be the foundation of the house.
- From the guide profile, 2 frames of the same size are made - the “floor” and “ceiling” of the house. The frames are connected by support posts at the corners from the same profile; to strengthen the structure, you can add stiffeners, securing them diagonally. The finished structure should resemble a cube, the sides of which are fastened with additional profile posts.
- On the “ceiling” frame, the sidewalls of the guide profiles are trimmed and set at an angle to each other so that a triangle is formed, the “back” is not touched. The resulting gable triangles are connected by another profile, which will serve as the roof ridge. The height of the ridge is 200-300 mm more than human height, so that it is convenient to get water.
- On one of the roof slopes you need to leave a hole for access to water. Therefore, a frame under the door is additionally attached to the rafter system. The door itself can be made in the form of a hatch cover.
A well with a closed house. After installing the finished frame on the well, you need to cover it with siding or PVC panels with imitation stone, brick or lining. And cover the roof with the door with corrugated sheeting and a backing made of plywood sheet. The door is mounted on hinges and a handle is screwed to it. The fastening points must be treated with an anti-corrosion compound.
Making a well ring with a stone with your own hands
You can only place a canopy over the well - it will protect the water from debris, branches and leaves. However, in addition to the head, it is necessary to somehow decorate the shaft itself. The simplest option is cladding with stone, medium-fraction pebbles and even cobblestones. For pebbles, it is enough to mix cement mortar; to support the cobblestones, additional reinforcement will be required using a mesh secured around the walls of the well. Before use, the finishing material is soaked in water. To prepare the solution, you will need store-bought tile adhesive and a dry mixture, after which you can begin tiling:
- The surface is cleared of dust.
- The solution is applied to a small area in a thin layer and finishing material is laid out on it, after which the seams are quickly rubbed until the solution is completely dry.
- After grouting, the solution is applied to the next area, and the entire procedure is repeated.
Work must be carried out with gloves. If large cobblestones are used for finishing, then the concrete rings are reinforced on the outside - they are wrapped in a metal mesh, onto which the solution is applied in a dense layer. For cobblestones, you should use a cement-sand mortar, which contains:
- a bag of cement brand M500;
- medium-grained sand;
- tile adhesive.
The solution is mixed in proportions 1:3:1/3 (cement, sand, glue) and applied to the surface of the ring. The technology for laying cobblestones is the same as for pebbles. But before applying the solution, the concrete surface also needs to be wetted for better adhesion to the cladding.
When finishing with wood, you need to remember that this material is sensitive to moisture. It will need to be either coated with protective compounds or painted, otherwise it will not last long. The structure in the spirit of a village well looks beautiful. It can be chopped, equipped with a brace - a crane.
Surface preparation
Before lining the well with natural stone, it is necessary to strengthen the structure. This is due to the large weight of the material. For this purpose, it is necessary to install a reinforcing mesh on the surface, which will allow the finishing slabs to be securely fixed.
Features of surface preparation:
- The reinforcement frame is installed using concrete mortar.
- The solution is applied in the same way as plaster is applied.
- During the work, a building level and a spatula are used.
The time after which the solution dries completely can be several days. After this, it is necessary to apply a primer and only then proceed with the installation of natural stone.
Laying
The work of lining a well with natural agglomerate is quite simple. The procedure has several features:
- For work, you can only use concrete mortar that is not exposed to climatic and weather factors.
- Concrete should be applied in a thin layer. If the mortar is laid out too thickly, there is a possibility of the tiles peeling off.
If you take into account these features of installing natural stone, you can line the well quite quickly.
Decorative stone for a well
This material is quite reminiscent of natural stone. It can have different shapes and sizes. Installation of decorative elements on the surface is much simpler than in the case of natural agglomerate. This is due to its low mass.
Subtleties of laying natural stone:
- The stones are attached to a flat, well-prepared surface.
- During work, you should follow certain instructions, according to which a number of actions are performed. Artificial stone is usually made from acrylic, gypsum, sand and synthetic materials.
Installation process
All work performed during the installation of natural stone is carried out using a specific set of materials. To begin installation, you should use the following kit:
- Adhesive composition for ceramics, used for exterior decoration.
- A level that ensures even installation of each part.
- A tile cutter that cuts artificial stone quickly and conveniently.
- A spatula that allows you to apply the solution to the surface.
The principles of installing artificial stone on a well house are very similar to installing natural agglomerate.
Additional finishing
Since the soil almost always remains moist along the entire perimeter of the well, a ground cover should be constructed. It can be done in 2 ways - pouring and pouring concrete. It is worth deciding in advance what the well will be covered with.
The choice should be made in favor of materials that cannot absorb moisture. It is better if they divert it effectively. Pebbles, crushed stone and gravel are most suitable for this purpose. Such stones may vary in color.
It is important to use stones when finishing the soil around the structure. This will not only remove moisture, but also make the appearance of the well more interesting.
Conclusion
The interior of any site consists of little things, and a well is far from a little thing.
Now you know ways to improve your well and how to do it efficiently. Watch the video in this article and don't forget to improve your source of drinking water. At a summer cottage, in addition to the main water supply, there must also be an autonomous one. A simple option is to install a well. However, such a building can be turned into a decoration of the site - for this you need a complete finishing of the well.
A well, if properly finished, can become a decoration for the site.
- high strength;
- dense structure;
- high resistance to various mechanical damages;
- presentable appearance;
- buildings made from a brick base can last a long time;
- The use of different colored materials will create a unique design for the product.
Advice from professionals
To line a well with stone with your own hands, you will need to know the procedure. The technology is quite simple, but when designing the design, certain rules must be followed. For example, you can use almost any natural stone. It is usually assembled with your own hands, but you can also buy it. It is better to choose flat stones that have dimensions from 8 to 12 cm. Such indicators will allow them to better adhere to the surface of the walls of the structure.
Cement for the mortar should be used grade M400. You will also need quarry sand for the solution. PVA glue must be added to the water with which the composition will be diluted. This will make the solution more durable and strong.
You should not lay out all the stones at once. The lower ones can float under heavy load. For this reason, no more than 15 stones should be laid at a time. After each installation, you must wait until the stones are fixed. This approach will result in an even and balanced finish.
In addition, it should be noted that the line solution must be removed without waiting for it to dry. This is due to the fact that it will be quite difficult to wipe it off afterwards. The seams should be rubbed down immediately. To do this, you can take a thick sponge or spatula.
After finishing the well, it should be treated with a special varnish. This will give the surface shine and a wet stone effect. Thanks to this design of the well, garden paths will look effective in the garden area.
Making a well ring with a stone with your own hands
You can only place a canopy over the well - it will protect the water from debris, branches and leaves. However, in addition to the head, it is necessary to somehow decorate the shaft itself. The simplest option is cladding with stone, medium-fraction pebbles and even cobblestones. For pebbles, it is enough to mix cement mortar; to support the cobblestones, additional reinforcement will be required using a mesh secured around the walls of the well. Before use, the finishing material is soaked in water.
To prepare the solution you will need store-bought tile adhesive and a dry mixture, after which you can begin tiling:
- The surface is cleared of dust.
- The solution is applied to a small area in a thin layer and finishing material is laid out on it, after which the seams are quickly rubbed until the solution is completely dry.
- After grouting, the solution is applied to the next area, and the entire procedure is repeated.
Work must be carried out with gloves. If large cobblestones are used for finishing, then the concrete rings are reinforced on the outside - they are wrapped in a metal mesh, onto which the solution is applied in a dense layer.
For cobblestones, you should use a cement-sand mortar, which includes:
- a bag of cement brand M500;
- medium-grained sand;
- tile adhesive.
The solution is mixed in proportions 1:3:1/3 (cement, sand, glue) and applied to the surface of the ring. The technology for laying cobblestones is the same as for pebbles. But before applying the solution, the concrete surface also needs to be wetted for better adhesion to the cladding.
Decorating a well with stone
There are several types of wells, but not all of them require finishing. Basically, finishing of a well is carried out if it is a shaft well. Here you need to initially build a house for him.