Workflow Features
Let's figure out what advantages milling drywall has over the classic version of the work, and also consider all the features of working with cutters.
Pros and cons of this option
Drywall milling has the following advantages:
- Saving time . The use of the technology we are considering reduces the time spent on the construction of boxes and corners by 2-3 times. Everything is done much faster and easier, in addition, the likelihood of damage to the material if all recommendations are followed is practically absent;
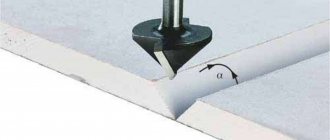
Making corner joints with a router is very easy
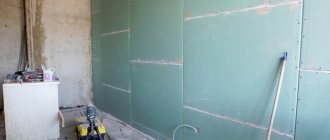
- Possibility of constructing boxes of any size and configuration . There are no restrictions on the complexity of the design, the main thing is to correctly understand the markings and make grooves in the required places;
It is better to train on designs of simple forms, and when you already have experience, you can move on to more complex options.
An experienced craftsman can make structures of very complex configurations without cutting the sheet into pieces
- The number of open ends is reduced . This makes the structure neater and greatly simplifies the work of puttying and finishing. In addition, you do not need to reinforce all bends with corners, which reduces the cost of the project and reduces the time spent on putty with metal elements;
- Possibility of creating structures without a frame . If there is no load on the box or corner protrusion, then you don’t have to reinforce such elements with a profile. They themselves will have good rigidity and will last for many years without deformation.
You can make blanks in advance if you need a lot of identical elements, this is very convenient
The only downside is that you will have to spend money on a cutter and router. But if you are doing renovations in your home, then it is easier to rent a power tool. The price of the service is low, so you will save significant money.
The working process
Let's figure out what you need for work:
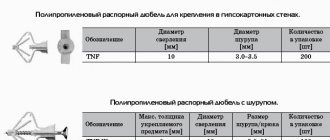
- A 90 degree drywall cutter is a special device that is used to make perfectly straight corner joints. The cost of equipment varies from 1000 to 4000 rubles. For household needs, the cheapest option is also suitable - even it will be enough for ten years of occasional use;
Drywall is a soft material, so the cutters practically do not wear out during use.
- Manual frezer . As I wrote above, if you are not involved in professional installation, then it is easier to rent a power tool. The work usually only takes a few days, so rental costs will be minimal. The main thing is to make sure that the shank of your cutter fits the equipment.
A manual milling cutter is a simple and convenient device for making grooves in plasterboard and gypsum boards
Instructions for doing the work yourself look like this:
| Illustration | Description of the stage |
| The strip is cut out . Its width should correspond to the distance from the edge of the router to the center of the cutter. This element is needed to transfer dimensions and precise location of equipment. You don't have to measure the offset; a ready-made pattern will help you do this quickly. | |
| The rule is set . To determine the exact offset of the stop element, use a previously made rail. This way you can set up the design accurately. | |
| The rule is followed by hand, the router is installed on the edge of the sheet . It is very important to hold the guide so that it does not move and you do not make a crooked cut. |
The cutter rotates clockwise, so during operation the router always pulls to the left. It is on the left side that the rule needs to be made.
Types of cutters for drywall and overview of manufacturers
Drywall is a building material that is very popular. With its help you can do any job: level a wall or make an interior partition. Often, with the help of plasterboard sheets, various arches or structures with increased complexity are formed.
When constructing such structures, there is often a need to minimize the number of joints between gypsum boards. To avoid careful adjustment of each such joint, its primer, reinforcement and putty, specialists are increasingly resorting to preliminary preparation of drywall - to its milling.
This process allows not only to accurately cut sheets of material, but also to create various holes in the gypsum board, as well as cut out grooves of complex geometry.
Features of the material
Drywall is a rectangular sheet of small thickness. It consists of a gypsum layer, which is covered on both sides with construction paper - cardboard. Due to the fact that the material is simple and easy to use, you can easily install it yourself - you just need to stock up on the necessary tools in advance.
Drywall does not contain harmful substances or chemicals, so it is absolutely safe for health. The product can serve for a long time, but only in those rooms where the humidity is not high, otherwise it will simply deteriorate.
Plasterboard sheets differ in color and size. Its thickness can be different: 8, 12.5, 16.5, etc. , and the color is gray or blue. But there are such types as GKLV (moisture-resistant plasterboard sheet), GKLO (material with increased fire resistance), GKLOV (fire-moisture resistant plasterboard).
Advantages and disadvantages
Milling drywall, like any other construction process, has its advantages:
- Saving time . The use of the technological process under consideration reduces the cost of working time during the construction of boxes and corners. Without exception, everything is done significantly quickly. In addition, there is no way to spoil the material if you follow all the tips.
- Reducing the number of open ends . This makes the structure neater and also greatly simplifies the work: there is no need for putty and sanding. Plus, you don't have to fix everything except the folds, which significantly reduces costs and saves time.
- Possibility of forming systems without constructing a frame . If the box or carbon protrusion is not a load, then you can avoid increasing the profile of similar components. They themselves have good hardness and will withstand many years without deformation.
The only downside of this method, perhaps, is that you will have to buy a milling machine to work. However, if you do repair work in your own home infrequently, it is easier to use a tool rented from a store or from friends.
Maintenance costs are low, so you save significant money.
Requirements
To form a groove you will need a special device - an electric router. It is not recommended to buy expensive professional equipment if the specialist is not interested in processing drywall regularly and needs it for individual needs. In this case, you can limit yourself to an economical view - the conditions for the router are not so demanding.
Conclusion
You learned how to make perfect corners in plasterboard structures yourself and spend a minimum of time on it. The video in this article will clearly show the workflow so that you understand it even better. If something is unclear to you, ask in the comments.
The most popular material for finishing rooms is plasterboard. It is used for the installation of curved structures, arranging gypsum plasterboard ceilings, leveling walls and erecting partitions. This material is so versatile that any structure can be built from it. The only inconvenience is adjusting the joints, which takes a lot of time. This is what V-shaped cutters for drywall of various sizes look like. But there is a tool that minimizes labor costs for fitting sheets - a drywall cutter. Thanks to this device, you can make even holes in the slab, or cut complex configurations with cuts.
Full contents of the material
Types of milling machines
This tool can be divided into 2 types:
Disk
This type of tool is intended for cutting gypsum boards along straight lines. Thanks to the disc, there are no chips or nicks on the cut, and the work happens quickly. But the Strong cutter is not suitable for products with complex structural shapes.
Shaped
This is the main tool for milling gypsum boards. Using a shaped tool, you can cut out complex geometric grooves or holes, which can be oval or round.
- V groove cutter for plasterboard expert, straight – for drilling holes at an angle of 90 degrees and forming grooves. With its help, you can drill holes of various complex shapes;
- T-shaped cutter - used in the same way as the first option, only the diameter of the holes can be the maximum possible;
- Edge cutter - to create a chamfer along the edge of a plasterboard board, the profile of this cutter can be different;
- U-shaped cutter, fillet. Used to create grooves with a semicircular bottom and holes of unusual configuration in drywall;
- The Festool 90 degree V-shaped plasterboard cutter cuts corner grooves between the sides of the cut, this is the configuration often used when installing plasterboard structures.
Return to contents
Applications of the festool V-shape cutter
When a person creates a box or partition from gypsum board sheets, the corners will be constructed from several elements, two or three. Drywall is attached to a metal profile, resulting in a right angle.
If you use a Festool V-shaped cutter when constructing the box, then it is not necessary to cut the sheet of drywall; it is enough to make a cut and glue its edges together while bending the sheet.
The result will be a structure without joints. This method has a number of advantages that are obvious:
This is what a festool V-shaped drywall cutter looks like
- Quick installation - assembly is much faster; the material does not need to be pre-cut and then joined.
- The number of joints becomes much smaller, thereby making the finishing process much easier and faster. As for the corners, in this case there is no need to make reinforcement and spend money on a perforated corner.
- If the structure of the plasterboard box is not load-bearing, then it can be installed without a frame made of profiles. It is worth noting that as soon as the adhesive on the joints dries, the corners will become very strong.
Thanks to this device, you can make structures of various shapes. To do this, you need to correctly mark the sheet of drywall and make cuts with a Festool cutter. If the work is expected to be large, then you can prepare all the corner structures at once, and then simply install them.
V-shaped cutter for drywall - the craftsmen's secret tool for getting perfectly straight corners
A 90 degree cutter for drywall allows you to greatly speed up and simplify the process of creating boxes and corner joints
When installing drywall, do the corner joints turn out crooked and unreliable? I'll tell you how to very quickly make perfectly even and strong corners. You don't have to putty them and reinforce them with corners - everything can be done much easier and faster.
The cutter has a specific profile and is sold in stores that sell accessories for power tools.
Working with a V-shaped cutter
The best result for milling will be work done on a special machine, but it is expensive and is used only on a large scale. In order to create corner parts from plasterboard using a Festul cutter, you will need:
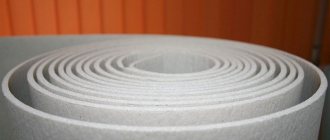
- waterproof plasterboard;
- table for cutting material;
- machine;
- cutters of different diameters;
- vacuum cleaner;
- clamps;
- rule;
- work clothes;
- respirator and gloves;
- priming;
- masking tape;
- hot melt adhesive.
Important! When working with a router, you need to remember that it is pulled to the left. Bosch drywall cutter, rotates clockwise.
Therefore, the stop should always be placed on the left side, the router will be pressed against it, and the work can be done with one hand.
The working process
The work itself on processing drywall can be divided into two stages:
Preparation
- A wide strip is cut from plywood - a measure, the width of which will be equal to the distance from the stop edge to the central part of the cutter, for ease of cutting.
- A rule is fixed to the edge of the table using clamps - this will be a stop for drywall when milling, you can fix a long level.
- The router must be adjusted according to the thickness of the gypsum board sheet, so that when cutting the sheet, the top layer of cardboard and gypsum layer are cut, while the cardboard underneath remains intact. A small amount of gypsum residue is allowed, approximately 0.4 mm.
Example of drywall milling - If there are a large number of small parts that need to be made from drywall, you can prepare special measurements for each cut; with them the work will progress faster.
Read also: Gas pressure reducer with pressure gauge
As soon as the preparatory work is completed, you can proceed directly to the formation of the cut.
Main works
- Calculate how many cuts are needed, on which side of the sheet and at what distance they will be from each other. This must be done very carefully, because if you make a mistake, the material will be damaged.
- If there are supposed to be joints between elements on the plane, then you should immediately remove the edge; after forming the cuts, this will be inconvenient.
- Draw the lines along which the milling will take place.
- Place the sheet on the table in a rule or level, and you need to attach a cutting measure to it, which was prepared in advance from plywood.
- Position the cutter against the left edge and run the cutter along the entire plane of the sheet.
- Make a reverse cut in the same place, so the cut will be clean, without jagged edges.
- If it is necessary to mill the sheet on both sides, then the material is carefully turned over so as not to tear the cardboard.
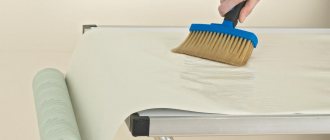
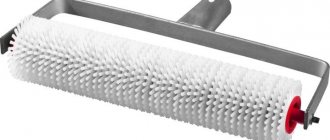
- Prime the plasterboard section; the brush should be semi-dry.
- Apply adhesive to the joints on both sides, give the structure the desired configuration, and check the corners.
The process of gluing plasterboard sheets - Use masking tape to secure the model in this position and let it dry.
Important! Only moisture-resistant drywall is milled, since it does not get wet when priming and has a more durable cardboard surface.
Pros and cons of this option
This process has several advantages:
- Boxes and corners are assembled several times faster when using this technology. It is almost impossible to spoil the material if you use the cutter correctly;
- Any design can be assembled using milling technology; there are practically no restrictions on complexity. You are required to correctly draw out the sheet and carefully assemble the structure; Options for calculating drywall sheets
- There is no need to carry out work on reinforcing the corners, which significantly reduces the time for finishing work and reduces the cost of repairs significantly;
- There is no need to waste time constructing the frame, since the box turns out to be quite stable and rigid. It will stand for many years without deformation, unless there is an external load on it.
Important! Do not start making complex structures without experience. Start practicing on small pieces of material. This method also has disadvantages. When installing corner elements from plasterboard, you will have to buy tools and accessories for them. If you need to make repairs in your apartment, then it is easier to contact a rental point for construction tools for drywall. The rental service is inexpensive, so you will save a lot! The video shows the process of milling and sealing gypsum plaster joints.
Peculiarities
The advantages of gypsum board milling include a number of features:
- Save time. The construction of boxes and other shapes using milling reduces the time spent several times compared to the frame method.
- Simplicity. This method is characterized by the simplicity of making figures, and strict adherence to the rules leads to an almost complete absence of defects.
- Flexibility. Among other positive qualities, this method allows you to give drywall almost any shape, thereby expanding the range of design solutions. Accuracy and precision are the only requirements when creating complex figures.
- Saving materials. Corner joints that are not expected to be subject to significant pressure may not need to be reinforced with metal corners. The default design has a sufficient margin of strength to last a long time without losing shape.
- Reducing the amount of work. Since during milling the corner of the room remains covered with a gypsum board sheet, it does not need to be finished with a corner for putty in order to cover the open end. In this way, a significant amount of building materials is saved.
Types of machines, cutters and areas of their application
There are two main types of routers: disc and shaped.
Disc router
A disk router is used to create straight grooves or to cut plasterboard sheets. The advantages of a disk router are the speed of work and the cleanliness of the cut. The plaster is cut very smoothly and without jagged edges. However, a disk router is not suitable for creating grooves of complex shapes.
Shaping router
The main milling of gypsum boards is carried out with a shaped router. It is used for cutting grooves of complex geometry, as well as round or oval holes. In principle, when using a router, the shape of the hole can be any. You can also make chamfers on plasterboard sheets using a router.
Drywall cutters come in different shapes and sizes, depending on what exactly needs to be done:
- The slot cutter is straight. Used for drilling grooves and holes located at right angles to the plane of the sheet. Can be used to create both pinholes and drill holes of complex shapes.
- T-shaped slot cutter. Used for drilling grooves and holes located at right angles to the plane of the sheet. Can be used to create both large-diameter pinholes and drill holes of complex shapes.
- Edge cutter. Allows you to make chamfers on the edge of a plasterboard sheet. May have a different profile.
- U-shaped fillet groove cutter. It is used for drilling grooves with a rounded bottom profile, as well as for drilling straight point holes and holes of complex geometry.
- V-shaped fillet groove cutter. Used for drilling triangular slots with an angle between cuts of 90°. This type of cutter is the main one in the manufacture of plasterboard structures.
Read also: Diameter of holes for screws in wood
Types and sizes of cutters for processing gypsum boards
Internal finishing of walls using the dry method in large volumes is carried out using a plasterboard cutter, which makes it possible to quickly and efficiently make mating sheets at 90 degrees without installing metal corners.
During the installation process, the drywall is bent along a V-shaped cut made on the back side of the material. A device in which the cutting element has a given diameter and angle of a cone formed by sharp edges helps to obtain a uniform sample along the entire length of the marking.
Time-tested equipment manufacturers (for example, Bosch, Strong) produce lines of specialized tools, which are equipped with cutters of various profiles for forming grooves and technological holes that have the required shape and standard diameter for electrical fittings.
For one-time work with soft material, they often choose the simplest equipment options, which can be purchased 4 times cheaper than professional equipment. After milling, they are faced with the fact that the unit is manufactured with large tolerances (transverse diameter, longitudinal axis), and the bend along the resulting groove is not ideal. It takes time to accurately set 90 degrees using putty or glue. The costs of Bosch products pay off in the speed and quality of the final result.
The cutting body drives the milling cutter, which performs operations in 2 main versions. They are determined by the positioning of the material and equipment:
- when working with your hands, the tool is held and moved, and the sheet lies on a flat plane,
- processing is carried out by moving a plasterboard blank relative to a rotating cutter (the equipment is fixed on a stationary frame).
If you choose trendy Strong type equipment, then it is advisable to purchase a set of cutters for it from the same manufacturer. Reliability of shank fixation determines high-quality continuous milling of the workpiece.
There are 2 types of units:
- Disk. Purpose – cutting sheets in a straight line. It is distinguished by a high speed of the process with a perfectly smooth edge.
- Shaped. High-quality cutting of curved shapes (ovals, circles, arches).
When processing with a rotating cutter, a lot of dust is produced, so it must be removed with a construction vacuum cleaner. The device is prudently equipped with a special pipe for collecting and removing contaminated air.
Milling cutters for gypsum plasterboard
The given groove profile is selected according to the contour of the rotation figure of the cutting edge of the interchangeable tool, unified for machine tools and almost impossible to do manually (knife, saw). Accuracy of edge processing is very important to obtain a minimum gap at the joints of several parts located in the same plane.
For each method, a different type of nozzle is selected. The main types of cutters change their diameter along the longitudinal axis and thereby form a specific groove profile.
There are groove (groove) and edge (chamfer) types. The following types are used for cutting grooves in drywall:
- straight (cut 90° to the sheet plane),
- T-shaped (large holes at right angles),
- fillet U - (semicircular grooves) and V-shaped (triangular cutout).
A professional finisher has a complete set for frequent use in specific situations when gypsum boards are milled. In most cases, the home craftsman makes do with a Bosch V-shaped nozzle.
The slotted V-shaped tool, depending on the thickness of the material, has a diameter of 12, 16, 24, 32 mm in the wide part of the cone. The shank is standardized with Ø 8 or 12 mm. Cutters of this type allow you to independently turn the gypsum board at right angles. The edges of the sheet groove are already exactly adjusted to each other and do not require additional processing operations.
When producing box-shaped forms, the device makes it possible to install the structure without installing an internal frame. The front paper covering of the slab is preserved intact, since complete cutting does not occur.
The V-shaped cutter gives the best results on a special machine, which is not always advisable to purchase for small volumes. Often rental services are provided by construction shopping centers and services, but at home you can easily get by with Strong hand tools.
Another advantage of a hand-held device is its mobility, allowing all cutting to be done directly on site. Visual inspection and adjustment of the angle of inclination is carried out simultaneously with your own hands.
Manual milling begins with the preparatory stage. Includes operations:
- Making a plywood guide for the cutter to move along the markings.
- Installing a stop (rule) on the cutting table.
- Adjustment to the thickness of the workpiece sheet so as not to cut through it.
- Applying precise markings to the paper coating of drywall. The defects cannot be corrected; new material will have to be used.
A triangular cutter allows you to make curved cuts that are inaccessible to a circular saw. You can prepare a curved template and use it to mill curved cladding parts. Before turning on the tool, the plasterboard rests securely against the rule. The mark on the part should not move during operation. The cutting head is moved along the marked line in the forward direction and then in the opposite direction to improve the quality of the sample.
If one workpiece has to be cut from 2 sides, then it is turned over very carefully so as not to bend a single plane. This disadvantage affects the installation dimensions when installing the finished product.
Possibility of using a V-shaped cutter
Creating partitions or boxes from plasterboard using the classical method assumes that the internal and external corners will be made up of two sheets. Accordingly, if, for example, you need to make a U-shaped box, then at least three separate pieces of gypsum board will be used, which will be attached to the metal profile at right angles to each other.
When making the same U-shaped box using a V-shaped cutter, only one piece of gypsum board will be required. By making only two cuts with a cutter, bending the sheet and gluing the sections, we get the same box, but without external joints.
The advantages of this method are obvious:
- Time costs. Milling drywall speeds up the cutting and assembly of structures significantly.
- The number of open cuts, fastening points and the number of required parts are reduced. This speeds up puttying and priming work. Reinforcement at external corners made in this way is not required at all.
- Boxes and structures bearing minor loads can be installed without a metal frame. After the adhesive layer has dried, the corners formed by milling themselves become quite strong.
- Using a V-shaped cutter, you can make structures of different profiles. To do this, you just need to correctly estimate the number of corners, evaluate which side each of the cuts is located on, make markings and cut the sheet. For large-scale work, you can prepare the required number of corner blanks in advance.
Drywall milling: process features
Milling drywall is one of the methods of changing the texture of the sheet in order to give it different shapes. This processing allows you to create various shaped structures without resorting to the use of frames. Thanks to milling, a plasterboard sheet can change shape, being bent at different angles, while there are practically no restrictions on the size and shape of the created figure. It is possible to apply various relief patterns to the surface of the sheet; in addition, the technique is easy to learn and economical both in terms of resources and time.
Working with a V-shaped cutter
The best quality milling can be achieved on a specialized milling machine. But this solution is quite expensive and is appropriate only for industrial scale work.
To mill drywall and create profile parts from it on the scale of a repair team or independently, you will need:
- Drywall (better if it is waterproof).
- Cutting table.
- Fraser.
- Milling cutters.
- Industrial vacuum cleaner with cyclone filter.
- Rule.
- Clamps.
- Protective equipment (gloves, respirator).
- Masking tape.
- Primer and brush for it.
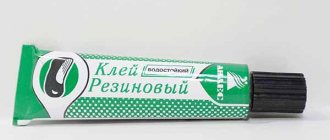
- Adhesive: polyurethane foam; PVA; "Uniflot"; hot glue, etc.
Work on milling and forming parts can be divided into preparatory and main ones.
Preparatory work
- For the convenience of further marking, cut a measure from plywood with a width equal to the distance from the center of the cutter to the stop edge of the router.
- Using clamps, secure a rule or level to the assembly table for use as a stop when milling.
- Adjust the router so that the cutter cuts through the entire thickness of the drywall sheet, but does not touch the bottom layer of cardboard. A residual layer of gypsum no more than a quarter of a millimeter thick is allowed.
- If you need to make a large number of parts of the same type, then it also makes sense to cut out measurements from plywood for each of the seams.
Main works
- Calculate the required number of seams, the distance between them and their location on the sheet.
- Saw off a piece of the required size from the gypsum board.
- Using an edge cutter, chamfer the edges at the plane joints in advance.
- Mark the routing lines.
- Mark the edge stop lines of the router.
- Place a sheet of drywall against the rule.
- Attach a cut measurement to the rule.
- Press the edge of the router against the measurement with the left side.
Note! In conditions of free movement, the router moves to the left, so the stop should be located on this side.
- Make the first cut along the entire height.
- Make a second cut along the same groove in the opposite direction - this is done to ensure a clean cut.
- Cut all the grooves on the side of the sheet to be processed.
- If the geometry of the part being manufactured requires milling drywall on both sides, then carefully turn the sheet over and repeat the work.
- Dust with primer using a semi-dry brush.
- Apply adhesive to the joints on one side.
- Place the part so that the joints are vertical.
- Apply adhesive to the joints of the second side.
- Give the part the desired shape, check the geometry of the corners.
- Secure the structure in this position with masking tape until completely dry.
Milling gypsum plasterboard is a very convenient and profitable solution when creating plasterboard structures. This technology, although it requires more expensive equipment, allows you to perform work more accurately and faster than conventional methods of working with plasterboard.
Features of the material
Drywall is a rectangular sheet of small thickness. It consists of a gypsum layer, which is covered on both sides with construction paper - cardboard. Due to the fact that the material is simple and easy to use, you can easily install it yourself - you just need to stock up on the necessary tools in advance.
Drywall does not contain harmful substances or chemicals, so it is absolutely safe for health. The product can serve for a long time, but only in those rooms where the humidity is not high, otherwise it will simply deteriorate.