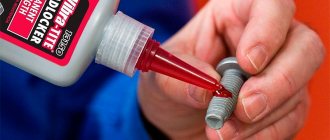
One of the options for installing laminate flooring involves using laminate adhesive for installation. In this case, it is important to glue the locks and joints, which will give the assembly a special degree of strength, and most importantly, rigidity.
The installation conditions of the lamellas are not always so ideal that the floor covering from the lamellas selected for the lock can remain in its original form for a long time.
But most often the lamellas make microscopic movements, and therefore laying the laminate on an adhesive composition remains the only method for reliably fixing the coating from destruction and movement.
Choosing the composition for the laminate base
The modern market offers a fairly wide selection of gluing compositions.
When choosing them, it is very important to take into account the fact that for laminates you can only use special glue for working with this material. It must be adapted for laminate laying work
Only with its use can you achieve soft connections and clean joints.
When choosing a suitable composition, you should pay attention to an adhesive with high levels of moisture protection, a high level of viscosity, environmental friendliness and adhesion. It is also advisable to choose durable compounds that are easy to use and maintain.
Resin-based adhesive protects well from moisture, ensures the strength of the connection between elements, and survives cleaning well with household chemicals, while maintaining its properties.
The two-component adhesive is characterized by the highest levels of strength and adhesion. Its main advantage is that there is no need to prime the surface or otherwise prepare it. This will significantly reduce the time and money spent on installation.
One-component transparent adhesive has a high level of ductility, elasticity and strength. It is environmentally friendly and does not cause allergies. Its composition is completely free of water, which makes it an optimal option for multi-apartment buildings.
Of course, you should choose only those formulations that were created by well-known manufacturers. They work in different price categories, so every consumer can find laminate adhesive to suit their pocket. Let's look at the best options than installing laminate flooring with glue to the floor:
AXTON
This adhesive composition is a market leader and is produced in Poland. Under this brand we produce high quality products. The adhesive composition is practically unaffected by water, household appliances and temperature changes. The fastening properties are maintained under virtually any conditions, and the adhesive itself is suitable for any type of laminate.
TYTAN PROFESSIONAL
Another adhesive from a Polish manufacturer that specializes in the production of compositions for laminate flooring. The technologies developed by the manufacturer are almost perfect, which helped to achieve high elasticity properties, and if excess drops of glue get on the surface of the laminate, they can be removed without any difficulty or negative consequences. To apply glue to the lamella, simply dry and degrease it. After this, you can begin installation.
Kiesel Bakit PU-P
This is a German brand that can fix even floating flooring. Maximum strength comes after 72 hours. The composition of the glue is completely safe and environmentally friendly, due to the complete absence of toxic substances. The price of this glue depends on its consistency. It also determines the consumption of the substance.
Expert advice
Before using laminate adhesive, you should carefully consider the need to secure the laminate locks using this method.
Work using glue should be carried out at a temperature of at least +15°C.
In addition, experts recommend paying attention to:
- glue quality;
- quality of locking connections;
- the technology of applying glue (spot or continuous method) must be studied according to the instructions.
When laying lamellas, it is recommended to lay them parallel to the light source to prevent illumination of the joints.
Experts do not always recommend using glue when laying laminate flooring. The material itself provides for a locking connection of elements that are quite firmly connected without glue . However, if there is a high load or the room is subject to high humidity, then it is better to use glue.
Instructions for use
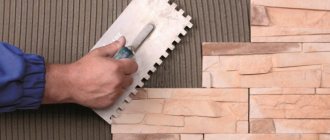
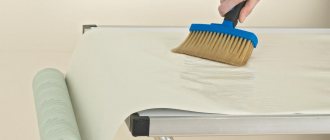
The vertical surface on which the panels will be glued must be well cleaned of dust, dirt, loose plaster, etc. The cleaned surface does not need to be leveled until smooth - for better adhesion it should be porous or rough.
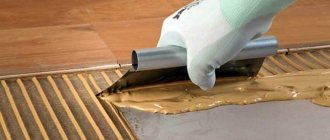
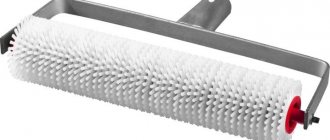
The adhesive can be applied to one or both surfaces. Spot application is acceptable - it is the most economical, but less durable. The method of finishing the wall with a snake or mesh increases the consumption of glue, but increases the strength of the installation. It is best to use a special gun to apply glue.
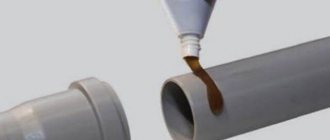
In order to glue the cladding using liquid nails, after applying the composition it is necessary to apply the panel to be glued to the surface and press with the maximum possible force. In this position, the panel must be fixed for 2-5 minutes.
Then the pressure can be released and the panel fixed using available means. It takes 10 to 40 minutes for the glue to set. However, the final completion of installation is the time for the adhesive to completely dry, which can take up to 72 hours.
During installation it may be necessary to remove the adhesive. For freshly applied acrylic composition, the solvent is water. For neoprene liquid nails, mineral solvents for synthetic rubbers should be used.
You can try to remove the dried layer of glue using contrasting temperatures - for example, alternating exposure to an industrial hair dryer and ice. By heating the old glue and then cooling it with ice, you can quite easily pick up the hardened compound with a spatula and separate it from the surface.
Some useful tips before gluing:
- Liquid nails should be stored in a dry, cool place, avoiding damage to the packaging.
- The layer of applied glue should not be too thick - this reduces the strength of the connection.
- Do not glue wet surfaces - water interferes with normal adhesion.
- To minimize the contact of glue on surrounding surfaces, they should be covered with masking tape.
Brands of liquid nails
The most famous brands are:
- Moment Installation transparent super strong MVP-70. Withstands a pull-out force of 24 kg/sq.cm. After drying, the adhesive seam is invisible. Virtually odorless. Non-toxic. Setting time – 15 minutes, complete drying – 48 hours. Country of origin: Russia.
- Tytan Professional Hydro Fix has excellent adhesion and does not turn yellow over time. Its advantages are high moisture resistance and heat resistance (up to 60 degrees). Setting time is 30-40 minutes. Manufacturer Poland.
- Point 98 instant all-season is suitable for both indoor and outdoor use. The adhesive is made on the basis of synthetic rubber and has a wide range of operating temperatures (from -20 to +60). Setting time is 5-7 minutes. The glue has the highest seam strength - 42 kg/sq.cm. Manufacturer Poland.
Thus, laying liquid nails with glue is a simple, fast and reliable way to attach laminate flooring to walls.
It is only important to follow a few simple safety rules and adhere to simple technological requirements in order to get a completely decent result.
And here you can read about laying laminate flooring with glue to the floor.
What glue to use for laminate flooring, types and composition of adhesive mixtures for laminate flooring
When asked whether glue is needed for laminate flooring, the answers are mixed. However, you need to know that the adhesive method of laying laminate provides a stronger connection and additional protection of the joints of laminated panels from moisture penetration and other aggressive influences. However, before deciding how to glue laminate flooring, you need to have an idea about the properties of adhesive compositions and the features of their use.
Based on its composition, laminate adhesives are divided into several types. This:
- Water-dispersed adhesive mixtures.
- Adhesive compositions based on synthetic resins.
- Two-component polyurethane adhesives.
- One-component polymer-based adhesives.
When laying laminate flooring with glue, it is strictly forbidden to use water-based adhesive mixtures (PVA and other similar adhesives), as this can lead to damage to the panels and failure of the tightness of the joints.
Which adhesive is suitable for laminate, depending on operating conditions and other requirements for the floor covering, can be determined by finding out the characteristics and properties of various types of adhesive compositions.
Water-dispersed adhesive mixtures for laminate flooring
In the event that the installation of the laminate will be carried out using your own resources and means, these universal mixtures are best suited. Water-dispersed laminate adhesive is designed for installation in a “floating” way - gluing panels together without gluing them to the base of the floor. The cost of such adhesive mixtures depends on the additives that are used in the adhesive production process, as well as on the manufacturer.
Additives to the water-dispersion adhesive may include:
- Water repellent additives.
- Coloring pigments.
- Polyvinyl acetates.
- Polyvinyl acetates.
Installation work using water-dispersed adhesive mixtures is recommended to be carried out in conditions of average humidity at a temperature not lower than 15°C.
Adhesives based on synthetic resins
The use of synthetic resin-based compounds for laminate installation guarantees the floor covering's resistance to moisture, its strength and durability. Such adhesive mixtures are not recommended for use when laying floors made of laminated panels up to 14 mm thick. Most often, adhesives based on synthetic resins are used for additional processing of joints and to ensure the integrity of the floor covering.
Two-component polyurethane adhesives
When laying laminate using the adhesive method, two-component polyurethane waterproof adhesive mixtures are ideal. Two-component laminate adhesive does not require pre-treatment of the ends of the panels, as well as their primer before installation, and in addition, it guarantees excellent adhesion and hardens quickly. Cross-linked polyvinyl acetate is used as a binding element in such adhesive mixtures, which ensures the strength of the connection and the durability of the floor covering.
One-component polymer-based adhesives
Polymer one-component laminate adhesive does not contain water or solvents. The conditions for using this adhesive require a strong, level and dry base.
One-component polymer-based adhesives harden very quickly, so excess should be removed immediately after laying each subsequent panel.
Functions and methods of using glue
The use of glue allows you to install the laminate hermetically.
You should start with the fact that the adhesive composition serves to protect the seams and joints. In addition, the flooring will be more aesthetically pleasing in appearance. Even when laying expensive types of laminate, complete sealing cannot be achieved, therefore the service life of the coating is reduced. In this case, the adhesive composition comes to the rescue.
Laminate is a floating floor covering, and its parts are mounted not on the subfloor, but on a special substrate, after which the planks are connected to each other. The end of each plank is attached to the end of the other plank. During the installation of the covering, it is important to shift each new row by half, which allows you to achieve structural strength and reliability of the entire floor.
But if an adhesive composition is used, the laminate will be a monolithic structure. To apply the adhesive, the following application methods can be used:
- on the connections of the planks;
- on the base of the coating.
Recently, it has become common to use only the connection of joints, and not the entire structure.
This method is popularly called “sealing seams,” which allows you to significantly strengthen the entire floor in just 3-4 hours of work.
During installation work, short breaks should be taken. In other words, after laying three rows, you need to evaluate the work done and, when the glue dries a little, you should continue installing the laminated covering.
Application technology
You should start working with adhesives after reading the instructions for use, as they may contain information about preparing the surface before using the adhesive, how to remove excess and other useful information.
The technology for working with glue is as follows:
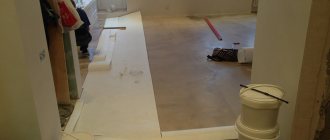
- the base is prepared: it should not have horizontal deviations of more than two millimeters per square meter, the substrate is laid;
- the first laminate panel is prepared: if the coating has a straight horizontal laying, then there is no need to trim the panel;
- the first row of slats starts from the first row. In this case, the compensation gap is maintained. The groove at the end of the first panel is covered with glue in the amount specified in the instructions;
- the locking element of the second panel is inserted into the groove of the first, pressed and hammered with a mallet or a block (but not a metal hammer);
- the elements of the first row are sequentially glued together in a similar way;
- squeezed out glue when pressed must be removed in the manner specified in the instructions;
- when laying the second row, you should file the panel so that the seams are offset by at least 20 centimeters;
- the next row of laminate is laid in the same way: the groove of the first locking connection is covered with glue, the locking element is inserted into the first panel, pressed, tapped, then all the slabs of the row are glued together in sequence, excess glue is removed.
Gluing the laminate to the floor (substrate), walls or side elements is unacceptable, since the wood structure of the coating implies its expansion or contraction during operation due to changes in humidity or temperature in the room.
Laminate initially provides technology for laying moving surfaces.
In this way, the entire laminate is assembled around the perimeter of the room. The glue takes at least 24 hours to dry, so you can’t walk and put furniture on the assembled covering right away. The coating can be used optimally after one and a half days.
Why is it needed?
Despite the fact that the laminate is laid using floating floor technology, the fastening of the locking elements can be secured using glue. This method of laying increases the wear resistance of the coating and also prevents the divergence of the laminate joints.
In addition, sealing the seams prevents moisture from penetrating into the coating..
Glue is also used when laying laminate flooring if the laminated panels are not equipped with locking fasteners and require the use of adhesives.
Laying laminate
Having chosen what to glue the laminate with, it is necessary to carry out additional preparatory work on its installation.
To do this, you first need to buy the glue itself and read the instructions for its exact dosage.
One of the best methods is to apply the product evenly over the entire area of the groove that will be joined.
The last layer is mounted with a crowbar foot
Next, you can begin installation work:
- A gap is made across the entire area of the room and the covering is laid. The first panel to be laid should be laid with the groove facing the wall. Next, an adhesive product is applied to the surface of the groove.
- The next laminate board is inserted into the groove and hammered through a block of wood. Often there is adhesive left on the laminate; it should be removed immediately with a cloth slightly moistened with water.
- By analogy, the entire first row is mounted. When it is laid, you can start working with the second row. To do this, a whole laminate board is cut into two equal parts, this will allow the position of the boards to be shifted in a checkerboard pattern.
- Again, glue for joints and seams is applied to the side of the cut board, and the surface is attached to the first row.
- Glue is applied to the next part in the side grooves and the end, after which it is attached to the first row and the installed part of the second row. For reliability, it is hammered through a block. Excess composition is removed.
- When the third row is laid, you need to pause for a couple of hours so that the glue can dry and set.
- The last row in the room should be placed using a crowbar foot. This will allow you to quickly and efficiently connect the rows. The main thing is to be very careful and not damage either the laminate or the wall.
From the description it is clear that no special equipment is needed to lay the laminate, and the process itself is quite easy. For more information about using glue when installing laminate flooring, watch this video:
Tips for choosing glue
How to glue laminate and how to choose the right material? It is important to take into account the basic criteria by which all such compositions are produced. They must be resistant to moisture, otherwise gluing will not make sense
The glue must also provide excellent adhesion to the substrate. Below are other rules for choosing a product.
Base for laminate
You can glue the laminate board to concrete (screed), plywood, OSB. Depending on the type of substrate chosen, you should look for an adhesive composition. It must be suitable for the base material, providing sufficiently strong adhesion.
Purpose of the premises
The load on the floor must be taken into account when selecting glue. If laminate is installed at home, the loads are moderate, but in shopping centers, stores, and office spaces, the special hardness and strength of the adhesive is important.
Conditions of use
In addition to the load, it is necessary to provide for the frequency of contact with water. Sealing of joints and the ability to withstand certain operating conditions are also written in the instructions for the glue. These characteristics should not be neglected.
Temperature resistance
Typically, laminate is used only inside heated rooms; it is not used at subzero temperatures. Therefore, temperature fluctuations are taken into account mainly when installing heated floors. But the use of the adhesive method for heated floors is seriously limited and is almost never practiced; only a professional can perform such a task.
Drying time
The shorter the curing time, the more difficult the installer’s job. If a dry film forms on the surface of the composition, adhesion to the surface deteriorates. A longer time between application and polymerization will be more convenient for the master, and will also ensure high quality and good adhesion. Therefore, you should not strive for a minimum drying time; it is better to wait a sufficient period before starting to use the coating.
Types of adhesives for laminated materials
There are several groups of adhesive mixtures that differ in composition:
- The glue is based on synthetic resins. They are characterized by: high adhesion, water-repellent properties, durability and chemical inertness. This type of adhesive is suitable for use when laying laminated panels that have good thickness.
- One-component adhesive composition.
This group of adhesives is made on the basis of modern polymers and does not contain water or solvents. They are easy to use and can be used with any panels. This composition can be used as adhesive for laminate flooring on the wall. The one-component adhesive hardens in a very short time. For this reason, after installation, any remaining adhesive should be quickly removed from the surface. - Two-component adhesive composition. This is the strongest, but also the most expensive type of glue, characterized by excellent adhesion and durable. Can be used for floors with high loads.
- Water-dispersed type of glue. Characterized by a cheaper price. Its main advantage: it is absolutely safe from an environmental point of view. The adhesive is intended for mounting laminated planks in a “floating” way: the lamellas are glued to each other without being glued to the base.
You cannot use PVA glue when laying laminated flooring because it is water-based; this can damage the coating.
The choice of which glue to glue the laminate with is determined by the composition of the glue and the characteristics of the particular room: its purpose, the type and condition of the subfloor, the degree of load on the floors, climatic indicators indoors, etc.
Rules for choosing glue
If you are interested in how to glue laminate flooring, then the most important rule that should be followed is that the substance must be intended specifically for these purposes and in no case should you use products designed for other materials.
You can purchase this material at construction and hardware stores.
Let's highlight several brands, the price of which is different, but the properties are almost identical:
- "Tomsit" is an ideal product used for all types of wooden coverings.
Main characteristics of the glue:
- resistant to high humidity;
- environmentally friendly;
- Suitable for all types of surfaces.
- "Cleo Laminate" is a French brand specializing in the production of glue specifically for laminate.
- “Kisel” is a German brand, distinguished by its reliable adhesion of plates and durability.
Tube “Cleo Laminate”
Each of the above brands is easy to use, and therefore you can safely purchase them if you decide to lay the flooring yourself.
Coating care
Caring for laminate flooring
In order for the laminate to retain its attractive appearance for a long time, it is necessary to follow certain rules for caring for the floor covering.
Basic care rules:
- if moisture gets on the coating, you should quickly wipe and dry the panels;
- If it becomes dirty, you should immediately clean the area without waiting for the dirt to set in. Then it will be more difficult to clean;
- When washing, do not use aggressive agents; you can damage the protective film of the top layer;
It is advisable to lay a rug on the threshold at the front door so as not to damage the coating with heels.
Fastening laminate with glue
There are two main ways to attach boards to walls vertically - glue and frame. Attaching the material to the wall with glue is considered the simplest method; you can create such a coating with your own hands
It is important that the wall is level, discrepancies and defects of more than 3 mm should be eliminated
Tools and materials
To install laminate flooring, you should prepare the necessary equipment and materials in advance. To attach the sheathing to concrete or brick walls, you will need a hammer drill or drill with a high-quality drill bit. You may also need a screwdriver and a jigsaw during the work process. To cut the board, you can use a regular hand hacksaw instead of a jigsaw. Other repair tools:
- hammer;
- pliers;
- roulette;
- marker (pencil);
- level;
- container for mixing glue;
- glue stick or construction mixer;
- trowel (rule);
- plumb line;
- spatulas - small and large;
- cloth for glue.
To tap the panels, you will need a block, and a boss is also useful - the panels are driven through it with a hammer. If you have to level the surface, you should buy putty (dry or ready-made), primer
It is also important to buy glue that will properly attach laminated panels
Selection of glue
Which glue to choose? There are ready-made adhesive compositions or mixtures that need to be diluted. Laminate adhesive must meet all the necessary characteristics. When temperature changes, the laminate tends to change its geometry, so a joint that is not too mobile may not hold the vertical coating. It is recommended to buy non-toxic compounds that are resistant to deformation and can be easily removed from the surface of the board.
It is best to use “liquid nails” type adhesives, but their price is quite high. The product must contain polymers or polyurethane. The following laminate adhesives have proven themselves to be the best:
- Tomzit;
- Kisel;
- Cleo Laminate.
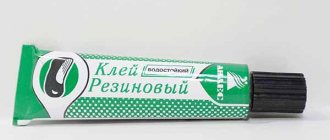
From “liquid nails” you can stick the laminate onto a Henkel brand product with a green bottom of the can. All of the adhesives listed have excellent water-repellent properties, good viscosity with minimal fluidity, long service life, and are environmentally friendly. Material consumption – 20–30 g/sq.m. m.
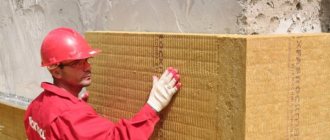
Alignment of walls
If small unevenness in the floor is perfectly compensated by the substrate, then on the wall there is no such possibility. Due to its high cost, the glue must be applied in a thin layer, and it will not hide wall defects. The remaining defects and irregularities will reduce the adhesion area and make the coating unreliable. To level the walls you need to use starting putty. Purchase good quality compounds that have high adhesion to the surface.
After puttying, you need to wait enough time (1–2 days) for complete drying. Then the surface of the wall is primed 1-2 times, which will improve adhesion to the glue. You can’t neglect priming - the laminate is quite heavy, without a primer it will stick worse on a vertical base. After the soil has dried, you can begin gluing the laminate. The glue should be diluted according to the instructions if a ready-made composition is not used. Before laying, you need to mark the wall so that the laying of the laminate is perfectly level.
Laying process
You should start gluing the material from the lower left corner. Take the first panel, cut it in half, coat it with glue, then apply it to the wall and press it. You need to hold the bar for a few seconds, then tear it off so that the glue wears out a little. Then the board is pressed again for final setting. Then continue the row upward, leaving a gap of 2 cm between the board and the floor. To do this, you need to lay a gasket from laminate scraps. Afterwards, this gap will be closed with a plinth. To create a level surface, use a level and gently tap the top of the boards with a hammer. The last board in the row is also cut to the required length.
The second row starts with a whole panel so that the installation is done in a checkerboard pattern. This will make the coating more beautiful. When the glue is not weathered, a technological break is taken after 2–3 rows. This is necessary for the glue to set well, otherwise the panels may “float”.
How to glue laminate to the floor
Let us remind you once again that this method is long outdated. Modern panels are equipped with reliable locks designed to facilitate the installation process and improve the operation of laminated coatings.
So, how to glue laminate flooring? Select and purchase enough glue. This amount is determined by the size of the room, the base material and its condition (for a rough surface, glue consumption increases), and the glue consumption rate. We recommend purchasing a small amount of glue, approximately 10% more than the consumption indicated on the can.
Keep packages with panels indoors for at least 24 hours to adapt to specific climatic conditions. The OSB surface is easy to clean. Think again: do you need to glue the laminate to the floor?
The sequence of your actions:
- Determine the layout of the panels; their number depends on this. It should be borne in mind that the joints of adjacent rows must be offset by at least 30 centimeters.
- A layer of glue is applied to the surface of the OSB boards and leveled using a spatula. Do not try to make the ridges perfectly even; when laying the panels, the thickness of the adhesive layer will be leveled.
- The first board is laid, starting from the corner of the room furthest from the entrance. If necessary, you can correct the panel by leveling it. The rest of the boards are laid in the same way.
It is not recommended to apply the adhesive layer to too large a floor area; it is better to cover the floor space under one row of panels with glue.
When working with glue in a plastic container, cut one corner and apply the glue in a “snake” pattern to the panel or base. It turns out to be faster to install. Many professionals install the panels on a wavy line of glue on the floor. The quality of coating installation does not decrease, and the speed of work increases significantly.
The adhesive method of laying laminated planks is more often used when finishing (pasting) walls and ceilings with laminate.
This technique of interior design has begun to be used more and more often, especially when decorating walls and ceilings in the kitchen. Even a kitchen apron made of laminated boards looks beautiful and original. What kind of glue is best for gluing laminate flooring to a wall? Above we talked in detail about the types of adhesive compositions, their properties and gave the names of the brands.
For details on how to glue laminate to the ceiling, to the wall: horizontally or vertically, how to glue laminate to the wall, read the article: Laminate to the wall and ceiling of the kitchen
Not long ago, a new material began to gain popularity, which can be described as something between laminate and linoleum, this is PVC or vinyl laminate
. This material has a lot of advantages: beautiful appearance, high degree of strength, absolute indifference to the effects of water (!), compatibility with floor heating systems.
There are two types of this coating: with locking systems and without them. So, panels without locks are flexible and can only be laid on the floor using the adhesive method; this is an adhesive laminate. Among the slabs without locks, there is even this variety: a flexible PVC laminate with an adhesive base, i.e., the adhesive layer is already applied to the tile and covered with a protective film, which should simply be removed during installation, and there is no need to apply glue.
Read more about this type of coating, the methods of its installation, and its operation in the article: What is vinyl (PVC) laminate
Laying laminated parquet with glue:
We tried to talk in detail about the use of adhesive for laminate flooring, in which cases it should or, conversely, should not be used, we talked about the types of adhesive compositions and their characteristics. Now it’s up to you to decide whether to use glue when laying the flooring, and which adhesive for laminate is better - this is your choice.
Advantages and disadvantages of laminate gluing
Laminate is one of the most popular types of flooring, which is distinguished by its beautiful appearance, quality and reliability.
Many people wonder why glue is needed for laminate flooring, whether it needs to be glued and how to use it correctly?
There is a myth that slats need to be glued to the floor. Naturally, this is complete absurdity and nonsense. This type of flooring can only be laid using the floating method, and a special adhesive is used to seal the joints (seams) between the panels.
Gluing laminate floors together is just one of several popular, proven installation methods, and you can resort to it after analyzing the pros and cons and compare it with conventional installation without the use of glue.
To better study the issue, it is worth studying both the strengths and weaknesses of this method, then summing up the results and finding out how to glue the laminate to the laminate in the best way.
Features and Pros:
- When gluing panels, it is necessary to use a special specialized composition for laying lamellas in order to ensure a certain strength indicator.
- This type of covering is very durable and will last at least five to seven years longer than a similar flooring with a conventional lock fastening.
- The installation process is absolutely independent of the geometry of the room; neither corners, nor curves or doorways play a role.
- There are special water-repellent versions of compounds, when used, moisture will not get inside and under the flooring.
Along with the advantages, this method also has a number of disadvantages:
- The first of them is the impossibility of using the floor immediately after installation is completed. You should wait about a day for all joints and seams to dry completely.
- Another important drawback is the impossibility of using this type of coating if you want to install a heated floor system.
- Financial costs are also higher, as is the total installation time of the entire structure, and reusing the panels is no longer possible, even if you clean them of glue.
- It is not so easy to carry out installation on your own, it is difficult, and if you do not have the proper experience, then it is much better to use the services of a specialist, but this is again a financial cost.
Laying methods, depending on the selected material
Laminate can have absolutely any color and textured pattern.
The technological instructions for laying laminated panels on a concrete or wooden floor consists of several sequential processes. Its features depend on what type of material you choose. If the substrate has already been laid, then markings should be made and the panels cut.
The direct installation method is one in which the decorative panels are laid out and connected parallel to the walls. Installation will save money, since pruning costs will be no more than 6-7%.
The herringbone design will make the flooring more aesthetically pleasing and stylish. But it will require the purchase of special laminated panels. Only a professional builder can lay out the panels in a herringbone pattern, since installation is considered the most complex and time-consuming.
How to lay laminate flooring with Click or Lock type locks on a concrete frame or linoleum? Below you will find detailed instructions.
Working with Click-type locks
Working with Click type locks involves the following steps:
Laminate can even imitate tiles
- The installation of elements with such locks begins with the installation of a sublayer under the laminate on the concrete floor. If there is already linoleum on the floor, then this operation can be skipped. Work begins from any side wall, the initial row of laminated elements is laid. Wedges are placed between the wall and the panel, which will subsequently provide a technological gap of 1-1.2 cm. The panels in the first row must necessarily face the side wall with a special protrusion;
- While working, make sure that all locks are in close contact with each other. There should be no gaps or cracks left. In order for the locking connection to close tightly, you need to install the next panel in the previous groove at an angle of 45 degrees, and only then secure it with pressure until it clicks;
- All subsequent laminated panels should be spaced apart. The joints should not be cross-shaped or coincide with each other. The so-called laying of the laminate diagonally is carried out;
- The installation of the second row of elements is carried out as follows: first, the panels are connected in the end lock (a strip of the required size is formed), then this strip is moved and placed in the groove at the same 45 degree angle and pressed until it clicks. The sublayer under the laminate should not interfere with work;
- As construction practice shows, the last row of panels will need to be “adjusted” to the dimensions of the room. Now you will need a jigsaw to cut off the excess part. Don't forget to leave a technological gap.
Working with Lock type locks
This installation of laminate flooring on a wooden floor or concrete frame differs slightly from the previous option. The lining for the laminate can also be linoleum, fiberboard and chipboard sheets, polystyrene foam (polypropylene foam).
Comparison table of laminate classes
Immediately before joining, the panels are installed horizontally. The tenon of one panel must match the groove of the other. The elements are adjusted using a hammer and a wooden stand. The first row does not have to be laid all the way to the end to begin installing the next one.
The initial laminated element is inserted into the groove of the previous row, then 10 mm are retreated from the end of the first one and connected to the previous row. Then the second panel is adjusted until it is completely connected to the end of the first. The finishing row is adjusted using a mounting crowbar.
Installation with adhesive joint
Technological installation of the coating on a concrete floor or linoleum can also be carried out using special glue. This is how laminate flooring is most often laid diagonally.
There is even a laminate that imitates artistic parquet
This technology will require a minimum amount of time and auxiliary tools from you. The use of an adhesive composition can significantly increase the service life of laminated materials. This effect is achieved due to the complete sealing of the joints.
If you fix the coating with glue, you will not have the opportunity to replace the damaged panel. To complete the work, you need to purchase only waterproof glue.
The procedure for laying a laminated coating on linoleum or a substrate is very similar to working with Lock type locks. Only before the final joining of the elements should their ends be coated with adhesive. The amount and consumption of glue is determined during the installation process. If excess mixture appears on the surface, it must be removed immediately with a cloth.
The need for gluing laminate
Laminated panels are a popular floor covering that includes several compressed layers of fiberboard, MDF, and polyvinyl chloride tiles. The surface of the board (lamella) is a special film, the purpose of which is to protect the material from abrasion, moisture, and damage. The inner layer includes a special impregnated kraft paper backing that will be in contact with the backing. The side edges are covered with protective wax; the ends have locks for the joints of the boards.
The class of material is selected depending on the conditions of its operation; installation on the floor is carried out by simply joining the strips or using a locking connection. Previously, a special laminate without locks was produced, which could only be glued. Now any material has locks, regardless of the fastening method.
So is it possible to glue this material? This is a very necessary stage of work; gluing will seriously improve the quality of installation, its strength, and durability. If you manage to purchase a laminate with a structure without locks, you will have to glue it when laying it in any case.
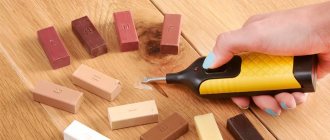
How to Repair Laminate Flooring with Glue
There are situations when the laid laminate begins to creak and the individual lamellas move. Problems arise due to gross errors during installation. Individual lamellas laid using floating floor technology begin to move a little, the grooves and ridges do not hold, and large gaps appear in the floor. Tapping the lamellas into place does not give a long-term positive result due to critical wear of the grooves and tenons. By the way, such problems never appear if the laminate is laid using glue.
Most builders recommend solving the problem by completely dismantling the floor and reinstalling it in compliance with all technological recommendations. But there is a simpler repair method using glue for the ends of the laminate. How to repair the coating?
For repairs, we will use the cheapest PVA glue, but if desired, you can purchase more durable compounds.
Step 1. Move the lamella to the side until it stops, widen the gap as much as possible
Use a thin object to carefully remove accumulated dirt from the crack; work very carefully to avoid damaging the front part.
Gap between lamellas
Step 2. Using a small brush, thoroughly stir the glue in the container until completely homogeneous. During long-term storage, PVA glue delaminates, water accumulates at the top, and the adhesive sinks down.
Step 3. Using a brush, coat the ends of two adjacent lamellas, leaving no gaps. Don’t be afraid that there will be too much glue; the squeezed out excess will be removed later.
Applying glue
Step 4. Push the panels as tightly as possible until they stop, wipe off the excess with a soft cloth.
The lamellas are connected, excess glue is removed with soft paper or rags
The same actions should be done on all moving slats.
What to look for when buying glue
Which glue is better? It has already been said above that a lot depends on the formula of the composition and the manufacturer. But no matter which composition we choose, there are general requirements. A quality product must have:
- environmentally friendly to be safe for the skin, mucous membranes, respiratory tract and the environment;
- excellent adhesion, which guarantees super strength and quality of the final coating;
- resistance to moisture and aggressive environments;
- resistance to high and low temperatures;
- strength after hardening;
- resistance to stress and durability.
Watch the video to find out more:
The instructions for use, which describe all the characteristics and features of the product, will help you determine what adhesive composition is needed.
When purchasing, also pay attention to whether the composition leaves stains or smudges after hardening.
This is important, because the aesthetics of the flooring is important in the interior
Among the assortment that is available in construction supermarkets, the best are considered to be adhesives such as “Kisel” (Germany), “Tomsit” (Hungary), “Cleo” (France). They are produced in sealed containers with a capacity of 0.5-0.75 liters and are inexpensive. With them, gluing laminate quickly and efficiently will not be difficult.
In some cases, a waterproof laminate sealant such as Masterfix or ClickGuard gel is used. It has optimal adhesion, quickly fills the seams and joints between the slats, as if “sealing” them. Sealants are produced with different pigments, which allows them to be matched to the color of the lamellas: spruce, pine, wenge, oak, alder, etc.