05/04/2017 7531 Stove maker (Moscow) Cladding a fireplace insert requires a correct and professional approach. This is primarily due to the fact that not all materials are suitable for finishing both the hearth and the portal itself.
Equally important is compliance with the basic requirements and rules for the facing work performed. In order to become familiar with these criteria, we suggest watching the video in this article or reading the following materials in a clear and accessible presentation.
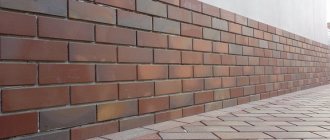
The use of bricks when lining fireplace inserts
The use of brick when lining fireplace fireboxes not only improves the appearance of the structure, but also increases its heat transfer. When using this material, several problems are solved at once: the facade of the fireplace does not require additional finishing, the brick can be folded into any shape, depending on the type of interior. When facing the fireplace insert with brick, an additional layer of thermal insulation is created, increasing the heat capacity of the stove.
Lining the fireplace with brick is necessary to retain heat for a longer period of time.
Brick is more often used in the construction of stoves due to its ability to accumulate, retain and distribute heat.
The main disadvantage of facing a fireplace insert with brick is the large weight of the structure, so such a heating device may not be installed in every private home. To complete the work, no more than 500 bricks will be required, so they cannot be considered expensive.
Covering materials
Solid kiln bricks or refractory bricks are used. The second option is most relevant for burning coal. The brick must be uniformly colored and fired, and have no cracks or chips on the surface.
For the body of the fireplace, a clay-sand mortar is used, mixed in the following proportions:
- 1/1 - for normal clay;
- 1/2 - for oily clay.
Water 1/4, consistency of thick sour cream
For the foundation and in the case of lining the chimney from the roof to the cap - cement-sand, mixed in a ratio of 1/3.
Additional elements - metal corners, arched profile, anchors, and so on. As the design scheme is selected, the issue of choice of materials is decided.
Mixing masonry mortar
A stove for which only fire-resistant bricks are selected will be much stronger if you prepare a high-quality solution at home with your own hands. It is important to remember that since the oven gets very hot, the composition must also be heat resistant. That is why it is recommended to use clay among the components. To knead, you need to use the following step-by-step guide:
- In a prepared container we will need to mix two parts sand and one part clay. Make sure the sand is clean and free of lumps, dirt and plants. First sift it through a special sieve and only after that start mixing with other components;
- Next, water is poured into the two components in a ratio of 1:4, mixed, and the composition is left under the lid for 40-60 minutes, after which it is mixed well again. For these purposes, it is most convenient to use a construction mixer;
- In order to check the quality of the prepared mixture, a small piece needs to be rolled up and shaped into a rope, the thickness of which will be 10-12 millimeters. After this, it is formed into a circle shape. If no cracks appear on the surface and the consistency is similar to plasticine, it means there is a lot of clay in the composition. To improve, you need to add sand to the solution and, after mixing, wait again for about an hour. If, on the contrary, the solution cracks badly and does not form a rope, add clay and let it brew.
A brick stove can also be laid using a ready-made composition. And if you don’t have the necessary components on hand, you can use cement and sand, to which PVA glue is additionally added.
How to veneer a fireplace insert correctly?
Cladding a cast-iron portal with solid brick is the easiest way to get a brick fireplace. To do this, you will need approximately 500 pieces of standard bricks and a sufficient amount of cement-sand mortar. Laying can be done in one row with seams of 1 cm.
Wooden formwork is often used to cover the firebox supports. In this case, ordinary cement joints are alternated with 10x10 mm rods, on which a reinforcing mesh is placed. Then the formwork is filled with a concrete mixture with sand and gravel (fraction up to 10 mm) and left for 2 weeks.
For fire safety purposes, the recommended air gap must be left between the grille and the ceiling. Experts recommend leaving a technological hole in the lower part of the cladding to facilitate the maintenance and repair of the fireplace insert in the future. This hole must be insulated and covered with non-flammable material.
We begin facing work
First you need to sort the bricks by color tone and thickness. For decorative finishing it is better to use shaped and textured bricks. By tinting the solution in the desired color, you can do without finishing.
Brick structures have an impressive weight, so a concrete foundation must be prepared at the site of their installation. Please note: the distance between the foundation of the building itself and the base of the fireplace cannot be more than 0.5 m (without any connection between them). The foundation for cladding should extend beyond the structure itself by 10-12 cm.
Preparing the solution
The quality of the masonry mortar is no less important than the base material. Agree, putting fireclay bricks on a mixture that can withstand temperatures up to 700°C is at least not logical. You should not count on the durability of ordinary cement mortar - it will quickly become covered with cracks.
Ideally, use a clay solution prepared according to a special “recipe”. Its basis is a sand-clay mixture. To prepare it, you need to determine the fat content of the clay experimentally. Make about a dozen clay balls with a diameter of 1 cm, adding a different amount of sand to each of them (it is better to take mountain sand - it holds surfaces together perfectly). After the balls dry, drop them from a meter height. The ball, which has retained its integrity and original shape, has an optimal composition.
The content of stones, clots, and air bubbles in the solution is unacceptable, therefore the clay must be sifted, the stones separated and the lumps crushed. Then it is filled with water and left for a day. Only then can you add sand and fireclay. It is best to mix the solution with a drill with an attachment - the mass turns out to be homogeneous and plastic.
No. 6. Tiles
Tiles are, in fact, the same terracotta tiles or majolica. The difference lies in the special structure. The tiles have a rumpa, a square hollow projection that holds the tiles in place during installation. Rumpa is also important for another purpose - it helps to retain heat. Tiles can be used to decorate a fireplace only during its laying. If the moment is missed, you will have to choose another finishing method.
Tiles have the same advantages as tiles. The choice of colors is huge, there are very sophisticated samples that will bring special chic to the interior.
Installation of tiles is carried out in this way:
- The pump is filled ½ full with a mixture of clay and broken bricks, and the so-called crutch, thick (5 mm in diameter) wire with a bend at the top;
- a flexible soft wire is attached in the middle of the crutch, which will later be embedded in the brickwork;
- the pump is filled to the brim with clay mixture;
- As the laying progresses, the tiles are installed and the wire is hidden in the seam. The individual parts are connected to each other using U-shaped brackets.
It is difficult to do such installation yourself, which makes installing a fireplace a more expensive pleasure. In addition, the material itself is more expensive than regular tiles.
Design options for modern fireplaces
Design options for modern fireplaces
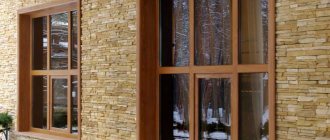
In past centuries, sandstone or marble were mainly used to decorate fireplaces. The first made it possible to create high-quality but simple finishing, which was mainly done with one’s own hands. The second emphasized the aesthetic appeal and status of the room.
With the advent of modern electric fireplaces, the need to line the firebox with natural stone has disappeared. They don’t often decorate stoves with their own hands, preferring to purchase ready-made products. But still, design decisions from time to time require such work as decorating a fireplace with your own hands to create a unique stylistic solution in the interior.
So, cladding has become much more diverse today. To accomplish this, the following materials are used today:
- Natural stone has not lost its relevance; it is in demand in the design of luxury premises and elegant interiors.
Diagram of a traditional fireplace
Mantel. Gypsum tiles. Living stone
Stylish finishing of decorative fireplaces
English style hearths
English fireplace - Mr. perfection. It is laid out in a U-shape and endowed with classic features. In design, priority is given to straight lines and smooth, clearly defined corners. The firebox itself is small, but spacious. A large portal is made into an accent area in the finishing of the stove. It is decorated with tiles, forging elements, and expensive wood.
Fireplace decor in English style
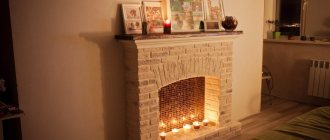
Hearths in Provence style
No frills, no bombast – just the simplest forms. When creating such a fireplace, its design is worked out in the smallest detail. The color scheme for the decorative finishing of the fireplace must be in a calm shade. Ideally, the hearth is made in white, although light, calm portal colors of the green, blue, and yellow spectrum will fit well into the interior composition.
White fireplace in Provence style
A good solution to age the paint, giving it a faded look. You can line the Provence fireplace with stone or ceramics. Wood, although not alien to the style, is not so common in the decoration of this type of fireplace. If it does appear, it is exclusively of precious rocks. The decor of the stove can be forged parts.
Fireplace decoration in Provencal style with wood
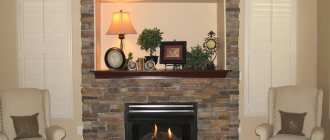
Country style hearths
Rustic style fireplaces, with all their simplicity and simple decoration, become real carriers of home comfort. They are heavy and have impressive dimensions. For this reason, building and decorating a fireplace with your own hands is difficult.
Massive fireplace in country style
Portals are designed in a D-shape. The hearth has a niche under the firebox where kindling wood is stored. A powerful beam, usually made of a stone monolith, is placed above the firebox.
The country stove can be made not only to run on wood, but also gas. It is recommended to decorate the portal with artificially aged sandstone, brickwork, and shell rock.
Brickwork is ideal for country style
Hearths in ethno style
Ethnic fireplaces are distinguished by their species diversity. They can be interpreted in a strict Old German, Scandinavian style or presented in a bright Indian flavor.
The decoration of the fireplace is responsible for the ethnicity, which will create the need to look for specific elements for its decor. They will help to make an association with the chosen stylistic direction. Chalk whitewash, stone, and clay mortar can be considered as an option for finishing the stove.
Ethnic motifs in the decoration of the fireplace
The fireplace can also appear in the form of an actually open hearth, which almost unfolds in the center of the living room like a regular fire pit.
Hearth in ethnic style in the interior
High-tech style fireplaces
Innovative materials, advanced technologies, shocking solutions - these are the leading guidelines in the decoration of high-tech fireplaces. They can be created in the shape of a coffee table, a prism, or hung like a fireball on a metal chain. Such stoves can stand on the floor, hang on the ceiling, or be attached to walls. Often these are rotating and mobile interior elements.
Hi-tech fireplace
The decoration of decorative fireplaces can combine incongruous elements, for example, fire and water.
The manufacturing materials are metal and fire-resistant glass, characterized by high heat transfer.
Metal and glass are the best option for finishing a fireplace in a high-tech style
Fireplaces in a classic style
The stylistic visions for the decorative finishing of the fireplace are absolutely identical to the basic principles of classicism: geometric clarity, straight lines, neutral colors. To add respectability to the hearth, its portal is decorated with unobtrusive stucco compositions and moldings.
Stucco molding will add respectability to the hearth
A classic fireplace may contain in its decor elements characteristic of the Baroque. When working on the design and finishing of the stove, you can use columns and forged protective elements.
Selection of facing material for the firebox
Fireplace inserts, unlike classic stoves, have certain advantages, differences and features, which you can read more about below:
| Advantages and features of fireboxes | Description |
| Decorative component | Fireplace inserts are distinguished by their simple and laconic design, which allows them to be combined and harmonized with different portals. |
| The need for a portal | Unlike stoves, fireplace inserts can be built into a specially prepared niche in the wall or into a portal. |
| Carrying out installation work | Stoves are easy to install, but to install the firebox, it is necessary to carry out a rather complex and labor-intensive installation. |
| Multifunctionality | The fireboxes are very functional and powerful. Even with one firebox, you can heat a house with a large area and several large rooms. |
| Stylish appearance | The fireboxes have a stylish appearance. They are complemented by a large sealed door, which has a transparent insert made of fire-resistant glass ceramics. |
After you have become more familiar with the features and advantages of fireplace inserts, you can learn more about what materials can be used to line the firebox, that is, make a special box for it.
Materials for lining the fireplace insert:
- Brick. It is one of the most common and good materials that is used for cladding fireplace inserts with your own hands. Brick is a good radiator; in addition, it also accumulates heat well and distributes it throughout the rooms of the house. The disadvantages of this material include the duration of masonry work, high cost and the need for a special and suitable order.
- Foam blocks. Foam blocks are also called aerated concrete. They are distinguished by their decent size and low weight. Due to this, they do not exert a large load and influence on the flooring and walls of the house. The disadvantages of foam blocks are that they are not as durable as drywall and especially natural stone.
- Drywall or gypsum board. Drywall is one of the most popular materials from which a fireplace box is made. This material is easy to process, easy to cut and takes the desired shape. In addition, it has a high level of fire resistance and thus can be heated to maximum temperatures without losing its strength or releasing substances that are harmful or hazardous to health.
- Stone. Stone cladding is a rather complex and painstaking process. Since creating a fireplace portal from artificial or natural stone requires a special tool, it is best to entrust this work to real professionals. There are several stone types that are most suitable for lining fireplace inserts - granite, marble and wild stone. Each of them has its own visual differences and different costs. The most expensive is marble.
Preparing the base
Considering that fireplaces are fire hazardous equipment, preparation of the floor and adjacent walls should be provided before covering the fireplace with fireproof plasterboard.
Floor preparation
The fireplace insert has a significant mass. Plus is equipment with an increased fire hazard. Therefore, at the first stage, a concrete base is prepared:
- The portal is marked on the floor.
- The formwork is being installed.
- The base is primed and filled with concrete.
- After hardening, a podium is laid out (4 rows of brickwork). Then install metal corners under the firebox.
- Lay the final level of masonry.
The whole process is carried out strictly according to the level. A misalignment of the foundation and podium will cause problems with the quality installation of the firebox.
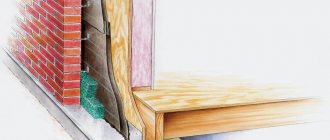
Preparing the wall
The simplest option is when the adjacent wall is made of aerated concrete, foam concrete blocks or bricks. In this case, it is plastered and whitewashed. If the adjacent wall is made of flammable materials (logs, beams, etc.), then the following work is performed:
- Treating the wall with fire retardant compounds.
- Fastening a foil-coated basalt slab to a metal profile. A ventilation gap is required between the wall and the facing slab. The dimensions of the protective screen should be 500 - 600 mm larger than the dimensions of the future furnace.
- Fixing drywall, which is puttied, and clinker or porcelain tiles are laid on top.
How to make a portal for an electric fireplace from plasterboard
Other options: asbestos board, magnesite. If the equipment will be installed in a corner, the joint between the walls is treated with a special fire-resistant sealant.
The same thermal insulation is also applied under the chimney. You should know that the gap from the fire-resistant wall to the rear surface of the firebox must be at least 100 mm, from the combustible surface - at least 700 mm.
Features of fireplace inserts, their advantages and disadvantages
The firebox is one of the main structural elements of any fireplace. The fireplace, made of brick, accumulates the heat generated during combustion of the loaded fuel, gradually releasing it to the external environment. In a metal firebox, due to a specially designed design, the fuel combustion efficiency is much higher, but heat transfer occurs only during its combustion. Taking into account this feature, the installation of the fireplace insert is carried out slightly differently and provides for the distribution of heated air, which ensures uniform heating of the entire room.
The air surrounding the firebox, warming up from its hot surface, circulates inside the free space of the fireplace and, due to convection, enters the ventilation ducts, giving off heat.
Products of this type are usually made from high-quality cast iron or alloy steel, the main advantages of which are:
- the ability to withstand high temperatures for a long time without burning the metal, which ensures long service life;
- high heat transfer.
Finishing features
One of the most important requirements for finishing a real fireplace is the fire resistance of the facing material. The structure consists of a hearth (the place where the fire burns) and a portal (the decorative outer part) with a chimney. The item is most often made from clinker - a special heat-resistant stove brick.
The color of the finish also matters. When the fireplace is intended primarily to heat the room, and not to decorate it, the darkest matte tones are preferable. The more textured and embossed the surface is, the stronger the heat transfer, which means the higher the temperature in the room with such a stove.
How to veneer a fireplace with your own hands
First you need to think about the location of the fireplace, as well as its height and width, in order to calculate and select the required amount of materials. Then select a high-quality brick of the same color, prepare the mortar and the necessary tools.
The first step is to make markings and lay out the front part first, and then the sides. You can veneer the corners first, and then the front part. A building level will help you lay out the first row exactly. Check each subsequent row and, if necessary, level it. This finish is suitable for interiors: country, loft, Provence.
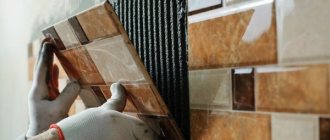
You can produce tiled cladding: flat (wall, straight) and corner, shaped (cornice). Corner tiles are installed at the corners (the front edges are at an angle to each other). Flat (one flat front edge) is used to line the box - front and side surfaces. Shaped tiles of various shapes are used for cornices, ledges and finishing elements. The cladding process is quite painstaking and time-consuming - this is not an activity for beginners.
For beginners, facing a fireplace with gypsum tiles is suitable - it is easy to cut and laid on a tile adhesive solution, the seams are carefully sealed with grout to match the stone. Also suitable for beginners is decorative plaster, which is applied in several layers, and if necessary, you can create an imitation of masonry.
Recommendations from fireplace trim professionals:
- Wall-mounted fireplaces and those raised above the floor (stands) should be wide. If the model is located almost on the floor, then a narrow version can be used.
- To enhance the beauty of an open fire, the portal should be on the same level with the fireplace.
- You should not build a portal without a fireplace model.
- Strict adherence to proportions when covering.
- The style of the fireplace and the portal should complement each other and be combined with the style of the room.
Step-by-step instructions for finishing a plasterboard fireplace
Before starting the finishing process itself, the product should be prepared - puttied. After this, the walls will be even and smooth, the material will fit better, and all joints will be perfectly hidden. To putty a wall you need to do the following:
- Make sure that sickle tape is taped at all joints of the plasterboard frame.
- Apply primer to the surface using a roller.
- Pour the putty into a bucket, add water according to the directions on the package and mix thoroughly until smooth and free of lumps. The easiest way to do this is with a special whisk that fits onto a screwdriver.
- Take two spatulas - a large one and a smaller one. Apply the finished mixture onto the large small one, evenly distributing the layer along the entire edge.
- Start applying the putty from top to bottom, spreading evenly.
- Level the entire surface and treat with primer.
Now all that remains is to do the most important thing - decorate the fireplace with decorative elements. There are many ideas on our website that will make decorating a plasterboard fireplace with your own hands simple and effective. Here are several options for what materials can be used and how to work with them. It is worth recalling that products in which the top shelf is combined with the foot of the fireplace look best.
1) Finishing with decorative plaster. This option is one of the simplest and most affordable, but do not forget to additionally glue perforated tape to the corners for strength. It will not be difficult to complete the work, especially after you have leveled the walls yourself. If you have chosen decorative plaster “like a bark beetle,” for example, you will additionally need a Venetian trowel or a painting spatula. It should be applied from the lower right corner, covering not too large a surface, since this type of plaster dries quickly. Once the layer is applied, wait at least 5 minutes and begin rubbing, creating the desired pattern. You can tell that the plaster has dried out and it’s time to start grouting by its appearance - it stops shining.
2) Finishing with decorative stone. You can see what decorating a fireplace with your own hands will look like in the photo in this article. To glue the stone, you can use cement mortar, gypsum mortar or liquid nails. The last option is easiest to work with, especially if the stone is small. You can create the drawing yourself, but you should start from the bottom.
Special corner stone elements are purchased for the corners. Even though the stone is of different sizes, watch your step and level. If you are working with mortars, be careful not to get them on the face of the stone. If the material gets dirty, wipe it immediately with a damp cloth. At the end of the work, coat the entire laid surface with varnish to protect it and also to reduce the accumulation of dust.
For a more detailed study of the process of working with materials, as well as searching for other options for decorating a fireplace with your own hands, video materials are posted on our website.
The fireplace is a radical response to the lack of comfort in the home. The reflections of the flame fascinate and drive away vain thoughts. Warmth instills peace of mind. A plasterboard fireplace made with your own hands and imagination can provide this.
There are not many things in the apartment that can be given a distinct individual style without fear of causing irreparable damage to a previously thought-out composition. It will become the visual and organizational dominant of the living space. It can be given any shape and style to emphasize the implemented design of the room or, conversely, to defuse the orderliness with a catchy interior element. Even a simple DIY fireplace cladding can be done by a semi-skilled home craftsman.