Functions of the entrance door threshold
The entrance door threshold performs important functions. Without it, the door block will not be able to fulfill its purpose. These include:
- sound insulation;
- thermal insulation;
- protection from dirt and dust;
- providing additional security;
- decorative function.
The door threshold protects the room from noise, dust and cold that can enter the room from the street. Thanks to it, the door leaf fits tightly to the frame, providing reliable sealing and protection against burglary. In addition, the threshold decorates the appearance of the house if it is made in the form of a continuation of the steps in front of the front door. And inside the room it will create harmony if it forms one whole with the floor covering of the room.
What is this design for?
The threshold at the door is the final element in the design of the door space. In interior passages, planks serve as a decorative element, but for entrance and balcony doors their installation is mandatory, as they protect the floor from the accumulation of dirt and dust. Thresholds are recommended at the entrance to rooms with high humidity or with a risk of smoke and odors (bathrooms, toilets, kitchens).
Purpose of thresholds:
- sound insulation;
- thermal insulation;
- obstacle to the spread of odors outside the premises;
- protection from accumulation of dirt and dust;
- decorative finishing.
Nut selection
As a rule, the threshold for the front door is supplied complete with the frame and represents its lower horizontal strip. Therefore, what it will be made of depends on the material of the door. Often, along with the threshold, a platform is installed at the same level, the width of which should be sufficient to place your foot on it.
When choosing a threshold, keep in mind that it is constantly subject to physical impact, so it must be strong and reliable, and withstand constant external influences, such as dirt and the weight of people standing on it.
Plastic thresholds are the least durable, so they are rarely used for entrance doors. If you want to install a wooden threshold, then you need to choose hard wood, such as oak. A wooden threshold will require regular maintenance: it needs to be painted or varnished to extend its service life.
A metal or concrete threshold is preferable; it is reliable and has a long service life. Metal ones usually come with metal doors. They are widely used for city apartments. Concrete is a common practice for private and country houses.
Selecting the material
As with any element in every room, certain criteria have been developed for the threshold. The materials used are:
- Natural wood . Solid wood is widely used in the field of interior decoration and construction.
- Metal . This is a reliable and wear-resistant material that retains its shape and appearance for a long time.
- Brick . Strong and, importantly, affordable raw materials.
- Plastic . One of the most popular artificial materials.
- Cement . A budget option to make a strong threshold.
Moreover, the color and texture of the threshold material should be in harmony with the door.
After the choice of material is made, it is necessary to select the form. Most experts agree that the most reliable design is in the form of a ladder. The most common material options for thresholds are concrete, metal and wood, however, the latter version is especially popular. Hard woods are ideal.
Despite the fact that solid wood construction is not as strong and durable as concrete or metal, it is much easier to repair and dismantle if necessary.
Next we will talk in more detail about the arrangement of this type of threshold: how to make a threshold from wood. Wood has a special natural appearance, which is distinguished by aesthetics and attractiveness. In addition to oak, you can safely use birch. In order for the boards to withstand constant loads without problems, they must be pre-treated with a composition that protects them from moisture and dampness.
Author: admin · Published 04/26/2017 · Updated 04/26/2017
The porch of a country house should not only be comfortable, but also beautiful. In order for its appearance to be pleasing to the eye, in harmony with the design of the building’s façade and driveway, the owners decorate it with a variety of materials. Most often these are ceramic or paving tiles, stone or porcelain stoneware.
Each of these types of cladding has both its advantages and disadvantages. Their installation technologies are similar, but may differ slightly in detail. We’ll talk about what to cover the porch of a house with, as well as how to install the tiles correctly in this article.
Installing a threshold on the front door
If the threshold comes complete with the door frame, then it is installed in place along with it. Installation of a separately purchased threshold is carried out additionally after installing the door.
When setting the threshold, you need to take into account that its height should not exceed 30 millimeters. This recommendation is explained by the convenience and safety of using the door. In some cases, its height is adjusted or increased in order to achieve the desired appearance.
The instructions will tell you how to make a front door threshold out of wood.
- Preparing the installation site, removing dirt and dust, leveling the surface.
- Cutting the threshold according to the dimensions of the opening.
- Drilling holes for screws.
- Fastening with screws or nails according to the level.
- Coating the threshold with varnish or paint.
In order for the threshold to hold better, experts recommend making it slightly wider than the doorway. And at the bottom of the box under it you should make cuts to the height of the threshold into which the product is inserted.
Before attaching the threshold, place it in place and check the operation of the door. It should open and close freely, and its lower part should fit snugly against the ledge.
The structure of a concrete threshold differs from a wooden one. To install it you need to follow these steps.
- Preparing the installation site, removing dirt and dust, leveling the surface.
- Surface treatment with primer.
- Leveling the formwork.
- Preparation of the solution. To do this, it is recommended to use special mixtures to which additives are added for their elasticity and frost resistance.
- Pouring the mixture into the formwork.
After the solution has dried, the formwork can be removed. To increase the strength of the product, it is moistened with water for several days after pouring. After final drying, decorative finishing is performed.
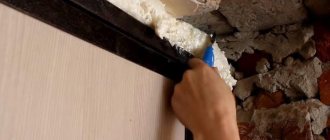
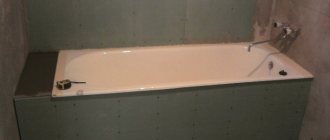
Often, after installing the threshold, gaps and gaps remain between it and the floor. They are sealed with putty, and after it dries, they are puttied with silicone putty, which will prevent cracking.
Purpose and device
The threshold at the front door is an important element in any living space. This part performs many useful functions, such as: protecting the room from dirt, moisture and dust from the street, insulation from drafts, and a decorative component (adding to the decorative design). It is worth noting that using the above design, you can increase the level of protection of an object from intruders. Also, due to the threshold, differences in the junction between the door and the floor are equalized.
Many owners are interested in the question of how to make a threshold yourself using certain materials and tools. Experts recommend creating this element with a height of no more than three centimeters. In certain cases, the parameters can be changed, especially if it is necessary to achieve a certain decorative effect.
In the process of manufacturing the structure, you need to find a middle ground so that the threshold fulfills its main task - tightly joining the door to the floor, and also decorates the entrance and does not attract much attention to itself.
Before you begin, you should select a certain type of structure, as well as materials for its manufacture and cladding. As a rule, the material is selected taking into account the general style of the room, personal preferences and financial capabilities. The choice determines the operational characteristics of the threshold and its resistance to external damage.
Some people mistakenly think that if they make the structure taller, it will look better and cope with other tasks better. However, height can be a hindrance and cause a lot of inconvenience when visiting a home.
A properly selected entrance threshold device must have optimal dimensions. Further in the article we will talk about the criteria for choosing the type of threshold at the entrance to a house or apartment.
Threshold finishing
As a rule, the matter is not limited to setting a threshold. After installation, you need to start finishing, which will make the front door more attractive.
If for wood everything ends with painting or varnishing, then you can finish the concrete threshold of the front door using tiles, linoleum or other materials. The finishing is usually made with the same material as the floor. To prevent chipping, an aluminum corner can be attached to the threshold.
Knowing the important role of thresholds on entrance doors, you will be responsible in their selection and installation. Installing and finishing the threshold yourself is not a difficult task, so it’s easy to do it yourself.
Installation of a concrete door threshold
If you decide to install a concrete ledge, then you first need to prepare the surface and install the formwork.
Materials and tools:
- cement;
- primer;
- boards;
- special mixture for mixing the solution;
- electric jackhammer;
- putty knife.
Related article: How to lay linoleum on laminate or vice versa?
The concrete mixture is poured into the prepared formwork and carefully leveled.
The first step that needs to be taken is to clear the area under the threshold from dust and other debris. The remains of the old structure need to be removed. Seal the resulting cracks with cement mortar. After this, the entire surface should be treated with a primer.
Features of threshold finishing
Typically the trim is made of the same material as the front door. If the door surface is wooden, then the master uses a paint coating of a similar color.
To enliven the overall interior, a specialist will offer you various types of cladding:
- decorative rock
- natural wood
- laminated panels
- plastic or moisture-resistant MDF panels
Before finishing the entrance door threshold, a specialist inspects the structure and assesses its condition. If necessary, insulation is performed. Gaps and cracks between the door and the threshold are sealed with plaster, then puttied.
To create an original design, the threshold is finished by Yudu artists with ceramic tiles or linoleum. You can install a plinth. If the entrance door is steel, then the craftsmen use powder coating, which is very practical and resistant to mechanical stress.
Material options for porch cladding: how to choose
There are a huge number of different types of materials suitable for cladding porches on today’s market. With such a wide choice, it is often easy for the owner of a country house to get confused. Therefore, first, let's look at what advantages certain finishing materials have, and which one is worth buying in order to get such beauty:
Let's start, perhaps, with ceramic tiles, as the most popular type of finishing for porches.
Ceramic finish
The main advantage of ceramic finishing is its aesthetic appearance and variety of designs. In addition, this is the most economical and fairly durable option. If desired, you can choose it both for finishing a small porch and for cladding a solid staircase of a two- or three-story cottage.
Tile is one of the most popular types of porch finishes.
Important: Do not cover the porch with tiles with a smooth, slippery surface. It's safer if the finish is rough.
Tile can be different. Therefore, knowing what tiles to lay on your porch is very important. Most often, outdoor stairs are finished with clinker tiles. This is a special type of frost-resistant non-slip ceramics, which is significantly superior in durability to tiles, but costs an order of magnitude more.
Clinker tiles - beautiful and durable finish
Paving slabs
Covering the porch with paving slabs allows you to get a very beautiful, yet durable and reliable coating. Usually, the owners of country houses do not bother too much and finish the street staircase with the same material that was used to line the driveway. However, if you wish, you can, of course, take another option. Concrete paving slabs can be painted. But in this case, the finishing will have to be renewed at least once every two years.
Covering the porch with paving slabs will make it a real decoration not only of the house, but also of the yard
Tip: You should not sprinkle salt on a paver porch to remove ice. It will very quickly corrode the lining and in the spring the finish will lose all its attractiveness, starting to crumble. The same goes for other types of artificial tiles.
Read also Program for house layout
Natural stone finishing
There is another answer to the question of how to decorate the porch of a house - natural stone. Of course, this is quite expensive and at the same time a solid and prestigious option. Granite is usually used for porch cladding.
This is interesting: Granite cladding can last up to a hundred years without losing its appearance. This is what makes her so popular.
Porch finishing. Photo of a semicircular granite march
Sometimes marble, sandstone, basalt, etc. are also used to decorate street porches. Polishing emphasizes the natural structure of the stone and porches faced with this material look the most attractive. However, when using this finishing option, you should additionally use special rubber anti-slip decorative pads.
Glossy granite steps look very attractive
Hemming the porch of buildings is simpler and is often done with your own hands using a type of cladding such as burnt stone. You can also line the stairs with a slightly rough, matte polished stone.
Granite finishing will be very strong and durable
Porcelain tile finish
Porcelain tiles for outdoor porches are also used quite often. This material looks more solid and solid than tiles and at the same time costs less than stone. In this case, it is also better to choose a rough, non-slippery version of this finish. However, polished can be a very good solution.
How to decorate the porch of a house. Photo of a stylish version of a street staircase finished with porcelain stoneware
This is interesting: In terms of abrasion resistance, porcelain stoneware surpasses even natural granite. The hardness index of this type of finish on the MEP scale is 8. For natural granite, it is 6.
Unlike tiles, the pattern of porcelain stoneware is enclosed in its very structure, and not applied on top. Therefore, the finishing made from it retains its decorative qualities throughout its entire service life. One of the disadvantages is the difficulty of cutting this material.
Other materials
The street porch of a private house can be decorated with other materials. For example, plaster, metal, rubber siding, siding, etc. Finishing the porch of a wooden house is often also done using edged or decking boards. In the first case, the material is painted. The decking board is beautiful in itself. The finishing of the street staircase canopy can be made of corrugated board or wood. Curved versions of canopies are covered with polycarbonate.
The porch canopy of a private house is often made of polycarbonate
Why is it profitable to order services from YouDo performers?
The threshold is finished by experienced craftsmen using high-quality finishing materials using modern technologies. Specialists will calculate the required amount of materials, organize their purchase and delivery. The thresholds of fireproof steel doors are covered by specialists using special equipment.
Finishing the threshold of the front door by Yudu artists has a number of advantages:
- reasonable prices for services
- high quality finishing work
- beautiful modern finish
- opportunity to save
Specialists travel to all areas of Moscow and the region. Only proven professionals offer services on YouDo.
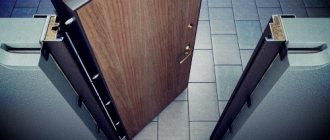
Installation of a threshold for an entrance door in a private house: we select and do it ourselves
The threshold under the front door prevents cold air and dust from entering the house from the street. This simple design tightly closes the gap to the street under the door leaf, so it becomes a good sound and heat insulator. In addition, it prevents the door from being broken into.
The threshold is a strip that is located at the bottom of the door frame.
This design for a private house is made with your own hands from the following materials:
- tree;
- concrete;
- plastic;
- metal.
Entrance door threshold made of different materials
Houses with different floor levels
There are houses in which the floor level on the site does not coincide with the level of the subfloor in the apartment.
In such a situation, you find yourself in a different situation. The front door opens, according to the rules, outward. This means that the width of the front door frame will be smaller outside the apartment, this is how the door vestibule is designed. If the floor on the site is lower than the floor level in the apartment, then it turns out that during installation the door will have to be raised, which will increase the already planned threshold inside the apartment.
I would like to note that all these nuances with levels and thresholds are of little concern to installers (although not all) and problems with floor levels emerge much later after installing the front door. We must be prepared for them.
Threshold selection criteria
If the strip comes with the door frame, then you don’t have to select a design - it is simply installed when installing the frame. If the front door kit does not provide it, then you need to independently select the material and its design. Installation is carried out after installing the box.
When choosing a design type, consider the following parameters:
- tightness of the canvas to the threshold;
- height of the structure;
- the material from which it will be made.
To ensure that the threshold fits the door as tightly as possible, select the correct shape and size of the product. It is better to order it together with the door frame.
Threshold under the entrance door with holes for crossbars of a locking design
When choosing a material, remember that the threshold is subject to mechanical stress during operation, and therefore it must be durable. Wood, concrete or metal are suitable for the entrance threshold.
If you decide to make a wooden threshold, install a plank made of hardwood, such as oak. Such a product will require constant care to maintain its aesthetic appearance and increase its service life, such as painting or varnishing. Wooden construction is the least durable compared to concrete or metal, but it is easier to repair and, if necessary, dismantle.
Attention! To increase heat and sound insulation, install a structure with a rubberized insert.
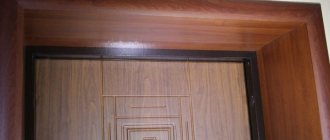
It is very easy to decorate a doorway with laminate and other materials.
Doorway of the entrance door before and after finishing
- Finishing requirements
- What materials are used?
- Plastering a doorway
- Plasterboard finishing
- Finishing with MDF panels
- Plastic finish
- Laminate cladding
- Decorative stone finishing
Finishing requirements
Before you start finishing the front door opening with your own hands, you should study the requirements for the work.
They must be followed if you want to get decorative and durable slopes that will not lose their visual appeal for many years.
- Installing suitable door and opening fasteners is an important step in improving the safety, strength and aesthetic appeal of the structure.
- It is advisable to choose the same material from which the door is made. In any case, it should be in harmony with the decor and contribute to the creation of a unified image.
- It is important to determine the appropriate mounting method. Thus, decorative stone is attached by gluing to the wall, and sheathing with MDF panels can only be done after installing the sheathing.
- Pay attention to sound insulation and the ability to conserve heat.
- The finishing of the doorway ends with the installation of platbands.
- Sometimes different materials are used for interior and exterior decoration.
What materials are used?
The finishing of the doorway after installing the iron door is done with the following materials:
- cement-sand mortars;
- plasterboard, which acts as an independent option or the basis for subsequent finishing (for example, you can use wallpaper);
- plastic, wood panels, laminate, veneer;
- decorative stone, natural or artificial.
If you decide not to call a specialist, we select the material and get to work.
However, it is important to learn in advance about the nuances of finishing and correctly assess your strengths.
Plastering a doorway
Plaster is considered a classic option. This method is used in non-residential premises or where additional finishing is expected in the future. You should plaster with care and attention, and then handle the doorway with care, because it will become difficult to care for. But the method also has advantages: strength, durability, resistance to adverse environmental factors, the ability to easily carry out repairs in case of damage, cost-effectiveness (30 kg of plaster mixture costs 200-300 rubles).
The finishing process looks like this:
- The surface is cleaned and then primed.
- After drying, guide beacons are installed. The evenness of the position is determined by the building level, and fixation is carried out with a solution.
- A reinforced mesh is attached to the surface. The door frame and walls that are not to be covered are covered with masking tape.
- Holes and voids are filled with the solution, after which it is applied to the entire surface.
- The resulting cracks are eliminated with putty.
The door opening is ready for painting or installation of other facing materials.
Plasterboard finishing
It can also become the basis for subsequent transformation or an independent option. Drywall is not as durable as plaster, but it looks attractive, strict and stylish, and is also easy to install. Another important advantage of plasterboard sheets is the cost, which is in the range of 200-400 rubles.
The finishing of the entrance door openings is carried out as follows:
- Measurements are being taken.
- Plasterboard sheets are cut into fragments. The resulting parts must completely cover the slopes and fit tightly to each other.
- Damage to the surface is repaired with polyurethane foam.
- Foam is also used to secure the finishing material. To do this, it is applied in a zigzag pattern to the wall, after which the drywall is pressed for several minutes. All you have to do is wait 10 minutes and press the material again. This ensures quick and durable adhesion.
- The cracks remaining after completion of the work are sealed, excess drywall and foam are cut off.
- The voids along the edges are closed with corners or putty.
Finishing with MDF panels
MDF is used for interior cladding of entrance doors in residential buildings and office buildings. The material is characterized by durability, hygiene and aesthetics, provides good sound and heat insulation, and withstands moisture well. The panels cost 150-250 rubles. per square meter. The tree will cost more: 300-700 rubles. Serious disadvantages of the material include its easy flammability and the fact that cladding is possible only after installing the frame.
Expensive purchases also include the purchase of veneer, a wood material characterized by high strength and aesthetic appeal. True, direct sunlight is harmful to it. Price per square meter – up to 5,000 rubles.
To decorate a doorway with wood, veneer or MDF panels, you need:
- Using self-tapping screws and dowels, install guides from wooden slats. Before starting work, the frame slats are treated with an antiseptic.
- Adjust the panels to the required size.
- Attach the first part with self-tapping screws or nails to the guides, continue cladding, completely covering the width of the slope.
- Mount corners and side panels to the guides.
- Mask the fasteners with adhesive and install a decorative strip.
- Secure trim around the perimeter of the door.
Plastic finish
A popular material, environmentally friendly, budget-friendly and easy to maintain. Manufacturers offer a wide color palette, which makes it easy to match the plastic to the texture of the door leaf. A square meter costs no more than 200 rubles. But the material is not particularly durable and does not fit every door.
The entrance door opening is lined with plastic according to the same principle as MDF: first the surface is prepared, then a sheathing of slats is attached, and then plastic panels are attached to it.
Laminate cladding
Such finishing usually does not raise questions even among inexperienced builders. This is due to the special flexibility of the laminate, its ability to take different shapes. The material looks good and does not harm the environment, but it does not tolerate high humidity, so you should not use it on the outside of the opening. The price of sheets is 300-3000 rubles.
Finishing a doorway with laminate differs little from lining it with MDF panels. But it is not necessary to mount the frame: another finishing method, suitable for smooth walls without flaws, involves gluing the material with foam directly to the surface.
How to make a wooden threshold in an apartment yourself
Tools and materials for DIY work
To ensure quality installation work, first prepare tools and materials. You will need:
- hammer;
- wood saw or grinder;
- chisel;
- plumb line;
- broom;
- brush;
- board;
- wood primer;
- varnish or paint.
Installation stages
- Preparing the base for the threshold.
At this stage, the installation site of the strip is cleaned. If there is an old threshold already installed, then it is dismantled. They level the base, remove beads of concrete, plaster the holes, clean out dirty places, and sweep away debris with a broom.
Manufacturing
Wood
If you need to replace a worn wooden threshold, you first need to dismantle the old one using ordinary tools - a hammer and a nail puller (if it was nailed) or a screwdriver (for cutters).
It will serve as a template for you to make or purchase.
Then you have to do the following:
- Thoroughly clean the installation site from dust and dirt. If the concrete base is destroyed during dismantling, remove all loose screed elements and level with mortar, having previously primed the surface.
- The threshold can be installed only after the solution has completely dried.
- At the bottom of the side pillars of the door frame, make grooves to the height you determine, measure the required length and cut the wooden blank along it. Insert it into place by carefully tapping it through the wooden spacer with a hammer.
Advice. If you are making a wooden one in a bathroom or toilet, its height should be such that there is a gap of 5–8 mm between it and the door leaf. It is necessary to allow air to enter the bathroom and ensure normal operation of supply and exhaust ventilation.
Made from concrete
Often after installing new doors, no matter what - entrance, balcony (see Options for balcony doors: how to make the right choice) or doors to bathrooms - you see this picture.
Naturally, the question arises: how to make it with your own hands so that they look good on both sides? The optimal solution would be to install a concrete threshold and then finish it.
In this case, you can repeat the configuration of the existing ledge, or you can make the threshold wider and more comfortable so that you can step on it with your entire foot when entering and exiting.
- Cut off the polyurethane foam and clean the area to be filled, prime it and screw iron bolts into the floor to the height of the future threshold. They will act as reinforcement.
- Make formwork from boards or any durable sheet material according to size and height. Place it in place and secure it firmly with spacers.
Attention! When preparing the solution, follow the instructions exactly! Do not add more water to it than is required by technology, in order to avoid cracking and destruction of concrete in the future.
Interior thresholds
Metal or plastic thresholds with open fastening are quite easy to install. They are cut to the width of the door opening on both sides so that the mounting holes are located at the same distance from the edges.
Then holes for dowels are marked and drilled in the floor through the mounting structures. After that, all that remains is to install the dowels, put the threshold in place and screw it with self-tapping screws.
Installation with hidden fastening occurs somewhat differently.
- Holes with a diameter of 5 mm are drilled in the floor at an equal distance from each other.
- The dowel-nails included in the threshold kit are inserted into the groove on its reverse side and distributed evenly along the entire length. The number of fasteners must correspond to the number of holes in the floor.
- The threshold is applied to the floor, the dowel-nails are installed directly opposite the holes and driven into them. After that, the threshold is nailed to the floor through a rubber gasket.
How to make a concrete front door threshold with your own hands
Building such a structure is labor-intensive, but the product will last much longer than a wooden one.
Tools and materials for work:
- hammer;
- perforator;
- level;
- putty knife;
- container for mixing the solution;
- electric drill with mixer attachment;
- roulette;
- screwdriver;
- broom;
- cement;
- sand;
- water;
- primer;
- wooden boards for formwork;
- self-tapping screws
DIY concrete threshold installation
- Cleaning the base surface.
As when installing a wooden structure, first dismantle the old threshold and clean the base for a new one. Seal cracks and holes with cement-sand mortar.
- Surface primer.
- Installation of formwork for concrete
Formwork is made from wooden boards or slats around the perimeter of the threshold. It must be securely fixed. Installation is carried out by level.
Attention! To create a durable structure, metal bolts are screwed into the base of the threshold to the height of the structure (they act as reinforcement) or metal mesh and wire are laid.
- Mixing concrete mortar.
To mix the concrete solution, take cement and sand in a ratio of 1:3. It is advisable to add plasticizers to the mortar mixture, which will make the structure frost-resistant. You can use ready-made mixtures that are sold on the construction market.
- Pouring concrete mortar into formwork
Pour the solution into the formwork and carefully level it so that all corners are filled with concrete. Now all that remains is to wait for the solution to dry. During drying, the surface of the threshold is moistened from above with water several times so that drying occurs evenly and the concrete does not crack.
Recommendations for the selection of facing materials and their installation
What is better to cover the porch: tiles or paving slabs?
Paving slabs for the porch are a cheaper option. In terms of presentability, it is in no way inferior to tile. The street porch can be decorated with either very simple or patterned or relief tiles made of concrete and other materials.
Paving slabs of the same type can be used for both the path leading to the house and the porch itself. This design is relevant and looks beautiful.
Laying a staircase with tiles is somewhat more difficult. Thin material requires a perfectly flat surface and careful grouting of the seams. Tile can be an excellent extension of a hallway or hall.
Facing the porch with tiled tiles requires a competent selection of materials. Particular attention should be paid to the surface of ceramic tiles. It should not be too smooth, as this is dangerous.
What is the best way to decorate the porch of a wooden house?
The decoration of the porch of the house, a photo of which can be found on the Internet, should be selected depending on the material from which the span and steps are made. A wooden porch in a private house can be covered with special overlay panels.
They are made from wood. For cladding steps, it is better to choose hardwood, such as beech, oak or hornbeam. Wood for the porch should be treated with an antiseptic, which will prevent it from rotting. It should also be coated with varnish for exterior use.
Before finishing the porch of the house with wood, make sure that all steps are under a protective canopy. This will minimize the ingress of moisture on them and keep them presentable longer.
How to decorate a porch with paving slabs?
The porch is finished with paving slabs from top to bottom. The first stage of this process is to remove unevenness and roughness from the concrete surface of the steps. This is necessary so that the facing material lies on them as evenly as possible.
Read also How to salt pink salmon caviar from frozen fish
The DIY installation technology is quite simple, but requires compliance with certain rules. To do this you will need a building level, a small rubber mallet, a spatula and a container for mortar.
Paving slabs on the porch should be laid gradually, one after another. It is attached to the surface using a cement-sand mortar. A small portion of concrete is applied to the step, and tiles are laid on top of it. Its position is checked with a level and, if necessary, trimmed with a blow of a mallet.
Remaining mortar should be removed from the surface before you lay new tiles on it.
What to consider when choosing material for cladding a porch?
Before tiling your porch, you should know what is important to pay attention to when choosing it. The staircase cladding should ideally match the exterior of the house. If the facade is finished with rusticated stone or clinker, then it is also better to finish the porch with clinker tiles. If the exterior of the house is finished with siding, then steps made of porcelain stoneware will look great in combination with it.
The shape of the porch must also be taken into account when choosing materials for cladding. Any material is suitable for a standard staircase. It is better to line a round porch with paving slabs. It is much easier to divide it into fragments of a certain shape.
Before tiling your porch, be sure to also consider the maximum possible load on the steps. Not every wooden staircase can withstand cement-sand screed and tiles, while for a metal or reinforced concrete porch this finishing option is not a problem.
What are the advantages of facing steps with clinker tiles?
The first and main advantage of finishing porch steps with clinker tiles is the high quality of this material. Clinker is wear-resistant, resistant to mechanical damage and is not afraid of moisture and sudden temperature changes.
Using this material you can make a beautiful porch in a country house. Clinker tiles are considered an environmentally friendly material because they do not contain harmful impurities.
Laying clinker tiles on porch steps is also safe, since the rough surface of the material prevents possible injuries in slippery weather.
What should you consider when decorating a porch with porcelain tiles?
Porcelain tiles for outdoor porches should be rough. It costs more than regular material with a smooth surface. If you do not have the funds to purchase special tiles for street decoration, but you still want to line the porch with porcelain stoneware, you can apply large marks to its surface using an engraver.
You can also increase the safety of a porcelain stoneware porch using anti-slip rubber strips. They are screwed to the edges of the steps.
It is also important to know how to properly line a porch with porcelain stoneware. This is what determines how long the facing material will last. There should be no voids or differences under it.
How to lay tiles on a semicircular porch?
Before laying tiles on a porch in the shape of a semicircle, it should be taken into account that according to SNiP, the angle of inclination of the march should be no more than 45-50 degrees. The ideal option would be steps with an angle of approximately 30-37 degrees.
Laying tiles on the porch with your own hands in this case should be done in stages. First you should measure one row and cut off the required amount of material. Remember that it is advisable to soak the tiles in water for about an hour before cutting.
Each tile should be checked with a level. If the ends of the porch are high, they should first be reinforced with reinforcing mesh for better adhesion of the material to the surface.
Is it possible to line the steps with natural stone?
Natural stone cladding material is available for sale today. Before laying tiles on the steps, you should carefully approach the issue of choosing a stone. For simpler houses, granite is suitable. A porch lined with such tiles will look great in combination with a brick or stone facade.
For houses with columns and other architectural elements, it is ideal to use marble tiles. It is expensive, but in terms of presentation it is superior to other materials.
Working with natural stone is very labor-intensive. The video below demonstrates how to tile steps with granite tiles.
Existing options and schemes of thresholds for doors
Installation sequence
To obtain a high-quality room design element, you need to perform all actions one by one. The sequence of work is as follows:
- Preparing the formwork for the future threshold. The formwork must be designed taking into account the height of the drop, which is measured by a building level or a manual level.
- Using tiles laid in the middle of the prepared formwork, a space is created for the future threshold. Afterwards the pieces are laid, rising above the central part of the formwork. You should also decorate the corners of the thresholds using profiles assembled manually or purchased ready-made.
- The space created between all sides of the formwork should be filled with a pre-prepared mixture of cement and sand. The consistency should be (1:3). Care should be taken to ensure that the solution does not extend beyond the boundaries of the formwork structure.
The process of pouring a door threshold with concrete
An example of mosaic finishing on a door threshold
Materials and tools
Regardless of what options for thresholds for the balcony you decide to make, you will definitely need materials and tools. For installation, the following set of raw materials is most often used:
- Wooden formwork to create the shape of the threshold.
- Tiles to strengthen the base of the threshold.
- Adhesive solution for fixing tiles.
- Primer material.
- Water.
- Cement mixture.
- Sand.
- Brick.
- Metal scissors for creating corner structures.
- Material for decorative surface finishing.
If the owner decides to implement some special threshold design option, then additional tools or materials may be required that are not included in the list above.
Using a guillotine type sill
It is also called automatic lifting threshold. This design is installed at the bottom of the door. The insertion is carried out to a depth of 20 cm.
The threshold is made of aluminum with a seal made of rubber or rubberized material and a spring.
Guillotine type threshold
On the side of the hinge post, a strip with a button is cut into the door. When closing, the button is pressed, the threshold spring is activated, and the seal falls down to the floor covering.
The service life of the structure is up to 25 years.
Such a system is easily repaired, and damaged parts can be replaced.
Installation features and procedure
Removing the old threshold
If you want to replace the old threshold, you must first remove it.
- Prepare your tools: a crowbar, a hammer and a hacksaw.
- Saw off the edges of the threshold and try to knock out its middle.
- Place a crowbar under the bottom of the structure and loosen it.
- If the crowbar is difficult to get through, drive it in with a hammer and hit the free end several times. The tool, like a lever, should knock out the structure.
- If the threshold does not give in, try removing the fasteners with a nail puller.