Installation of modern double-glazed windows requires careful adherence to technology so that the window structure serves properly for the entire stated period. This is especially true for slopes, because any violation of their installation can significantly reduce the operating time and provoke the occurrence of drafts. To avoid such phenomena, you need to follow a certain algorithm of actions and use high-quality materials. Let's take a closer look at the technology for finishing slopes from the inside.
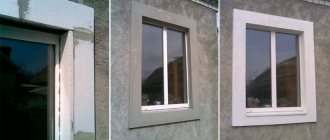
How to seal slopes after installing plastic windows from the outside and inside: instructions, video
It is impossible to replace any window without deforming the adjacent sections of the wall. How to seal slopes after installing plastic windows, what to do to make the structure look neat and serve as reliable protection from noise, wind, and other troubles? It will be difficult to do without repairing and sealing windows. Let's consider the most rational options.
- Features of sealing window openings
- Various finishing options
- Plastering with dry mixtures
- Plastering with tile adhesive
- Finishing with plastic tape
- Application of window sealant
- What material to choose for sealing slopes
- Internal slope
- External slope
- How to properly seal slopes
- Video
Delivery of materials to the site within the Moscow Ring Road (+ 10 km) - 700 rubles, then - 15 rubles/km.
| Slope depth | Sandwich panel (running meter) | Panel - foamed PVC (running meter) |
| up to 25 cm | 650 rubles | 930 rubles |
| up to 30 cm | 690 rubles | 990 rubles |
| up to 35 cm | 840 rubles | 1200 rubles |
| up to 40 cm | 900 rubles | 1270 rubles |
| up to 45 cm | 930 rubles | 1330 rubles |
| up to 50 cm | 1000 rubles | 1430 rubles |
| up to 60 cm | 1200 rubles | Negotiable |
INCREASE RATIO:
- bay windows - 1.15
- arched windows - 1.5
- colored slopes - 1.8
COMPLEX OF WORK FOR FINISHING SLOPES:
- removing old plaster from slopes
- leveling large potholes, chips, and mortar overflows
- plastering the gap under the window sill to a depth of 3-10 cm, up to 80 mm high
- installation of plastic slopes
- sealing the joint between the frame and a quarter of the wall opening on the street side
- sealing the joint between PVC panels and the window frame
- designing the joint between the slope and the wall with decorative corners
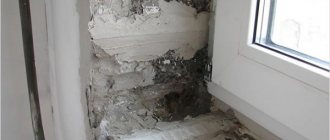
Seal the cracks
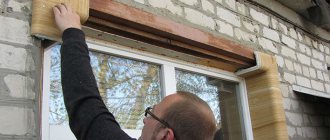
The outer slope is not always plastered, but it is constantly foamed. Before work, you need to trim off the excess foam so that the depth of the seam between the window profile and the slope is 1-2 cm. You can trim the foam with a paint knife or a metal spatula.
After cutting the foam, it is advisable to prime the gap, since on the street side, as a rule, there is old plaster with high absorption. If you skimp on the soil, then the fresh plaster will fall off to the owners' grief.
Cut off the foam, coat the seam with a brush dipped in soil and mix the plaster mixture. The consistency is as thick as possible; the joint does not need to be plastered so much as it needs to be filled with mortar. Mix the plaster in a plastic container, apply the solution using the main and auxiliary spatulas. The main one is 20-25 cm long, on it you keep a supply of solution so that you don’t have to run to the bucket with the mixture every time; the auxiliary one clogs the seams. The width of the second spatula is 5-8 cm, no more is needed, it’s inconvenient to work with.
Drive the seam of the slope from the window to the street horizontally, remove excess mixture with a vertical movement along the seam. Try to press the solution into the gap as much as possible, it should fill all the voids inside.
Technology for sealing windows with plastic slopes
Since plastic slopes are very popular due to their simplicity and accessibility, let us consider in more detail the scope of work and the principle of installation of the structure.
The interior decoration of windows is most often done with plastic panels.
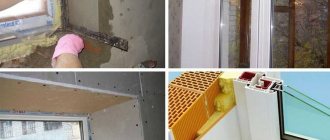
First, you need to remove the remaining foam from the working surface, treat the openings with an antifungal agent and apply a layer of waterproofing. Pay attention to the sealing of the window under the window sill: the free space must be carefully filled with foam to prevent future blowing .
The space under the window sill is carefully sealed with foam
The starting profile needs to be attached around the perimeter of the window frame, and the rail should be placed on the outside. This is an important installation part on which the profile fastenings for slopes are mounted. This can be done with the staples of a construction stapler. Be sure to check the thickness of the slats: if there are slight deviations, use a thin shim.
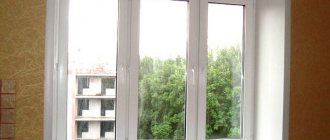
Next, the panels need to be placed between the prepared profiles. You need to start working on the upper side of the window frame, moving to the lower ones. First, the plastic is introduced into the starting profile and secured well, after which you can use a sealant.
Silicone sealant is used to seal joints
Before you start fixing the second side of the plastic, a layer of mineral wool is placed under it. This step will improve the sound and heat insulation function. Having successfully attached the slopes along the top of the window, you can install the side panels in a similar way. At the end of the work, the joints and the connection strip with the window sill are covered with a thin layer of liquid plastic, and the excess is carefully removed.
Even an inexperienced craftsman can seal windows after installation, since the methods are simple to perform and do not require high labor costs. Ready-made structures made of plastic or plaster will delight you with their neat appearance and reliability. It is only important to follow the technology and stock up on knowledge on how to properly and efficiently seal a window.
Covering slopes with plastic
As noted earlier, plastic is in demand due to its simple installation and low cost. Besides this, there are other advantages:
- The material goes well with the window profile. The slope and profile have the same expansion, so there is no tension between them;
- performance characteristics are maintained for up to 20 years;
- withstands temperature changes;
- there is a protective layer that does not burn or melt;
- easy care. Dust and dirt are removed with a damp cloth.
The following sequence is selected for work:
- A wooden block is attached to the slope so that the window space is not covered.
- Using a stapler, we attach the starting strip to the block.
- We cut strips of plastic to size. They are inserted into the starting strip fastener.
- After everything is inserted, carefully move the panel away from the wall and fill it with foam from the far corner.
- We fix the panels with mounting tape to the wall.
- After the foam has dried, the ends of the panels are closed with special corners.
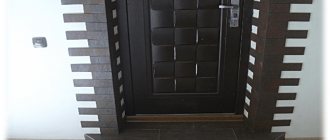
Differences in artificial stone by material of manufacture
The artificial masonry used to finish door slopes does not differ in appearance from natural masonry. The composite is made on the basis of different materials, so it has three varieties.
| Material | Description |
| Gypsum | This is an environmentally friendly material, which is characterized by: • high sound insulation; • thermal insulation; • practicality; • strength; • various shades; • ease of installation. |
| The features of this material include the following: • special equipment is required for its production; • can be used not only for internal, but also for external cladding; • high moisture resistance; • the material does not absorb dust and dirt; • easy to clean, but the use of cleaning products with abrasive additives is not recommended; • when ignited, it only melts without releasing toxins dangerous to humans; • wear-resistant; • repairable. | |
| Consists of marble, granite and quartz chips with the addition of coloring pigments. This decorative material is characterized by: • the ability to be used in rooms with temperature changes and high humidity; • strength; • practicality; • moisture resistance; • costs less than acrylic stone. |
Use of plastic panels
Sealing foam after installing plastic windows can also be done using other materials. One of the popular finishing materials is plastic. Panels made from it are sold ready-made. All that is required is to saw off the part to the required length and attach it to the wall. Such work will take much less time than using plaster and will not cause any difficulties for an amateur. To complete the task you will need to do the following:
- Cut out the pieces to the required size, which will be secured using a plastic strip.
- Install side panels. They are fixed at an angle of 90 degrees with respect to the window, you can make 110 degrees. For better insulation, the cracks can be filled with foam. The remaining foam must be cut off after it has dried.
- The gap between the slopes and the wall is closed using an f-shaped batten.
Installation of plastic slopes outside
An integral attribute of window construction is window sills. Read more about them in our article “Installing ebb tides for plastic windows.”
You can also read about other options for finishing slopes about their insulation, sealing and vapor barrier of seams between the window and the wall.
Types of artificial stone depending on external design
Modern manufacturers offer the most common textures and shades of this artificial material. Below are samples of some of them.
| Alpine slate | Rock formation |
| Under the brick | Bassoon |
| Marbled | Granite |
| Rocky Pile | Old fortress |
Plastic panels and working with them
The use of plastic panels is the fastest option, allowing you to improve the opening after installing window blocks within one day. Do-it-yourself slopes for plastic windows are installed in this order (without auxiliary profiles):
- The slopes are measured.
- The panels are cut to the required size.
- “Liquid nails” or putty are applied to the reverse side.
- The fragment is pressed to the surface.
- A sealant is applied between the frame and the panel.
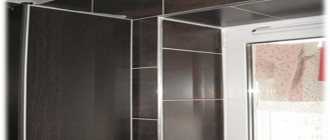
- Plastic corners are glued to the outside.
Installation of plastic panels on window slopes
Indeed, this option allows you to close areas in a short time.
Of course, everyone chooses the method of repairing the slopes of plastic windows, which is used after installing the frames. The main thing is to strictly follow the technology.
Slope putty
Puttying of slopes is carried out if plasterboard or ordinary cement-sand plaster was used to finish the internal surfaces of the window opening.
A layer of putty is applied so that the slope can then be painted, but even a perfectly white surface left without painting will look very aesthetically pleasing.
If the putty solution will be laid on gypsum plasterboard, it is recommended to immediately use the finishing mark, since the drywall does not require additional leveling. When puttingtying a plastered surface, use universal start/finish compounds.
To prevent the outer corner from losing its sharp profile in the future, it should be protected; for this, a perforated corner is installed at the junction between the wall and the slope. It can be secured either with self-tapping screws or with a putty solution.
Options for installing corners on walls
Installation on a wall covered with wallpaper.
- The first method is wallpapering. Suitable if the paper surface does not have a deep relief. In case of installation on a deep-relief surface, there is a high probability of accumulation of dirt and dust in the resulting cracks.
For wallpaper
- The second method is more labor-intensive; you need to prepare the paper surface. It is necessary to attach the element to the wallpaper, mark it with a pencil, and cut out part of the paper. Corner fittings will lie flat and will not create slot holes. Recommended for deep textured wallpaper.
How to plaster slopes on windows?
You should start plastering the slopes on the windows indoors, and first of all do the right and left sides, and then the bottom and top of the surface.
- We dilute a little solution more liquidly and spread it over the entire area for better adhesion of the next layer to the base. Be careful: the mixture should stick to the surface and not spread over it. Let the base layer dry.
- We install the square flush with the window frame and draw a line along the window sill. We do the same thing at the top. We drill holes in the rule for subsequent fastening. We place it according to the drawn marks and screw it to the wall.
- If your window is wooden or there is simply no window sill, then the position of the rule is determined as follows:
- We place a square to the edge of the frame and use it to make a mark at the bottom and top of the window at the same width.
- Then we set aside the required distance to the right (for the right edge of the window), for example, 5 cm, and make a mark. This is necessary to create the “dawn angle”.
- Based on the received marks, we tighten the rule.
- There are two ways to level a slope:
- Using a lighthouse. We plaster the gap between the slope and the frame sealed with masking tape. We spread the plaster in the form of convex cakes. We install the beacon by pressing it into the plaster. We check its position - the lighthouse should be level with the lines drawn on the window sill and the top panel of the window. In the middle we check the position of the beacon using a level. If necessary, we correct it, remove excess plaster and wait for everything to dry. We plaster the surface along the exposed guides.
- With the help of malka. In this case, the beacon is not needed - the frame itself is used instead. The plaster is applied immediately, and the remainder of the mortar is removed with a specially made strip. To do this, it is carried along the slope from bottom to top.
- Let's remove the rule.
- We grout using a grater.
- Apply a layer of primer.
- When we finish making the window slopes with our own hands, we apply decorative plaster.
Do-it-yourself plastering of external window slopes uses a similar technology. After working with a plastic window, a groove is made between the frame and the leveled surface using a spatula. Then they fill it with sealant to prevent cracks.
By following these simple rules, you can get the job done quickly and efficiently.
Finishing slopes with plaster without insulation
Making a window opening without using insulating material is not a modern method, but is often used. The main reason why such finishing disappears is improper execution of the work.
How to properly plaster window slopes
The step by step process is as follows:
- Guides made of metal or wood are placed around the window.
- Beacons are installed level and fixed with dowels in the walls. In fact, the beacon shows the percentage by which the thickness of the plaster will be.
- The second beacon is placed on the corner of the window opening.
- Plaster is thrown onto the wall, uneven walls are leveled using a rule that is carried out from the bottom up along the beacons.
- By analogy, work is carried out for the ceiling part and drainage.
- The main task of the first layer is to fill the voids and form the corners and the window opening itself.
- It is necessary to level the walls when the mortar is no longer wet, so the material is thrown on and the surface is leveled along the beacons. A flat plane should form. Excess material is removed and the window is left to dry the solution.
- The window opening must be primed and a finishing layer of putty up to 1.5 mm thick must be applied.
At the last stage, the opening can be updated with paint or other finishing materials, for example, a paper layer of wallpaper, etc.
Important! Every meter of work done with your own hands will not only decorate a private house or apartment, but will also provide experience and pleasure. The design of the slope can be carried out according to the described method everywhere, inside, outside, on the balcony and in other places.
You can familiarize yourself with the process in the video at the end of the article.