Published on October 29, 2018 by Stroitel
A wide variety of finishing materials can be used to finish the slopes of a door or window opening. One of them is a door slope made of stone. This is a stylish design solution that gives the room a special mood depending on the type of artificial decorative stone.
There are several techniques for decorating slopes and the openings themselves - this can be a strict symmetrical finishing of the entire opening from the outside or partial: the edges can be torn, the masonry can extend to a fragment of the wall. In any case, finishing the slopes of the front door with decorative stone or window openings always looks modern and elegant.
Types of masonry
There are two types of masonry - with and without seams. The seam looks better when laying elements of a clearly defined geometric shape.
Seam preservation
When performing finishing work from artificial stone, you can use a masonry technique that preserves the seams. In order for the seams to be even, it is necessary to install plastic wedges between them. This will keep the masonry elements in the required position while the adhesive solution sets.
To maintain the gap between the stones, plastic wedges are used
When finishing slopes with stone, work begins in the lower corner. Cover part of the wall with the adhesive solution using a comb spatula. The decorative element is applied to the wall and pressed.
Stone surface finishing technique
If the door slopes do not have a door leaf, then the decorative stone is laid overlapping. If there is a door, the color and texture of the openings should fit harmoniously into the interior and be combined with other decorative finishing materials.
Joining seams
The jointing occurs after the decorative material and the wall surface have completely set. The instructions from the manufacturer of the artificial stone contain recommendations on the use of the type of grouting composition.
Using a syringe gun, the seam is filled to a depth not exceeding 5 mm. This will give the masonry a more pronounced relief.
Seam cutting is done using a syringe gun.
When the grout begins to set, it must be leveled using a shaped spatula or spatula.
A spatula or spatula is used to grout the seam.
The remaining grout from the front surface can be cleaned off with a brush.
Clean seams with a brush
A stone door slope will look more solid if the grout color is gray. Light grout against the background of dark decorative masonry will refresh its overall perception.
Monolithic masonry
When designing a door slope without seams, the work takes less time. The monolithic nature of the masonry is achieved by placing the elements as closely as possible to each other. With this method, the adhesive solution is applied directly to the product .
In monolithic masonry, the elements are laid as close to each other as possible
It is important that there are no traces of glue left on the outside.
The adhesive solution is applied to the stone
When laying, it is necessary to control the vertical direction of the masonry. If the products have the correct geometric shape, then it is important to ensure their correct horizontal position.
Check the evenness of the masonry using a level
At the final stage, the masonry is coated with a solution that increases the strength and water-repellent characteristics of the material.
How to do it yourself: step-by-step cladding instructions
When finishing the slopes of window or door openings, it is necessary to carry out all work in accordance with the chosen masonry method - with or without seams. This determines the technique of applying the solution - on the tile or on the wall. It is necessary to take into account the boundaries, and carry out all work as carefully as possible, since it is impossible to remove contaminants using a “live” solution without disturbing the evenness of the elements.
In doorways
To decorate doors with decorative stone, you will need to complete the following steps:
- Prepare the surface of the door entrance openings from the inside: clean, level and coat with a deep penetration primer.
- Apply markings to the surface using a level, a ruler and a pencil. The first row will be formed using it.
- To increase adhesion, you will need to apply notches to the surface.
- All work should be carried out only on dried primer.
- Laying begins from the bottom corner. If special corner elements are used, they are laid out first vertically.
- Apply the adhesive to the wall or tile in an even layer using a notched trowel.
- The elements are laid out on the surface, slightly recessed, which allows you to expel excess glue and level the stone.
- Only after the coating has hardened, if there are seams, are they opened.
In window openings
Similar techniques are used as when working with doorways. In order for the work to be done efficiently, you must adhere to the following rules:
- use decorative tiles of small sizes;
- laying tiles in an arc will create more interesting compositions;
- the presence of an uneven outer edge of the cladding will give the effect of natural stone;
- if several boxes of tiles are used, it is necessary to remove all the elements, mix them completely, and place them back so that a slight difference does not create a sharp transition.
Uniformity of distribution should be achieved according to texture, color, thickness, relief, size of elements on the decorative surface.
All work begins from the corner; it is more convenient to use corner tiles. This will significantly reduce the complexity and duration of finishing.
Finishing a window opening with artificial stone
Decorating windows with stone looks no less impressive than decorating doorways. An important condition is the size of the elements. It is necessary to trim the window slope with a small facing stone so that the finished window opening does not look massive.
It is recommended to use small products for window cladding
Window slopes must be leveled and primed outside and inside. When using artificial material, reinforcing the surface of the slope, even if it is made of plasterboard, using reinforced mesh is not required.
The material is laid on the windows using the monolithic method, starting from the bottom of the slope. When the lower fragments are securely fixed, you can continue laying out the upper rows. Corners should be formed by trimming the end sides of the facing products at an angle of 45 degrees.
Modern glazing technologies imply careful attention to every detail, so questions about how window sills and slopes are designed also do not go unnoticed by the craftsman. Proper repair of these structural elements of the window will provide it with a longer service life and prevent the risk of cold air entering the home. Let's talk further about how the interior window slopes are finished, and what materials need to be used for this.
Useful tips
To ensure a beautiful, natural finish, you must follow the following advice from the experts:
- preparation of the surface before laying should be carried out regardless of its evenness, since to increase adhesion there must be a layer of soil, and the absence of large differences will significantly simplify installation;
- if the stone is heavy, then a reinforcing mesh is applied to the surface of the slopes;
- to prepare glue, you need to buy such compositions as are recommended by the manufacturer of the decorative stone;
- In order for the coating to be uniform in pattern, texture, relief, it is better to lay out the elements before cladding on a flat surface with a decorative layer facing up;
- if cement elements are used, then the cut is made with a grinder with a diamond blade, gypsum blanks are cut with a hacksaw;
- remove the plastic wedges and seal the seams only after the glue has completely dried;
- To increase the service life of the cladding, additional coating can be applied.
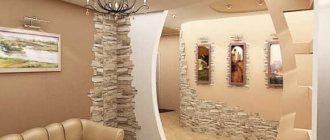
Slopes trimmed with decorative stone look very beautiful, attract attention, and provide an unusual design for the room. In addition to decorative characteristics, finishing the corners performs another task - it provides protection from mechanical damage.
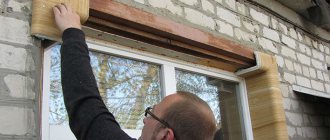
Today, window replacement has become very common. Old frames are still being actively replaced with modern analogues made of plastic, metal and wood. The installation process itself occurs quite quickly, which cannot be said about finishing the windows from the outside, since this procedure has a number of technological requirements, and from an aesthetic point of view, the owner should be satisfied. In the article we will analyze various ways to create beautiful and reliable slopes and frames, focusing on materials and methods of their installation.
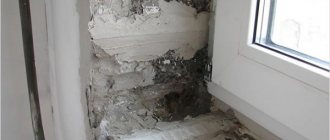
The need to finish the slopes inside the window
The relevance of finishing window openings indoors and outside the house with sandwich slabs, plaster, etc., as well as the front door with decorative stone, is very high. Internal factors, the action of which can negatively affect the quality of the window itself and its slopes, include:
- increased humidity indoors;
- the appearance of condensation on the window due to a significant difference in temperature outside the window and inside the house.
External factors that have a destructive effect on the window and its slopes include:
- precipitation, wind, sunlight;
- sudden changes in ambient temperature;
- mold, mildew, harmful insects.
Proper finishing of windows and doors with decorative stone allows you to raise the level of resistance of the window structure to the influence of the described factors to the highest possible level. This will ultimately extend the service life of the windows, improve the appearance of window openings in particular, as well as the facade of the house as a whole.
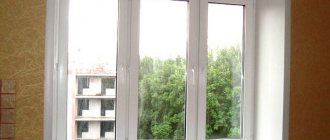
You can see a window with high-quality slopes inside the room in the following photo.
Choosing stone cladding for work
High-quality decorative stones of artificial origin are difficult to distinguish from similar natural materials with the same texture. However, natural stones differ in their pattern and texture, which are not repeated, and may contain various inclusions and foreign additives. But the strength of natural materials is much higher. This ensures the durability of the coating, which can last up to 150 years.
Artificial stones have advantages:
- Light weight, which greatly simplifies installation and lightens the entire masonry. In multi-storey buildings, these materials do not create a significant load on the supporting structures.
- The price of the material is lower than natural analogues with the same texture, installation will also be much cheaper.
- Due to the same size of all elements, the amount of waste and operations to adjust the shape and pattern is significantly lower.
- It can be used in different rooms, even for wall cladding in the bathroom, bathroom, kitchen and other rooms with extreme conditions: high humidity, temperature fluctuations, fat deposits, and other influences on the surface.
- Maintenance is very easy due to the dense surface, which allows you to use different detergents.
The disadvantages of artificial stone compared to natural stone are:
- less strength, durability;
- since scratches, chips, cracks as a result of mechanical damage appear more easily, repairs of artificial slabs will be carried out more often;
- gabbro, diorite and granite may have a small degree of radioactivity because they are of igneous origin.
Attention
Natural stones are heavier, which does not allow them to be used as cladding in multi-storey buildings.
Drywall
Most often, the decoration of indoor slopes and entrance doors is done using plasterboard. This is a finishing material with high performance parameters, which allows you to quickly and with a minimum of effort make slopes perfectly smooth and resistant to external influences.
Drywall is lightweight and its installation on vertical surfaces is not particularly difficult. It is beautifully painted in the current color shade. In addition, such materials, when properly treated with antiseptic compounds, can prevent the risk of mold and mildew developing at the joints of slopes and window frames. Window finishing with plasterboard is shown in the following photo.
Material selection
You should not think that you can choose any type of drywall to design slopes in your house. The material should be selected taking into account its operational parameters. And they differ for different types of drywall, which should be taken into account by the master before materials are purchased and window repairs begin.
Types of drywall
Absolutely any window is a source of moisture in the form of condensation, which is formed due to the large difference in temperature in the house and outside. As a result, the materials used to repair slopes must certainly be resistant to this factor. This means that you need to select only moisture-resistant plasterboard sheets, on which the presence of condensation will not have a negative impact. Otherwise, the repair will retain its functionality and attractive appearance for only a short period of time. In addition, it is worth using antiseptic compounds to cover the surface of the material, as well as special paint for its finishing.
Measurements
Finishing the slopes of plastic windows in a house should always begin with taking measurements, for which you will need to stock up on a measuring tape. The final results of the master’s work largely depend on the quality of this stage of work. If the slope does not fit as tightly as possible to the window frame, there will be a risk of developing such negative consequences as:
- the appearance of mold and mildew outside and inside the premises;
- the appearance of microcracks through which frosty air will begin to penetrate into the house during the cold season. Gradually, without adequate measures to eliminate the problem, the cracks will grow, and with them the costs of heating the premises;
- reduction in the service life of the window structure, its rapid wear both in quality and aesthetic terms.
Taking measurements
Installation of slopes
Finishing slopes with plasterboard begins with an analysis of the measurements taken. All window parameters are transferred to plasterboard sheets, from which you need to cut out pieces that are ideal for the window opening.
Drywall cutting process
Installation of such canvases can be carried out on the lathing, on the profile, or without them. The choice of technology should be determined by the fact in which state the slopes are. Visually evaluate whether they are processed with high quality, as well as what quality the double-glazed window itself has.
Installation of drywall is carried out using a special adhesive composition if the walls are perfectly even. If not, you will need to first bring them to this state.
Next, you need to attach the strip to the window profile or frame, which will securely fix the drywall on the side of the double-glazed window. Plasterboard panels are installed on top of the planks, carefully treating the resulting voids with sealant. Then the structure will be devoid of cold bridges.
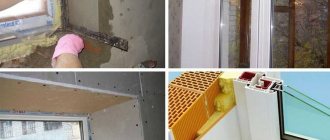
Removing excess polyurethane foamInstalling a slope angleMetal lathingInstallation of plasterboard slabsFinished plasterboard slope
Features of the material
Despite its unusual nature, decorative brick has only recently begun to be in demand. When choosing decorative cladding, more and more people are leaning toward this type of wall decoration, realizing that brickwork fits perfectly with any interior. To understand what qualities and features are inherent in decorative bricks, you should familiarize yourself more carefully with this material. Today, the construction market offers customers several options for brickwork for decorative finishing, which are made from various materials.
Clinker
The main part of the composition for this type of decorative brick is clay. During production, it undergoes a special process of pressing and subsequent firing. Thanks to these procedures, clinker decorations can easily withstand changes in temperature and weather conditions. It follows from this that this type of brick can be used not only for interior decoration, but also for exterior cladding.
Clinker, by its characteristics, has an increased level of strength. Of course, it is possible to damage it, but to do this you will have to make every effort and use construction equipment. In addition to its strength, clinker easily withstands exposure to ultraviolet rays and is also not afraid of chemical elements. A humid environment is not a problem for clinker decorative bricks. Of course, it absorbs some moisture from external influences, but this does not affect its appearance in any way. An important feature that appeals to residents of regions with harsh winters is that clinker bricks are resistant to low temperatures.
During the production process, a coloring pigment is added to the main composition, due to which the finished product acquires different shades, from which you will have to choose one that suits the overall style of the interior. In addition to a number of advantages, clinker has one important drawback: price. This cladding option is not at all cheap, but by paying once, you can be content with the beauty of the brick decoration for many decades. Especially when it comes to the exterior of the house.
Due to its properties, gypsum is widely known in the construction industry and is used in almost all types of repair work. It is very easy and convenient to work with him. Installation of gypsum brick is very simple; anyone can cope with this task. Those who like to do everything with their own hands will be delighted to learn that decorative bricks based on gypsum can be made with their own hands; you just need to stock up on gypsum mixture and several molds.
According to its characteristics, gypsum is a very flexible material. It can be processed without hesitation, due to which it has a huge variety of color palettes. In addition, gypsum is safe, which is also a positive quality for interior decoration. Decorative brick based on gypsum has heat and sound insulation. But, despite a lot of advantages, this material can only be used in closed, warm rooms, since gypsum does not tolerate a humid environment and low temperatures.
Polyurethane
Polyurethane is considered the most budget option. But it is not suitable for finishing indoor spaces or cladding the facade of a house. Polyurethane decorative bricks are mainly used for finishing public places. Its appearance resembles the outline of bricks, but upon closer inspection, it becomes visible as a prop. The main disadvantages of this option of decorative brick are its intolerance to sunlight. Under the influence of ultraviolet radiation, the paint becomes faded, and then completely fades.
Styrofoam
Polystyrene foam itself is a fragile material. Decorative bricks made of foam plastic have several qualities. Of course, the cost of this material will be invisible to the family budget. But children, exploring their surroundings, may stumble, fall and hit their heads on the wall, but the foam cladding will not cause harm, it will only soften the blow.
In addition to the standard characteristics of decorative bricks, special attention should be paid to the compositions that are suitable for laying the facing material.
- For the installation of gypsum and clinker bricks, cement glue is most suitable. It adheres to concrete and plaster without difficulty. Not afraid of contact with moisture. Easily tolerates temperature fluctuations.
- Gypsum-based putty is suitable exclusively for interior finishing. Its composition can withstand clinker decorative bricks, gypsum and foam varieties.
- Silicone mass is suitable for working with every type of decorative brick. In addition, silicone is an indispensable material for installing decorations in rooms with high humidity.
PVC panels
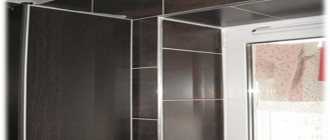
No less popular today is the repair of slopes in a house with PVC panels on the profile and doors with decorative stone, thanks to which the entire structure acquires a solid appearance. Such repairs, as shown in the photo below, have a long service life and retain their properties for a long time.
PVC panels
Plastic panels are selected taking into account the size of the window opening, as well as its technical parameters. Before starting repairs, you will need to prepare the surface of the slopes. Then, PVC parts of the current size are cut out, which will be mounted around the entire perimeter of the window on wooden slats and profiles.
If you want to insulate the house, the space between the wall surface and the panels should be filled with a layer of mineral wool or construction foam. Finishing slopes with PVC profile panels is also advantageous because PVC materials have a smooth surface, are produced in different color shades, and look harmonious in the interior of a private home. This allows you to save on the final painting of the slopes.
Another attractiveness of this method lies in the fact that all elements of the window structure (window, slope) acquire the same expansion coefficient, which will ensure they fit tightly together and prevent the risk of cracks forming.
Scheme for finishing a slope with PVC panel
Surface preparation
To install plastic slabs on a slope, you need to carefully prepare the surfaces. To do this, I carefully cut off the excess mounting foam using a utility knife, and the surface itself is cleaned of dirt and dust, coated with an antiseptic, and primed. Next, you will need to install a metal frame made of guide profiles.
A hairdryer can help remove paint from walls.
Installation of the guide profile
Measure the profile along the outer edge using a construction tape, and then its outer width and the distance from the top edge of the window structure to the surface of the window sill. Take a U-shaped profile of the current width, cut it into pieces using metal scissors, according to the window measurements. Next, the sections are screwed at intervals of 20 cm using screws along the outer part of the window frame. The top and side profiles are mounted in the same way.
Metal profileInstallation of starting profile
Lathing
To organize the sheathing, you will need wooden slats with a cross-section of 20x40 mm, which are fastened on the far corner of the slope from above and on the sides with dowels in increments of 30 cm. The sheathing must have perfect evenness, for which the thickness of the wooden slats is trimmed with a plane and the work is checked with a building level.
Fastening the sheathing
Panel installation
Finishing with plastic plates can be easily done with your own hands. To do this, cut the material with a jigsaw, then fix it on the upper profile and secure it to the sheathing using self-tapping screws.
The side profile is mounted in the same way as the top bar. And the gaps between the window frame and the wall need to be filled with construction foam, for which the surface is first moistened with water. After this, you need to lean the plastic panel against the base and secure it to it with metal screws.
Fastening PVC panels
Installation of F profiles
The F profile is cut and inserted along the edges of the panels. In those areas where the corners come into contact with the fasteners, you will need to make a small cut. At the same time, the slopes of the front door should be decorated with decorative stone, which looks very expensive. At the end of the work, you need to fill the joints with white sealant, carefully filling the gap with the compound, removing excess volume.
These measures will not only make the window even more attractive, but also protect it from mold, mildew, and rapid wear.
F profile for slopes
Decorative finishing of internal walls using the example of laying gypsum tiles under brick
There are many positive aspects of this material:
- attractive appearance that will fit into almost any interior;
- ease of installation;
- environmental friendliness;
- durability.
The downside is that the cost is unfortunately not accessible to the general population.
You can lay gypsum tiles on the wall yourself, the main thing is to follow a number of recommendations:
- the wall should be plastered or puttied relatively evenly. For better adhesion, the working surface is treated with a deep penetration primer for interior work;
Wall prepared for laying tiles.
- gypsum tiles are purchased in the desired size and color, the main thing is to take them with a 5% margin. White tile adhesive is used for installation. It is diluted with water to such a state that the spatula “stands”, i.e. the consistency should be quite viscous and thick;
- since gypsum does not have particularly strong properties, you can use a hacksaw or a baguette saw to trim it;
- Wall finishing should start from the bottom up. Apply tile adhesive quite thickly to the tile using a small spatula, press it against the wall, and remove excess adhesive. Everyone chooses the width and size of the seams individually. It is better not to do the trimming right away, but leave it for the last stage of work (this will reduce material consumption). After installation, leave for a day or even more to dry completely, depending on the temperature in the room;
Adhesive for decorative gypsum tiles.
Glue ready for use.
Apply glue to the tiles.
We glue gypsum tiles to the wall.
Laying gypsum tiles - photo.
Wall decoration with gypsum tiles - photo.
- To finish the coating, you can use any façade varnish for stone. Its shade depends on the color of the tile. It can be colored or transparent. Apply the varnish to a dry surface using a regular brush in several layers. A minimum of a couple of hours should pass before applying the next coat. The seams should be treated especially carefully to hide defects, if any.
Sandwich panels
Repair of window and front door slopes can be done with sandwich slabs, as shown in the following photo. The window sills and windows are decorated with sandwich slabs, and the door slopes are decorated with decorative stone. Sandwich slabs retain their visual appeal and original performance parameters for a long time.
Sandwich panels
In accordance with all the rules and regulations, repairs of window structural elements can increase the degree of resistance of windows to the negative effects of negative factors inside and outside the house. The distance between the wall and the sandwich plate must be filled with construction foam, which will act as additional insulation for the structure.
Installation of such plates is not particularly difficult. The sandwich board is fixed to the base using liquid nails, which will provide the connection with high practicality, density, and durability. Check the angles of the slopes for compliance using a small tool.
Installation of sandwich slabs should be carried out on wooden blocks, which will give the surface of the slope ideal evenness even if there is a deviation of the slope from the vertical. To ensure a neat appearance for the joints of the plates, they need to be treated with silicone.
Installation diagram of PVC sandwich panels on window slopes
Surface preparation
In addition to beauty and originality, covering with decorative bricks allows you to hide flaws in the walls. Therefore, there is no need to level the base before installation. Otherwise, surface preparation must be carried out using special technology.
- The walls are thoroughly cleaned, old wallpaper and peeling paint are removed.
- Next, you need to get rid of any remaining fat. To check for the presence of greasy deposits, use water.
- If decorative brick is glued to a wooden or metal base, then the surface will have to be treated with insulating material. In some cases, a lightweight cement-based mortar can be used.
- To increase adhesion strength, frequent scratches are required across the entire surface of the substrate.
After preparing the base, you can begin installing decorative bricks. In order for the result to exceed all expectations, you need to remember several important rules.
- To ensure an even seam between the bricks, you must use special crosses. Nails can serve as an analogue of crosses.
- Upon completion of the installation work, the seams between the bricks must be sanded. The ideal composition would be a special grout mixture or gypsum.
- To preserve the appearance of the finished decorative surface, use wood varnish.
- You can decorate any room in your apartment with brick decorations. For example, varnish the surface in the hallway, and paint the rooms with paint that matches the interior.
Plastering
Finishing window slopes outside or inside the house is often done by plastering the surface. But applying this method is only relevant if the slopes are perfectly even. The layer of plaster mass should not exceed 2 cm in thickness, otherwise the slopes will quickly crack and become unusable. This type of finishing goes well with finishing door slopes with artificial stone.
| Stages of work | Target |
| Slope preparation | Removing greasy stains, dust, applying antiseptic |
| Slope primer | Increases adhesion of finishing materials |
| Applying the first leveling layer of plaster | The plaster is sprayed with a spatula and leveled using the following rule: |
| Slope reinforcement | To impart stability to the structure outside the house, you can use a reinforcing mesh on the slope, which is pressed into the first layer of plaster |
| Applying a decorative plaster layer | Finishing the base, giving it texture, painting |
Applying plaster
Common mistakes
It often happens that the finishing of window slopes inside is carried out in violation of technology, which entails a number of negative consequences. In other words, these structural elements of the window opening acquire low resistance to the effects of negative factors indoors, which entails rapid wear of the slopes. This is why it is so important to identify the most common mistakes made by inexperienced builders when finishing window slopes:
- incorrect measurements of the base for installation of sandwich or PVC panels, plasterboard, etc., which leads to a loose fit of materials to the slopes;
- neglect of antiseptic and sealant increases the risk of mold and mildew developing under sandwich panels, drywall and other finishing materials for decorating slopes;
- When using plaster mixtures, inexperienced craftsmen often try to correct defects in the base by applying an excessively thick layer of finishing. And this is unacceptable, since plaster more than 2 cm thick may crack after drying;
- When finishing door slopes with stone, you should not give preference to too cheap material. Decorating even with artificial stone cannot be too cheap, because such savings affect the quality of the finish.