Finishing window slopes - plastering, leveling and installation of plastic slopes
An important stage of work associated with the installation of plastic windows is the preparation of window slopes. It is necessary to install window slopes correctly, because even if you carry out the work of installing a plastic window very carefully, the window opening is destroyed, and potholes and cracks may appear, the repair of which is necessary. We will consider in detail the stages of preparing and leveling slopes for walls, as well as the materials that we will need during the finishing work.
Working with plaster
Most often, this is a radical method of leveling, in which the differences are much greater than 1 cm (in the second case, putty is used, but more on that below).
In order to plaster slopes, you may need a wide variety of tools, but now you will find out which ones.
Tools and materials
- Masking tape
- Corner special profile
- Plaster strip
- Rule or homemade instrument in its likeness
- Primer
- Brush
- Mixture for plaster
- Various spatula sizes
- Trowel or grater with sponge
- Drill or hammer drill
- Level
- Attachment - mixer
- Glue container
Installation features
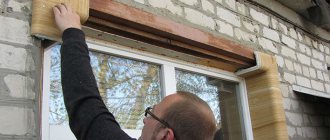
At the first stage, we prime the slope that we are going to level (you can use any means, for example, concrete contact is perfect).
Next, carefully seal the frame with masking tape, and cover the windows themselves with film or newspaper so as not to get dirty while you level the slope.
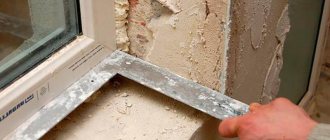
And now we place a plaster profile along the perimeter of the slope, actively using a level to check horizontality and verticality - this is your external “beacon”. But along the frame you can attach a plaster strip that has two “shelves”. The first one will hide under a layer of plaster, and the second one will be another beacon for the exhibition of the rules.
So, having mixed the plaster in a special container with a hammer drill with a special attachment - a whisk, we throw it on the slope, immediately leveling it using the rule.
A nuance - according to the rules, the second layer is applied when the first one has completely dried, which is why it will not be possible to level the slope on the slopes in one day in this way.
But after the final plastering, you can level the surface with a trowel if the plaster was cement-based, and with a float with a sponge dipped in water if it was gypsum.
And then - putty, how exactly to apply it - read on.
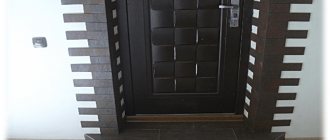
Plastering door slopes
The geometry of the door slopes is set even more simply, because in this case, there is no need to maintain any special angles - we should get an opening whose edges are perpendicular to the wall in which it is made. The start of work is preceded by the preparation stage:
- Having established the required opening width in accordance with the dimensions of the rough frame, note the thickness of the future slopes. Markings are made with a pencil on the floor;
- paired slats are attached to the wall so that they form a kind of formwork;
- the base is pre-dusted and moistened with water, after which plaster is applied
To carry out the work, it is convenient to use dry gypsum mixtures, which are pre-mixed according to the instructions on the package. It is important that the consistency of the solution ensures that there are no voids in the volume to be filled. After application, the solution is smoothed using a wide spatula, eliminating visible defects. After half an hour, when the mixture has set, they begin to eliminate less noticeable defects: the surface is moistened and glossed using a trowel until a perfectly even coating is obtained. Well, at the final stage, when the material has hardened, the “formwork” boards are carefully knocked down.
The video shows the process of leveling a door slope using gypsum plaster. The only caveat: the solution is too thick, which can result in the formation of voids in the finishing layer.
And this is an example of work on a balcony door slope.
Finally
As you can see, there is nothing particularly difficult about plastering slopes with your own hands. What will take you the most time is setting up a system of beacons that limit the working plane. Everything else is a matter of technique!
Common mistakes when plastering corners
If plastering is carried out without prior assessment of the condition of the working surface. As a result of such unprofessional actions, cracks may appear in the plaster, and in some places it may completely peel off.
- Plastering a surface without applying a primer layer can lead to unevenness of the plastered surface. Such a surface can repeat the relief of the main surface.
- Applying the topcoat directly to the concrete base. As a rule, this leads to peeling of the plaster layer from the concrete, since they do not fit together. In such cases, work should begin with ready-made gypsum plaster, which contains the necessary binding additives.
- Plastering of the surface is carried out with long breaks, which gives a less reliable surface. Slopes should be plastered in one go for more uniform drying.
- The concrete base has a moisture content of more than 4%. In this case, the solution adheres very poorly to the concrete surface, because the surface does not absorb moisture. The solution will simply float off from such a surface.
- To prevent gaps from appearing at the joints of door frames and window frames with a layer of plaster in the future, expansion joints are formed in these places. Before applying the plaster, expansion slats are attached to these areas.
- To prevent external corners from being damaged during operation, especially in areas of heavy traffic, metal corners must be installed on them.
- As a result of cutting galvanized profiles with a grinder, the protective layer is damaged, which can lead to the appearance of rust at the installation sites of such profiles. To prevent this from happening, the profiles should be cut using metal scissors. This is the simplest and most reliable way.
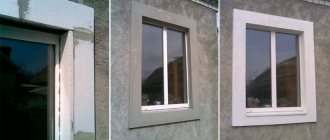
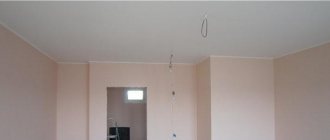
Leveling internal slopes
After you have managed to level the slopes on the windows from the outside, you can begin to design the internal slopes.
Plastering internal slopes
You need to plaster from the bottom up, first with vertical and then horizontal movements.
If you choose this method of finishing slopes, you may need:
- putty knife;
- building level (plumb line);
- roller;
- brush;
- primer;
- plaster mixture;
- finishing putty;
- wooden slats;
- perforated corner;
- painting mesh;
- dye.
At the 1st stage of work, you need to remove the remaining foam and install plaster beacons or wooden slats around the entire perimeter of the window opening and the wall, which are attached to regular plaster mortar. During installation, be sure to check their levelness using a building level.
After the slats are fixed, the finishing surface must be treated with a primer, which can be used to increase the adhesion of the finishing material. After the primer has dried, you can begin plastering. The solution is prepared in accordance with the instructions indicated on the packaging of the dry mixture.
Plastering should start from the bottom up. Using a spatula, the solution is applied first with vertical movements and then horizontal. If leveling slopes requires applying a large layer of plaster, then it is better to divide the whole process into several stages. After the first layer has hardened, the second can be applied and so on. When a smooth base has been formed, perforated corners are placed on the corners and putty is applied with a finishing mixture. After the putty has dried, the surface of the slopes is rubbed with a painting mesh. At the last stage, the prepared base is painted with water-based paint in 2 layers.
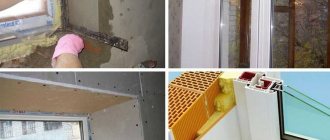
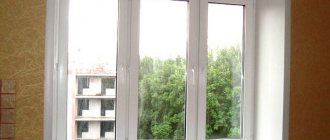
Leveling slopes using plastic panels
Scheme for finishing slopes with plastic panels.
To install them you will need the following tools and materials:
- drill (perforator);
- level;
- metal scissors;
- plastic panels;
- polyurethane foam;
- silicone sealant;
- self-tapping screws
The procedure for installing plastic slopes is as follows:
- Along the perimeter of the slopes, a starting profile is attached to the window using self-tapping screws, into which the plastic panel will be inserted.
- When constructing slopes, there is no need to mount a frame, since the edges of the panel at the corners of the slopes are fixed to the wall using mounting foam and self-tapping screws. After the foam has hardened, the gap between the wall and the panels is finally sealed with foam. In this case, it is necessary to constantly monitor the evenness of the installation using a building level.
- To complete the work, platbands are attached to the slopes to hide this gap. For these purposes, you can use a regular plastic corner or a special F-profile.
- After leveling the slopes, minor gaps form at the joints of the plastic parts, which can be sealed with silicone sealant.
Leveling slopes with plasterboard
Scheme for finishing slopes with plasterboard.
Having chosen this option for finishing the slopes, you need to prepare:
- grinder or hand saw for cutting drywall;
- building level;
- putty knife;
- brush;
- plasterboard sheets 12 mm thick;
- polyurethane foam;
- putty;
- primer;
- paint.
After the base is prepared for the installation of slopes, you need to cut out a blank for the right (left) side of the window from 12 mm thick plasterboard, having previously measured the height and width of the wall. In this case, the width of the workpiece should be made 20 mm larger than the width of the wall. After this, apply mounting foam to the wall over the entire finishing area. After it has hardened a little (about 10 minutes), press the workpiece against the wall and level it using a building level.
Using the same technology, drywall is installed for the left (right) side of the window. Then you should measure and cut the blank for the upper slope (its width should also be 20 mm larger than the width of the wall). Then lay the slab on the floor and treat its entire surface with foam, then after 10 minutes press the workpiece against the wall.
After the foam has completely hardened, you need to saw off the protruding edges of the drywall with a hacksaw. Then the surface of the finishing material is puttied, primed and painted in 2 layers.
Preparing the work surface
How to properly plaster slopes on windows and get an excellent result depends on good surface preparation. A small violation of an important stage will be the main cause of cracked or fallen plaster. So:
- The beauty and accuracy of plastering work will require leveling the surface of the window slopes from the outside and inside. According to building codes, vertical slopes should not deviate by more than 1-2 mm per 1 m. Inspect the evenness of each wall. Before plastering the window slopes, you need to level the walls . Time costs and plaster consumption will increase, but it is better not to ignore quality requirements in order to get a good result. If the surface is slightly curved, a wire mesh is suitable for leveling.
Construction beacons are used to level the surface of slopes
To properly plaster the slopes on the windows with your own hands, take into account all the preparatory stages to achieve high quality work. To accurately level the surface, use construction beacons or a plaster profile . Visually smooth walls can play a cruel joke after all the work is completed, so be sure to install guides along which the surface will be leveled. Beacons will serve as a guarantee as a leveling element, the use of which will avoid future alterations and additional costs.
Plastering on beacons
Plastering slopes - pros and cons
Plastering slopes is a traditional finishing method, and despite the abundance of proposals for new materials, sometimes you simply cannot do without plastering work. The advantages of the method include:
- production of slopes of any size, complexity and shape, including arched, round, curved;
- resistance to difficult operating conditions;
- environmental friendliness and aesthetics;
- maintainability and the possibility of color design, painting;
- Plastering slopes with cement mortar fills cracks and uneven areas, levels the surface, and provides additional sound, water and heat insulation.
But leveling slopes with plaster also has some disadvantages: the process is complex, multi-stage and labor-intensive; if the technology is violated, cracks may appear at the junction; solving the problem will require additional costs: sealing and restoration.
Window profile for plaster, greatly facilitates the formation of the geometry of the opening
Features of the design of window/door openings
There are several simple ways to finish the internal slopes of doors and windows - cladding with plastic, plasterboard, wood. These materials allow you to quickly level and at the same time decorate the surface, but the highest quality option is plastering slopes with cement mortar. It allows you to obtain slopes of various widths and shapes, which is especially important for arched and round structures.
Note: although plastering window slopes is a dusty and labor-intensive task, it allows you to achieve absolute tightness (the finishing layer becomes part of the wall, which cannot be achieved when covering with plastic and plasterboard).
Invalid Displayed Gallery
Plastering door slopes.
When the door frame is already in place, plastering of the door slopes is required. The sequence of actions here is the same as when forming window slopes. If the canvas has not yet been installed, then metal corner profiles are mounted on both sides of the solution. They will be an additional protective measure for the corners from negative influences. If there is no profile, plastering door slopes will require the use of wooden or plywood flat strips. But after this the corners will have to be strengthened again.
Plastering door slopes as a process becomes absolutely clear if you at least once see how a master works (this could be a video on the Internet). When installed, the profile extends beyond the slope to a length equal to the thickness of the plaster layer. The result is controlled by the level and slope.
A reinforcing mesh is installed in the resulting space, selected according to the thickness of the layer. How to level a doorway with plaster? Just throw on a certain amount of solution and level it with graters.
Why plaster slopes
The technology for filling openings with building materials involves the sequential application of cement mortar, primer, insulating and insulating layers.
Plastering door slopes is carried out for the following purposes:
- Creating a flat surface. A special feature of the putty is its plasticity and softness. Irregularities can be easily removed with hand tools.
- Preparing the base for finishing. The hardened mixture after priming has excellent adhesion. You can glue any types of materials to it: wood, ceramics, wallpaper, fabric and leather.
- Heat and sound insulation. A special feature of plaster in its hardened state is its porosity. Air bubbles enclosed in a layer of material trap cold and noise.
Drywall installation
A sheet of plasterboard is a building material in which gypsum is placed between layers of cardboard. The material is indispensable for hiding various wall defects, so it is recommended for slopes.
Its advantages include:
- wide range of uses. Suitable for all types of windows;
- can be used to finish slopes of any size;
- low price;
- quick installation;
- environmental Safety;
- painted in different colors.
There are also disadvantages:
- low strength. Any mechanical impact leaves traces;
- destruction at high humidity;
- rapid wear, requiring additional painting;
- inconvenient installation. When cutting, it is necessary to use protective equipment, as gypsum dust is harmful to health.
1. Drywall is the base that requires finishing.
2. It is better to choose a moisture-resistant version of the material that is not afraid of condensation on the windows.
There are several ways to cover slopes with plasterboard, but the simplest is considered to be the following installation using putty.
- The slope is measured from the wall to the frame. If the wall is uneven, then it is necessary to take measurements in several places.
- The measurements are transferred to the drywall. For convenience, a pattern is made.
- The future slope is cut out of the sheet. The material is cut with a knife or sawn.
- Putty is applied along the edges and in the center of the workpiece.
- The workpiece is pressed tightly against the slope, and a spacer is installed. It takes a day for good adhesion.
- Very often, aluminum corners are installed to align corners.
- The surface of the slope is puttied and, after drying, treated with sandpaper.
- The cladding is completed with two layers of painting. In this case, the window profile and window sill are protected with masking tape.
In general, everyone independently chooses the method of repairing slopes. If the technology of the work is not violated, then it will be beautiful and reliable.
Recommendations from the experts
Experts recommend adhering to the following tips:
- Depending on the type of slope that will be puttied (external or internal), a suitable mixture is selected. Frost-resistant and water-resistant putty is suitable for outdoor work. At the same time, it is selected carefully according to its expiration date. Expired goods should not be purchased. The best look is any façade mixture.
- Depending on the microclimate in the room, the composition is selected. At high humidity levels, puttying is carried out with a polymer or cement composition. With normal humidity and a dry microclimate, you can use mixtures made directly from a gypsum-lime base.
- It is better to start all work from the corner of the first wall. It is recommended to level the second wall in the same corner when the mortar on the already treated wall has set. This will reduce the risk of damage to the leveled coating on the finished side.
To do this, after leveling the still fresh putty layer, use a spatula to make a shallow furrow in the corner. It will be located approximately between the window frame and the corner opening. When the solution is completely dry, fill the base with sealant.
Any surfaces need preparation before finishing. To do this, you need to remove old finishing materials, as well as surface fragments that do not adhere well. Only after this can the walls be primed.
Both plastic and wooden window blocks require such preparation. Then it won’t hurt to cover the glass and window frame with tape and protective film to avoid contamination.
Puttying slopes is quite easy when you have the skills. To work, you need to prepare the necessary tools and select a high-quality putty mixture. You also need to remember to protect your skin by wearing special glasses, gloves and thick clothing.
Design nuances
Any facade system solves several functional problems at once:
- Protection of building walls from precipitation and mechanical deformation;
- Insulating the building, reducing the cost of heating the interior;
- Prevention of premature destruction of a building, extension of its service life;
- Giving the facade an attractive, aesthetically finished appearance.
The basic configuration of a ventilated facade is usually represented by a metal or wooden sheathing, a layer of insulation, a membrane to protect the heat insulator from moisture and wind, and cladding materials. Facade cladding can be made with any finishing material; it all depends on the taste and financial capabilities of the property owner.
A distinctive feature of hanging systems is the creation of an air gap between the heat insulation layer and the cladding material to ensure air circulation and prevent rotting of the insulation layer. This determines the choice of thermal insulation material in ventilated facades - preference should be given to non-combustible materials. But the presence of a moisture-proof membrane does not completely reduce the fire hazard; when heated, this layer begins to quickly melt and support combustion.