Far in the past is the method of plastering walls, which was carried out in three stages - spraying, priming and covering. Such work was not only labor-intensive, but also required the presence of appropriate experience and certain regimes for air temperature and humidity levels. Today, a lot has changed, and instead of outdated finishing work, paintable plaster has appeared. It is considered more durable, does not require special skills, and after hardening it can be puttyed and painted.
Types of plaster mixtures
The plaster used to level the surface of walls for painting contains mineral binders. It comes in four types:
- gypsum based;
- made of cement material;
- lime-cement;
- clay.
Builders most often give preference to the first two types.
The gypsum-based solution is easy to apply, is elastic, and does not shrink. The material is considered environmentally friendly and non-flammable. Unfortunately, there is one negative feature associated with the rapid setting of the solution. Some take it as a positive quality, since it becomes possible to quickly apply a second layer. True, you have to knead small portions of the material before work in order to have time to completely work it out.
Cement-based plaster retains its elasticity for several hours, so it can be prepared in large quantities. Apply it to any surface. This material is much cheaper, but over time it shrinks and requires more time to dry, thereby increasing the time to complete the work.
There are several important points that determine which material to choose for plastering and painting walls:
- There is no sand in the gypsum mixture, and the surface is more even and smooth. This material is recommended for finishing interior walls;
- a plaster mixture made from cement and sand is more suitable for plastering external surfaces and rooms with high humidity levels.
Each of the materials considered is beautifully painted, forming a smooth surface in the first version and a moisture-resistant surface in the second.
The final stage before painting
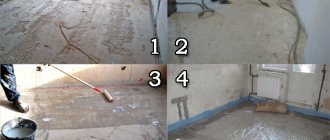
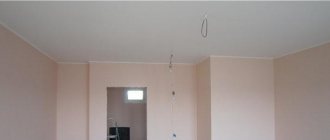
So, the surface of your walls has been completely processed, all grinding and plastering work has been completed, the wall looks perfectly flat and smooth. Now you need to get rid of excess debris and dust, for which you can remove excess particles from the walls with a rag or use a vacuum cleaner. Paint does not like dirt, because small particles, if they get in, will ruin the appearance of the wall. Apply a layer of impregnation to the previously cleaned wall.
Preliminary priming with your own hands increases the adhesive properties of the base, which will allow the paint to adhere better to the surface, because the better the adhesion to the wall, the longer the painting will please you with its impeccable appearance and look more beautiful. The technology involves applying impregnation in one layer and waiting until it dries completely. For each type of paint, a specific impregnation must be used, as indicated in the instructions on the package.
If you do not plan to paint your bathroom walls with oil paint, then only acrylic impregnation will do. For water-soluble compositions, gypsum impregnation can be used. Once the primer layer has dried, you can begin painting.
Preparatory work
Any surface is prepared before plastering, and we suggest understanding some of the features of such work.
It is difficult to finish wooden walls with plaster mortar - the mixture will not stick to such material. In this regard, some actions need to be taken:
- cover the walls with reed mats;
- to fill wooden shingles;
- fix the steel mesh for reinforcement.
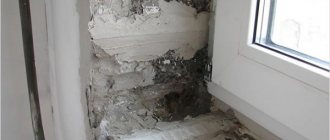
The brick surface is prepared in another way:
- the wall is cleaned of dust and dirt and washed. Uneven areas are removed with a hammer or spatula;
- the surface is checked for verticality and horizontality.
To improve the adhesion of the plaster mixture to the wall surface, it is recommended to make notches on the brickwork.
Now let's look at the preparation of connecting areas that are considered special. The fact is that the junction areas of surfaces made of concrete or brick stone differ in the time required for complete drying, and the preparatory measures have certain differences.
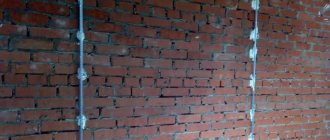
In such places, it is best to use reinforcement technology, fixing a metal mesh with screws or dowels.
Installation of beacons
If you are concerned about how your walls will look after renovation, use lighthouse profiles when plastering them. This is the name of the vertical guides, in the spaces of which the plaster solution is evenly applied. The mixture is leveled by a rule moved along the plane formed by the installed beacons.
Before installing the beacons, it is necessary to carry out the procedure of vertical and horizontal sagging of the wall.
In the first case, at a distance of fifteen to twenty centimeters from the ceiling surface, a dowel is driven in, leaving it 1.2 – 1.3 cm above the surface in relation to the maximum unevenness. Having installed the second dowel, we tighten the thread and tighten the hardware to level it out. Similar activities are carried out in the opposite corner area.
To check the horizontal evenness, the threads are pulled diagonally, giving the middle of the surface at their intersections. Self-tapping screws are screwed into these points, from which horizontal markings are made to the corners, where thread fasteners are also inserted.
The final flatness of the surface depends on the accuracy of such procedures. All work is checked by the building level.
Leveling technology
The entire finishing technology before painting work can be divided into small stages:
- wall preparation, priming work;
- leveling with plaster solution;
- again priming the leveled walls;
- puttying;
- grinding-grouting;
- priming the surface before applying paint;
- painting.
Surface preparation
Before starting work, the surface is cleaned. Plaster does not tolerate construction and other dust, grease, or pieces of old finishing. Therefore, maximum cleaning is required. Then a deep penetration primer is applied . It contains antiseptics. This treatment will help prevent mold and mildew in the future. The advantage of the primer is that plaster adheres well to it.
If necessary, a reinforcing mesh is fixed , and then construction beacons are installed on the surfaces to control the leveling process. Without them, you can only process drywall sheets that are either attached to the frame or directly to the wall.
Plastering on beacons
To obtain an ideal surface, and subsequently a flawless painted wall, beacon profiles are used for plastering.
These are vertical guides between which the plaster is evenly distributed. The solution is leveled with a rule that moves in one plane created by the beacons. Installation of beacons requires a preliminary procedure for sagging the walls . It can be vertical and horizontal.
Vertical. A dowel is driven in 15-20 cm from the ceiling and corner. It should protrude from the surface 12-13 mm larger than the largest bulge. A thread with a plumb line is attached to it. Next, another dowel is mounted. The thread is stretched and fixed. Then the self-tapping screw is tightened until the level is completely level. The same algorithm is performed in the opposite corner.
Horizontal. It requires tensioning the threads along the diagonals, and at their intersection you will get the middle of the plane. This is where the self-tapping screw will be screwed in. From there, using a level, horizontal markings are made to the corners. Self-tapping screws are also installed in them and the thread is tensioned. The geometry is checked again by level. If the thread comes into contact with the surface, it should either be corrected or the thread should be adjusted using the unscrewed screws.
The final smoothness of the walls depends on how accurately the procedure is performed. After this, a beacon is applied to the screws and attached to the plaster mortar.
Important! The procedure is performed only under level control. Plastering of primed walls will begin when the gypsum support points harden and the beacons are well secured.
The plaster is applied over the beacons in several stages . The first layer is sprayed and leveled using the rule. After it has dried, the next, thinner layer is applied. It eliminates defects in the starting coating. The third layer is optional.
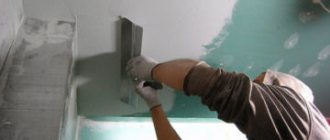
Then grouting is done . Using a sanding block with a fine mesh, rub down all the grooves and places where the putty is layered. The better the putty is done, the less work there is to do when grouting.
After the walls are leveled and dry, they are puttied. This is the final stage of finishing for painting or wallpaper.
learn in detail about the difference between plaster and putty in our article. In short, the plaster mixture has a coarse grain and is designed to smooth out rough defects up to 5-6 cm; putty - fine-grained, good for cosmetic finishing of irregularities up to 15 mm. Surfaces treated with putty are smoother.
Wall putty
Let us now consider the stages of puttying after plastering.
- Water is added to the dry mixture. The consistency should resemble thick sour cream and stick to the spatula without dripping from it.
- First, a starting layer is applied onto a large spatula with a smaller one. It is applied to the wall at an angle of up to 30 degrees. The main condition is uniform distribution. Each subsequent layer overlaps the previous one by about 5 cm.
- Corners require careful processing, especially internal ones. It is better to use an angle spatula.
- When the starting layer dries, the finish is applied using the same technology. The layer should not be thicker than 2 mm. Each subsequent one is applied after the previous ones have dried, after about 4 hours. But the last layer should dry for at least half a day or longer.
- For painting, paper with grain from P120 to P150 is required.
Expert opinion
Alexander Guryanov
Plasterer and decorator
When ideal surface smoothness is not so important, you can do without putty. This stage can be replaced by glossing the plaster layer, and subsequently painting the walls without putty.
You can read more about glossing here.
Applying plaster
Before applying the plaster mixture, the surface of the walls is primed. After the applied composition has dried, finishing can begin.
To determine the optimal thickness of the layer of applied mortar, it is necessary to take into account the recommendations of the manufacturers of the purchased building materials and the nature of the irregularities present on the surface to be repaired.
An excessively thin layer will quickly collapse and will poorly retain thermal energy, but painting a thick plaster layer will cause it to collapse.
Let's figure out how to plaster a brick or other wall for painting. To do this, the prepared solution is applied to the area highlighted by the beacons, after which it begins to be pulled together by construction rules while simultaneously filling the remaining void areas. After about a quarter of an hour, the wall is leveled and floated, after which the beacons can be dismantled by sealing the exposed strips with plaster mortar. As soon as the applied layer dries, it is covered with a primer mixture to strengthen it.
On plastered walls, internal corner areas are formed using a spatula or a special trowel. A finished steel profile is attached to the outer sections.
Which plaster to choose?
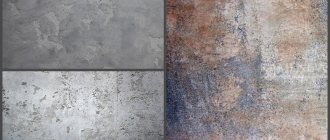
Plaster for leveling walls for painting is used with a mineral binder: gypsum, cement, lime-cement or clay. The first two are most often used.
Features of popular coatings
Gypsum mortar is easier to apply, it is more elastic and does not shrink.
In addition, the material is environmentally friendly and ensures fire safety. But there is a characteristic that can be both a plus and a minus - it sets quickly. On the one hand, this makes it possible to apply subsequent layers relatively quickly. On the other hand, you need to mix a small portion at a time so that you can put the prepared amount in half an hour. Cement plaster does not lose elasticity for up to two or more hours, so you can mix a large volume at a time.
It can be applied to any surface. At the same time, the mixture costs less. But it can shrink and takes longer to dry, so the process is lengthy. Important points that determine which plaster to choose for painting:
- Gypsum does not contain sand, so it is much smoother. It is used for interior decoration.
- It is impossible to create walls without roughness using cement-sand mortar. But it is suitable for wet areas and outdoor work.
Both types of plastered walls can be painted well. In the first case, the surface will be smooth, in the second - moisture resistant.
Puttying
If the plastering work is carried out perfectly, you still will not get a smooth surface. All the same, porous places remain into which the paint is absorbed, changing the shade and revealing shortcomings made in the work.
To get a perfect shade, before applying the paint you should apply a layer of putty, which can be:
- starting. Contains sand, the grain size of which varies from 4 to 5 mm;
- finishing. Gives perfect evenness and does not contain sand.
Taking into account the condition of the wall and the required evenness after repair, use two putty compounds or only the second (finishing) option.
When preparing a wall for painting, use polymer putty, which has certain advantages:
- forms a durable layer;
- excellent resistance to temperature changes;
- allowed for use on different surfaces;
- creates an elastic layer and is an ideal base before applying the coloring composition.
Anyone who decides to do such work with their own hands may not have sufficient skills.
Technologically, the process looks like this:
- Use a large spatula to cover the maximum area of the wall. Using another, smaller tool, remove excess putty solution from the blade;
- minor irregularities are eliminated using a finishing layer.
The evenness of the treated surface is checked with a powerful lamp held at an angle.
If necessary, the finishing putty solution is applied and sanded again. After this, uneven areas are cleaned again and dust is removed, for which it is recommended to use a vacuum cleaner.
The surface may not be puttied if the wall is planned to be finished with decorative plaster.
Additional sanding
Once the applied finishing mixture has completely dried, the surface is sanded again, for which it is best to use sandpaper with a grit of 240 or 320.
Grinding completes the process of plastering walls, the surface of which is given ideal smoothness. At the same time, the smallest defects after puttying are hidden.
After this procedure, the dust is removed, the cleaned wall is primed, after which you can proceed to painting it.
Wall painting
Plastering walls for painting is carried out in rooms for various purposes.
If repair work is planned in the bathroom, on an open balcony or in the kitchen, then it is not recommended to use gypsum solutions. This type of coating is not resistant to moisture and will constantly get wet.
The wall prepared for painting is treated with a primer mixture that ensures reliable adhesion of the covering material to the main surface, preventing deep penetration of paint, reducing its consumption.
The first layer of paint highlights and highlights all the flaws made by the builders during the preparatory work. So painting in two or three layers is a prerequisite.
It is recommended to use special paints and varnishes, which must be applied strictly according to the manufacturer’s instructions. First of all, the corner areas are “outlined” with a brush, after which the walls are rolled with a roller. You should move from the bottom to the top edge, not allowing the previously applied layer to dry out.
Wall paints - choice and types
When choosing the type of paint, you should consider what material your room will be decorated with and what decorations you plan to use. Water-dispersed paint compositions are most often used to treat rooms, walls, and ceilings. The composition lies very easily on the surface, spreads well, forming a uniform layer, and it can be applied to the surface with a roller, brush or spray. In addition, it is absolutely safe, does not contain harmful ingredients, and is diluted with ordinary water.
The drying time of the layer depends on the temperature in the room, but, as you know, water-based paints dry very quickly, their layer will last a long time and will not fade or crumble.
Unlike oil or nitro paints, compositions based on water dispersion allow air to pass through, therefore eliminating the possibility of the formation of fungus and mold. An optimal level of humidity is always maintained in the room, which has a beneficial effect on health. Such paints may contain various components, so they are usually divided into types:
- Acrylic resin is the main component in the production of acrylic paint. The main advantages of the acrylic composition is its ability to allow air and moisture to pass through. This paint does not lose its original appearance for a long time, fits perfectly on the surface, does not crumble and protects the walls in the bathroom from rotting and the formation of fungus. A wall painted with acrylic paint can be treated with a damp cloth; the wall will not fade in the sun, so you can safely use this paint for external finishing work. This composition has proven itself excellent in the treatment of facades, when painting concrete surfaces, wooden structures, metal products and plaster. The acrylic composition fits perfectly onto wallpaper and plastered surfaces after preliminary preparation.
- Latex compositions contain rubber in their structure, which is not capable of permeating water, but is elastic. This surface can be washed with any chemicals, it is durable and perfect for bathrooms. The disadvantage of latex paints is their inability to withstand ultraviolet radiation. With prolonged contact with sunlight, the surface gradually fades, and therefore such paint is not used for exterior decoration. But it will serve perfectly in the bathroom.
- Dyes based on aqueous dispersion also include vinyl compositions. The surface covered with them is not able to repel water, but has an impeccable appearance. Such paints are not recommended for use outdoors, in rooms with high humidity; in addition, the surface treated with vinyl gets dirty and is difficult to clean. It is best to apply this paint in a room with dry air, for treating ceilings and walls of residential premises. This base is inexpensive.
- There are also combined paints that have a wide range of performance characteristics. Naturally, their price is significantly higher.
In conclusion, we note that choosing paint is not such a simple matter. When planning a painting job, you should pay attention to the characteristics of the compositions, because not every paint can be used both indoors and for outdoor painting. The only exceptions will be universal types. In addition, the better the quality of the preparatory work you do with your own hands, the easier the finishing coating will lie on the surface and will last longer.