Installing beacons for plastering walls seems to beginners to be perhaps the most difficult and incomprehensible task. And, although displaying beacons is a responsible task, however, it is not too difficult to master and do it yourself. A beginner needs to understand the intricacies of marking and creating an auxiliary plane, after which the rest of the work will no longer be so mysterious.
How to place beacons under plaster
A beginner, when starting to level walls, has little idea how to install the beacons, at what step to place them, or how to attach the guide profiles to the wall surface. The placement of beacons under plaster must be taken seriously, since only correctly aligned guides will allow achieving the required evenness of the walls. An incorrectly installed beacon (crooked or insufficiently fixed) becomes the cause of defects.
Let's talk about which beacon pitch to choose. The distance between the planks should be chosen based on the length of the rule with which you will level the plaster mixture. It is better for beginners to use a short tool (up to 1.5 m). This rule is simpler and easier to manage.
Since the rule is supported and moved along the beacons during alignment, the maximum pitch of the guides is set less than the length of the rule bar by 20 cm (up to 1.3 m). The minimum step can be any, most often it is 0.8 m. The distance of the outer guides from the internal corners is 10-30 cm. When installing beacons, they retreat from door or window openings by 0.1-0.15 m.
The main stages of placing beacons for wall alignment:
- mark the surface of the structure to be leveled;
- set guidelines for the outer beacons;
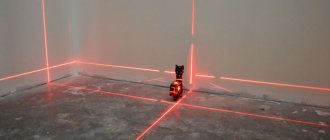
- at a short distance from the surface to be leveled, using levels, a plumb line or a laser level, create an auxiliary strictly vertical plane using laces (threads, rays of light);
- take measurements of the deviations of the wall surface from the auxiliary plane, find the “zero point” - the place where the surface protrudes most;
- the auxiliary plane is corrected, taking its elevation above the zero point by the thickness h of the plaster layer;
- install alternately two extreme beacon profiles according to the position of the adjusted auxiliary plane;
- install intermediate profiles, checking their position along the outer guides;
- prime the mortar part of the beacons (laps or mortar paths).
What are beacons needed for?
A plaster beacon is a thin-walled metal perforated T-shaped profile. Its height is usually 6 or 10 mm. The 6 mm profile allows you to form a thin layer of plaster, which is suitable for smooth walls. However, in most cases, vertical planes have a curvature, and a noticeable one, and therefore the 10 mm bar is used more frequently.
The installation of plaster beacons plays an important role, as it ensures ideal verticality for the future coating. These elements act as a kind of reference level and at the same time serve as guides for the rule during leveling of the solution.
The plaster beacon is a metal T-shaped profile with perforation
How to place beacons under plaster walls without a laser level
The main thing here is to correctly align the beacon profiles under the plaster.
Like any installation technology, the installation of beacons for plastering walls includes marking the area with the subsequent alignment and fastening of profiles to the surface.
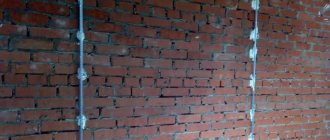
Before the advent of laser levels, plasterers used a plumb line and a ruler to mark, driving nails into the wall, the heads of which, aligned in the same vertical plane, served as a guide. In addition to the plumb line, a building level is used to check verticality.
To install beacons for plastering walls, two main marking methods are often used:
- regular markings;
- spider method.
Methods for marking beacons
Regular markup
Let's look at how to set beacons in the usual way. You will need a level and a nylon thread. Our task is to create a strictly vertical auxiliary plane, spaced from the “zero” point (see gallery below) at a minimum distance (h) - the thickness of the solution. For different plaster mortars, h is different (usually indicated on the packaging of the dry mixture as the minimum thickness).
Taking into account the fact that the beacon profiles already have their own height b (mm), formed by the heads of the screws, the auxiliary plane should rise above the zero point by (h – b) mm.
- We retreat from the corner of the room 10 cm, from the ceiling 15-20 cm (point A). Similarly, on the other side of the wall we mark point (B). At both points we install a self-tapping screw protruding 3-5 cm above the wall.
- We attach a plumb line to the first screw, and under the thread we mark two new points (A1 and A2): the first at a distance of 0.15-0.2 m from the floor, the second in the middle between A and A1. We screw in the screws. Similarly, mark points B1 and B2 and install two more screws.
- At this stage, you need to align all the caps in the same plane. To do this, we pass the cord of the plumb line tied to the upper screw over the head, and screw in or unscrew the underlying screws so that their heads touch the cord passing above them. We do the same with the screws on the other side.
- We stretch a horizontal line (lace) between the opposing screws, passing it over the caps. We connect the fishing line and the diagonals (A-B1 and A1-B). If the hardware is installed correctly, the diagonal lines will touch in the middle.
- We mark points C and D (10 cm to the center from A and B under the horizontal line). We also install on self-tapping screws with caps adjacent to the fishing line (for convenience, we draw lines between the screws with a marker). Having measured the distance CD, we divide it into segments of length from 100 to 150 cm (the distance between the beacons). We install the hardware, focusing on the fishing line.
- For all new screws, repeating the operations described above, we install a pair of lower beacons on the lines.
- The resulting vertical plane makes it possible to identify the most protruding point of the wall (zero), which is determined by measuring the distances from the wall to the plane formed by the fishing lines.
- If the distance between the zero point and the vertical plane is greater than h or hb, we adjust the position of the plane by screwing or unscrewing the hardware to the same distance.
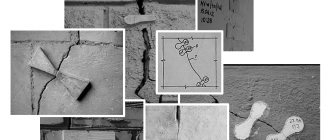
Marking points A1 and A2
Installation of self-tapping screw
Pulling the lace
Marking points C and D
Determining the zero point
If clips are used to attach beacons, then the thickness of the clip plate is also taken into account.
Screwing and unscrewing screws simultaneously is not difficult. It is enough to tighten or unscrew them by the same number of turns, because the thread pitch of the self-tapping screws is the same.
Spider markup
Installation of beacon strips for plastering walls is carried out in another way - the “spider” method. The name arose due to the use of four (two horizontal, two vertical) stretched threads. However, if everything is done carefully, high accuracy is achieved. The method will help to determine the optimal thickness of the coating for leveling, which means that the consumption of plaster on the beacons will be minimal.
- Having retreated from the corners of the wall (and from the ceiling) 15 and (5) cm, mark points, drill a hole in them, then, inserting a dowel, screw in 2 self-tapping screws with a screwdriver so that the caps rise above the wall by 5 cm.
- Now you need to use a plumb line to mark a place above the wall, 5 cm from the floor, for installing two more screws (strictly vertically, under the top ones). Holes are drilled into which self-tapping screws are installed, protruding from the wall also by 5 cm.
- At a distance of 2 cm from the wall surface, a nylon thread is tied to the upper screws. Using a plumb line, notice on the lower screws the places where you need to tie the nylon thread coming from above, so that it is strictly vertical. In these places the ends of the threads are tied with tension.
- A pair of horizontal threads is tied to two threads stretched vertically so that they can be moved. By moving horizontal threads along the wall, they reveal the curvature of the surface, the maximum protrusion (zero point), as well as whether the wall is collapsing and in which direction.
- If the distance from the zero point to the horizontal thread is greater than the minimum possible layer thickness for the selected plaster (h for beacons made of mortar, or hb - in the case of using standard profiles, where b is the height of the flange of the beacon profile), screws are screwed deeper into the wall at the same distance, ensuring that the horizontal thread is positioned above the zero point by the amount h (or hb). If the zero point protrudes beyond the vertical plane formed by the threads, the protruding section is cut off, or all screws are unscrewed to the same distance.
- Along the created vertical zero plane, 3-5 self-tapping screws are placed under each thread, the heads of which touch the threads.
Installation of 2 screws
Marking the space for screws using a plumb line
Attaching a horizontal thread
Installing screws under the thread
Setting up intermediate beacon profiles along two precisely oriented lines is no longer difficult. You can place beacons in the gap under horizontally stretched threads. Any beginner can handle this.
What you need to know
Aligning walls with beacons is a rather labor-intensive process and requires a person to have some knowledge and even experience. But there is no particular reason to refuse to do such work yourself, since it is quite easy to understand how to align a wall with beacons, what is the principle of the whole process.
In many apartments, despite seemingly correctly completed finishing and preparatory work, the walls have strong blockages and a large number of flaws, which manifest themselves in the form of certain irregularities. They can be eliminated by applying a layer of plaster to the walls using special beacons to level the walls.
How to choose a plaster mixture
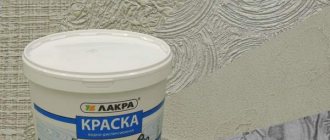
When choosing finishing materials, you should try to pay special attention to one manufacturer . This will help avoid incompatibility of materials and the subsequent development of various defects and difficulties.
On the Russian building materials market you can find plaster mixtures based on cement and gypsum. Gypsum plaster materials are in great demand as they help to apply a plaster layer of up to five centimeters without causing cracks.
The gypsum mixture is not subject to shrinkage and has a high plasticity index. Due to its high adhesion and low weight, gypsum mortar is the best material for ceiling leveling work. Unlike the cement composition, gypsum has the properties of thermal insulation and sound insulation, as well as the ability to “breathe”.
Gypsum mixture is considered the best material for leveling smooth concrete bases without reinforcing mesh.
The best gypsum-based building mixture is considered to be the material produced by the German company Knauf. But the price for such mixtures forces users to look for more budget-friendly materials from Russian manufacturers.
Dry mixtures are considered more preferable than ready-made ones , as they give the master the opportunity to choose the desired consistency on his own. Russian grouts include: dry mixtures from the company Starateli, material from the company T.D. Stroymontazh MS, ready-made mixtures Rusean, as well as Mansurov mixtures from the Joint Stock Company MKU.
Not so long ago, inexpensive grouts of European quality from a young construction company called Kreps appeared on the modern market.
Rules for selecting beacons
Beacons are metal strips of a special shape and up to three meters long , which are fixed on the surface of deformed walls and serve as the main guide for creating an even layer of plaster. They can be fixed to a variable surface using:
- self-tapping screws;
- dowel nails;
- special fastening elements;
- mixtures for plaster.
Possible replacement
In this case, there is no need to use beacons purchased at a hardware store when plastering. They can be easily replaced with the following materials:
- smooth metal strips;
- square metal profile;
- pipes;
- elongated self-tapping screws with caps.
Sometimes it is possible to replace beacons created in production conditions with simple plaster , which is applied to the surface of the wall in a certain area and in small quantities (as islands).
First, the person doing the work determines a more protruding point on the surface and applies a small amount of plaster mixture in this place. Several more such points are laid off from the resulting landmark in a strictly vertical direction. The height of the lighthouse, that is, the total distance from its top to the wall, can be determined by a plumb line.
Aligning walls according to beacons requires special care and increased attention from a person ; in addition, such a process must be carried out under the strict supervision of an experienced builder. It is also very important to pay attention to the ability of the device used not to succumb to the negative effects of moisture that is released from the solution. This means that the material for beacons created by yourself cannot be wood or iron, which is susceptible to corrosion.
Ready-made beacons made of galvanized iron or aluminum have reliable quality . But plastic cannot play the role of a guide when leveling walls with beacons. It is fragile and not hard enough to continue to hold its shape and withstand the combined pressure of the tool and the mixture. The best way out of this situation would be to purchase ready-made beacons based on aluminum or galvanized iron.
These types of beacons are very convenient when working, since with the help of perforation they can be installed on the surface not only thanks to plaster, but also with the help of various fasteners.
How to place beacons under plaster walls using a laser level
One of the modern marking tools used is a laser level. Using it, placing beacons under plaster walls is much faster and easier. You can also use a laser level to set a right angle between adjacent walls. You will need a rule 5-10 cm long less than the height of the wall. The device is placed perpendicular to the wall near the corner (if the wall is short) or in the middle (if the surface to be plastered is long).
We install the laser level as close to the wall as possible (3-4 cm) so that the plane created by its beam is parallel to the one being processed and perpendicular to the adjacent, already plastered wall. We mark with a pencil the places where the lines of light pass, so that when knocking down we can place the device in the same place. Using a metal square, we measure the deviation of the wall surface from the plane formed by the beam, recording the results on the surface or in a notebook.
- Having identified the zero point, we mark it with a cross, measure or calculate the distance from the light plane to the future surface. Let’s say that from the zero point to the beam is 25 mm, the plaster layer is 10 mm, the height of the beacon profile is 6 mm. We calculate the minimum distance between the beam plane and the top of the beacon ribs: 25 – 10 = 15 mm (see figure).
- To mark the rule in three places, glue masking tape onto its plane, onto which we apply a mark spaced 15 mm from the working edge (or draw a line directly on the rule, spaced 15 mm from the edge). The beam must pass along this mark when setting the rule on the edge of the beacon being set.
- We draw beacon installation lines on the walls. We throw along the line furthest from the level the solution. We install the profile bar by slightly pressing it into the solution.
- We set the rule with the edge on the edge of the profile and press the profile against the wall with the tool so that the laser beam coincides with the marks on the tape.
- We set aside the rule, remove excess solution, clean the top of the beacon with a spatula so that the working surface is clean and smooth.
- We install the following profiles in a similar way, sequentially approaching the level.
Zero line
Attaching grafted to the lighthouse
Combining the line on the rule and the laser beam
Removing excess solution
Installing a beacon on a solution
Marking beacons is done with a laser level several times faster than other types of marking.
Applying plaster mixture
The next stage of work is applying the plaster mixture to the wall. First of all, the thickness of the plaster layer is determined. If it is more than 10 - 15 mm, then the whole process must be divided into two stages. During the first approach, you need to throw the solution on the wall and level it so that the upper surface does not reach the plane of the beacons by about 5 - 10 mm. After the first layer of mortar has dried, the final finishing can begin. The solution is applied to the walls in slightly larger quantities than necessary and leveled using a rule that rests on the planes of the beacons. The instrument is moved from bottom to top, making swaying movements from side to side. Under no circumstances should the rule be torn away from the guides during this movement. Ideally, the surface will be smooth after the first pass.
During the first approach, you need to throw the solution on the wall and level it so that the upper surface does not reach the plane of the beacons by about 5 - 10 mm
Removing the corners between the ceiling/floor and the wall is done only after the entire main surface has set, but it should still remain damp. A special trowel is used to mark the corners. The beacons are removed after the wall has completely dried. The furrows remaining after them are sealed with plaster mortar using a level sliding along the already finished sections of the wall. If you plan to stick ceramic tiles to the wall in the future, then the profile can be left in the wall.
Types of plaster beacons
Beacons made of different materials are used as guides when leveling walls.
It can be:
- mortar (tracks made from mortar, the top edge of which serves as a guide);
- metal profiles (made of aluminum or galvanized steel);
- plastic profiles (disadvantage - they bend easily);
- wooden slats (rarely used, secured in place with nails);
- strings.
Types of lighthouses
All types of beacons have advantages and disadvantages. It is not recommended to leave beacons made of metal in the plaster; they are removed after the composition has set. Profiles left behind will corrode over time, causing rust spots to appear. Wooden slats can swell and warp from moisture. Plastic profiles warp too easily, making them more difficult to install and secure accurately.
In addition to T-shaped beacon profiles, L-shaped ones are produced. They are installed on plastered protruding corners. After leveling, the L-shaped profiles are left in the thickness of the finish.
Metal beacons come in lengths of 3 or 6 m. They are cut to size before installation.
How to remove beacons and whether it is necessary to do so
There are positions both for and against this action. There is a meaning in each case, so the decision is made individually. They usually rely on the materials used, operating conditions, and possible consequences.
In the case of removing beacons, the following arguments are usually given:
- Risks that the lighthouse will damage the fasteners when using paintings and similar decorations.
- The beacon itself begins to move away from the walls over time, for various reasons.
- Rust breaks through from residual material.
One of the reasons for the appearance of rust is the low quality of the source material. When leveling the applied plaster, the base may also suffer. And the profiles of famous companies are not protected from such problems. Finally, high indoor humidity levels often lead to damage. Guide profiles can be removed on any plaster – both fresh and already hardened. Only extracting parts from frozen material is somewhat more difficult.
Guide profiles can be removed on any plaster – both fresh and already hardened.
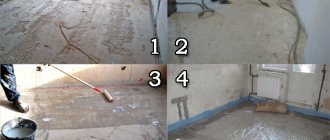
Preparing the wall surface
Before placing beacons for plaster, the surface to be leveled is prepared. Get rid of unusable old coating, stains, mold, and excess metal parts. Cracks and chips are repaired. Smooth concrete surfaces are covered with notches, and the joints in the masonry are embroidered to a depth of 10 mm.
Details about plastering walls made of different materials:
- Plastering brick walls.
- Concrete walls.
- Plasters for wood.
Remove dust from the surface, dry it, the base must be primed and, after drying, reinforced (if necessary).
Preparing the base for installing beacons
This is the very first and most important stage of the entire technological process. First you need to carefully inspect the entire surface to be treated. The old plaster layer must be removed completely, without leaving pieces, thereby exposing the base. You also need to eliminate stains of various origins, pockets of mold, and remove excess metal parts, if all this is present on the walls.
If cracks, chips, or defects are detected, they must be repaired, otherwise the desired result will not be achieved. If the walls are a smooth concrete surface, it makes sense to make several notches in order to increase the adhesive properties of the building mixture. For brickwork, expand joints to 10 mm.
Dust must be removed from the walls, dried and coated with a primer, depending on the base material. If necessary, strengthen the walls.
First of all, the wall is thoroughly dusted and primed
Installation of beacons for plastering walls in different ways
When installing, the main thing is to securely fix the beacon profiles to the wall. To reliably, quickly and accurately install the beacon on the wall, use ready-made or home-made fasteners, for example, eared ears, clips. Often the installation of beacons for plastering walls is done using mortar.
To prevent the solution on which the profiles were installed from serving as an accelerator for the crystallization of the plaster composition applied during plastering, the flashings are coated with a primer after installing the beacons.
Installation on plaster mortar or tile adhesive
Let's look at how beacons are placed, when they are installed and fixed using a plaster mixture. If you install the profile directly on the screw caps, it may rotate during the fixation process, deviating from the correct position. Therefore, piles of plaster composition protruding above the caps are laid around the hardware with a spatula.
Round or rectangular “bedside tables” are formed from the slides; the top is cut off along an auxiliary vertical plane at the height of the caps. On such hardened bedside tables, it is much easier to place beacons under the plaster and secure them with plaster mixture or tile adhesive.
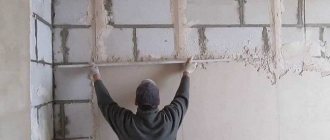
After installing the plaster beacons on the marks, fix the position of the profiles between them. Pieces of cut drywall can be useful here, from which you can make a mark of the required height by gluing the pieces with a solution or adhesive mass. If the beacon profiles are located close to the surface of the base, it is enough to place a mortar mixture under them in the right places.
Installation of beacons without mortar
Since our task is the reliable installation of beacons with protection against displacement during the plastering process, we need quick, strong fastening of the profiles to the self-tapping screws. For this purpose, several types of fasteners have been invented.
You can install beacons on hardware using:
- clips;
- creamers;
- eared;
- cleverness;
- homemade brackets made from straightened and cut beacon profiles.
The advantage of such fastening is the speed of installation, the absence of the need to wait for the plaster mixture to harden. In other words, it is enough to install the beacon profile and secure it with the fixing parts on the screws, and almost immediately after installation you can begin plastering. Beacon profiles installed on the walls will no longer move.
The disadvantage of such fastening compared to fastening to a plaster mixture is that it requires the installation of additional hardware, as well as the purchase of clamps.
Lighthouses from solution
You can make your own beacons for leveling walls using a plaster composition, for example, gypsum or cement. Such paths, made from the same plaster composition that will be used for subsequent plastering, do not need to be removed.
The easiest and fastest method is suggested by Andrey Shaiter.
To make guides from mortar, only a rule, a spatula and a trowel are used. The axes of the beacons are first marked on the wall, the zero point is found using a laser device, an auxiliary plane is set, and marks are made on the rule. Before starting work, prepare a viscous elastic solution.
Step-by-step production of a mortar beacon using the Scheiter method:
- the rule is installed on the edge (fixed in this position on the scaffolding);
- use a trowel to apply a solution to the upper edge of the rule;
- apply the correct bar with the solution to the wall, pressing until the line on the rule and the laser beam are aligned;
- using a rectangular trowel, adjust the angle of contact between the rule strip and the wall (to achieve the formation of a perpendicular);
- use a spatula to remove excess mortar from both sides of the instrument;
- using cotton threads, cut off the edge of the rule from the created mortar path, remove the rule;
- Allow the solution to dry for a day, after which they lightly pass along the top of the beacon with a block of sandpaper.
Fixation rule on scaffolding
Application of the solution
Adjusting the contact angle
Combining the line on the rule and the laser beam
Cutting off the rule from the track
This method creates mortar paths 2 cm wide. Made from gypsum, they dry out within a day and become suitable for plastering. During manufacturing, it is recommended to rest the lower end (heel) of the tool’s strip on a wooden wedge to avoid displacement of the strip when cutting with a thread.
Another method of making mortar guides and controlling their vertical level is somewhat more complicated.
- The rule bar is attached to the pre-installed screws to the wall (perpendicularly, on the edge).
- The gap between the plank and the wall is filled with mortar (without gaps).
- Use a spatula to remove excess plaster longitudinally from both sides.
- Gently tapping, shift the rule along the axis of the beacon, and then remove it from the formed path.
Installation
Attaching beacon profiles to the wall can be done using devices or using the adhesive method. The most famous devices are:
- "Kremmer";
- "eared";
- clip.
Latch "Kremmer"
This type of fastening is made in the form of a rectangular galvanized plate with a slot in the middle designed to capture the head of the screw. Attached to the profile plane by bending the ends onto the beacon.
The presence of slots at the ends of the plate makes it possible to bend the ends by hand, without the use of special tools. When all the fasteners are installed, the beacon is pressed against the screws, and the Kremmer is pushed onto the hardware until the head of the screw is fixed in it.
Having many advantages over other types of fastenings:
- quick installation - the ends of the fastening can be bent by hand without using pliers;
- thin, which is why the plaster layer in many cases is not as thick as, for example, when using a clip, which significantly saves dry mortar.
Kremmer mount.
- can be used on any type of hardware (self-tapping screw, screw, dowel-nail);
- tensions the beacon guides well.
It is not as popular as the other two devices. The reasons are the shortcomings. Minuses:
- self-tapping screws should be installed at a distance of 30 cm from each other, which increases their number on the beacon line, and this means additional time for installing dowels and screwing in self-tapping screws;
- a slight deviation of the hardware head from the vertical line does not allow the Kremmer latch to grab it;
- It is difficult to attach it to the profile so that the cutout for the screw head is exactly in the middle of the beacon.
"Ushastik"
This type of fastening, like the Kremmer latch, is made of galvanized steel. It is a rectangular plate with a hole in the middle for a self-tapping screw and ears for bending onto a metal profile.
How to install beacons for plastering walls on the “eared”? The technology is the simplest:
- when screwing the screws into the dowels, the “eared ear” is passed under its head - the hardware is screwed in together with the fastener;
- after bringing all the screws into one plane, the profile is tightly applied to their heads, and the fastening ears are bent, fixing the beacon.
"Eared" fastening.
Clip
This type of fastening is made of polypropylene. Consists of two parts:
- a base that is attached to a self-tapping screw and holds the profile;
- plugs - fixes the entire structure motionless.
The clip (abbreviated as KDM-2) has a thickness of 6 mm, which is most acceptable for rough plaster, when its layer should be at least 12 mm (6 mm clip + 6 mm profile).
How to attach beacons to a wall under plaster using clips? The plug is removed from the mount. Its base is fixed on the head of the screw. The beacon is inserted into the clip and closed with a plug. The operation on the entire profile takes 3-4 minutes.
Fastening with glue (plaster mixture)
In a situation where there are no special mounts for beacons, you can use:
- ordinary plaster (cement mortar) with the obligatory addition of PVA glue (to speed up the setting process);
- gypsum dry mixture;
- tile adhesive.
Attention: the use of plaster mixtures with gypsum in the bathroom, toilet and kitchen is not recommended.
How to install beacons for plastering walls with mortar? For this you will need:
- dry plaster mortar of any kind;
- plasticizers (PVA glue to speed up the setting process, liquid soap to slow it down);
- mixer;
- container for mixing the solution;
- trowel.
The instructions for this technology contain only 5 points.
- The guide beacons are cut to size using a grinder.
- The solution is mixed (each type of mixture has its own recommendations printed on the packaging).
- Along the lines of the beacons, between the screws, a solution is applied to the wall every 15 cm.
- The profile sits on the screws with the straps down until it fits snugly to the heads of the hardware.
- The solution that has come out from under the lighthouse is removed with a trowel.
The walls can be plastered only after the adhesive has completely dried. For gypsum this is 2-3 days, for other types of mortar - at least 8 days. Therefore, professional plasterers very rarely use this method of attaching guide beacons. If the apartment is being renovated on its own, the extra few days do not play any role.
Mortar beacons
If you want to save money and not bother with removing metal beacons from plaster, beacons can be made from mortar.
How to place beacons under plaster walls made of mortar? There is nothing complicated here either. The only requirement is that the beacons must be made from the same mortar that will be used to plaster the wall. The step-by-step process looks like this:
- Along the line of beacons, after 1 m, self-tapping screws, pre-lubricated with oil or soap, are screwed into the dowels;
- All screws are brought into the same plane with the first hardware, already aligned in accordance with the calculations;
- The solution is being prepared;
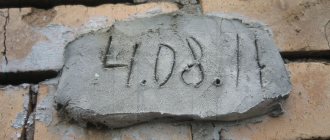
Mortar beacons.
- Using a trowel, the solution is transferred to the wall between the screws. A solid shaft is formed, from bottom to top, covering the screws by 1-2 mm;
- A rule, also lubricated with oil, is placed on the solution (so that the solution does not stick) and pressed until it comes into contact with the heads of the screws;
- Excess mortar that has come out from under the rule is removed with a trowel or spatula;
- After the hydration process is completed, the screws are unscrewed.
Work can be continued only after the mortar beacon has gained strength. If you do this earlier, the possibility of destruction of the lighthouse during leveling of the plaster with the rule cannot be ruled out.
Attentiveness and strict implementation of all recommendations will allow you to correctly install the beacons, which will serve as the key to well-executed plaster.
Materials and tools
To plaster with leveling compounds and prime, use conventional plastering tools.
To install beacons you will need:
- plumb line (laser level or building level);
- nylon lace;
- a set of dowels and screws (the length of the latter depends on the thickness of the leveling layer);
- spatula and trowel;
- marker or pencil for marking;
- trapezoidal rule (10 cm shorter than the height of the leveled wall);
- solution container;
- screwdriver (for self-tapping screws);
- metal scissors (needed to cut the profile into pieces for making fasteners);
- perforator;
- chisel and pliers for removing metal guides;
- masking tape.
Installing beacons for plastering walls may require purchasing beacon profiles and a sufficient number of screws (of different lengths). In the case of making mortar paths or attaching guides to the mortar, you will need to stock up on dry plaster mixture or components for preparing the composition.
Necessary tools and equipment
In addition to beacon profiles for plastering beacons, they prepare tools and devices with their own hands:
- mixer;
- containers;
- spatulas;
- rule (for a beginner, 1.5 m long is better);
- level;
- plumb line;
- fishing line (nylon cord);
- Master OK;
- grater or grater;
- roller;
- screwdriver (for self-tapping screws);
- pliers;
- brushes;
- masking tape;
- roulette;
- chisel;
- reinforcing mesh (shingles);
- stepladder (or scaffolding);
- rags;
- protective equipment;
- film to protect the floor of the room.
Of course, you need to prepare plastering materials in sufficient quantities.
Rules for plastering lighthouses
Leveling the walls by plastering is carried out following the rules developed over centuries.
- The plaster should not be stronger than the base material. During hardening and strength gain, internal stresses arise in the composition, which can be destructive for a weak base.
- The base surface must be carefully prepared before plastering. Any negligence will lead to the appearance of cracks, peeling of the plaster layer or the appearance of stains, efflorescence and other defects in the plaster.
- Applying a primer to patches, mortar marks, and mortar paths is mandatory.
- It is better to place beacons under the plaster slowly, especially paying attention to the accuracy of the geometric constructions.
- When plastering, the solution is applied evenly, spreading without leaving gaps.
- The strip between the guides is plastered in small sections, since otherwise too much excess mortar will accumulate on the rule. This may cause the instrument to become deformed.
- It is necessary to rest the rule on the guides only with slight pressure, so as not to damage the tops of the profiles.
- After leveling the mixture from bottom to top, one leveling is performed in the opposite direction, which ensures the mixture is fixed to the wall and prevents the composition from sliding.
- The profiles are removed until the plaster gains strength.
- The resulting grooves are filled with a solution that is more viscous than when plastering.
- If plastering is done with gypsum, then the excess is either immediately thrown onto the wall where the mixture is missing, or thrown into a separate container. The gypsum composition, which has already been on the wall, can cause the freshly prepared solution to instantly set, becoming the center of crystallization.
From all of the above, it is clear that the correct installation of the outer guides becomes the basis for the correct exhibition of intermediate beacons for plastering walls with your own hands. Having successfully completed the beginning of marking work, beginners usually get a taste for it and work with great pleasure, because the result - perfectly maintained geometry - is inspiring.
Retrieving Beacons
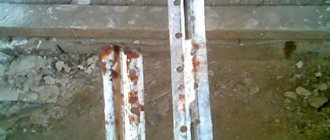
Metal beacons are usually removed if the wall is being prepared for painting or wallpaper. The walls in an apartment, depending on many reasons, can change humidity (depending on the season, the proximity of interpanel seams, the functional features of the room). Since zealous owners usually use cheaper steel beacons, when the humidity in the wall increases, such products will rust. Beacons can also begin to rust from the cut points. First, rust appears through the plaster, then through the putty, and finally onto the wallpaper. This is a fairly lengthy process: rust stains can appear when you completely forget that you ever made repairs. If the wall is being prepared, for example, for tiles, then there is no need to remove the beacons.
The lighthouse is pulled out of the wall
It is easier to pull out metal beacons after you have plastered the wall. To make it easier to find them, you can mark their location with a simple pencil. The best option for pulling out is 2 hours after the end of plastering. However, if more time has passed, there is no particular problem either. All you need is a scraper and pliers.
Pay attention to the advice of professionals - How to properly putty walls for painting.
To pull out the beacon, you must first find the place where it is located, either by a pencil mark or by knocking off a little plaster. Then pry it up with a scraper and pull some of it up. Use pliers to pick up the pulled out part and pull out the entire beacon. It's okay if the plaster flies off nearby, because it can't be done without it. It’s better not to pull the lighthouse too hard to avoid causing a lot of damage. Beacons can be removed equally from walls plastered with cement or gypsum plaster. After removing the beacons with a regular spatula and mortar, all seams are sealed.
String beacons
A rather rare version of the lighthouse is a string one. Its installation requires some experience. However, professional repairmen who have mastered this technique try to attach string-type plaster beacons when working with large surfaces - both due to the affordable cost and due to the increased speed. Using another option for walls of the same size, the construction team will spend several times more plaster and the guides themselves.
When using these types of fasteners for beacons, you will only need 2 strings, installed within a few minutes. To complete the work you will need a small number of tools:
- hammer;
- plumb line;
- pliers;
- screwdrivers;
- key;
- 2 strings (which can be replaced with cables or thin wire) and 4 dowels with bolts;
- plaster mortar and 4 wooden blocks.
Rules for installation of structures
In order to install fasteners for string-type plaster beacons, you will first need to drill 4 holes, retreating 150–200 mm from each corner in the horizontal direction and a few centimeters in the vertical direction. The next stage is driving in the dowels into which the bolts are screwed. When screwing in the fastener, you should leave about 10 mm of its length for twisting the string.
The process of attaching a string beacon consists of performing the following actions:
- Unwinding the string;
- Fastening the beacon to one of the upper bolts;
- Tensioning a string or wire using wooden blocks and screwing it onto a second fastener;
- Repeat the same steps with the lower bolts and the second guide.
After securing both strings, their verticality is checked. And, in order to reduce the likelihood of their subsidence, a small amount of solution is poured under each to install beacons. Without this, the string may sag, and the section of the wall will have to be leveled again.
When performing work, you should avoid string distortions. The beacon is checked using the rule that it should slide easily along the strings.
Further finishing should begin only after the solution has completely dried and the strings have been removed. You should also remove the dowels to which the beacons were attached. The traces remaining after the guides and fasteners are sealed with the same mixture immediately after completion of the plastering work. Step-by-step instructions for attaching string beacons.
Video:
Which mixture should you choose?
With a huge selection of plasters and putties, it is necessary to answer a number of questions.
Where did you plan to align the walls with the lighthouses?
If outside, then choose cement plaster. If it’s inside, but in a room with high humidity (bathroom or kitchen), then it’s also cement. Gypsum mixture does not handle moisture well.
Which mixture is easier to level?
Gypsum plaster is more elastic, it applies better, but it sets faster, which is good for a professional, the work goes faster. However, you have to work in small portions so that the solution does not deteriorate. Cement mortars retain elasticity longer and larger volumes can be covered, but they take longer to dry and work proceeds more slowly.
Which layer needs to be leveled?
With a large curvature of walls up to 80 mm, one layer of plaster can be leveled, but putty can be leveled with a maximum layer of no more than 5 mm.
Having answered these questions, you can move on to prices for ready-made mixtures of different brands, as well as the volumes of necessary materials. Calculations will give the final, most cost-effective option. For a home craftsman, it may be better to prepare the solution yourself and save up to 30% on this, while professionals feed on productivity and have already developed habits for quickly and efficiently leveling walls, so they have already decided on the mixtures.
Preparing walls for plastering
- A thorough inspection of the wall will give you an idea of the scope of the work ahead.
- If the wall is made of unplastered bricks, then it is necessary to tap out the excess mortar. Seal deep cracks with mortar. The difference in height between the projections and depressions should not be more than 10mm.
- It is better to free a plastered wall from the plaster to the base; the result of the work will be better. As a last resort, tap to reveal voids and beat off the exfoliated mixture.
- Concrete walls should also be free of putty, lime and paint. If you need to clean it up, then you need to clean it up.
- Before installing the beacons, it is better to clean the surface and prime the wall.
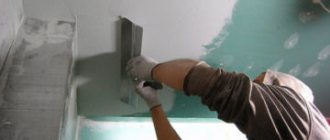
Grouting plaster
Upon completion of all work, the working walls are adapted to the stage of finishing and decoration (applying paint, gluing wallpaper, creating decorative relief). Grouting is the application of a thin layer of a more liquid plaster solution. Proper grouting is very important for the future design. A liquid plaster solution is mixed and applied to the wall in small portions. You should not process more than 1 square meter in one approach. meters. The plaster is spread in a thin layer using a trowel until there is no more material left on it. The trowel should be placed at an angle of half a straight line and movements should not be too fast, but confident. Excess material must be removed from the work surface. Considering the transition between zones, it is necessary to treat the entire surface. It is advisable not to take breaks between squares so that the material fits better.
It is forbidden to work with plaster in a room with open windows; this can cause cracks, detachments and other defects in the material.
The plaster is spread in a thin layer using a trowel until there is no more material left on it.