Greetings, friends.
Have you decided to renovate and are faced with the problem of uneven floors?
In this case, you will have to level them, because finishing floor coverings such as carpet, laminate or linoleum require a flat floor surface.
The best option for eliminating uneven floors is to make a screed. There are several types of screed - dry, semi-dry and wet. Each has its own disadvantages and advantages, and we will get acquainted with them further. But there is a key point that unites all types of installation - the installation of beacons . The evenness of the floors depends on how correctly and competently the floor screed beacons are installed.
Here you won’t be able to “work by eye” and even liquid self-leveling floors require the installation of special benchmarks that control the future floor level.
So, friends, no matter where you are going to pour the screed: in the garage, in an apartment or in a private house - follow my step-by-step instructions for installing beacons. Thanks to them, you will not only save money, but also not lose quality :)
Preparing the base
In order to properly fill the screed, you need to correctly install the beacons, but before that it is necessary to carry out a number of preparatory work. Preparation for screed is similar in essence to preparing the floor for laminate.
- We dismantle the old floor covering to a solid base. If the floors are wooden, I recommend that you disassemble them. In principle, screed is poured over wooden floors, but this is a separate topic. It is necessary to remove all irregularities and flaking pieces. Cracks, if any, in the subfloor are sealed with plaster or mortar.
- “Greasy” or shiny surfaces should be treated with a metal brush to ensure better adhesion to the screed. Then you need to remove all dirt and dust the surface.
- We prime the surface. You can use a roller or brush. The surface is primed in two stages. The second time the primer is applied only after the first layer has completely dried.
- After the primer has completely dried, waterproofing is rolled out on the floor. Typically, a film with a thickness of 200 microns is used for this.
- You need to glue damper tape around the perimeter of the room. This is especially true for unheated rooms. Let's say you need to install beacons in the garage, then sticking a damper tape will be mandatory. It is glued to prevent cracking of the screed, which changes in size due to changes in temperature characteristics.
The preparation of the floor for the installation of beacons is completed and now you need to determine the floor level.
Stages of preparatory work
Leveling the rough base assumes the absence of any floor covering. After dismantling work, various types of damage, lesions, differences in plane and level are revealed. If such defects persist, the subsequent leveling layer will correct the situation only for a short time. Therefore, the preparatory stage is not limited to just removing the finishing material and remaining debris.
Preparatory stage
Before installing beacons for floor screed, you need to correctly assess the situation regarding the level and evenness of the base along the plane. This is only possible after all loose materials and weak areas have been removed. The latter must either be dismantled or secured in the case of floorboards.
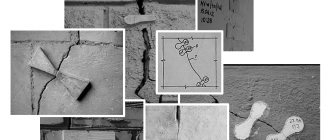
All damaged areas must be prepared for restoration. These include cracks in concrete. They need to be embroidered, dusted, and treated with a primer. Finally, fill with repair compound. To prevent further expansion of concrete, recesses are formed across the seam for reinforcing rods.
Reinforcement of cracks Source www.ivd.ru
The best option would be blanks with applied threads. In order not to look for them on sale, you can take galvanized self-tapping screws, from which the caps are then bitten off.
On a wooden floor, you need to dry the splits, prepare a chip that is as identical in nature and size as possible, and insert it into the gap. For reliable fixation, you can use wood glue or construction/universal PVA glue.
Grease and oil stains must be removed with alcohol-containing solvents or special construction degreasers. Protruding areas are ground with coarse abrasive. If iron fittings stand out, it is recommended that after removing the rust, apply an anti-corrosion compound to the metal.
Often, regardless of the nature of the subfloor, after the finishing is removed, pockets of biological damage are identified. Before installing beacons on the screed floor, such a “disease” must be “cured”. Here you need to use two types of means: destroyers, protection. Some manufacturers offer to purchase both products at once, so as not to look for them separately.
Products in convenient containers Source stroyleto.ru
The first ones are applied to the affected area, wait for the time recommended by the manufacturer, and mechanically clean the base. If necessary, repeat the procedure. Finally, preventive treatment of the enlarged area is carried out with protective antiseptic compounds.
Next, the rough base is completely covered with a primer in order to strengthen, remove dust from the surface and reduce the absorbency of the floor if necessary. After the treatment has dried, waterproofing is installed. For dry screed, a technical film with a thickness of 150-200 microns is sufficient.
In a damp room, during any leveling, a layer of a coating-type hydrobarrier is applied. Additionally, polyethylene can be laid under the solution, extending onto the walls at a height equal to the thickness of the screed. The seams between the canvases are formed with an overlap of 20 cm; they must be sealed by gluing with plumber’s tape or universal double-sided tape (the most reliable is bitumen-based). A damper tape is laid around the perimeter.
Ready base for leveling Source vbud.in.ua
See also: Catalog of companies that specialize in finishing materials.
Zero level
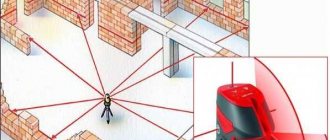
Before setting up the beacons for screeding a heated floor, in addition to preparing the base, you need to set a horizontal reference point. The zero point means the highest section of the floor relative to the level. To determine it, it is easier to use a laser, or a hydraulic one. The reference unit is usually 1 meter. First, it is measured along the entire perimeter, reflecting the results on the walls. A solid line is drawn along the highest mark. It monitors the presence of protrusions throughout the floor. If they are not there, then the final landmark is applied below.
Here, in addition to the relief of the rough foundation, it is necessary to take into account the height of the leveling compound. For example, a dry expanded clay screed can be 40 cm, and a cement mortar only 3 cm. That is, the final result for installing beacons will be higher than the guideline for the height of the leveler.
Determining flatness with a laser level Source interpol16.ru
Determining the zero floor level
There are two ways to determine the level of floors - using a laser level and without one.
- How to Determine Floor Level Using a Laser Level
We install the laser level in the middle of the room. If available, it is better to use a laser barrier builder.
Using a tape measure we find the highest point. It will be the starting point in calculating the minimum thickness of the screed. To find out how to calculate the thickness of the screed, read this article.
We add the height of the screed to the zero point and get the level at which the beacons will be placed.
- How to determine floor level without a laser level
If you don’t have a laser level, you can do without it. Next to the doorway we mark a point at a height of 100 mm. We mark a line from it along the entire perimeter of the room with a building level.
Using a tape measure, we find the highest point and make a mark taking into account the thickness of the screed.
IT IS IMPORTANT TO KNOW!
According to SNiP, the minimum floor screed cannot be less than 4 cm.
Now we beat off the found screed level around the perimeter of the room.
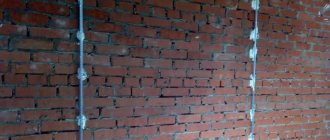
We drill several holes on the sides of the walls (the number depends on the area of the room), install self-tapping screws and stretch nylon cords, along which the level of the beacons will be set.
Floor screed using beacons: technology
Initial data of the technology under consideration: do-it-yourself semi-dry concrete floor screed (mixing the solution with a mixer) using beacons on top of soft soundproofing mats. The screed is reinforced with welded mesh in living rooms. The thickness of the mesh wire is 3 mm, the cards are 50x50 cm. The purpose of the screed is to hide communications in the apartment and level out a large difference in heights (a slope of more than 5 cm between the bedroom window and the front door).
Communications in the apartment
Step 1. On the prepared rough base (floor slabs), we lay soundproofing mats with an overlap of 15-20 cm on the walls. We glue the joints of the sheets with reinforced tape. This will prevent hard contact between the screed and the wall and improve sound insulation in the room by preventing the spread of vibration noise.
Universal solutions for screeds
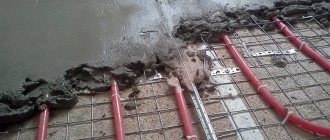
We lay the reinforcing mesh (on the clamps) and communications where it is provided for in the project.
The reinforcing mesh should not lie on the mats; it is necessary to set the clamps
Step 2. We begin to place beacons. We make markings and screw in rows of screws.
Screwing screws under beacons
We check their position using the rule along the laser level line.
A laser level allows you to do work faster and more accurately. The photo shows the marking process
Checking the position of the screws
If all the screw heads are in the same plane, we begin to mix the semi-dry mortar (sand concrete) in a bucket with a construction mixer. We spread the finished solution with a trowel under the entire length of the beacons. Installation of beacons for floor screed is carried out in the laid mortar, the profile is recessed until it comes into contact with the screws.
Beacon profile
Prices for plaster beacon profile
Beacon plaster profile
Laying out the solution under the profile
The profile must be laid on the screws and fixed with a solution
Installation of beacons
We check the position of the beacon. Remove excess solution with a trowel.
The beacon profile is recessed in the solution
Beacons for screeds
Step 3. Mix the filling solution.
Preparation of the solution
The proportions of the solution can be calculated using a calculator. Plasticizers are added to the mixture if it is necessary to speed up the hardening process of the screed or if pouring is carried out at temperatures below +5°C.
Go to calculations
We spread the solution with a trowel between the beacons.
The solution can be applied with a shovel or trowel
We level the mixture with a plaster rule, moving it along the beacons to the right and left and at the same time towards ourselves. The screed is poured along the beacons in the direction from the far corner of the room towards the door.
Filling the screed along the beacons
Another photo of the process
A couple of days after pouring, you can proceed to removing the beacons and grinding the surface (it is enough to use the sharp side of the rule to knock off small tubercles and minor irregularities). If the surface is planned to be additionally leveled with self-leveling mixtures, the grinding process can be skipped.
Installation of beacons for wet and semi-dry screeds
Let's look at the main types of beacons for wet and semi-dry screeds and how to install them.
- Self-tapping
A very productive and fast method of installing beacons, as it does not require time for the mixture to dry. First you need to purchase mounts for beacons. The most common are Knauff “crammers” and Zubr fasteners. The kit includes:
- self-tapping screw with plastic dowel
- direct fastening, consisting of two parts
Work order:
- Mark the locations for drilling holes in 30 cm increments
- We hammer in the dowels and screw in the screws to the required level.
- We put the lower part of the mount on the screws and install the beacon in it.
- We fix the beacon with the upper part of the fastener.
As you can see, it's fast and practical.
- On solution
Installing beacons on the solution is not difficult. If the first method required special construction beacons, then for the solution you can use improvised means. For example, I used a 20 by 40 mm profile pipe.
Work order:
- Using pieces of drywall or wooden backing, we set the beacons to the level.
- Mix the solution and secure the beacon
IT IS IMPORTANT TO KNOW!
The drying time of the solution is quite long, so I advise you to use quick-drying mixtures with the addition of gypsum.
3. If you use factory-made beacons, then first throw on the “bloopers” from the solution in increments of 40 - 50 cm, and then recess the beacon into them to the desired level.
4. The remaining solution is carefully applied to the beacon for better adhesion.
- Combined installation option
The combined option for installing beacons is a mixture of the first and second methods. It’s just that instead of attaching beacons, a solution or mixture is used.
Work order:
- Drill holes and screw in screws until they are level.
- Mix the mixture and apply it directly to the screws.
- We recess the beacon until we hit the self-tapping screw.
- Distribute the remaining mixture evenly throughout the lighthouse.
- Lighthouses from solution
There is still a debate among builders about whether to leave the beacons in the screed or not. So, particularly smart installers figured out that it was possible to make beacons from a building mixture. And we will adopt their method.
Work order:
- We install self-tapping screws along the entire length of the room to the level of the screed.
- We spread the mixture along the entire length of the lighthouse.
- We turn the building rule over and push it down to the screws.
- Carefully remove the remaining mixture with a spatula, forming a beautiful plaster beacon.
IT IS IMPORTANT TO KNOW!
If it is not possible to use self-tapping screws, then you can make gaps with a piece of drywall on top. This is clearly visible in the video.
How to make a lighthouse from plaster on the floor - video
- Beacons for semi-dry screed
Semi-dry screed has a number of advantages over wet screed. This includes speed of installation and hardening time. The installation technology is similar to the creation of mortar beacons.
- We form “bloopers” from semi-dry screed, placing them level.
- After they harden with the reverse side of the rule, we form a beacon along the entire length and wait for it to harden.
- Beacons for floating screed
When carrying out renovations, many people want additional insulation for their floors and use penoplex for this. The screed that lies on top of the insulation is called floating.
How to properly install beacons on penoplex - video
Work order:
- We screw in the screws, adjusting from level to level.
- We install beacons using either a mixture, as in the combined method, or fastenings for beacons.
Floor screed device using beacons
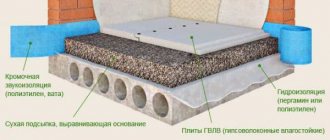
Prefabricated or dry screeds are installed without any “wet processes”.
Dry screed, layers
A waterproofing material is laid on the floor slab, usually a thick polyethylene film, on top of which, after setting the zero level, beacons are attached with self-tapping screws. Most often in this case, ceiling profiles for plasterboard or their analogues reinforced with stiffeners are used. The direction of the beacons is along the long walls of the room (from the front door to the window). There cannot be less than three profiles, even in a small room and using the three-meter rule, otherwise the strength of the finished screed will be in question. The optimal distance between the beacons is about 60 cm. Expanded clay or sand is poured from bags, starting from the far corner, and distributed between the beacons in a dense, uniform layer.
The backfill is leveled using the rule
The “finishing” layer of the screed is sheets of gypsum fiber board, OSB or plywood in two layers, fixed with glue and self-tapping screws. Naturally, beacons are not removed from the backfill.
Gypsum fiber sheets of the top layer of dry screed are attached with glue and rigidly fixed using self-tapping screws
Dry screeds can hardly be called budget-friendly; they are not recommended for installation in wet rooms, but their use is widespread due to their low weight and high installation speed.
Semi-dry screeds differ from wet by a reduced amount of moisture in the solution, the presence of plasticizers and fiberglass.
Semi-dry floor screed
The mixture for semi-dry screeds is supplied to the site using a pneumatic compressor, and for wet screeds it is most often prepared in portions in the room immediately before pouring.
Cement-sand floor screed (wet)
Both semi-dry and wet beacon screeds allow you to hide utility lines, including warm water floor pipes, in the thickness of the mortar.
Beacons for self-leveling floors - benchmarks
If floor differences do not have any prohibitive values, then it would be more advisable to use self-leveling self-leveling floors. Many beginners make the mistake of naively believing that the mixture itself will fill all the unevenness.
When pouring the self-leveling mixture, special beacons are used. You don’t even have to buy them, but make them yourself.
If you don’t want to bother making beacons for screeded floors, you can buy them. A benchmark is a professional beacon, which is a tripod with a rotating mechanism.
By rotating the central bolt you set the required filling level. Benchmarks are placed in 1 m increments. After pouring the self-leveling floors, the benchmarks are removed.
Types of beacons for floating screeds
The choice of method for installing beacons under the floor screed on your own depends on the finishing budget and the skills of the finisher. There are two major categories of beacons:
- point – faster to manufacture, but require highly qualified craftsmen when leveling the laid mixture;
Point beacons.
- linear – take longer to construct, but are ideal for beginners.
Linear beacons.
Beacons are made from special quick-hardening mixtures, ordinary solutions, special profiles, products and even ordinary hardware, strings or fishing line.
Spot
For small areas, with a limited budget, a highly qualified finisher or the use of a self-leveling floor, point beacons can be used - benchmarks, self-tapping screws screwed into the base, or piles of quick-hardening starting putty mixtures.
Important! The screeds are not reinforced because they are poured onto a obviously strong concrete base. However, communications and heated floor contours can be built into them, which must be laid on the floor slab before installing the beacons.
Reference
With a sufficient finishing budget, it is advisable to use reference beacons for screeding floors made of self-leveling mixtures or concrete with various fillers. Benchmarks are tripods with a central screw-in rod, which has a scale on the threaded part and a support table for setting the rule at the upper level.
Benchmark for self-leveling floor.
The beacon installation technology looks like this:
- benchmarks are installed in a checkerboard pattern;
- the support tables are unscrewed to a common horizontal level according to marks on the walls, a bubble level or a laser mark on the level;
- the mixture is placed along the lower scale of each benchmark;
- after which these devices are pulled out by the master;
- self-leveling mixtures close in these areas on their own; the usual solution is additionally leveled with a rule or spatula.
Important! Leveling technology was created for additional control of self-leveling floors, therefore it is used very rarely when pouring concrete screeds.
There are polymer benchmarks without support tables and tripods in the form of a vertical ruler with a millimeter scale (usually 10 cm), fixed inside the base with a self-adhesive sole.
Plastic benchmark.
They are mounted similarly to steel benchmarks; after the screed has dried, the ruler is removed, the base remains embedded in the concrete, and the hole is filled with cement mortar or starting mixture.
Pin
Cheaper, but more difficult to install, is a pin beacon made from dowel-nails for gypsum plasterboard systems. Installation is done as follows:
- making parallel rows of blind holes in the concrete base, the step between the beacons is 0.5 - 1 m, between the rows is 10 - 15 cm less than the length of the rule;
- driving polymer dowels into the holes;
- screwing in special screws so that their heads are at the same horizontal level (controlled by a rule, cord or bubble level).
Installation of pin beacons.
Important! After laying and leveling the mixture and gaining strength with the screed sufficient for walking, the screws are unscrewed and the holes are filled with starting mixtures.
Mortar brands
A more expensive, but less complex way to provide beacons when casting screeds is mortar grades using the following technology:
- conical piles of the starting putty mixture are laid in rows at intervals the length of the rule, with a step of 0.6 - 0.7 m in rows;
- the top of the cones is cut off with a rule or a long bubble level using a laser level or marks on the walls of the room;
Mortar brands.
Advice! After laying the mortar, the beacons remain inside the screed structure. Therefore, it is not recommended to use alabaster, which is rejected by some concretes and self-leveling floors.
Linear
More convenient for the home craftsman are linear beacons, which serve as guides for the rule, which is used to clean off excess concrete when pouring. When using mortar guides, it is necessary to ensure compatibility between the components of the beacons and the concrete (self-leveling floor), since they are embedded in the screed. Plaster beacons are usually permanent, profiles for gypsum plasterboard systems are removed after the mixture has partially set, and the grooves are sealed with concrete.
Mortar
If you have a sufficient amount of starting putty, you can install linear beacons using the following method:
- strips of the mixture are laid in a cone across the wall in which the doorway is located;
- according to the marks on the walls or the beam of the laser plane builder, their upper edge is trimmed at the general horizontal level by the rule;
- after the guides have hardened, concrete is laid between them;
- As a rule, alignment is carried out according to these beacons.
The lighthouse is mortar.
The technology requires relatively low qualifications of the craftsman and ensures the strength of the screed structure.
Plastering
The industry produces a T-shaped perforated profile for preliminary leveling of walls and ceilings, called plaster beacons. Perforation is intended for self-tapping screws with which long elements are attached to the building envelope.
Lighthouse plaster profile.
The profile is placed on the concrete base of the floors either on plastic wedges (support spacing 0.4 - 0.6 m) or on piles of quick-hardening putty. The inherent rigidity of plaster beacons is very low, so it is not recommended to exceed the specified support step.
Profile
With a significant thickness of the screed, the ideal option for beacons is a galvanized or stainless steel profile for gypsum plasterboard systems. These elements are installed level on a quick-hardening starting putty mixture or fixed to the concrete base with self-tapping screws.
Profile for gypsum boards.
The profile has a stable spatial geometry, can withstand the pressure of large volumes of concrete, and is easily removed from the mixture after it has hardened. It is not recommended to leave the profile embedded in the screed.
Timber
To save budget, an individual developer can use a wooden block of a suitable cross-section as beacons. Since these elements are removable, it is enough to treat the lumber before laying it on the base with an antiseptic and waste oil or soap solution, after removal, clean it from concrete and use it in partitions and the rafter system of the building.
Important! The technology is completely identical to installing a profile, however, lumber rarely has ideal geometry, and the technique is not used often.
Tubular
Another option for low-cost leveling linear elements for moving the rule are square and rectangular pipes. They are laid on quick-drying branded beacons and removed after the concrete has completed its curing in the usual manner, discussed in previous technologies. Round pipes are completely hidden in the structural material of the screed; it is much more difficult to pull them out of concrete without damaging the areas adjacent to them.
Pipe guides.
How to install beacons for dry screed
Dry screed, which is characterized by ease and speed of installation, is becoming increasingly popular. For the most part, fine-grained expanded clay is used for dry screed, on the leveled surface of which GVL slabs are laid.
But since expanded clay is a loose mixture, it needs to be leveled. For this purpose, dry screed beacons are used.
The minimum layer should not be less than 3 cm, so a regular factory beacon will not suit us. I advise you to use a metal profile for plasterboard 60 by 27 mm.
We already know how to prepare the base and set the floor level, so we will immediately begin installing the beacons.
The profile can be laid with the flat side down and then it does not need to be removed. It will remain in the floor and will act as a lag for the gypsum fiber sheets. With this position of the profiles, expanded clay will fill the space between the walls.
Or you can lay the profile with the flat side up and after the expanded clay is leveled, remove the profile and then fill it with expanded clay.
Filling the screed
After setting the guidelines, all that remains is to lay the screed mortar. Regardless of what kind of screed solution you are going to use (concrete, cement, semi-dry or dry mixture), laying the mixture along the beacons is the same:
- The prepared solution is laid out between the guide profiles, starting at the wall of the room farthest from the entrance. In this case, the mixture should be slightly above the reference level.
- Immediately after laying out the solution is leveled using the rule. To do this, the tool is placed on the guide profiles and pulled towards itself with movements from side to side.
- After a day, the profiles must be pulled out of the hardening screed. The holes from them are treated with a primer and sealed with mortar. The floor surface in these places is leveled with a trowel.
- The first time after installation (4-6 days), the wet screed must be moistened and covered with plastic film to ensure uniform evaporation of moisture.
When installing a dry screed, the guides do not need to be removed. Immediately after filling the granular material and leveling it, sheets of plywood, OSB, gypsum fiber board or chipboard are laid on the profiles and screwed to them using self-tapping screws.
Types of beacons for screeds
Beacons for floor screeds come in two types.
- The first type of lighthouses is all rack lighthouses. The following can be used as slats: a square pipe, a channel, a plaster beacon, a flat wooden lath.
- The second type is professional beacons in the form of tripods (benchmarks). They are placed throughout the room. Each tripod has a retractable rod, which indicates the level of the new tie.
- Rack beacons are often used for installing cement-sand screeds, lightweight concrete screeds, and levelers. That is, where the solution requires manual leveling by rule.
- Point tripod beacons (benchmarks) are very convenient for indicating the level of a cement-polymer floor, finishing screed and self-leveling levelers. The use of these beacons requires certain professional skills.
Let's look at each type of beacon separately.