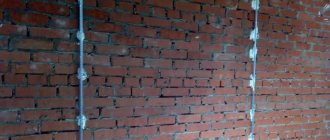
Option 3: rubbed plaster beacons
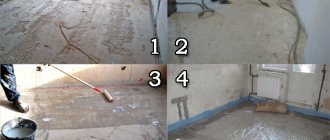
If there are minor irregularities on the walls that need to be covered with a layer of plaster, builders refuse to work with galvanized iron lighthouse profiles.
Craftsmen prefer to install so-called rubbed plaster beacons. Manipulations require certain professional skills, the work time increases, but the result can please those who carry out construction or repairs themselves. If you need to build intermediate elements, two identical tools are attached to the walls, acting as the basis for creating a polished beacon
Materials and tools
Having chosen this technology, you should find out how to properly carry out the installation, what tools and materials will be required when the use of this method is justified. First of all, you will have to take care of having the necessary tools. The master will need:
- plumb line;
- rule;
- spatula;
- screwdriver;
- self-tapping screws;
- screwdriver;
- construction water level.
The prepared solution does not have a high level of strength, and the created structure will not be durable. It's better to prepare:
- Gypsum plaster (Rotband).
- Cold water.
When choosing a material intended to create a structure, it is important to remember that the dry mixture must contain gypsum. It is not allowed to use cement-sand mixture in the work.
The working process
The prepared, cleaned, primed wall is marked by marking on the surface the points into which self-tapping bolts will be screwed. It is to them that a plumb line is attached to determine the vertical line. It should be done at a distance of 5 cm on both sides of each inner corner.
You need to carefully select the rule used to create the rubbed beacon. Its size should not be 2-3 cm less than the height of the wall. The tool is fixed vertically using self-tapping screws, having previously drilled 3-5 holes in it, located at an equal distance. Further:
Use a level to mark the vertical. Fix the rule strictly along the red line, retreating 5 cm from the corner. Prepare a composition based on a gypsum mixture, mixing the ingredients well. Fill the gap between the wide edge of the tool and the inner corner with the prepared solution. After smoothing the edges, wait until the solution hardens, remove the screws and carefully remove the profile.
A water or laser level will help you check the correctness and accuracy of the actions performed. The main advantage of this method is that there is no need to remove the landmark before applying the plaster mixture to level the walls.
It is almost impossible to make any surface level without installing beacons. Knowledge and ability to carry out high-quality and accurate markings, determine the zero and working planes, install galvanized iron profiles or create plaster beacons will help you achieve success in achieving your goal.
Before you start work, you should carefully study all the positive and negative qualities of a particular design, choose the one that will save money and avoid additional time costs.
Materials and tools
The necessary materials and equipment are purchased after figuring out how to properly install the beacons and choosing the method of attaching them, as well as the type of rail or profile. You will need:
- slats or profile for beacons, the length corresponds to the height of the wall. When the surface height is more than two meters, for convenience, sections 2 m long and additional sections up to full size are used. For example, for a room 2.5 m high, beacons 2 and 0.5 m long are used;
- cement-sand (cement-polymer) mortar for basic plastering work and the same mixture or quick-drying mortars (alabaster, cement-gypsum mixture);
- a primer to increase adhesion between the base wall and the plaster mortar and to slow the absorption of liquid into the wall. Especially relevant for red brick and foam or aerated concrete blocks, porous stone;
- water and a container for diluting the solution;
- level with a length of 2 m;
- rule length 1.3...1.5 m;
- trowels and graters;
- cord for aligning intermediate beacons (fishing line, thin flexible wire);
- electric drill and screws;
- protective equipment - glasses, gloves, respirator if necessary;
- chalk, markers, construction pencil or other means for marking the wall;
- brush (broom, vacuum cleaner) for initial cleaning of the wall.
Important: the control profile for plaster is available in lengths of 250...300 cm, widths of 10...20 mm and thicknesses of 6 and 10 mm. Moreover, the thicker and more rigid the profile used in the work, the more massive the layer of mortar can be applied to the wall
Thin profiles bend under the weight of the solution and the load from the rule when leveling.
Advantages and disadvantages
Like any type of work, leveling walls without beacons has its advantages and disadvantages. Specialists and ordinary craftsmen highlight the following advantages of this type of work:
- Economical use of the solution - when working with beacons you will need at least 7 millimeters of plaster, while without them from 4 to 6 mm, this allows you to save a significant portion of money and eliminates the need for a large amount of materials.
- Reducing the cost of repairs - a set of beacons for plastering walls will hit the budget hard, you will need additional tools and much more mortar, so working without beacons will help reduce the size of the budget for repairs.
- High quality plaster - thanks to the integral processing of the walls, the surface will be crack-free, because there will be no need to tear out the beacons: this process can damage the surface of the walls.
- Preserving the area of the room - a thinner layer of mortar allows you to preserve the volume and area of the room where the interior walls are being finished.
- Fewer materials - in addition to saving, the advantage is that there are fewer problems associated with additional work; screws and holders for beacons are not needed.
It should be understood that leveling walls using the beacon rule is much simpler than the plastering process, so if you have never plastered walls, it is better not to try to do it without beacons. The main disadvantage is the required work experience in this field, but there are other disadvantages:
- Minor defects - it is difficult to create a perfectly flat surface without beacons; you will need to additionally putty the walls.
- Drawing a plane - without experience, it will be problematic to draw diagonals and verticals; there will also be a lot of mortar on the floor during this process.
- Labor intensity - this type of work is more difficult than leveling walls with plaster according to beacons.
- It takes a long time - plastering without beacons cannot be done quickly.
Although installing beacons takes a lot of time, the process of leveling the walls is much faster with them, so work without beacons takes longer. The process will be complicated by the lack of a mixer, a good rule and a small number of spatulas of various sizes.
Following on from what was said
Unfortunately, the world does not yet know a simple and convenient technology for arranging lighthouses. One way or another, you have to endure wet processes and put up with a monstrous loss of time. And no matter how hard you try, you still can’t get a perfectly flat surface. Somewhere the hand will tremble, somewhere the screw will bend... There will definitely be a slope of a couple of millimeters. And if the lighthouse is even, then it is not a fact that it will be possible to apply the plaster exactly the same evenly - it is also full of its own nuances.
- home
- About the interior
- Practical advice from a finishing specialist
- How to plaster over rubbed plaster beacons
→
→
→
Types of lighthouses
Depending on the material and properties, the beacons differ from each other. They all have their own characteristics and specific application.
Metal
This is the most popular version of profiles available in construction stores. Installation of metal beacons is the simplest; no special training is required. They are most often not removed after work is completed. There are metal beacons of different sizes on sale, with small ones used infrequently, while medium and large ones are most in demand.
Perforated beacon profile
Since a thin profile is used for the manufacture of products, it can be easily cut with scissors according to the required dimensions, which is a definite advantage for the craftsman. The disadvantages of metal beacons include the risk of rusting. Such products are made from ordinary carbon steel, which is prone to corrosion. In some cases, this leads to the appearance of unsightly red spots on the finish. In addition, if the beacons are too flexible and thin, to fill them you will have to prepare a special solution to strengthen the structure, or additionally use clips.
Wooden
Such devices are made from rectangular wooden slats with a channel-shaped profile. After the plaster hardens, they are removed. It is necessary to saturate each lighthouse with a water-repellent agent in advance, otherwise the wood may warp and bend, and the coating will not be even.
Wooden guides for applying plaster
Plastic
Such profiles are made of durable plastic. Their standard thickness is 3, 6, 9 mm, length - 3 meters, although there are other options on sale. The advantages of plastic beacons are undeniable:
- light weight, easy to transport and store;
- strength is not lower than that of metal products;
- non-susceptibility to deformation, return to original shape after bending;
- no risk of corrosive destruction or rotting.
PVC profile for leveling
Plastic guides also have disadvantages. They are less resistant to shock loads than their metal counterparts. In addition, the products are not suitable for facade decoration, since they lose strength under the influence of sub-zero temperatures. They require strictly correct fixation on the surface, otherwise they will bend when moving the trowel.
Reusable steel
Beacons, which can be removed and reused after plastering, are an order of magnitude more expensive than disposable ones. They are made of very durable metal (usually stainless steel or galvanized), they will never move even when a thick layer of the mixture is applied. Due to the high price, such beacons are most often used by professional builders.
Reusable steel beacon with fastenings
Homemade
Craftsmen often use various homemade devices that act as guides. For example, when finishing wooden surfaces, wooden blocks of the required size are used, which are easily attached with self-tapping screws. Experienced finishers even make beacons from the mixture, applying it in “heaps” according to the level or on the heads of pre-screwed screws. There is no need to dismantle them, because they will be completely hidden by plaster.
Installation of self-tapping screws for leveling walls
Strings
These products are also homemade analogues of purchased beacons. To install them, screw in self-tapping screws and stretch a thin wire or string between them, checking the correct location with a level. The free space that has formed under the string is filled with plaster. The strings must be removed before the solution has completely hardened. If you make a mistake and install the string beacons incorrectly, you can end up with a crooked surface.
Set of string beacons for plaster
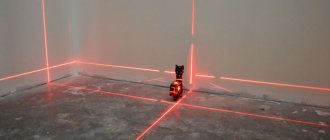
Laser
Such “beacons” are projected onto walls using levels or laser levels. Such devices create marking lines in one plane. If you install the device and set the vertical plane parallel to the position of the base, the laser beam on the floor will outline a line to adjust the thickness of the finishing layer. Using this mark, you can install self-tapping screws with a certain height.
Using a laser level to level the plane
Methods for controlling cracks in buildings
Receive an expert decision on the further operation of the house on the day of departure by conducting an examination of cracks.
Alexander Pechenkin
Conducted 586 construction examinations, 50 forensic examinations
The main causes of cracks in building structures: types and features.
To monitor the condition of buildings, special devices are used, which are usually called “beacons”. They are used to monitor the deformation of an object, to monitor emergency structures, and when conducting nearby construction or restoration work that may affect the integrity of the structure.
Installing beacons on cracks makes it possible to accurately record all changes occurring, and thanks to this, monitor the objective condition of the building. Based on the results of measurements, a decision is made as to whether the building can continue to be used, or whether it requires repairs, or the elimination of factors causing the crack to increase (for example, stopping nearby construction).
The choice of beacons for monitoring cracks is carried out depending on the condition of the object and the features of a particular structure, as well as taking into account the following issues:
- How precise changes are required?
- Is it important to measure the effects of temperature and humidity?
- Will it be convenient to service the device and take readings?
- The price and service life of the device, where it will be installed, is it possible to ensure its safety?
Depending on these issues, the optimal type of monitoring system is selected.
Types of beacons for cracks in the wall:
We will consider 5 main options for monitoring systems, which differ in price, capabilities and installation features. It is impossible to clearly name the best of them, since each has its own advantages and is used in different situations.
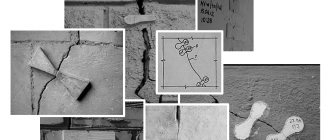
Gypsum beacons for cracks
This is the most traditional method, and at the same time the cheapest, since it is disposable. As soon as it works, that is, a crack or break appears in its body, it is necessary to install a new one nearby. At the same time, the reliability of the indicators is quite low, and usually at least two pieces are installed, at the rate of one piece for every three meters of the fault. It is important to understand that this method of crack control has a number of disadvantages:
- Not suitable for outdoor use, since due to temperature changes and exposure to external factors, arbitrary destruction of the sensor is possible.
- Installation is not carried out at sub-zero temperatures.
- Performance largely depends on the quality of installation and proper preparation of the surface, taking into account the size and design features of the sensor.
- The measurement accuracy is not very high, since when triggered the system quickly collapses.
Electronic beacons for cracks
The optimal choice if you need to calculate how a crack is affected by changes in temperature and humidity from inside and outside the building. Electronic measuring sensors today can transmit information remotely, recording differences of tenths and hundredths of a millimeter.
Electronic beacons for cracks on walls have their own characteristics:
- It is impossible to measure how much parts of the structure have moved up and to the sides if only one sensor is installed.
- The cost of the equipment is quite high, and resistance to vandalism is low, so it is problematic to install them in public places.
- Most often, this method is used for short-term measurements, ranging from several days to two weeks, in order to quickly monitor the situation and make a decision.
Plate beacon for monitoring cracks
This is a very simple design, to some extent reminiscent of plaster, but without the inherent disadvantages of the latter. Today, this type is used most widely, since it is optimal in terms of installation cost, ease of observation and accuracy of the results obtained.
Installing a beacon on a crack is very simple; it requires dowels or epoxy glue (sometimes both are used), and any marks can be applied to the surface to facilitate monitoring. This diagnostic method compares favorably with others:
- Thanks to the use of a signal measuring scale, changes in the opening are monitored visually, without the use of any tools, but they can also be used to measure the opening width even by hundredths of a millimeter.
- It is easy to track the movement of the structure along two or even three axes.
Point beacons on cracks in buildings
These are inconspicuous, but very durable sensors that are highly resistant to vandalism, as they are properly attached to the wall. There are a variety of fastening methods, ranging from the simplest dowels to special mounting devices - it all depends on the specific object. Peculiarities:
- You can monitor measurements at 2, 3 or 4 points, and track how much parts of the building have moved upward or horizontally relative to each other.
- You can make beacons for cracks almost invisible, from organic glass or a material that matches the coating, and in many cases, preliminary surface preparation or removal of the finish is not even required.
- Various instruments are used to measure disclosure, and the accuracy of the measurements depends solely on the accuracy of the assessment instrument.
Monitoring cracks using sentinel beacons
These systems, also called “messuras,” do not require special measuring instruments; they already have their own scale with high-precision sensors. The most convenient option for tracking the slightest changes and quickly recording readings. Features of application:
- Such beacons for monitoring cracks are quite expensive, and can only be comparable in price to electronic ones. At the same time, they attract vandals as much as possible, and even special protective structures cannot save them. They are placed inside buildings or outside, but in such a way as to ensure the possibility of monitoring an expensive device.
- As an option, the method of fixing two points on the fault is used, and the messuras are used only as a measuring device to assess how much the space between them has changed.
We considered only the 5 most popular options. There are also paper and glass systems, but they have a lot of disadvantages, and in this case, installing beacons on cracks will not provide the required measurement accuracy. It is better to choose one of the sensors described above.
Rules for installing beacons on cracks
The state regulates certain norms and standards for various types of sensors, as well as the frequency of readings. Before installing beacons on a crack in the wall, it is necessary to study these requirements and be guided by them during the installation and monitoring process.
If during the monitoring process (usually 30 days) the system does not work, it is concluded that the deformation has ended, and the resulting crack is usually simply covered with mortar. If the lighthouse is deformed (the first 20-30 days after fastening are especially important), it means that the destruction continues, and a decision must be made on further operation or repair of the object.
- The initial installation of beacons on walls with cracks is always carried out in the place of greatest discrepancy.
- Each sensor is assigned a number, and the installation date is indicated in the log.
- With active deformation, the beacon is inspected once every 48 hours or more often; with slow deformation, checking once a week or even less is acceptable.
- If the system has worked and is deformed, a new beacon is placed nearby, but the old one is not removed.
- When installing beacons on cracks in walls, the location of installation, its number, the date of work, as well as the initial width of the fault are recorded in the log.
- It is important to monitor not only how much the crack opens, but also whether it lengthens. If elongation occurs, a new sensor is placed on that end.
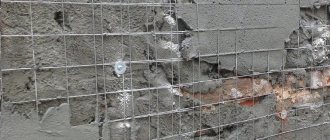
- Installation of beacons on cracks in brick walls is permitted only after the surface has been thoroughly cleaned from dust and dirt. It is recommended to rinse the fault with clean water, measure its depth, and only then install the sensor. Cracks are sealed with cement or metal staples.
- The wall can be deformed not only due to problems with the masonry, but also due to temperature effects, so after installing the system, it is necessary to check whether the sensor is moving away and whether its functionality has been impaired.
October 9, 2017
Author: Alexander Pechenkin
Has a crack been discovered in your home?
Don't put off the problem.
Hurry up to take advantage of the free inspection until September 30th! By submitting contact information, you agree to the Privacy Policy
Related articles:
Examination of cracks in buildings and structures Cracks in monolithic walls Cracks in brick walls: causes and elimination
Installation
Let's look at the sequence of how to correctly place beacons under plaster.
1. In order to level the wall with plaster mortar and not overuse it, first you need to determine the section of the wall that protrudes as much as possible. This will be the starting point for installation.
2. Using a large level or a regular plumb line, you need to mark for installation. This step will be equally important both on walls that are simple in terms of geometry and on complex elements. Profiles can also be cut for installation at points of rotation or difference in height of the wall, and periodically they have to be bent when plastering rounded wall elements. Now on the market there are rules of various lengths, which already have a built-in level, which will greatly facilitate the implementation of horizontal markings.
According to construction standards, markings are carried out at a distance of 20 cm from corners and slopes, as well as on straight sections at a distance of 1.5-2 meters.
3
When choosing a method for installing beacons with your own hands, you need to take into account the physical and chemical properties of the material from which it is made. The leveling is carried out using a composition that will harden faster than the plaster mixture itself
For example, in the past, alabaster composition was used. Today you can use either gypsum-based glue or directly prepared gypsum initial plaster. During installation on such mixtures, you can easily adjust the level of the exposed element. To set it to the required level, it will be enough just to click on the beacon protruding beyond the required limits.
The most convenient way to install beacons under plaster is either with self-tapping screws or with fasteners that are now widely available. But this does not mean that the gypsum mixture is not suitable for this. On the contrary, for the most part, craftsmen place beacons on a gypsum mixture. For gypsum beacons, which some craftsmen also highly value for the speed of installation without additional devices, a gypsum mixture will probably be the only option for fixation.
Whatever composition you choose for fixing, it must be applied to the wall in small lumps. The most optimal distance between the fixation points is 30 cm. However, for the first in the row, it is advisable to make the interval between the clods 15-20 cm.
4
When installing beacons for plastering walls, it will be very important to maintain both vertical and horizontal levels. Also, during work, you need to ensure that the fixing solution covers the profile on both sides, and the existing perforation is carefully filled with the mixture
Providing reliable fixation will prevent it from moving during the application of plaster, during which significant loads will be created on profiles of any configuration.
When checking the level of the beacon immediately after its installation, while the solution is still damp, it is necessary to eliminate any deviations from the rule level - all gaps or sagging. When one edge of the profile deviates from the desired level, it must be adjusted by pressing or pulling out of the solution to fix it. If deviations from the level with a large length of the beacon are difficult to determine, then it would be best to install additional horizontal elements. Typically, such an operation is performed using a mechanized method of applying plaster, but in our case it can also be useful. Therefore, it is also recommended to understand how to place beacons under plaster walls using this method.
5. Designation of the required level for plaster using gypsum tape elements will have its own characteristics - it is prohibited to apply the plaster solution until the tape fastenings are completely dry.
As a visual example, here is a video on how to install beacons for plastering walls yourself without involving specialists.
We recommend reading:
- How to plaster walls with cement mortar;
- How to plaster a ceiling;
- What are flock plasters
https://youtube.com/watch?v=oJtjBHmaC1I
Brief description of the technology
- Self-tapping screws are screwed into the wall, the heads of which extend into a vertical plane.
- A solution is placed between the screws in the form of a vertical path.
- The construction rule rests on the heads of the screws, which presses the mortar and forms an even strip of the mixture from it.
- We remove the rule and wait for the mixture to dry. The lighthouse is ready.
Now in more detail:
- We mark a strictly vertical line on the wall from floor to ceiling. This can be done using a plumb line, level or a modern laser. Laser rules! We draw this line with a pencil so that we can see it later. The line should be approximately 15-20 cm from the adjacent wall.
- Based on the length of the rule, we mark along this line the places for the screws. If this is the usual one and a half meter rule, then three screws will be enough for the entire height of the wall. Mentally number them from bottom to top from one to three. If we apply the rule to 1 and 2, then this will be the bottom of the lighthouse. If ko 2 and 3 – the top one, respectively. Simply put: the lower and upper screws are at a height of approximately 10-15 cm from the ceiling and floor, the third is somewhere in the middle.
- We drill holes in the center of the brick so as not to chip off the edge and not get into the weak masonry mortar. It is extremely important to drill as smoothly and perpendicular to the wall as possible. If the self-tapping screw is placed crookedly, then the rule will slide off its head and then you will be tortured to keep it straight.
- We screw in the screws. Using a bubble level, we align the screw heads vertically in one plane. The best part is the rule for the entire height of the wall with a built-in level. With this tool, the plane is set easily and simply. Or a meter and a half long level will do.
- The length of the screws should be sufficient so that they go deep into the dowel and do not dangle. Dowel-nails will also do.
- We set the next row in the same way. We make sure that the rows are in a plane not only vertically, but also horizontally. This is especially important when installing three or more beacons. So that it doesn’t happen that, for example, the middle row falls through or sticks out relative to the general plane.
- Once again we check the verticality and horizontality of the installed screws.
Now we add the solution. Traditionally, gypsum plasters are used because they are plastic, dry quickly, adhere well to any surface and do not fall off when the rule is moved. Cement mixtures are unsuitable for rubbed beacons.
How to set markup for beacons
Markings begin by determining the starting point, which is the most protruding part of the wall. In this part, the plaster layer will be made the thinnest, and the remaining places will be trimmed to match this area. You can mark with twine or a laser level.
In the first method, the top points in the corners of the wall are determined; they need to be placed at a distance of 10 centimeters from the corners and the ceiling covering. At the marks, a hole is made into which the self-tapping screws are screwed; it should not protrude too far from the outside by three to five centimeters. A plumb line should be attached to the screw, serving as an indicator of the vertical.
The same screwing in of self-tapping screws is done on the floor; their caps should be at the plumb level. These actions are done on both sides, a rope is pulled between the screws. Tensioning is also carried out along diagonal lines, resulting in a plane.
Next, they move on to drawing out the places where the first beacons will be attached. From the vertically stretched ropes they extend 10 centimeters, horizontal marks need to be placed in normal increments of 80-130 centimeters, in these places the following beacons will need to be fixed. If there is a door or window opening on the wall, 10 centimeters are also set back from it, a beacon should also be placed there.
To determine the most protruding place, using a ruler or tape measure, measure the distance from the wall to the rope, the measurements are recorded, the place with a small value will be protruding. As a standard, it is in this place that the first beacon is attached.
Markings begin by determining the starting point, which is the most protruding part of the wall.
Working with a laser level is easier and faster. A bubble level (2 m) is applied to the surface in different directions to determine the location of the most protruding point. Next we move on to determining the most protruding point vertically. This point can be marked with the level itself, or using a plumb line.
Having marked the extreme points from the wall, mark the intermediate ones; the step between them should not be greater than the length of the rule. The following steps will be performed depending on how you decide to install beacon profiles. And they will be described further.
Working with a laser level is easier and faster.
Methods for installing beacons
For plastering walls, floors or ceilings, the most widely used method is to install guides on gypsum mortar. In addition, special mounts are produced, named because of their appearance, for example, “Ushastik”.
Fastening using gypsum mixture
Before placing beacons under plaster, the surface to be treated is cleaned and primed. The height of the wall or the length of the floor and ceiling are marked. The beacon is cut to this size 1-2 centimeters smaller. This is done so that after finishing the work it can be easily removed.
Depending on the width of the rule - this is the tool with which the most even surface is achieved - the installation location of the slats is marked. The width between them is chosen so that it is 10–15 cm less than the width of the rule. The first guides are installed along the edges of the surface at a distance of 5–20 cm from the corner. When marking, the straightness of the marking lines is controlled: for this, a level or a construction suspension is used.
When installing beacons for plastering walls made of metal, a solution is prepared from a plaster mixture or gypsum. Next, after 30-40 cm, the prepared solution is applied to the marking line, to which the beacon is pressed. It is better to press the beacon using a level, as this will allow you to simultaneously fix and control the correct alignment of the staff. After installing the two outer beacons, a fishing line is stretched between them in several places. Using the fishing line as a height limiter, the remaining guides are installed behind it along the entire length of the surface. In the case of using beacons made of wood or plastic, similar actions are performed.
When using construction plaster, you need to remember that it sets quickly and allows you to quickly fix the beacons. But the time to adjust the position of the beacon does not exceed 3-4 minutes. If you use a cement-sand mortar, the setting time will be 6-8 hours.
Installation using “Ushastik” fasteners
Using Ushastik fasteners, the installation of beacon strips is greatly simplified. The device is at the same time an adjustment and holding device. The installation itself occurs according to the following steps:
- A hole with a diameter of 6 mm and a depth of 40-50 mm is drilled on the prepared surface, at a distance of 200 mm from the edge and 100-150 mm from the opposite surface. All other holes are made with the same dimensions. The pitch between dowels on a vertical line is 400 mm.
- A dowel is inserted into the hole and vertical markings are made. In this way, markings are made over the entire surface.
- Using a screwdriver or screwdriver, screws with Ushastik fasteners are screwed into the dowels. The depth of screwing is controlled by a level.
- The mounting rail is applied to the mount and crimped with an “Ushastik”. To perform crimping, round nose pliers are used.
Using this type of beacons, you can begin further finishing of the surface immediately after their installation. Their installation does not require special knowledge and experience.
After the beacons are installed, plaster mortar is poured between them so that it is above the level of the guides. Using the rule, relying on the beacons with progressive movements, excess solution is removed.
At the end of the work, the beacons can be left in the wall or on the ceiling, but it is better to remove them from the floor, since when screeding, these places will disrupt the solidity of the structure. The voids formed after removing the guides are filled with the same solution that was used to level the surface.
Installation of beacons to determine the size of cracks in walls
The degree of danger of a crack that appears is determined by the location of its formation:
- on load-bearing walls - create serious emergency situations;
- on partitions - are local in nature.
The problem area of the structure is monitored using different types of beacons. Monitoring is also used in buildings identified as emergency or with limited functionality. The development of the resulting destruction is also monitored in structures near which active construction work is taking place or reconstruction is being carried out.
Point control method for cracks on walls
Electronic sensors and monitoring systems
Gypsum beacons
Plate beacons
The main purpose of observation is to record in a special log all changes in the parameters of cracks that appear. The following indicators are needed:
- for a correct assessment of the technical condition of the building;
- decisions on the possibility of further operation;
- the need and complexity of repair work;
- eliminating factors that destroy the building.
When choosing a suitable observation method, they take into account the urgency of obtaining information, the accuracy of the results, the reliability of the method itself and the complexity of the upcoming work.
How to draw a right angle between walls for subsequent installation of beacons
When marking and installing, it is important not only to make smooth walls, but also to create right angles between perpendicularly placed partitions. Unfortunately, these works are carried out extremely rarely, which is associated with a large overconsumption of plaster during repairs.
When doing the work yourself, we recommend that you determine the ideal geometry of each room; overhead costs will be small when using cement-sand or gypsum plaster.
Work on leveling corners is carried out in the following order:
choose the wall from which you will start: in rooms with windows, the outer wall of the apartment is taken as the basis, in interior rooms - the central wall, which you rest your gaze on when you enter the room;
subsequent actions depend on the condition of the main wall, if it has the shape of a “propeller” (various irregularities), the installation of embedded beacons begins and the wall is “pulled” into a flat vertical plane, then the rest of the room is marked;
to draw an angle (for a wall that is piled away from you), use a square or ceramic tile as a sample and the rule that is attached to the wall to determine the curvature of the angle - draw a line taking into account the embed. Do the same for all three walls;
to draw a corner (for a wall that is piled up on itself), markings are done along the ceiling with the help of an assistant, but this is a very labor-intensive task. In practice, leveling is carried out similarly to the version of a wall piled “away from you”, using a vertical level to determine the maximum “internal” angle of inclination of the wall. Then the right corners of the room are set similarly to the previous option.
Beacons for leveling walls: what are they?
Wall leveling is the process of creating a flat and smooth surface before applying a decorative layer. To smooth this layer, a long wooden or plastic board is used as a rule. To use it, beacons are installed on the wall plane, onto which plaster is applied. Thus, the beacons are rails for the movement of the rule and must withstand its pressure when removing excess solution. In addition to guiding functions, beacons also play the role of fittings.
Aligning walls with beacons
Today, beacons for leveling walls mostly mean perforated guides. Profile beacons are made of profiled metal or galvanized strip with perforation or plastic. They often remain in the wall after work is completed. The main requirement for the manufacturing material: chemical inertness. The beacon is in contact with wet cement or other mortar and therefore should not rust or react with aggressive substances dissolved in it. Otherwise, a yellow rust stain may appear on the wall and bleed through the finish.
Different beacon configurations
Modern beacons are designed for mounting on mortar, on self-tapping screws or on special polymer fasteners. Metal beacons can withstand quite large loads when applying the solution, leveling and removing excess without deformation. Plastic beacons are more often used on surfaces with complex configurations, when bending of guides along different radii of curvature is required. In addition, they are easier to cut in areas where the height of the walls changes.
Products vary in size. Standard sizes are 250 and 300 mm. This is exactly the length with which it is convenient for a master to work in a modern apartment. There are also longer beacons, the length of which reaches 6 m: such products are most often used for working in high industrial premises or for leveling floors.
Beacons 6 mm thick are used when the wall is flatter and it is necessary to apply a thin layer of mortar to level it. Six-millimeter paper is also suitable for cases when the beacon will be removed from the wall. Wider beacons - 10 mm - have greater rigidity and are installed when the wall is obviously very uneven. They are also used when pouring floor screed. A metal thickness of 6 to 10 mm provides the necessary rigidity when layers of plaster of different thicknesses are applied. The presence of perforations on the product provides better adhesion to the solution and fastening to the surface.
6 and 10 mm beacons
Beacons are classified according to their design features:
- V-shaped - used directly as guides for the rule;
- corner (L and T-shaped) - for decorating corners.
Installation of beacons for plaster
Professional plasterers still use mortar beacons made of plaster to level walls. They are made quickly, do not require additional costs and do not require dismantling. However, to do them quickly and correctly requires considerable professional experience. In addition, mortar beacons do not meet the requirements of rigidity and do not always withstand the rule pressure exerted when leveling the surface.
You can use improvised materials such as pieces of square metal profiles or pipes to create guides. Such guides must be cut out of the wall one day after completion of work on the walls, and then the groove must be sealed. Wooden blocks for creating lighthouses are practically not used today due to warping and deformation that occurs as a result of the influence of water on them, which is always present in the solution.
To install guide beacons, special fasteners have been developed that allow you to adjust their distance from the wall. There are several types of fasteners: these are umka, eared, and cremmers. Ushastik, for example, looks like a plate with side clamps with ears. It costs a penny. Using such an adjustment and retention system, beacons can be quickly installed.
Crammer fasteners
Rules for plastering lighthouses
Before figuring out how to place beacons under plaster, it is important to clarify the order of work in general
Preparing the wall
The illustration shows a typical example of a wall that requires leveling.
If there are old finishing materials or remnants of plaster on the surface, they must be removed before taking measurements and the wall must be thoroughly cleaned of dust, dirt and debris.
Before installing beacons, it is necessary to check the verticality of the wall, the correctness of the angles (the angle between adjacent walls should be 90 degrees over the entire height of the room), and the presence of noticeable protrusions. The first point is checked by a level or plumb line. For more effective measurements, it is advisable to use a laser level, but with some handling skill, a bubble level with a length of 2...2.5 m or a plumb line of the same length is acceptable. The correctness of the angles is assessed using a square or laser level.
The presence of significant irregularities (depressions, protrusions) is determined visually. If this is difficult, you can check it after installing the basic (corner) beacons.
Surface primer
Treating the wall with a primer with antibacterial, fungicidal and adhesive properties is necessary. It is advisable to do this before installing the beacons. The more porous the wall surface, the more carefully you should consider the choice of soil.
Base marks
Installation of beacons for plastering walls begins from the corners of the room. The base slats are fixed at a distance of 15...30 cm from the corners on both sides of the wall.
To simplify the creation of a strictly vertical line of a profile or rail, experts advise creating a “line” of self-tapping screws. For this purpose, holes are drilled in the wall along the entire length of the future lighthouse, and self-tapping screws (screws) are attached to dowels (wooden chips) so that the cap does not adhere to the wall. A plumb line is hung on the top self-tapping screw, and the heads of the intermediate and bottom screws are aligned with it. The same procedure can be performed using a level. For metal profiles, the same self-tapping screws can be used to install beacon fasteners. The distance between fasteners is assumed to be 25…40 cm.
Next, the rail (profile) is mounted.
Another option for installing beacons for plaster is on the solution. Using a plumb line (level), a vertical line is drawn on the wall. Along this line, at intervals of 15...30 cm, a mortar is thrown with a trowel, to which the beacon is applied. By pressing down the beacon with a level and maintaining its strict verticality, a stable position of the slats (profile) is achieved.
Important: if the wall is “filled up” both to the floor and to the ceiling, the minimum distance between the lighthouse and the wall may be at the middle of the height or in any other place. Therefore, before starting work on installing beacons with your own hands, it is important to find the deepest and most protruding place on both lines of the base (angular) marks.
How to place beacons under plaster?
Published Friday, June 14, 2021 Source: vashdom.ru
Plastering walls is a mandatory stage of repair work. Firstly, plaster serves as the basis for many types of finishing. For example, perfectly flat surfaces are needed for paint, wallpaper, and tiles. Secondly, with the help of plaster it is possible to correct defects in the geometry of the room. Curved walls and slanting corners are everywhere, especially in old Soviet-era houses. Without alignment, there will be no aesthetics in the interior - there will always be gaps between the walls and furniture/appliances.
It is impossible to level the walls by eye. Beacons must be used in the process. Special metal profiles are temporarily fixed to the surface and serve as marks for even laying of the plaster. The thickness of standard profiles is 6 and 10 mm, respectively, the thickness of the finishing layer in the thinnest place will be the same.
If thin-layer plaster is needed, it is recommended to work along string beacons. This is a 1 mm thick knitting wire, fixed to angles with bolts and aligned with self-tapping screws. In the most “convex” place, from where the marking system is built, the lighthouse is adjacent almost flush to the wall. Therefore, the plaster along the strings is 6 or 10 mm thinner than when using beacon profiles. The strings are also convenient for marking walls over 4 m in length.
When plastering walls with a cement-based material, the beacons are fixed with a cement composition. If the plaster is gypsum, the marks are attached to the gypsum mortar. It is unacceptable to combine different materials, since during their chemical interaction there is a high risk of the formation of a mineral called ettringite, which during the process of hydration (reaction) increases in volume and thereby tears the material from the inside - subsequently, in such places, the plaster swells and peels off. Gypsum plaster is suitable for leveling walls and attaching beacons in dry rooms. Cement-sand materials are universal, they can be used in dry and wet rooms, as well as for exterior decoration.
Step 1. Marking
For profile beacons, the wall is drawn with vertical lines, and the marks will run along them. To ensure that the lines are strictly perpendicular to the horizontal, you need to use a level. The optimal distance between lines is 1.5 m (the rule of this length is most convenient to work with).
In the case of string beacons, you need to make only two transverse lines, 30–40 cm from the floor and ceiling. An even horizontal line is verified using a level.
IMPORTANT: before you begin marking, you must clean and prime the walls. The soil increases the adhesion of the plaster mortar to the base, and also protects the freshly applied plaster layer from excessive moisture loss, which is especially important for porous surfaces. Choose a primer that suits your task - there are compositions with antifungal, waterproofing and other properties.
Step 2. Fixing beacons
Metal profiles are attached to gypsum or cement mortar along the marked lines. The vertical is leveled. In places where the wall leans outward, the mortar is applied in a thicker layer. After installation, excess mortar on the sides of the lighthouse is removed with a spatula. For intermediate beacons, a level is not required; they are easily aligned along a thread stretched between the finished marks.
For string beacons, you must first fix the corners (4 pieces in total). The wire is attached to the corners using bolts and nuts. Next, two self-tapping screws are screwed along the strings, approximately 30 cm from the corners. Each vertical pair of self-tapping screws is leveled, the strings are inserted behind the caps, tensioned and additionally fixed with plaster mortar.
IMPORTANT: to attach the beacons, you do not need to mix a lot of mortar at once in order to have time to work out the plaster before it hardens.
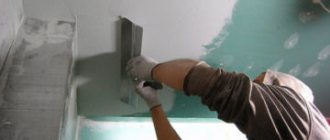
Step 3. Plastering
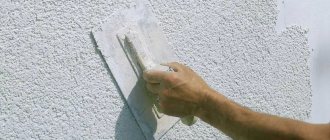
The first layer of mortar is applied to all walls of the room to fill voids and masonry joints. Alignment is carried out in stages, from lighthouse to lighthouse. The plaster is thrown over the area and distributed in wave-like movements. The rule rests on the beacons, so the walls are smooth.
Before applying plaster, check that the beacons are installed correctly on the wall. The rule must touch both the outer and intermediate marks. To be on the safe side, check in several places - under the ceiling, in the middle, near the floor, and also diagonally.
IMPORTANT: minor unevenness on the base plaster is normal. During the application process, they do not need to be smoothed, since these irregularities are easily corrected by cutting and troweling the already picked up layer.