Home |Construction |How to place beacons under a floor screed?
Date: August 28, 2017
Comments: 0
The technology for installing any type of floor covering requires the elimination of defects and unevenness, followed by planning and ensuring the horizontal surface of the floor. In order to level the base, a dry or wet cement-based composition is used, which is distributed evenly over the surface. Beacons for floor screeding are used when performing this operation, serving as a guide, as well as simplifying the process of pouring the base and facilitating the work. Let's dwell on the varieties, figure out how to install beacons for screeds, study the specifics of installation, as well as the technology of implementation.
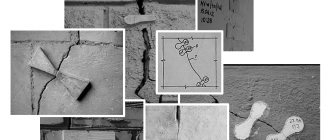
Options for beacons for pouring screed
Special elements display and indicate the level of the future floor. They are installed at the same horizontal level at an equal distance (between each other) in the same room. This makes the screed easier. In different cases, different types of beacons are used. There are rack screeds, which are structurally a linear, strong structure, and are used when constructing wet (concrete, cement-sand) screeds. The quality, appearance, and service life of the final coating depend on how correctly the beacons for the screed are positioned. Dry (expanded clay) screed is also performed on the slatted elements (their top). Benchmarks (tripods) are installed for the construction of self-leveling floors.
Horizontal level tapping
The beating is carried out using the following technology:
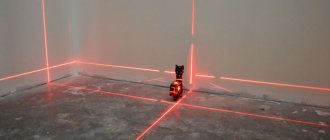
- a laser level or a plane builder is installed in an area of one room so that its beam hits the walls of adjacent rooms through doorways, a mark is placed on the wall in each room of the house/apartment (it doesn’t matter at what level, the main thing is that it is at the same level) all rooms);
Positioning the plane builder.
- the level is transferred to the center of one of the rooms, the beam is tied to a previously made mark and the distance from the beam to the floor is measured with a tape measure (in the corners and in the center of each wall);
- then the level is transferred to another room, the beam is tied to the previously applied mark, and the distance from the beam to the floor is again measured at each corner of the room and in the center of each wall.
The point of the actions described above is to find the highest point in the apartment/house. Where the distance from the laser beam to the floor is minimal, there is the highest point of the floor. It is from the highest point in the apartment that the finished floor level is measured, based on the requirements for the minimum layer thickness. For cement mortar, the minimum layer is 3 cm, so we add 3 cm to the highest point, this will be the level of our screed. All beacons must be placed at this level.
Example: For simplicity, we will not consider an apartment or a house; we will show an example for one rectangular room. Let's say, based on the results of measurements in the corners of the room, we got: 1st corner - 65.5 cm; The 2nd corner is 66 cm, the 3rd corner is 63 cm, the 4th corner is 62 cm. This means that the highest point is where we have 62 cm. It follows that in order to fill the cement screed you need to pour it to the level of 62-3 = 59 cm from the plane of the laser beam.
Then you need to place the beacons in the found level, i.e. the distance to the beacons is measured precisely from the virtual plane constructed by the level. For convenience, you can make a template from wood or other material on which the required distance is marked; this will allow you not to measure with a tape measure every time. The designs of beacons and methods for adjusting their level will be discussed further.
Advice! For the convenience of measurements, we recommend drawing a plan of the apartment/house on a piece of paper and putting each measurement on this plan, this will be more clear and practical. Alternatively, you can apply the measurement results directly to the walls, next to the measurement site.
Important! The floors of the apartment consist of laid large-format floor slabs, so the highest point most often (in 99%) will be located on one side of the slab, and not in the middle.
When using some modifications of the self-leveling floor, the screed can be brought “to zero” or lowered by a maximum of 5 cm if the lowest point is at the front door and to level the horizontal line you will have to make a step at the entrance to the apartment.
Advice! Instead of a laser device, a hydraulic level can be used; the technology is completely identical to that indicated, but constructions take much longer and are less accurate. If you don’t have a laser level, you can rent one for a very reasonable price.
Wood slats
Filling a floor using wooden beacons is done very rarely today, and dry screeding on them is done more often. This method is now almost never used. The guides are wooden beams (30 mm thick), which must be thoroughly soaked in water before use. After completion of the work, such beacons are pulled out of the set solution, and the resulting voids are filled with fresh mixture. The level is maintained according to the laid screed. To correctly position the beacons, their height is adjusted using wooden wedges, pads, and self-tapping screws.
Video:
Definition of zero mark
After completing the preparation, before installing the beacons for filling the floor, they begin to search for the base level and only then set the guides. Using a laser level will help you mark.
The process for determining the zero point is as follows:
- At a distance of 100 centimeters from the floor surface, mark the starting point.
- Then, using a level, markings are applied on the walls at a meter height along the perimeter of the room and all points are connected with a solid straight (base) line.
- After this, measure the distance from it to the surface of the base. Practice shows that there will always be points that are located below the initial mark. For example, this distance is 97 centimeters. Thus, it turns out that the highest point will be one meter, and the lowest – 97 centimeters.
- The zero level is drawn through the highest mark. Then they raise it 3 centimeters. As a result, at all points the screed height will be at least 3 centimeters.
- Since the highest point may be located in the center of the room, it is better to check this. For this purpose, the painting cord should be stretched across the entire width of the room and moved along its entire length. When a new zero point is discovered, another zero level must be carried out. In the case where a small area of the base surface protrudes, you can simply remove it with a hammer and chisel, or it is best to use a hammer drill.
Experts advise how to install beacons for floor screeding: they should be placed in parallel, starting from the entrance. In this case, the distance between them cannot exceed the length of the laser level - it should be 20 centimeters less.
Metal plaster profiles
Today this is the most common method of arranging a not very high screed. Along the line of future placement of the guides, self-tapping screws are screwed into the floor, by screwing in and out of which the height of the profiles is set. To control the horizontal position, a thread, cord or fishing line is pulled between the screws. The zero level of the future floor is drawn, and tubercles of solution are laid out around the thread. To make the mixture harden faster, alabaster is sometimes poured in. Simply, cement-sand mounds dry out in 2-3 days (the composition with additives sets within 3-4 hours). Quite often the role of beacons is performed by plaster profiles. Experts recommend fixing the profiles with the same mixture that is used to make the entire screed (without additives, alabaster breaks down quite quickly). It turns out to be much more reliable, but often special plaster compounds are used to attach the guides. Profiles are placed on such tubercles and pressed into the mixture to the required level. Plaster profiles are easily deformed. Therefore, it is necessary to carefully align the screed with beacons. Using such guides, you can make screeds in a layer of up to 2-3 cm. It will no longer be possible to lay out a thick layer (6-10 cm) (under the pressure of the solution the profile will bend).
Video:
Setting beacons to zero level
Several methods can be used to place beacons. The simplest is to pull a thread or fishing line along the zero level. However, it should be taken into account that the thread may sag in the middle under its own weight. This will be especially noticeable if the room is large. Such sagging will lead to errors when installing beacons.
The most commonly used installation method is self-tapping screws. The operating procedure when using this method is as follows:
- A self-tapping screw is screwed into the corner farthest from the door, 30 cm from the wall. To install it, a special wooden plug, plastic or wooden dowel is used, which are driven into a hole specially drilled in the floor.
- The self-tapping screw is screwed into the dowel with a screwdriver so that its head is at the height of the zero level. A self-tapping screw is installed in the same way at the other end of the drawn marking line. A thread or thin wire is stretched between the screws. Intermediate self-tapping screws-beacons are installed in the row. Leave a distance of about 30 cm between the screws.
- After installing the first row, install in the following rows in the same way. When installing self-tapping screws, constantly check the level readings in order to maintain the horizontal level in both the transverse and longitudinal directions.
Before proceeding with the installation of beacons, the zero level is struck
A U-shaped metal profile is attached to the self-tapping screws positioned in this way. It's quite simple to do this:
- Place small piles of thick mortar near the screws;
- put the profile on the screws and press it into the solution.
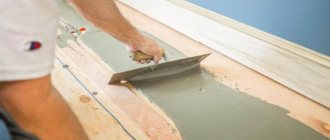
When installing profiles, it is necessary to constantly check the horizontalness and evenness of the created surface. The screed begins to be poured after the solution has completely hardened under the guides.
Helpful advice! To make the solution under the guide harden faster, add a little gypsum to it.
The method described above is not applicable when installing a dry screed, since drilling in this case is impossible. In this case, experts advise laying the wide profile flat, placing pieces of tile, wood or brick under it. The profile cavity is filled with dry mortar, which with its weight will give the profile stability.
If there is no profile, then you can use ordinary pipes that are installed on the solution. After pouring the screed, the pipes are pulled out and the resulting groove is filled with mortar.
Metal profiles for plasterboard UD 27
U-shaped profiles for drywall are also used to display beacons. First, self-tapping screws are screwed into the base (the step should be 40-50 cm). Their size is chosen so that at least half fits inside the dowel. Self-tapping screws near the walls are set to the zero level of the future floor (adjustment is made by screwing in or unscrewing). To make it convenient to install guides, a thread, cord or wire is stretched between the walls. U-shaped profiles are placed with the base up on top of the screws. The remaining screws are twisted along the stretched thread to align the guides to the zero level of the future floor. The rule checks the correctness of the horizontal, as well as the correct placement of the profiles among themselves. Beacons can be installed similarly:
- on wooden blocks;
- bricks;
- tubercles from solution.
Then, where the screws are located, a solution is placed under the guides.
After the mixture has set:
- the correctness of the horizontal is checked;
- the beacons are removed and sealed with mortar.
When the mixture is completely dry, screed is poured around the profiles.
Video:
Installation of a screed beacon
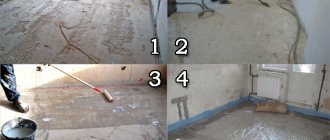
Preparatory work
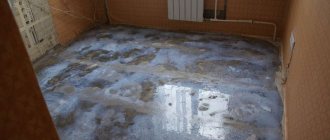
Before you begin installing the beacon and filling the floor with screed, you need to prepare the surface for this. First of all, you need to clean the surface from the covering that is in the room, dismantle the baseboards.
Then remove, if any, various stains, dirt and dust, sand the protrusions, and seal cracks and grooves. Then you need to prime the surface. If required, make a waterproofing layer from polyethylene film or special mastic.
In general, it is always recommended to install protection against moisture, which in any case penetrates from the lower floors or basement. And finally, we need to determine the zero level for installing beacons.
Definition of zero level
The zero level is determined for uniform installation of beacons. This part of the work is the most important. To perform this you will need a hydraulic or laser level, the latter option being more convenient.
- For each wall, measure 1 meter from the base and make a mark.
- Determine which mark is higher than the others. You need to align all the remaining marks with it, and draw a line along them using a level.
- From the drawn line we go down 1 meter and make another one that will run parallel to the first. This is the zero level.
- You need to step back 3-5 centimeters from the zero level, depending on the thickness of the screed you plan, and again draw a parallel line. You can highlight it with a different color, since beacons should be placed along it.
Steel pipes
To equip a floor where it is necessary to install powerful concrete screeds, pipes of various sections are used. Pipes can be used round or rectangular, they are durable and do not deform. In spacious rooms, it is more convenient to make beacons for the floor of this type: the zero level of the future floor is set; a cord, thread or fishing line is pulled, you should focus on it when making a tie; mounds of mortar are laid out; pipes are installed on them and slightly pressed in; the horizontal and the correct placement of the guides among themselves are verified using the rule and level; The height of the future floor is adjusted by pressing, or by placing mortar where there is not enough mixture. It is easier to set up screed beacons using square pipes.
Video:
DIY installation features
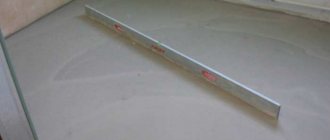
Experienced builders can make a screed without beacons if they have a long level.
If you pour a screed without using beacons, you end up with a surface with differences in height, and you have to spend time and effort eliminating defects.
It is recommended to adhere to the following rules:
- at the beginning of the repair, draw up a detailed, step-by-step work plan;
- place beacons at a shorter distance than the length of the device used to level the mixture;
- use durable parts that can withstand pressure from the solution and rules;
- do not skimp on materials, as this can lead to breakdowns and disruption of the pouring plan;
- follow the technology for handling fixing compounds; haste in such matters leads to negative consequences;
- if the solution tends to settle after hardening, the beacons will serve as guides for re-leveling;
- When using wood as supports, it must be carefully treated with hydrophobic agents or several layers of waterproof paint.
If you follow the beacon screed manufacturing technology, you can count on obtaining a smooth surface on which you can lay a coating of any assembly complexity.
Mortar walls
First, 2 screws are screwed into the base. They are connected by wire (fishing line), which is wound several times. The future guide is covered with the mixture to form a low wall, along the top of which a rule is drawn. The wall is leveled to the level of the future floor, and a mortar guide is obtained. The horizontal surface (top of the wall) is a beacon. The movement is usually performed perpendicular to the wire, along the heads of the screws. When the beacons are dry, you can finish the screed.
Video:
Slides of solution
To install a semi-dry screed, it is convenient to install beacons on the floor from piles of mortar (cement-sand). Mounds of the mixture are placed in the corners and brought out below the zero level of the floor. It is imperative to maintain the distance between the tubercles no longer than the selected rule. The piles dry, and the solution is placed in the free space. The tubercles are used as guides along which the rule moves when the mixture is leveled. This is a good way to arrange thick, high screeds (6-9 cm).
Video:
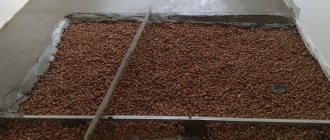
U-shaped profile
When there are no special slats, craftsmen use a U-shaped profile (when arranging a backfill screed) to level and control the amount of expanded clay. The guide walls are 27 mm (when the screed height is 30 mm). The beacons are left in the backfill material. A ceiling profile (60x27 mm) is also used, which is placed with the edges up. The space between the edges, as well as the space around the guides, is filled with material. To level the expanded clay, the rule is placed on the beacons and pulled towards itself, thus removing excess material. Correctly placing the beacons under the floor screed is a very important stage in preparing the base for final finishing. The quality and appearance of the flooring depends on this. It remains controversial whether to choose guides from the wet screed (or they can remain inside). The argument for removal is that the metal profile rusts over time and the screed is destroyed. You can always purchase aluminum guides that are specially designed 
Video:
Calculation of beacons for screeds
Calculations of how to install beacons for screeds begin with determining the location of the first of them.
This can be done using simple calculations:
- For example, between the outermost lines the gap is 655 centimeters. At the same time, they should retreat from the walls 40 -70 centimeters. If the length of the rule is 150 centimeters, taking into account the need to maintain a 15-centimeter margin on each side, the guides must be mounted at a distance of about 100 centimeters from each other.
- In this case, the gap between the outer beacons will be equal to 385 centimeters according to the following calculation - 65- (135x2) = 385.
- Taking into account the permissible distance between the guides, which is approximately 120 centimeters, it turns out 385:120 = 3.2. Based on the calculations made, it is clear that in addition to the two outer beacons, 2 more will be required, which are fixed with the same distance - (655-70):5 = 117 centimeters. At the same time, 70 is the gap between the walls and the outer beacons, and 5 is the number of spaces between the beacons.
The best choice for guides is a T-shaped or U-shaped beacon floor profile, since it is more convenient to work with it than with wooden elements.
Adjustable reference points for self-leveling floors
Benchmarks-tripods (Benchmarks or point beacons for self-leveling floors) are installed before pouring the floor. The self-leveling floor spreads independently over the base and forms a horizontal line. Benchmarks are used to control its height. The benchmark is a tripod containing a rod inside. It moves up and down, this is how the zero level is indicated. Benchmarks are considered professional instruments. Several of these tripods are required per room: first, the surface is primed; benchmarks are installed on the floor after 5-6 hours (maintaining a distance of 1 m); The horizontality of the screed is adjusted on the central rod (using caps).
Video:
Beacons for wooden floors
Logs are unique beacons when laying a wooden floor. Without them it is impossible to lay a ventilated wooden floor.
Logs in a wooden house
Logs are set strictly according to level. The height is adjusted using screws or self-tapping screws, placing wedges under the beams to prevent the lag from sagging.