Time for renovation! Why not
Time for renovation!
Why not? Many skilled (and not so skilled) people believe that something (one room) can be done in a weekend. One day I also managed to freshen up my kitchen a little. Since then, I know that I need to prepare for such repairs, so I’ve been collecting a collection of ideas—creative, of course—for DIY repairs.
And here's what I love. Almost painting. Yes, on the wall - lovely, lovely, lovely. At the same time, it is not at all difficult (painting) and not expensive. Simply because the canvas is painted with a sponge and latex or acrylic paint in 4 colors.
Advice beforehand: the best sponge for such painting is a natural sea sponge - it has a more varied surface, which is what we need. One sponge should be enough: latex paint is easily washed off from the sponge, but you will have to wash it more often. We will also need latex glaze, it will give the latex paint a translucent look, which is what we need. For beauty. A thinner for the glaze is also desirable, but not required (it will prevent the paint from drying quickly). A paint tray, duct tape, and some regular sponges to remove excess paint. Master class from Famely Handyman
We choose color combinations and the paints needed for them. The palette of combinations is for a visual example. We'll choose from here
Before we start, it's worth experimenting on a smooth surface to understand what we want. But... this is for those who are especially diligent and patient. And we, having read the post to the end, will understand what we want, I believe in us.
Mix the paint and glaze according to the glaze manufacturer's instructions (usually one part paint to four parts glaze). Thinner is optional.
The first coating is the base one. Glossy paint. Cover the wall and let it dry.
Let's create now. In an inconspicuous place (somewhere in the closet area). Apply a sponge to the first paint and lightly squeeze (wet) it. Then we apply the sponge to the wall, then turning it a little to the left, then turning it a little to the right. Not very tightly, definitely like a pattern (look at the pictures carefully). Using the same side of the sponge, with the same force, we stain the entire wall. The wall is quite “decorated” with the first color, wash the sponge. And we admire it, letting the layer dry.
Apply a second color. Now it’s looser, that is, not so often and tightly, leaving about half of the entire surface without a second color. Let it dry.
Apply the third color very lightly, with an almost dry sponge, to give the wall a misty look.
4 and subsequent
Working with the final color. In this case, metallic gold, an accent that reflects light and contrasts sharply with the previous colors. We use very little paint, in the form of scattered clouds and wandering lines.
All. This is such an amazing and simple project that everyone always succeeds. What a pleasure it is to paint like this!
taken to familyhandyman.com with gratitude and respect. Adapted the text of what-you-want
Well, if you are not inspired by such creativity, you can entrust the repairs to specially trained people, professionals. With good reviews and portfolio. An example of their capabilities would be finishing a three-room apartment from scratch in Shchapovo. These people can do a lot, for example, make a fireplace in a city apartment, paint the walls with a cage. Having mastered the whole range of finishing works, they generously share their accumulated knowledge on their blog, there is a lot of useful information there.
Unexpected facts about a famous kitchen tool
Yes, it's a rolling pin. The dough is rolled out with it. And with a little modification, the rolling pin can be used as a stencil.
Double-sided tape + thin strips of elastic - eraser. The pattern can be used not only for paper, but also for walls
Here is a rolling pin + bubble wrap. Rolling pin + piece of metal mesh
More bubble wrap and rubber
a stencil made from a paper towel roll. The rings (after application they can be painted over like peas) were dripped with hot glue from a gun.
blog.2modern.com: playbasedlearning.com.au: creativej ewishmom.com
My dear craftsmen, we will do everything beautifully everywhere. With my own hands. Good luck and success to everyone
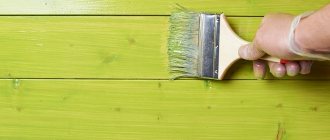
Painting walls is a trend that has not lost popularity for several years. Such repairs are less expensive, non-allergenic, and refreshing them over time will not be difficult. In addition to regular painting, there are dozens of original solutions to give walls an original texture.
To bring them to life, you don’t have to turn to designers, just stock up on simple materials at hand and... give free rein to your imagination!
How much effort does it take to re-stick wallpaper? Remove the old ones, prepare the walls, remove a bunch of construction waste from the house. With painting, everything is simpler: a new layer of paint can be applied on top of the existing one. No problems with pattern selection, unraveling seams, or peeling stripes. In addition, the paint can be cleaned with detergents, so this is an ideal solution for apartments with small children or pets.
What is needed to create an original texture? Tools that are already at your fingertips. Next in the review are the tricks of using ordinary cellophane, a dish sponge, a broom, a shoe brush and a simple rag.
Rag
An ordinary rag will also be an excellent help in creating a textured surface. The wall must first be painted in the desired color, then soak a rag in the paint, crumple it well and, pressing, walk over the entire wall. It is best to place the prints close to each other, then the painting will look uniform.
You can use a white rag without soaking it in paint, then the color of the walls will be less saturated as a result. The fabric can be rolled onto a roller. For variety, you can also add all kinds of threads and knots. Using such a roller will be faster than manually, and the result will be no worse.
Examples of makeup in different ways
With the help of cosmetics you can create completely different images - from a simpleton or a business woman to a femme fatale. Examples of makeup with different lip designs:
- Natural - despite its apparent simplicity, it will require effort, the main thing here is to create the effect of naturalness. Apply foundation all over your face to create the effect of a healthy skin tone, as if you were washing your face with dew every day. Apply peach or pinkish blush with a brush. Use a beige pencil to outline the outline, apply lipstick the color of a pink rose, but not too bright and without pearl. Powder a little on top and make a second layer.
- Focus on the eyes for going out - outline the eyes with a pencil like a cat. Apply dark gray and pearlescent shadows to the upper eyelid and temple. Under the eyebrow there is a stripe of white pearlescent. Blend the borders, apply blush with shiny particles in the direction from the corner of the mouth to the temple. Outline the mouth with a pencil, then shade the entire surface and smooth it out with a brush. Apply a little glitter to the protruding parts. Straight colored hair will look beautiful with this makeup, but you should not combine it with curls.
- Emphasis on the lips - cover the face with base, highlight the cheekbones a little with pale blush. Use gel to straighten eyebrows, apply brownish-beige shadow to the upper eyelid. From the upper eyelid to the eyebrow arch, distribute a thin layer of whitish shadows. Outline the mouth with dark red, 1 millimeter away from the natural border. This way the image will be more sensual. Apply dark cherry pigment from the tube. Blot lightly with a napkin and powder. Now comes the second layer of cherry lipstick. Next, apply vinyl gloss one shade lighter. This makeup is suitable for brown-haired women.
You can experiment a lot with lip makeup and combine it in different ways with the makeup of everything else. On the Aromacode website you can please yourself not only with a variety of cosmetics that will help you do your makeup, but also with caring creams, oils and perfumes from famous manufacturers.
To understand how to learn how to paint your lips exactly beautifully and correctly step by step so that you get gorgeous photos, you can focus on the advice of makeup artists and fashion shows, without forgetting about your individuality. Then the image will be stylish and harmonious.
Broom
Using a broom or broom, you can create a structure with barely noticeable vertical stripes. To make the painting look more interesting, you can apply light paint as the first layer and dark paint as the second. It is best to use texture paint; it is denser and the pattern on it is more pronounced.
The second layer should be applied after about half an hour to avoid smudging. Once you have applied the contrasting paint, start texturing: move the broom with pressure from the ceiling to the floor, without stopping.
If you want to get a decor that resembles linen fabric, use a stiff shoe brush. It is more convenient and easier to hold in your hand than a broom. First make vertical stripes, and then horizontal ones. To keep the stripes clear and even, constantly clean the broom or brush from excess paint.
Application technique.
The first step is to prepare the surface you want to paint. This will help to carry out painting work efficiently and quickly. To do this, the surface should be cleaned of dirt and dust.
Choose paint colors that suit you. After this, take a container and pour some paint into it and dip the roller in it. Wring it out, let it dry a little and apply the first layer to the wall. This is done so that the paint does not flow and lies flat. Now let this layer dry.
Then take a sponge. First, wet it with water and squeeze thoroughly. After this, dip the sponge into the prepared paint and squeeze it out again. The paint should not run off. In addition, to make accurate prints, the sponge must be semi-dry.
Paint is applied with a sponge from top to bottom, slightly pressing it onto the surface. After the next layer is applied, you also need to let it dry a little. Meanwhile, prepare a sponge for applying the last layer. It needs to be wetted again and squeezed out well.
Now we apply the final layer. Please note that the paint must be applied so that the first and subsequent layers are visible underneath. If only one color was taken, then the prints are superimposed one to one.
If there are several colors, cover the surface by moving the prints relative to each other. They should not be applied exactly on top of the previous ones. To create a slight shimmer pattern, twist the sponge in different directions when applying.
For your information, if you need to speed up the process, you can apply the first two layers with a brush, and apply the paint with a sponge only on the third layer. This option is possible; it will help you reduce the amount of paint you use.
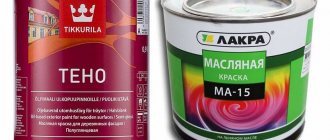
For most people, the problem of choosing a painting technique is not as pressing as the question of which paint to choose. In this case, you should consider the type of room. For the outside of a house or apartment, you need to take certain paints - silicate, cement or oil, which are weather-resistant.
For the pantry, kitchen, bathroom and corridor, use water-based or oil-based paints. Enamels are also an option. For living rooms, which include an office, a living room, bedrooms and children's rooms, adhesive paint is best suited. It is able to maintain an optimal level of humidity in rooms.
Popular questions about construction
Design documentation is necessary to solve the following tasks: assessing the compliance of a construction project with the requirements of technical norms and state standards. This assessment is made before the state examination of the project; calculating the required amount of construction and finishing materials, drawing up estimates and determining the budget for the construction (reconstruction) of the facility; coordination with government services and departments; obtaining a construction permit; development of working documentation necessary for construction and installation work. The project will also be required when handing over the finished object to the customer to check it for compliance with the stated requirements.
To select the type and quantity of building or finishing materials, you must use project data or your own calculations. In this case, it is recommended to purchase goods with a small reserve, approximately plus 10-15% of the estimated volume. When purchasing, you should pay attention to the presence of labeling, expiration date and specific qualities of the product. Characteristics such as frost and moisture resistance of building materials and their maintainability will be important. We should not forget about additional consumables, such as fasteners, glue, mortars, etc. You shouldn't skimp on them. After the construction or repair project is equipped with the necessary material, you need to ensure that you have the tools to carry out all types of planned work.
The quality of the work ahead largely depends on the choice of building materials. If financial capabilities allow, it is best to purchase goods from well-known brands that inspire confidence in the buyer. And you need to purchase them from official dealers so as not to purchase a fake. The cost of building materials in this case will be high, but the quality will also be excellent. If you have a limited budget, you can use cheaper analogues with a good price-quality ratio. You should not buy a product if its price is too low compared to a branded product. As a rule, these are low-quality and short-lived products.
The packaging of high-quality building materials always contains all the information necessary for the buyer. It must have the manufacturer’s logo, a description of the purpose of the product, production and expiration dates, composition, and rules of use. Compliance of the product with the declared characteristics is confirmed by a certificate, which the seller is obliged to present to the buyer upon his request.
You can carry out various construction and finishing works on your own. But their list is limited for a number of reasons. Firstly, the use of special machines, for example, a crane or excavator, requires not only the availability of special equipment, but also permission to operate it. Secondly, if it is necessary to carry out electrical and welding work, you will need to undergo fire safety training. Thirdly, not every type of work can be done alone. If you are installing rafters on the roof of a cottage or installing SIP panels, then you cannot do without helpers. Fourthly, some types of work require the use of special, expensive tools and equipment, which are not rational to buy for one-time use.
Engineering systems are complex objects that include lines for energy supply, water supply and sewerage, ventilation and air conditioning, gas supply, and heating. Their construction requires highly qualified contractors, since the comfort and safety of home residents or office workers depends on the quality of engineering networks. Therefore, the construction of such objects should be trusted exclusively to professionals.
Reviews about building materials
The professionalism of our employees allows the company to take on projects of any complexity. Work has to be carried out not only in warm rooms, but also somewhere outside the city in severe frost. The equipment must show stable operation in any weather. It is for this reason that it is important for us to use high-quality and reliable tools. In addition, it must have an autonomous power source.
Andrey Vladimirovich, construction company Novosibirsk
Yes! Finally, my wife and I managed to buy our own apartment. The layout suited me completely. But there was one problem in the bathroom. The strong humidity in this room literally ate away the surface of the walls. They suffered for a long time until I decided to cover them with moisture-resistant plasterboard (GKLV). We haven’t remembered the problem for 12 years now. And the appearance of the room did not deteriorate.
Vyacheslav, Moscow
I spent a long time choosing what material to use to build a house on my plot in a holiday village. Many friends began to recommend pine timber. I decided to take the risk at my own risk. As it turned out, I was right at all. This durable material can withstand any weather surprises. At the same time, excellent thermal insulation pleases. A lot of time has passed, but the timber is not going to rot.
Fedor Mikhailovich, dacha village
For many years our team has been famous for its painters. A team of professionals who were always rewarded by their superiors for good work. But what a disappointment I was when people began to openly complain about the poor quality of work. This was all due to poor quality materials. We switched to NC paints. Paintwork lasts long, colors remain vibrant, and we no longer receive unfair complaints.
Decorative cosmetics have existed for more than a century, and now most women use mascara and other products every day. Sponges are everything, they reflect facial expressions and emotions. Therefore, it is important for every coquette to know how to learn how to evenly, beautifully and correctly paint her lips step by step from a photo, otherwise the makeup will be the same type every day. Such knowledge will help you create the perfect coverage, like in a fashion magazine.
Often women prefer to buy lipstick of the same color, for example, pink pearl or bright red. Makeup in this area is corrected more often than makeup on the eyes or face as a whole. Eating, walking in the rain, or simply having dry skin that quickly absorbs cosmetics - all these factors reduce the durability of cosmetics applied to this area. But now there are many techniques on how to make sponges perfect. You can make them visually larger or thinner, apply them with a brush, mix shades like an artist on a palette. It is ideal to have several options suitable for going out with casual wear or evening wear, in a color scheme appropriate to the occasion.
Sponge for washing dishes
Want a grainy texture? Then use a regular foam sponge. The main secret to even painting using a sponge: before starting work, you need to dip the sponge in the paint, and then clean it of excess. To dry the sponge, you can wipe it on paper. Afterwards, apply prints to the freshly painted wall, using movements as if you were blotting wet spots. To avoid monotony, it is useful to change the position of your hand.
If you manage to choose high-quality paints and sponges, you can transform any surface. To master this painting method, you will need the right paint and sponge.
The latter should be natural, while the former should be latex, whose base should be water-dispersed. If you purchase eraglass.com, the question of painting will immediately disappear.
1) In order for the work to be of high quality, it is worth clearing the surface of various debris. Then you should choose the desired color of paint and pour a little of it into the container. Next, you should take a roller and dip it in paint, but you shouldn’t paint the walls right away, because you need to squeeze the roller so that the layers are applied evenly. After you have applied the first layer, you need to let the paint dry a little.
2) When the layer has dried, you need to take a sponge and moisten it with water, then squeeze it out. After this, you should dip it in a container of paint and squeeze it out so that the paint does not start to drip. In addition, it needs to be slightly damp so that the prints are neat.
3) You need to paint with a sponge from top to bottom, lightly pressing it against the wall. Once you've finished applying the second coat, let the wall dry again. While it dries, it is recommended to wash the sponge before applying 3 layers.
4) Next, you need to apply the next layer so that it can show through the 1st and 2nd layers. Most likely, you chose only one color to paint. Then you have to apply prints one to one. But the matter changes, if you have chosen a couple of colors, then you should move the prints away from each other. When you apply paint, you have the opportunity to choose any direction of the sponge, and only then can the shimmering design appear.
5) You can save time by applying layers 1 and 2 with a brush, but layer 3 with a sponge. Thanks to this tactic of wall finishing, you will be able to save not only time, but also paint.
Stages of coating walls
Before any painting, the walls of the apartment need to be prepared. To do this, the old coating is cleaned off and the surface is leveled. If the walls are decorated with wallpaper, it is easier to remove them using a spray bottle of water and a wide spatula. The old paint is first removed with a spatula and then sanded down.
The surface of the walls is leveled, large cracks are filled with putty. Finally, the walls are rubbed down with a wet sponge or fine sandpaper. Only after preparation do they begin the main work.
Photos are enlarged, click!
Preparing materials and tools
For work you will need the following materials and tools:
- Dye. For interior work, choose a natural base: water-based or natural oil. The composition is environmentally friendly and dries quickly, does not cause allergies and has no pungent odor. The color matches the design. Price from 650 rub. for 10 l.
For rooms on the north side, colors with warm shades are taken, for rooms on the south side, on the contrary, cold ones.
- Brushes (from 15 rub.), roller (from 50 rub.) or sponge, depending on the chosen application method.
- Primer. It is selected individually for the finishing coating; it is better to take the same manufacturer. Price from 70 rub.
- Molar tape. Price from 25 rub.
Work progress
The coating is applied in the following steps:
- The door jambs and other elements that need to be protected from paint are glued with masking tape.
- The surface is primed using a brush or roller. The primer is needed to make the adhesion of the coating and the wall stronger. The primer is allowed to dry.
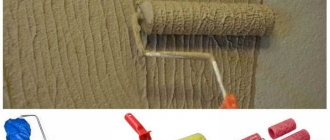
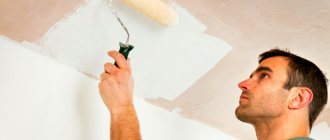
- The coating is applied. If you choose to paint the walls with a sponge, you should be careful. The sponge is dipped in the composition and it is applied to the surface using blotting movements. Do not rub the paint with a sponge, otherwise the application will be uneven. Painting a wall with a sponge is not easy, but the result is an even coating. If unevenness is visible after drying, a second layer of finishing is applied. Places under pipes and at the junction of baseboards and ceilings are tinted with a thin brush.
After the paint has dried, the work is considered completed. You can wash the tools and arrange the furniture in its place. You can paint an apartment in various ways, it is chosen individually in each case. Patient owners can use a sponge; for others, we recommend using a roller or brush.
Escape boredom
Using paint on the wall you can create an exclusive design that is not found on wallpaper. This allows you to make the interior special and different from others. You can experiment with colors and shades, shapes, textures. When using several colors, it is worth remembering that in this case it is better to combine: Different shades of the same color; Related shades; Contrasting colors that go well together.
Personal experience of painting walls using the sponging method.
Sponging
is a way of decoratively painting anything using a sponge.
The term comes from the English word “sponge”
- sponge. This means a sea sponge, not a foam sponge. Due to its natural origin, it has a beautiful and intricate pattern. With the help of such a sponge and multi-colored paint, you can create very beautiful patterns on any painted surface. If you don’t have a natural sea sponge, you can use a synthetic one with a beautiful texture or modify it with scissors. We bought our sponge at a well-known construction supermarket. I have long dreamed of trying this unusual method of painting and finally the opportunity presented itself. We publish the result in the form of photographs in this article.
For sponging, you can use different colors and shades of paint, getting a very diverse palette. For our experiment, we took as a basis white water-based paint and a green dye - colorant. By changing the content of the colorant in the base, you can get shades of the same color of different intensity. This is the simplest way to select paint for sponging, but you can be sure that different shades of the same color will combine perfectly with each other. First, using the sponging technique, you need to create a uniformly colored surface, and only then draw patterns on it. Any coating looks beautiful only on flat and smooth surfaces, so the walls should first be puttyed, primed to ensure even absorption of the paint, and only then the first layer. For the base we chose the lightest shade of green. We paint the entire surface of the wall with a paint roller, and go through the corners with a brush. To avoid gaps, paint should be done in two layers with intermediate drying. For convenience, we will call this process creating a background, and we will count the layers from the next one.
Sponging - applying the first patterned layer of paint
So, the routine part of the process is completed, then continuous creativity begins. For the first layer, we added a little more dye to the rest of the paint, creating a slightly darker shade of green. Next, we dip our sponge into the ditch with paint and creatively but evenly distribute the paint over the wall, starting from the top corner. You should move from top to bottom, avoiding smudges; for this, the paint should not be very liquid. The sponge should be turned on different sides for greater spontaneity of the drawing. You can place cardboard in the corners so as not to climb onto the ceiling and the adjacent wall. There is no need to apply a drawing very often, because we will have one more layer.
The first layer is applied
When the first layer dries a little, you can start the second. Add a little more colorant to the paint and get an even more intense shade. We paint with it even more creatively, because the last layer (in our case) is the finishing one. And you can not stop there and continue as long as you like, experimenting with different colors and shades. On the contrary, you can go from darker colors to lighter ones. We decided to stop while the color of the base was still visible.
Applying a second coat of paint
To select your own design, you can experiment on a sheet of paper or cardboard. Or even choose colors in some photo editor, for example Gimp. Take the desired background, a brush that resembles a sponge, and without spending on consumables, get an idea of different combinations of colors and shades. All that remains is to find materials that are similar in color in the real world. It is better to use matte, water-based paint; color transitions look bad on glossy paint. The sponge should be washed after each layer.
The second layer is applied - the wall is ready
You can use a sponge to paint on the ceiling. In this case, the blue base represents the sky, and we draw the clouds with a sponge in white and blue. The more shades, the more realistic the picture will be.
For decorative painting of walls, you can use not only a sponge, but also any other tools, such as a brush, a broom, textured rollers, stencils, a crumpled rag, and so on, but that’s a completely different story. I wish you creative success!
The clouds on the ceiling are painted using the sponging method.
Video - how to paint walls using the sponging method
With the help of paint and improvised means that can be found in every apartment, you can change the interior beyond recognition. And there are many ways to paint walls that will not only transform the space, but also bring a lot of pleasure to those who will participate in this process.
Gradation, blots and mold
Today it is fashionable to experiment not only with colors. Increasingly, designers are trying bold wall design options. For example, they age a wall, create the effect of mold or a damp wall, but use blue, pink, and green shades. Large blots, stains and stains look bold and extraordinary. It is appropriate to use such decor on one of the walls to highlight a certain area in the room or make it the compositional center of the interior.
How to paint your lips beautifully and correctly
To create a delightful image, you need to follow certain rules in makeup:
- You shouldn’t grab the first lipstick you see off the store shelf, even if it’s the trend of the season;
- the color of the cosmetic product should be in harmony with the shade of the skin and eyes;
- if the clothes are bright, it is better to choose a neutral pigment tone;
- To complement the pale or achromatic colors of the outfit, you can choose a bright color, with the exception of a tone-on-tone combination;
- the upper part should be painted separately from the lower part, and not blotted to save money in order to get beautifully painted lips;
- to obtain a more saturated color, you can first apply foundation or primer;
- with a business suit you should not use bright mother-of-pearl or glossy coatings;
- for girls with dark skin, plum, wine and lilac shades are suitable; blondes should avoid them;
- Matte ones make the sponges visually narrower, and pearlescent ones, due to the reflection of light in different directions, will hide minor defects and visually increase the volume.
Marker and chalk to help
Increasingly, walls and furniture painted with slate paint appear in modern interiors. This allows you to make notes on the surface and draw all kinds of images. So the interior is always updated depending on the mood of its owners.
Innovative types of coatings also include marker paint. After it has completely dried, which occurs within seven days, you can draw on such a surface with dry erase markers.
Preparing the walls
If decorating a wall with paint is being done for the first time, you need to prepare the surface for such a design solution. Preparing walls for primary painting is carried out in stages:
- Cleaning the coating from old finishes.
- Surface priming.
- Inspection for flaws, which are repaired if necessary.
- Uneven surfaces are puttied and sanded.
- Re-priming.
Related article: All about methods of painting walls with water-based paint
After all the work done, the wall is ready for decorative painting.
In order for the paint to lay evenly on the walls and to avoid any defects on the coating, you must wait until the putty mixture and primer on the wall have completely dried.
Using stencils
In an unusual way, you can paint a wall using stencils, buying them at a hardware store or making them yourself.
To make your own stencil, you will need thick paper or cardboard. You can also get an interesting effect if you wrap a piece of rolled rag around a roller and paint the wall with it. As you know, there is nothing easier than covering something with a sponge. This technique is ideal for flat surfaces such as furniture and walls. Want to give your coating a shimmery effect? A good sponge application of paint will help with this. In order to successfully cope with such a task, you do not need any specific skills. It's not difficult at all. The main thing that is required of you is to follow certain rules, use a natural sponge and paint. The ideal option would be latex paint on a water-dispersion basis.
A sponge can be used to treat any surface: concrete, metal, plastic and even wood. To verify this, you can read the information on the website of a company that builds wooden houses.
Required tools:
- Gloves;
- Dye;
- Paint container;
- Roller;
- Sponge.
Fabric stains
For this technique you will also need texture paint. After the first coat of paint has dried, apply a second coat using a rolled piece of fabric. There are two options here: wrap a cloth around a roller or paint with your hands, then the effect can be more controlled. If you apply the second layer of paint a tone darker or lighter, you will get an interesting shimmer.
If you take regular paint and, without waiting for the top layer to dry, rub it over the surface with a clean and slightly damp cloth, you will get the following effect:
Photos: stylisheve.com, justimagine-ddoc.com, valsparpaint.com, diynetwork.com, homedit.com
Add to favorites8
- Tags
- painting
- wall decoration
painting, wall decoration