Che Guevara
12104 0 0
Che Guevara December 10, 2016
You can line the well with wood yourself.
A beautiful well on the site is always pleasing to the eye. Today, it has become fashionable to decorate a well with wood, decorate it with stone, and also build heads in different styles. I will tell you about the simplest and most affordable ways to equip your own source of drinking water.
A little about finishing
As a rule, today's well shafts are concrete structures formed by special rings. And finishing the well is not a necessary measure. But when a structure with a nondescript appearance sticks out in the middle of the site, it is at least not aesthetically pleasing.
It is necessary to sheathe a structure made of rings based on the material of its manufacture. It is also important to consider the type of construction.
Wells can be made of brick, foam concrete, or wood. The first two options require external and internal finishing work.
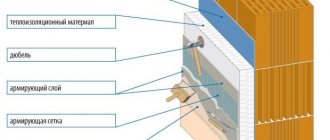
Recommendations for finishing and video tutorials
Before lining the well, the surfaces need to be prepared.
To do this, all dirt and dust are removed. You can apply a primer. The main thing is that it is an antiseptic. Mold, mildew, and microorganisms will ruin not only the appearance of the well, but also the water if they get inside the shaft. It is better to think about how to line the well before the blind area is laid.
Dismantling soft and pouring concrete will require additional costs. Those who veneer with wood should understand that within a few years the lining will have to be replaced. Paint doesn't last forever either. And lovers of sophistication should consider the option of lining with fresh flowers.
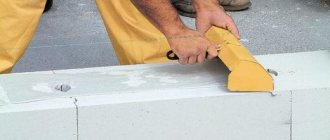
Brick
If the owners are interested in a simple technique, we recommend finishing the well with bricks. The required material here is solid brick. Its installation takes place using the method on the edge in a lying position.
The working stages for brick cladding are as follows:
- Approximately 1 m around the circumference of the concrete rings, we dig 30-50 cm of soil.
- In the resulting depression we compact the soil until a dense crust is formed.
- We create a plank rectangular formwork. It can also be set to other geometric shapes. Often customers choose hexagons.
- We place a sand cushion with a maximum thickness of 10 cm on the compacted soil. We compact it thoroughly.
- We place strips of the chain-link mesh system on this pillow.
- We fill the created formwork with concrete. It is prepared according to this recipe:
- cement grade M400 - 3 shares,
– strained river sand – 3 shares,
- fine crushed stone - 4 shares.
- We level the concrete strictly horizontally.
- Based on the degree of concrete hardening, we create a cement-sand composition in small doses. We use it to level out relief areas.
Poured concrete should not crack when drying. Therefore, we periodically moisten it with water, or make a canopy for a while to obtain shade.
- We make 6 points around the circumference of the well. We remove them from each other at an equal distance. The lines connecting these points should touch the concrete ring in the middle. We nail the dowels at the points and tie them together with twine. This is the main line for laying bricks.
- The brickwork is slightly offset in relation to the previous row. This results in a bond with better strength.
This type of masonry is clean. For this reason, we work extremely carefully. We form the joints between the bricks until the working composition dries.
Do you have questions about finishing wells? CALL! 8 (999) 98-000-98
Well design and functions
- Before starting construction of a structure, it is necessary to draw up a project. You can do it yourself, download it from the Internet. It consists of several stages: General provisions. Includes engineering-geological data, technical indicators, and pursued goals. At this stage it is decided what function the structure will perform:
- If it acts only as decoration, then all that remains is to choose a suitable place for installation, decide on construction materials and cladding.
- For the well, which will be used for drainage, hydrogeological studies of the soil are carried out. If it is water-absorbing, filter models are installed; where moisture is poorly absorbed, storage models are installed.
- Wells that serve as a source of water (plumbing option) also require preliminary research related to determining the depth of the aquifer. 2. Graphic part. It consists of drawings of the main components, the appearance of the building, the roof plan, if any, recommendations for finishing, the technologies used, the location of lighting fixtures, electrical points (socket, light bulb). 3. Specification. It includes materials and equipment used for construction.
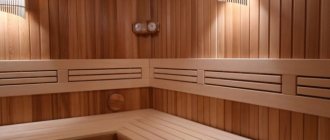
Wood cladding
Today, finishing a well with wood and other lumber has become widespread. This is a simple and high-quality method.
For external decorative finishing of wells, various lumber is used:
- Edged board.
- Gorbyl.
- Logs that have undergone rounding
- Profiled timber.
No matter how the option for facing work is chosen, the final result is influenced by the imagination of the owners or workers.
Today, cladding using profiled timber is considered very popular.
Decorative finishing with this material occurs as follows:
- We remove soil and vegetation along the perimeter of the ring. Length – 1-1.15 m.
- We create formwork from boards.
- We cover it with a reinforcing mesh made of thin rods.
- We create the composition: cement - 3 shares, sand - 5 shares, fine crushed stone - 4 shares.
- We fill and level the formwork. The height of the base should exceed the ground surface by 15-20 cm.
- We are preparing the material for the bottom trim. We give it a square shape. We use two whole timber and one half timber.
- The side of the beams that will be in contact with concrete is covered with bitumen mastic in one layer.
- First we put in half material. The placement of the halves in relation to each other is parallel.
- We have a whole range of options for them. From their corners we determine the connecting bowl to be half a tree. This results in an angular mounting into the paw:
- We attach such connections to the concrete base using wooden dowels. For this task, we make a through hole in the timber that goes into the concrete.
- We make dowels from the beams using the planing method. The dowels are twice the thickness of the timber. We drive them with a sledgehammer into the pre-made holes. We remove excess wood flush with the plane of the beam.
- The second line accommodates entire variants with designated corner mounting.
- In the first and second lines we connect the timber with dowels. The pins of the second line are slightly shifted in relation to the pins of the first line.
- When we bring the timber up to the plane of the ring, we create a frame from the boards. We attach a hatch to it. This is a defense against debris entering the mine.
Stages of finishing a well
A beautiful source is always nice.
To bring the above to a more harmonious system, let's consider the simplest way to arrange a water source. All stages have been tested in practice many times, so you will be satisfied with the result.
- We take measurements of the ring: outer diameter, wall thickness, height above ground level. Using the obtained dimensions, we assemble a frame of four boards, which we put on the ring. We drill holes in the boards, pass the ring itself through them and secure the frame to the ring with an anchor and nuts;
In this photo we are interested in the way the boards of the lower frame are arranged. The surface plane formed by the ends should rise slightly above the ring.
- The leveled frame is sewn up with a board. In the middle we leave a hole for the passage of the bucket, which is better equipped with a valve or doors;
We sew up the area with a board. Leave a hole for the bucket.
- According to the drawing, we assemble the frame for the house. It is better if it is steel or aluminum.
Frame for a well house.
- We attach the frame to the site and insert the gate.
Frame with a collar on a ring.
- We cover our frame with corrugated board, plastic or wood. Profiled sheet is the best solution.
We cover the house and hang the door.
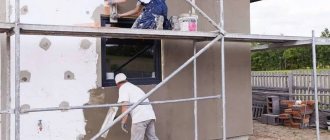
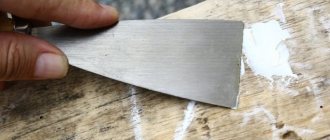
- We plaster the ring. Apply the solution with a spatula. If the ring is old and battered, place it on a fiberglass mesh, which is pre-attached with dowels.
We do plastering. If the ring is new, apply a thin layer.
- When the plaster is completely dry, prime it. After the primer has dried, apply 2 layers of acrylic paint for exterior use.
We work with a roller, and in hard-to-reach places with a brush.
- At the end we make a blind area. To do this, we dig up soil within a radius of 120 cm around the ring to a depth of 10–15 cm, cover it with polyethylene, lay a metal mesh and concrete it.
The blind area should cover the clay castle.
Before starting work, it is advisable to pump out the water from the well and clean its bottom. To do this, a person is lowered on a climbing rope in a special rubber suit, the dirt is removed with buckets, and then the climber is raised.
Construction and installation of houses
Finishing wells in a country house is often associated with the creation of a specific structure with decorative and defensive functions. This is a house.
This is the best option for finishing ring wells in which a submersible pump is used for water intake.
List of required materials:
- Edged board. Dimensions: 10 x 25 cm.
- Beam with parameters 10 x 8 cm.
- Hinges for doors.
- Insulating material: roofing felt and mastic.
- Slate. Only the flat view is suitable.
- A set of screws and nails.
The required tools are:
- Jigsaw.
- Hacksaw for working with wood.
- Plane.
- Water level.
- Screwdriver.
- Bayonet shovel.
- Roulette.
- Felt pen or pencil.
The work order is as follows:
- The soil is leveled around the circumference of the ring. It is covered with pebbles on top. Maximum layer thickness – 5 cm
- The pebbles are watered and thoroughly compacted.
- Frame assembly
To create its strapping, we place its racks on a flat surface. Next, we nail down the boards of the outer frames
To enhance the strength of the frame, we secure the boards on all sides with four screws. The use of nails is not allowed here. This will only weaken the frame.
The other two frame racks are assembled in the same way.
Then we arrange the assembled components around the circumference of the ring and connect them into a whole structure.
- Assembling the rafter system according to the indicated diagram:
To make this system as strong as possible, we connect the rafters and other components with hardware and screws.
- Assembly and installation of the door frame. It is made from boards.
- Let's create a door. We use an edged board. The shape of the product resembles a typesetting shield. We put it on special loops.
- Creation of lattice rafter technology. Strengthening this structure according to the diagram:
- Installation of rafters to the upper frame frame.
- We finish this sheathing - roofing felt is used. Bitumen mastic is used to glue it.
- We place slate on the roofing felt. We install it with nails.
- The structure of such a house is covered with wood.
.
Before use, all lumber is thoroughly treated with antiseptics.
Why do you need a house over a well?
A mine well is a hole of a certain size that does not have an attractive appearance. Also, such houses for the well are built in order to protect against dust or other dirt.
Advice. The finishing of the block in a suburban area plays a big role. The houses can be decorated with landscape design.
What are well houses made of?
Well houses can be built from:
- Brick.
- Foam blocka.
- Aerated concrete and other building materials that have similar properties in shape and structure.
- Wood structures are also considered very common. For this purpose, beams or logs are used. They do not require additional finishing. They are simply varnished or painted in a certain shade.
Advice. Such houses cannot last very long. The service life of wood is about 10 years. Stone buildings of this type are more durable and strong.
Everyone decides how to line a well of this type in their own way.
How to register
A variety of materials can be used for decoration:
- Stone. These can be cobblestones with pebbles collected on a nearby beach or decorative processed stone. Working with them is quite simple; they are fixed on cement mortar.
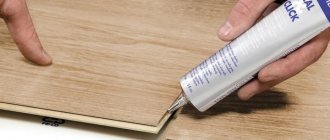
- Tree. Under skillful hands it can take any shape and can be processed well. To work with it you will need a hammer, nails, glue, and a special composition must be used to protect it from the harmful effects of the environment.
- Concrete blocks. They are rarely used, and the price of the device will be higher. But the advantage of the material is its durability and strength.
- Brick . Brickwork is considered a recognized and widespread method.
- Siding. This is a modern material with a variety of colors, textures, quality and cost. Lightweight and easy to use material.
- Metal profile and polycarbonate. Most often, they are used to make roofs, awnings and canopies, but with a little imagination, they can also be used to decorate walls.
- Well head. Usually these are rings of concrete protruding from the ground. In addition to the complete lack of style and decorative properties, it also has poor sealing. Dust, debris, sediment and insects often get inside. A positive indicator is the absence of freezing in winter.
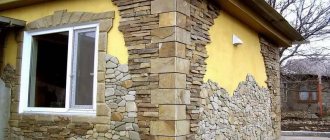
Stone cladding
Stone is a fairly ancient facing material. It is excellent for exterior and interior cladding. Although decorative stone is often used for these tasks, which has the following advantages:
- High strength.
- Durability.
- Moisture resistance.
- Weather resistant.
- Easy installation.
- Large range of tones.
Finishing a well with decorative stones occurs using the following avant-garde:
- A special adhesive mixture or cement composition.
- Level.
- Decorative stone.
- Tile cutter
- Pairs of spatulas of modest parameters.
Installation is carried out only on a flat surface. The material should not be deformed.
Artificial stone can be acrylic, sand, concrete-sand, synthetic or gypsum. The latter option is completely unsuitable for exterior decoration. It absorbs moisture and becomes deformed.
For exterior finishing, we level the surface - use concrete or moisture-resistant plasterboard.
Work algorithm:
- We install drywall on the frame. At the same time, we additionally insulate the well with sheet insulation.
- Before installation work, we carefully treat the surface of the material. Cover it with primer.
- Installation of stone using special glue or cement composition. We do not strengthen the structure. After all, this material is not heavy.
- Roof installation. We often use corrugated sheets. Although the option with tiles is also popular.
Another aspect worth mentioning here is that there is moist soil around the entire perimeter of the well structure. Therefore, we fill this area with pebbles, gravel, or crushed stone.
Finishing a well with natural stone is somewhat more complicated.
We pre-prepare the surface. Since natural stone can have different shapes and parameters, the method of its use may vary.
The ring well is lined with this material along its entire perimeter.
Necessary elements for work:
- The natural stone itself.
- Ingredients for the composition: cement, sand and water.
- Level.
- A mesh of reinforcing bars with small cells.
- Construction mesh.
Work algorithm:
- Surface priming.
- Coating the surface with a concrete composition. A construction net is attached to it. Thanks to it, the structure acquires integrity.
- This network is covered with another layer of composition. We are already installing a second mesh on it
Work continues in 5-10 days. During this period, the composition will completely harden.
Then we install the natural stone on a concrete mixture or a special adhesive solution.
Types of well houses
Well houses do not have any strict classification, but they can be distinguished by the following characteristics:
- according to the degree of “closedness”;
- according to placement method.
According to the first characteristic, they are open, semi-closed and closed; according to the second characteristic, they are above-ground and above-ground.
Open houses, as mentioned above, consist of a canopy; semi-closed ones are additionally equipped with a lid on the well. Closed houses resemble a gable roof, which is attached to a well ring or upper frame. The hatch for closed structures can be located either on the pediment or on one of the slopes.
Note. Sometimes the hatch door is not installed, leaving access to the well neck free.
Of course, you can find completely open wells, without a house, but this is rather an exception to the general rule. Typically, such sources are used for irrigation, but even in this case some kind of protective device must be provided to protect children and pets - for example, a grate on the neck.
If you do not consider wells with surface pumps, then a gate is needed to lift the water. Usually this is a rounded log with a handle, which is attached to racks or similar power elements. And the materials for making a house can be different.
Sheathing with siding and plastic
Today, the external finishing of a concrete well ring is often done with siding or plastic. These are quite popular options.
The well is finished with plastic panels (or siding, the principle is the same) on a frame. It can be wooden or metal.
It is possible to cover the surface with panels using an adhesive composition. To do this, thoroughly level and prime the surface.
For work you need the following arsenal:
- Hammer.
- Jigsaw.
- Level.
- Set of screws and dowels.
- Special stapler.
- The panels themselves.
- Guides for their installation.
- Sealant
- External corners.
To create the sheathing for this material we use planks of wood.
We mount them to the surface. At the same time, we insulate the structure from the outside. We attach the planks to the frame with self-tapping screws.
Examples of decorative wells in the country
Some design examples:
- Wooden tower. The head is decorated with boards and metal hoops, which makes it look like a wooden barrel. A gable roof is installed on top on carved pillars. Additionally, you can decorate the composition with flowers in wooden vases, decorative figurines of gnomes or fairy-tale animals.
- Decorative crane. The traditional well design is without a canopy; a long lever is used to lift the water. Its support can be made from a tall wooden figurine of a bird or animal. The upper part of the well is designed in the form of a wicker basket.
- Sailing ship. The rotating lifting mechanism is equipped with a wheel stylized as a ship's steering wheel. The well itself and its top cover are finished with deck boards.
- Ceramic jug. The design is in the form of a jug, the surface of which is lined with ceramic tiles or natural stone. The hole for water intake is covered with a lid.
- In the style of minimalism. This fashionable style trend today involves the absence of decorative elements. The head of the well is trimmed with plastic panels. The supports are made of forged metal. The roof can be covered with colored polycarbonate.
The design of the well should be in harmony with the landscape of the site and the style of the house. If the building is covered with siding, then a well in the old Russian or medieval styles will look alien. In this case, it is better to choose plastic and metal for its design.
Ceramic tile cladding
Often a concrete well is finished using ceramic tiles.
Before installation, we level the surfaces of the outer well walls. We prepare them, clean them, and treat them with a primer.
In our work we use the following tools:
- level,
- roulette,
- putty knife,
- special glue or concrete mixture.
At the end of the work, we use decorative putty to mask the masonry joints
If the basis of the well house is a round reinforced concrete ring, we use ceramic mosaic.
Ceramics can have a smooth or structured surface. There are matte and glazed options. There are imitations of expensive stones. This is an excellent method of finishing a well with a natural-looking stone.
As a result, the design receives a unique design.
Decorative well design ideas
The construction of decorative structures does not involve their use as a source of water. They represent an element of landscape design. Its main purpose is to create an impression. Proper design of the structure, the area around it, and the approaches will allow you to create a magnificent garden that can delight others.
For decoration you can use any raw material. The most economical option is to use leftovers after construction, for example, logs or bricks. Any available materials are also suitable, for example: birch logs that have not been cleared of bark, laid out in a circle, stones of various sizes; you can cast a concrete head and paint it; lay brickwork.
Flowers and hanging plants look good as decoration. Instead of a bucket, you can install an old watering can, a barrel, or do without it altogether, placing an original composition in the form of birds in a nest. A standard gate easily replaces a wheel, steering wheel, or steering wheel from an old car.
Lining of wells with clapboard
Lining is a fairly popular material. It is also quite suitable for lining a well. Working with lining is the same as with panels. The tools and procedure are no different. Frame and insulation are also used.
Finishing a concrete ring with clapboard is easy and quick. The result is beautiful. Only the material is carefully treated with protective agents and varnishes.
If desired, we decorate the structure additionally.
Do you have questions about water supply and prices? CALL!
8 (999) 98-000-98
When to start construction
When choosing a construction time, the following nuances are taken into account:
- A permanent frame can be constructed no earlier than one year after the formation of the shaft. This is explained by the fact that when digging, the soil structure is disrupted and voids appear in it. Over the course of a year, the earth becomes compacted, and the free space around the rings disappears. A blind area built on dense soil will not sag or become covered with cracks.
- To protect the well in the first year after construction, a temporary structure is used. A trench 20-30 cm deep is dug along the perimeter of the well. The soil is compacted and the bottom is covered with plastic film. Clay is laid on top of the waterproofing material. To prevent slipping, wooden boards or boards are installed. This design will maintain water quality until a permanent blind area is built.
- You need to choose the right time of year. It is recommended to begin construction work in early autumn or late spring. The soil has optimal moisture; it does not dry out or become wet. Digging dry or wet clay is inconvenient. In hot weather, concrete must be watered so that it gains strength and does not crack. When choosing the construction time, the climate of the region is taken into account.
Selection of materials
The choice of material for lining a well is a business decision. A lot depends on your goals and budget.
If wood is preferred, I recommend choosing hard varieties that are resistant to aggressive influences (oak, birch, cedar, etc.)
Any material chosen must have strong wear resistance.
To enhance the protective qualities of the material, after finishing work we cover it with plaster or paint it with strong moisture-resistant paint.
The main criterion for any materials for lining a well is strong moisture resistance.
As for painting, we most often paint wood with varnish. We cover stone and brick cladding with special paints.
How to make a water supply mechanism
There are 2 types of structures that can be used to manually raise water. It is worth highlighting the following:
- "crane";
- "gate".
You can make a “crane” for your own well, but it will require a lot of space. It is quite difficult to install, so it is rarely used. But to install the “gate” you will need 2 pillars; they need to be dug into the ground immediately after the well is brought to the surface. In order to prevent rotting, it is useful to coat a wooden post with a special compound. It can be replaced with resin.
First, the pillars are coated 2 times with a liquid composition, and then 1 layer of thick resin is applied. The pillars should be made of coniferous trees, then they will not require repairs for a long time. This material is less susceptible to rotting.
It is quite easy to make a concrete head with your own hands and equip it with a wooden roof. If the well shaft is made of brick or monolithic structures were used in construction, then they may contain embedded parts. For example, a sewer can be made of concrete rings with factory-installed embedded parts. They can be used to securely fix supports. The step-by-step instructions are as follows:
- It is necessary to measure the stand welded to the embedded reinforcement. The plate must be bent to its size.
- Using long self-tapping screws, the timber must be attached to the plate. Self-tapping screws can be replaced with nails. If there is no plate, then instead you should put a piece of pipe with a square cross-section. It is selected taking into account the size of the timber.
- In order to install pillars for a well with your own hands, you need to dig holes. Their diameter depends on the diameter of the pillar. The depth of the pit is 1.3 m. Before installing the pillars, you need to prepare the bottom of the pit. First you should pour sand, forming a pillow. It is enough to make a layer 20 cm thick; it needs to be compacted well. Then the bottom must be covered with a piece of roofing material, overlapping the walls. It is necessary to pour a 30 cm layer of concrete at the bottom of the hole. Ruberoid is required so that water does not escape from the concrete into the sand.
- The pillars must be completely covered with antiseptic impregnation. When it dries, the end is wrapped with waterproofing material. You can replace it with roofing felt. The pole is placed in the hole, and the vertical installation is adjusted using a plumb line. Then it is fixed with spacers and the hole is filled with concrete mortar. Allow 2 days for the foundation to dry, then proceed to further work.
The well gate is made of smooth logs and is a rotating drum. It is best made from hard wood. Ash is perfect, but you can use beech or more expensive oak. To remove friction, the drum needs to be made 40 mm less than the distance between the supports.
Making a gate for a well with your own hands is quite simple. You need to find a central point at the end of the drum and make a hole 50 mm deep. The hole must be drilled on the other side as well. Through holes of the same diameter should be made in the gate posts. They need to be strengthened; for this you can use steel bushings. After this, a handle is attached to the collar. Since high-quality drilling is quite difficult to do, it is easier to order the gate from a workshop.
At the last stage of arranging the head, it is sheathed. If the log house is made of calibrated logs, then it already has an excellent appearance. It is enough to make a roof, equip the source with a mechanism for raising water, and hang a door. If desired, the structure can be decorated with carvings.
The head of the manhole does not require decoration; the space around the shaft can be filled with concrete mortar.
Drinking water well heads made of other materials require additional finishing. The easiest way is to sheathe the surface with a board; you can use clapboard or material that imitates timber.
First you need to make a frame by purchasing a beam with a section of 50x100 mm. The structure, made for the well with your own hands, should be attached to the gate posts; it can be fixed to the concrete wall of the shaft. Next, the frame needs to be sheathed and the missing elements attached to the gate posts. The casing can completely cover the head, imitating a well house. The door will be on the roof.
https://youtube.com/watch?v=e7-qcjc0ZiA
If you wish and have free time, you can cover the head with a well house in the form of a mill. There are a lot of design options, so it’s worth choosing a drawing in advance
It is important to take into account the landscape design of the site and the style of other buildings
The head of a concrete well can be lined with ceramic mosaic. A house made of natural stone looks impressive.
Closed and open type
Over the centuries-old history of the existence of wells, different technologies for constructing structures in general, and the upper part in particular, have evolved.
Essentially, the top comes in one of two forms:
Open buildings are often built on the streets, in public areas. They consist of a ground part of a log house with a door, a lift on a rack and a roof on supports.
The completely closed top is made in the form of a house, the design of which depends on the traditions formed in the area and the taste preferences of the owners. In order to make such a structure, you need skill and a lot of time. The result is a well that is reliably and completely protected from external factors and is absolutely safe for others.
Working on the roof frame
At the same stage, the rafter system is assembled, and then installed in finished form on the rack. The next step will be finishing. The structure can be protected with roofing material, clapboards and boards. If the latter are damp, then after a while they will dry out, and gaps of up to 5 mm will form between the elements. In this case, there can be no question of hygiene. Dust and rain will get inside. Using a dry board is also not a solution, because in wet weather it will swell, and the assembled flooring will simply move in waves. If you want to have clean water, then you should build a house with doors. In this case, there will be more chances to protect moisture from contamination.
Cost of materials and work
You can buy a ready-made house at completely different prices. A simple structure made of boards and a gable roof costs from 7 thousand rubles. The options are more interesting, but with walls they will cost you more. Such houses are sold at a price of 15 thousand rubles.
If you do all the work yourself, then the prices for materials will depend on what type of house you have chosen, as well as your design decision and preferences in the choice of material. On average from three to seven thousand rubles. However, one thing is for sure, the final price will be cheaper than ready-made models on the market.
If you have already decided to install a well house on your property, here are the main points you should keep in mind:
- The cheapest and easiest to make design is an open house without walls. The most expensive and difficult to install is the closed hex version.
- It is very important to treat all parts with impregnations and varnishes before installing the structure directly above the well. Doing this after installation can contaminate your well water with chemicals.
- A wooden block nailed to the door diagonally will prevent it from skewing.
- If your site does not have suitable conditions for a well, you can always install a decorative log house.
Finally, do not forget to properly care for the well, and it will always delight you with clean and tasty water.
We build a house for a well with our own hands - step-by-step instructions
Probably, each of us associates a well with a wooden frame, a gate and a bucket on an iron chain, a neatly folded gable roof and a peasant woman standing next to her with a rocker resting on her shoulders. It is unlikely that you will find something like this as soon as you dig a well in your dacha. No log house, no roof, just bare concrete rings. But everything is in your hands, since they are exactly what you will need when you start making your own house for a well. Don’t be alarmed, there is nothing complicated in this, you just need common sense and a powerful desire, coupled with knowledge of some of the features of the work, and now you are building your own little architectural miracle.
Simple open house design
It’s quite simple to design a structure for an open well with your own hands. Main design elements:
Below, for clarity, a general drawing with dimensions is presented:
Since the racks are dug into the ground next to the well, the installation of supports for the canopy is carried out after the decorative design of the well ring.
Basic steps for making a well canopy:
- Two side triangles are assembled. The dimensions in the drawing are indicative only and can be adjusted if necessary.
- The length of the canopy is selected taking into account the diameter of the well and where the supports will be located: behind the casing or close to the ring. A detailed drawing of the canopy with dimensions for a well with a diameter of 1 m is given below:
- For reliable protection from rainfall, the spread of the slopes of the open house is recommended to make the diameter of the well 40 cm larger.
- The material for the frame of an open house can be a wooden beam, a profile pipe or a galvanized profile.
- When the frame is assembled, the rafter system is attached to it.
- Boards, siding or metal tiles are used as roofing for a well canopy. Boards are a rather capricious material when decorating an open-type house. The wet ones will dry out over time, and the roof of the house will begin to leak, the dry ones will swell from precipitation, and the structure above the well will begin to wave.
The order of work may vary. In some cases, the supports are first dug in, then the rafter system is attached, after which the roof is installed. It is more difficult to assemble the rafter system of an open house directly on fixed supports. Sometimes the entire structure is first assembled together and then dug over the well. The weight of the structure and personal experience will tell you how to make it more convenient with your own hands.
Self-installation
Typically, wood is used as the material for building a house. It is easy to process, durable and looks good. Both timber and logs are used to make sheathing. Bricks or cobblestones can be used to cover the above-ground part. This material goes well with wood.
List of building materials for all work:
- A wooden beam, the cross-section of which is 5 x 5 cm, or logs for a log house (depending on the design).
- Roofing material. It must be light, otherwise the supports may break.
- Log for making a lifting mechanism.
- Protective impregnation for wood, paint, varnish.
- Metal hinges, handle, latch or other latch.
- Nails, screws.
- Metal corners and bushings.
- Bucket, chain.
- Door materials.
A general set of tools that you will need in any case:
- To process logs we will need an electric planer, and for timber and boards - a jigsaw.
- You also need to have a grinder.
- Building level.
- Roulette.
- A hammer and preferably a nail puller.
- Hacksaw.
- Screwdriver Set.
As the foundation itself, concrete formwork or a tile base is usually used. You can use the well blind area, modifying it a little. Do not forget to take care of the drainage of rainwater in advance by using special gutters in the formwork for this purpose. It is also recommended to add a little liquid glass to the formwork solution to protect it from moisture and dampness, but this is not a necessary condition. Consider the size of the base so that when the house is ready, it will be convenient for you to collect water; the design should, first of all, be comfortable and practical.
Next, we will study the process of assembling the frame, first we will consider the option of a log house:
- Logs cut to the required length must be treated with a plane and then with an antiseptic for protection. Since the log house is traditionally not held together by anything, it is necessary to make grooves in the logs. An insulation underlay is required under the first layer.
- Then the log house is assembled layer by layer; the protruding parts of the logs can be made of different lengths. The last crown should be flush with the frame under the gate and roof.
- The racks are made of two logs, between them a gate made of a single log with a diameter of twenty centimeters is attached. Such a log should be processed and made smooth. Metal holders are installed at the ends; for them you need to drill holes five centimeters deep and two in diameter. Washers are mounted in them, and metal bushings are placed in the slots in the frame, so the wood will not crack and the gate will rotate easily. If the roof is supposed to be closed, the frame should be inside it, and vice versa if a hinged roof is used.
- A closed type roof is usually made of a gable roof; for this, a base is made from timber, which is then fixed to the upper crown, and a ridge is installed. The racks serve as a frame for sheathing. Open roofs are also common. The base is mounted on racks; the material used is strong timber.
The procedure for making a closed house
An open house does not provide the well with 100% protection from adverse factors. It is much more efficient to assemble a closed type structure with your own hands. A detailed drawing indicating dimensions and a diagram of the assembled version is shown in the photo:
Frame design
To make the frame you will need timber and boards. As in the case of an open canopy, it is important for the structure to correctly select the dimensions of the main elements. Excessively thin parts will lead to deformation or breakage of the structure above the well as a result of wind loads. A large margin of safety will also be unnecessary, as the structure above the well will turn out to be bulky.
The photo shows a detailed drawing of the roof of the house:
It is optimal to select the following material sizes for work:
- The thickness of the board is 4 cm, the width varies from 120 to 150 mm.
- The section of the beam is 80x100 mm; for heavy roofing, it is better to take 100x100 mm.
- To work, you will need 4 timber supports and 4 boards for the lower and upper trim.
The boards are cut in advance, taking into account the dimensions of the well, and then nailed to the support posts. 100 mm nails are used as fastening elements. The algorithm for making a frame for a well house includes the following steps:
- the first pair of supports is fastened with boards at the top and bottom;
- the second pair of risers are connected in a similar way;
- the blanks are placed around the well;
- The elements of the house frame are connected by strapping.
The photo shows an example of a finished house over a well:
Roof installation
The design of the roof of the house over the well begins with the assembly of roof trusses. They represent a rigid structure onto which the sheathing is subsequently attached. For the rafter legs of the house, boards are taken, the thickness of which is at least 3 cm. The length is selected individually, depending on how high the house above the well you want to get. The next elements of the rafter system are crossbars and jibs; a board thickness of 2.5 to 3.0 cm will be sufficient. The set of elements for the rafter system of the house above the well includes:
- jib - 8 pcs.;
- crossbars – 3 pcs.;
- rafter legs – 6 pcs.
The parts are cut at an angle, the upper ends are connected to each other using self-tapping screws. The crossbars perform the function of additional fixation; they are installed 0.3 m below the point of the upper connection of the rafter legs. The rafters are fastened to the frame using nails 120 mm long.
In order for the well house to have sufficient strength, the rafter system is strengthened with jibs. When the structure is assembled, lathing is carried out. The fastening step of the boards is 15 cm. First, the sheathing is covered with roofing felt, then the finishing roofing is installed. Corner joints are usually covered with boards.
Gate installation
Decorating a house with your own hands above a well necessarily touches on the issue of installing a gate. To make it you will need a round log with a diameter of more than 200 mm.
The size of the gate depends on the distance between the two supports on which it is attached. It is optimal to choose a length that is 4-5 cm shorter. The approximate dimensions of the gate for the house above the well are shown in the drawing:
The main stages of making a gate for a house over a well:
- The required length of the collar is cut.
- After removing the bark from the log, it is carefully cleaned and sanded.
- The edges are covered with steel wire; this measure will preserve the geometry of the log.
- Holes are drilled in the center of the ends to a depth of 50 mm. The diameter is 20 mm.
- On top of the holes, metal plates are installed, on which the corresponding holes have already been prepared. This element will protect the wood from destruction.
- Similar holes are prepared in the supports, at the points where it is planned to fix the gate.
- The areas are covered with metal plates with holes.
- Metal bushings are inserted into the holes on the supports.
- The ends of the logs are equipped with metal rods. For the left part, a length of 200 mm is sufficient, the right element is represented by the letter “G”.
- Finally, the gate is hung on the posts.