Advantages of wall panels
A few decades ago, kitchen decoration was limited to painting walls, ceilings and whitewashing the ceiling. Modern finishing materials are much more aesthetically pleasing, durable, practical and easier to install.
The popularity of wall panels is only increasing every day, and this is due to the following advantages:
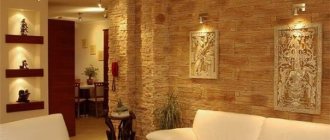
- The functionality of the material is not limited to simply protecting the wall covering from contamination. The stoves have a noise-reducing effect, are easy to clean and are installed not only in the kitchen. Such materials are often used to decorate office rooms, showrooms, shops and living rooms.
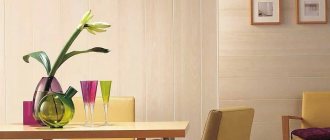
- A variety of colors allows you to choose the ideal design for almost any interior.
- Thanks to a special installation method, electrical wiring is hidden behind them, lighting and additional power sources are built in. When attaching the wall panel, a small gap remains in which the wires are hidden. But this does not apply to the installation of transparent slabs.
- Ease of installation makes it possible to save on paying for the work of professionals and do everything yourself. The easiest way to attach slabs does not involve leveling the walls or removing the old finish: all imperfections are hidden behind the new slab.
- Ease of maintenance makes wall panels practical and easy to use. After each cooking, it is enough to wipe the surface of the walls with a clean cloth or damp sponge. For more contamination, a regular glass cleaner will help.
- Saving money. Finishing with inexpensive plastic panels will cost less than decorating with conventional tiles.
Installation of wall panels for the kitchen is possible in different ways. The installation option will directly depend on the characteristics of the room, the characteristics of the rough surface and the choice of material for the panels themselves. They are made of plastic, chipboard, glass, stone, fiberboard and other materials.
Material selection
A beautifully designed and practical kitchen is the dream of every housewife. The materials for its finishing, or rather, their choice, will depend not only on personal preferences. The purpose of the selected panels is no less important.
Important! The main criterion for choosing a material is its resistance to humidity and high temperature, mechanical stress and cleaning agents.
Wall panels are made from various materials, differing in texture, design, performance characteristics, cost and installation method. The modern market of construction and finishing materials offers:
- Plastic panels . They have a wide selection of colors, sizes and textures. They are extremely easy to install and operate, are not afraid of moisture and are easy to clean. A flaw is considered to be a fragile surface that is easily susceptible to all kinds of mechanical damage. Such panels should not be mounted above the worktop or near the stove.
- Plastic mosaic tiles for the kitchen are the same PVC panels, only with a changed texture. The surface of this finish is stylized as a mosaic and has small figured compartments separated by pseudo-seams.
- Laminated MDF boards are relatively practical and inexpensive. The panels look presentable, are not afraid of moisture, are durable and easy to maintain. For the kitchen, in order to protect the walls from dampness and mold, it is recommended to use slabs laminated on both sides. The only disadvantage of such panels is that they are afraid of strong heating.
- Laminated plywood differs from MDF in its characteristics. This is a waterproof material, covered on all sides with a protective plastic layer. It is easy to clean and durable. Disadvantages of the surface include intolerance to open flame.
- An apron made of tempered glass is the most expensive, but also durable. The material is not afraid of abrasive cleaning, moisture, dampness or heat. The glass apron looks very impressive, but does not provide the opportunity to hide electrical wiring or other communications behind the stove. The material is environmentally friendly and easy to care for.
- Artificial stone is more expensive than tempered glass. The material is very durable, not afraid of moisture and flame. The finish will last for several decades. The material is environmentally friendly, is not afraid of household chemicals, and is easy to use and clean.
When choosing panels for use in a kitchen, take into account the characteristics of the room, as well as the frequency of its use. For example, if in a family the kitchen is only sometimes used for cooking, inexpensive finishing will be quite enough. If the kitchen is used every day, it is better not to skimp on finishing materials.
When choosing a practical apron for the kitchen, do not forget to consider:
- high levels of kitchen humidity and temperature changes;
- greasy coating on all surfaces, which is inevitable;
- cleaning with abrasive substances and mechanical materials.
Requirements for panels for finishing walls and kitchen splashbacks
The main function of an apron is protective. Many different processes are constantly taking place on the kitchen surface. Frequent use of any type of slab leads to the wall gradually beginning to collapse. Elevated temperatures have a detrimental effect on plaster.
Moisture also has a rather negative effect on the wall surface. This is, in fact, the most dangerous factor. Based on this, several basic requirements for panels should be highlighted:
- the material must not allow moisture to pass through;
- the surface of the panels must be of sufficient quality so that it can be washed using any cleaning agents;
- the material should not change its appearance and characteristics under various mechanical influences;
- panels must maintain their functionality during sudden temperature changes;
- the appearance of products made from various types of materials should match the design of the kitchen as harmoniously as possible.
How to install in the kitchen: preparation stage
After choosing the material, you can begin preparing the room and the necessary equipment.
To install you will need:
- yardstick;
- chop cord;
- any writing object;
- building level;
- jigsaw, grinder or scissors;
- electric drill,
- mallet,
- screwdriver
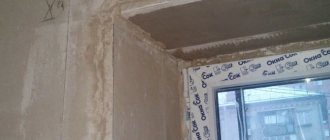
The presence of a laser level replaces the need for a chop cord and a building level. The materials for fastening the panels will require aluminum guides, “quick installation”, self-tapping screws and a plinth plug. Silicone or other sealant and liquid nails will be needed as an adhesive composition.
Preparing the walls:
- You need to make room for work. Remove anything from the countertop that will interfere with installation. Move the kitchen unit aside and, if necessary, remove the upper modules.
- Clean the surface of the walls from dirt.
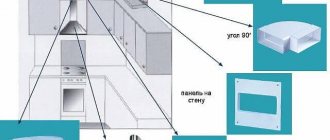
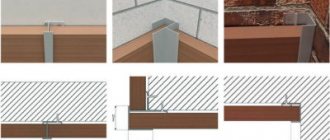
- Mark the walls for future sheathing. The frame for the wall panels consists of strips with jumpers packed around the perimeter of the apron. When marking, it is important to take into account the height of the apron (depending on the selected panels) and the distance from the floor. The jumpers are generally attached at a distance of half a meter from each other, but this also depends on the thickness and practicality of the chosen material. The thinner the panels are chosen, the more often the sheathing is attached.
The number of profile guides will depend on the size of the future apron and the frequency of the sheathing.
For your information. If you decide to glue the panels directly to the wall, bypassing the installation of the sheathing, first clean them of the old finish and level them with putty mixtures.
To install any translucent panels, you only need a rough finish, smooth walls, a hammer drill and mounting bolts.
Installation with glue
Before sticking plastic panels to the wall, make sure the surface is level. If the wall is uneven during installation, careless pressure may cause the panel to break.
Installation steps:
- Measure the wall fragments that you plan to cover with plastic.
- According to the measurements, cut off the required parts of the apron for further fastening. Depending on the thickness of the plastic, a jigsaw, grinder or regular scissors are used for cutting.
- Apply the adhesive composition first to the wall, then to the panel itself. Distribute the composition in an even layer so that no cavities form when attaching the panel.
- To glue the panel to the wall, be guided by the marked height and check the evenness of the installation with a building level. If the panel moves, carefully straighten it with a mallet.
- Using the same mallet, beat the panel over the entire mounting area to eliminate possible unevenness.
- Treat the panel joints with silicone and install plugs. The plinth is glued directly after installing the tabletop.
If it is not possible to level the walls or you need temporary finishing of the kitchen apron, there is an alternative installation option.
Installing an apron on the frame
If leveling the walls is not included in the plans, fasten the panels to a frame base.
Advantages of lathing:
- the ability to hide uneven walls, old finishing and wiring;
- speed of panel installation.
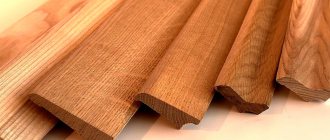
The disadvantage of this method of fastening is that the width of the sheathing takes up kitchen space. If wooden planks are used instead of an aluminum profile, they are treated with wood antiseptics before attaching them.
Frame installation steps:
- Cut the sheathing elements according to the markings made. Wooden slats are cut with a hacksaw or jigsaw; for an aluminum profile it is better to take a grinder.
- Attach the perimeter strips to the walls, according to the level and markings. To do this, a hole is made in the wall with a drill or hammer drill, and a quick installation is driven through it. When installing the sheathing, do not forget to check not only the horizon, but also the vertical and diagonal.
- Before attaching the vertical jumpers, it is necessary to align them in one plane using a thread stretched across the sheathing. If the frame elements are in different planes, the panel will lie crooked.
Advice. Do not skimp on fasteners when installing the sheathing. This is a key stage of the design; the reliability of the entire apron depends on its strength.
Cut the canvas according to the measurements. The panels are fastened in stages:
- The fragment is placed in the correct position and fixed. To secure the apron elements, use special fasteners, a stapler or self-tapping screws.
- If the apron consists of stacked panels, insert the next element into the special groove of the previous one and secure it.
- The corners of the panels are carefully cut off.
- After installing all the elements, treat the corners and ends with sealant, and attach the plastic corners.
After completing the work, put the kitchen set in place and attach the baseboard to the work surface.
Options for work wall
Plain
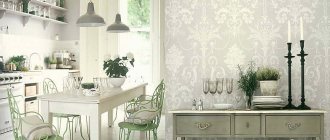
MDF aprons are incredibly varied in their color scheme. Single-color options are produced in a wide range and are suitable for both light and black interiors, bright and pastel, matte and glossy. You can choose a panel that exactly matches the kitchen unit, opt for a contrasting solution, or purchase an apron that is just 1-2 shades lighter/darker than the existing furniture. Read our tips on how to choose an apron for a white kitchen at this link.
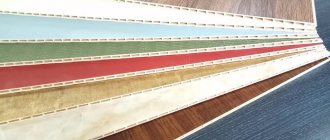
Colored
A one-color solution is not for you? Pay attention to the colored aprons. Panels with imitation wood, cork, stone, parquet boards, ceramic tiles... The range is limitless
At the same time, there is no point in choosing a panel according to the principle “dark colors show less dirt,” because the MDF surface of any shade can be easily washed with water.
Photo printing or artistic drawing
This option is suitable for connoisseurs of non-standard solutions. A real painting will appear in the kitchen area, a canvas that will become a bright accent. You can choose panels with floral patterns, panoramas of metropolises, still life, picturesque landscapes of mountainous areas, or one of hundreds of thousands of other options. Read how to choose an apron for a white kitchen with a black countertop in this material.
For an interior decorated in red and black shades, a Japanese-style panel, options with imitation animal skins, black and white panels, white panels with large photographs of red berries, etc. would be acceptable.
For a kitchen in soft colors and with floral wallpaper, panels depicting fruits, a spring meadow, and bright butterflies would be appropriate.