To install high-quality ceiling cladding, you will need to make a full calculation of the Armstrong ceiling. Despite the outwardly simple design, the frame turns out to be quite sensitive to the appearance of deflections of the supporting profile, slipping of slabs or breakage of suspensions. Therefore, it is better not to take risks and, at a minimum, calculate the Armstrong-type ceiling according to basic conditions.
Armstrong ceiling device
The entire system consists of a metal profile lathing suspended from the ceiling slab using customizable hooks. The sheathing cells are filled with slabs or lamps, and their arrangement can be combined and changed at any time.
Suspension system PRELUDE 24 Armstrong
Bioguard hygienic ceilings
Mineral modular ceilings Armstrong
Cassette aluminum suspended ceiling
The sheathing consists of several types of profiles.
- Wall corner . Attached to the wall around the perimeter of the room, it serves as a load-bearing and decorative element.
- Main guide . It rests on a wall corner and hangers, has a length of 370 cm, is usually installed across the room and takes on the main load.
- Cross guide . There are two types of them, 120 cm and 60 cm long. Those that are longer are installed between the main guides, and the short ones are installed between them, i.e., long transverse ones.
Thus, a lattice is obtained with cells in the form of squares with a side of 60 cm. All connections are made using latches, with which the profile is equipped in advance.
Installation of suspended ceilings Armstrong
Hanging hooks are attached to the ceiling using dowels and screws above the attachment points to the main rails. Decorative panels or lamps are inserted into the resulting frames from the inside.
Armstrong ceiling prices
Armstrong ceiling
Types of Armstrong ceiling edges
The assembly process consists of installing a wall corner around the perimeter of the room at the desired height, installing the main guides while simultaneously attaching hanging hooks above them. A gap of 120 cm is maintained between the main guides for the installation of long crossbars, the distance between which is 60 cm. Installation is carried out gradually, the installation of each subsequent main guide is immediately accompanied by the connection of the crossbars. After the sheathing is completely assembled, lamps and decorative panels are installed.
Stages of installation of Armstrong suspended ceiling
Choice of ceiling material Armstrong. Economy class slabs OASIS
What's Included in Design Planning?
To manufacture the frame, you will need to calculate the components for the Armstrong ceiling, namely, find out their exact number for the suspension system of a room of a certain shape and size. Therefore, the initial data will always be:
- Accurately measured area of the room at the level of the future frame;
- The perimeter of the walls is at the height of the ceiling installation.
The same data will need to be entered when calculating the Armstrong suspended ceiling using a software calculator. This is convenient if it is not possible to calculate manually, or you need to check the calculation result. Sometimes the machine requires a wall length of, for example, 3x4 m; in this case, in addition to calculations, the program also offers a graphic diagram for fastening the parts of the ceiling system.
Advice! Most customers prefer to check the calculation of the total consumption of materials made by the manager of the construction showroom with their own calculations made manually on a piece of paper or a small program on their phone.
As a result, with any calculation method it is necessary to obtain information about the quantity:
- Guide or supporting profiles, total length or number of pieces of standard length 3.7 m;
- The number of wall corner rulers is 3 m each;
- Pieces of Armstrong decorative panels;
- Information about ceiling suspension points;
- Information about the transverse profile, the number of pieces of 0.6 m and 1.2 m.
It is clear that by entrusting the calculation of components for the ceiling to Armstrong, the customer always runs the risk of getting inflated results and buying items that are completely unnecessary for himself.
Another solution to the problem is not to make an exact calculation of the required number of components, but to purchase several sets of parts. The manufacturer did all the necessary work. The consumer can simply calculate the number of sets, knowing the consumption of materials per 1 m2 for the Armstrong ceiling.
Hanging systems from the company YU-MET
YU-MET is one of the largest Russian manufacturers of lightweight metal structures, metal profiles for gypsum boards, fastening systems, ventilated facades under the Primet brand.
The Yu-MET company produces components for TM Primet suspension systems that comply with the TU5285-003-79227238-2006 standard, and guarantees that the materials, structural and quality characteristics comply with the prescribed standards.
The Yu-MET company offers suspension systems and components for Armstrong-type ceilings:
- Primet metal cassettes with and without perforation;
- ceiling tiles;
- wall corner;
- Euro suspension;
- Armstrong LED ceiling lights;
- T-profile.
Armstrong type ceiling suspension systems
For successful installation of the suspension system, it is important to correctly calculate the Armstrong ceiling.
A suspension system is a set of profiles for forming the cells of a suspended ceiling frame. Armstrong suspended ceilings are popular due to their versatility, low price and ease of installation.
Armstrong ceilings are currently chosen for most office and public spaces.
Suspended ceilings of the Armstrong system consist of a metal profile and pressed mineral slabs. The visible part of the metal frame is a distinctive feature of Armstrong suspended ceilings and a design element.
Mineral slabs come in square and rectangular shapes.
The installation and calculation of suspension systems from almost all manufacturers represented on the Russian market is identical.
Standard sizes
As already noted, the most commonly used square cell is 60 by 60 cm. However, there are other filling options, for example, rectangular decorative panels 120 by 60 cm. This option is achieved by eliminating the 60 cm transverse guides. This method is rarely used, as how the strength in this case decreases, and the decorative panel, picking up moisture from the atmosphere, can begin to sag under its own weight.
Suspended ceiling Armstrong: technical characteristics
The material for decorative panels is most often stone wool, which, despite all its positive qualities, reacts poorly to high air humidity. The problem can be solved by using panels made of other materials (MDF, glass, mirrors, etc.) that are little susceptible to moisture. You can use a combined system that includes both square and rectangular cells with different decorative panels. Aesthetically, this method is very attractive and allows you to find a lot of design options.
Ceiling prices "OASIS"
ceiling "OASIS"
Permissible loads for frame elements under Armstrong ceilings
Dimensions of main elements
The most common size of decorative inserts is 60x60 cm. Rectangular decorative panels 120x60 cm are less common. In this case, transverse guides of 60 cm are removed from the sheathing structure. Considering the effect of reducing the overall strength of the system, this option is rarely used. In addition, such extensive inserts, when absorbing moisture from the surrounding space, begin to deform under their own weight.
Decorative panels are made from mineral wool. It has many good qualities, but has little resistance to high humidity. In such cases, you can use more moisture-resistant materials to create panels (MDF, glass, mirror, etc.). There are also combined solutions consisting of both square and rectangular inserts. Such design options are characterized by visual appeal and great potential for the implementation of various design ideas. In general, the characteristics of ceiling panels with Armstrong components are quite diverse, which allows you to complete the necessary set of materials for a specific project.
Scheme for calculating the number of Armstrong guide profiles required for installation
To determine how many guides you will need, you need to divide the area of the room by the length of the profile you will use, and multiply the result by a coefficient depending on the length of the profile. This coefficient is 0.8 for a profile with a length of 3.66 meters and 1.55 for a profile with a length of 1.22 meters.
Number of components, including Armstrong guide profiles, required for installation
Calculation example. In the same room with an area of 44.82 m2, we will determine the quantity of a profile with a length of 3.66 meters: (0.8 * 44.82) / 3.66 = 9.79, that is, you need to buy 10 pieces.
How to independently calculate a suspended ceiling
The simplest thing is to count the number of ceiling tiles. A standard square slab has dimensions of 60x60 cm. This means that to calculate the number of slabs, you need to divide the ceiling area by 0.36 sq.m.
It is recommended to buy slabs with a small margin. In case of accidental damage to the plate, immediately replace it with another one.
Then you need to calculate the number of wall profiles. To do this, the perimeter of the room must be divided by the length of the profile. Round the result up.
How to calculate the number of supporting profiles? To calculate the number of profiles in a row, you need to divide the width of the room by the size of the profile. If you divide the length of the ceiling by the step of fixing the supporting profile and round up, you will get the number of rows.
Then we multiply the number of profiles in a row by the number of rows and get the required number of supporting profiles.
To calculate the longitudinal profile, the length of the ceiling is divided by the length of the profile and rounded up, and the width is divided by the installation step equal to 0.6 meters and rounded down. Then the two resulting numbers are multiplied.
We calculate the amount of transverse profile. Divide the length of the room by 1.2 meters and round down. Then divide the width by the length of the profile and round up. Multiply both numbers.
You also need to find out the required number of hangers. To do this, the sides of the room are divided into 1.2 m (installation pitch). Then both results need to be rounded up and multiplied.
How to calculate the required number of elements
The easiest way is to calculate the length of the wall corner. To do this, you need to sum up the entire length of the walls at the place where the element is attached, the entire perimeter, including beams, protruding parts of the walls, niches, etc. Divide the resulting amount by the standard length of the corner - usually 3 m - and round up to get a whole number. That is, if the perimeter of the room is 40 m, then the number of corners will be 40: 3 = 13.3333... Rounding, we get 14 corners.
To calculate the number of main and transverse guide elements, you should make a drawing that will show the location of the ceiling elements.
Armstrong ceiling design diagram
Most often, it turns out that the ceiling area does not allow the use of a whole number of cells, leaving surpluses. Ideally, all elements should be arranged across the ceiling area in such a way that smaller cells are located evenly around the entire perimeter. In practice, it often turns out that the remainder is too small to divide into two parts, and you just have to place the cut panels on one side of the room.
Ceiling frame prices
ceiling frame
The ceiling area in the diagram should be divided into squares of 60 by 60 cm (to scale). The number of squares, including incomplete parts, is the number of decorative panels and lamps.
Using the same diagram, we count the number of main guides. They are usually located across the room, perpendicular to the long wall. The first row is ideally installed 60 cm from the adjacent wall, the next - 120 cm from the first, etc. In practice, the length of the room is almost always not divided into the required number of segments, so they try to place the elements symmetrically, or, if the remainder is too small, from the side that is less conspicuous.
Calculation of the quantity of materials
If the width of the room is greater than the standard length of the main guides (i.e. 3.7 m), then they are joined in length using locks, and the excess is cut off with metal scissors. In this case, the number of main guides increases as many times as the number of elements that need to be joined. For example, if the room width is 5.8 m, you will need to connect two main guides. If the length of the room is 10 m, then you will need 9 rows of main guides or 18 standard elements.
Next, you should count the transverse guides, first the longer ones, then the short ones, if they are used.
Important! Any element that requires cutting to length is counted as a whole.
We calculate according to the sketch of the suspension system
We take the first diagram to calculate the ceiling. First of all, we draw the thickest guide profiles in increments of 60 cm; they are blue in the diagram. Knowing the length of the room and the number of beams that fit on the diagram, we obtain linear meters of the base profile.
Next, in the transverse direction to the blue beams, we will add crossbars 120 cm long in green. All necessary information on the distance from the walls can be taken from the assembly drawing of the ceiling system manufacturer.
We simply measure the length of the drawn profiles with a ruler and convert them into standard segments of 120 cm. Small crossbars of 0.6 m are calculated in a similar way. The total length of the wall or starting corner is taken equal to the perimeter of the room.
The situation with decorative panels is a little more complicated. To calculate the required quantity, we divide the length in meters of each of the two conjugate sides of the room by 0.6, multiply between each other and get the theoretical value of the required number of pieces of decorative slabs required for laying the Armstrong suspended ceiling.
For example, to calculate a room measuring 6x3 m, we divide the side 6:0.6=10 pieces, the second wall 3:0.6=5 pieces. As a result, it turns out that the suspension system will require 50 slabs.
Important! If the room has incorrect proportions, for example, in the form of a trapezoid, then the panels are calculated according to the dimensions of the rectangle formed by the large base and the height of the figure.
Useful tips for installing suspended ceilings Grilyato
To ensure that the ceiling looks beautiful and lasts a long time, trust the work to specialists. Installation of the profile requires professionalism, since the quality of the entire structure depends on the frame. The craftsmen will calculate the ceiling in such a way as to avoid cutting the ceiling tiles as much as possible, as this spoils the appearance, and will also set the lighting correctly. Another important detail is that it is advisable to wear clean gloves when installing ceiling tiles and lamps so as not to leave dirty marks on the surface.
Other calculation methods
If you cannot create a drawing or some reason interferes, then you can calculate the number of elements in another, fairly simple way. First, the ceiling area is calculated. Next, it is multiplied by a certain coefficient, and the resulting value is rounded to a whole number. For each element of the suspension system, its own coefficient is used.
Formula for calculating the area of a rectangular ceiling
An example of calculating the ceiling area in an irregularly shaped room
Table. Coefficients for different elements of the Armstrong suspension system.
| Element | Coefficient value |
| Decorative plate | 2,78 |
| Main guide profile | 0,23 |
| Cross profiles (120 and 60 cm) | 1.4 |
| Suspensions | 0,7 |
For example, if the area is 96 sq m, then you will need 96×2.78=266.88≈277 pcs. decorative slabs.
96×0.23=22.08≈23 pcs. main guides.
96×1.4=134.4≈135 pcs. crossbars
96×0.7=67.2≈68 pcs. suspensions.
In addition, there are online calculators for calculating the number of Armstrong elements. Using such calculators saves time, but the accuracy of the calculations often leaves much to be desired. For greater reliability, you can try to use several calculators and take the average value as a basis, but experts definitely advise calculating yourself according to the scheme.
Armstrong ceiling manual calculation method
There are two ways to calculate the main positions of the suspension system, as they say, “on the knee”:
- Graphic construction of an exact diagram of the future ceiling system;
- Perform calculations based on the simplest dependencies that were determined by manufacturers when designing the load-bearing capacity of the ceiling.
Of course, none of the cladding builders uses higher mathematics, so most formulas have a structure at the 5th grade level of high school. They are easy to remember and use when calculating the detailing of a suspended structure.
Options for calculating the cost of your ceiling with installation
| Blade type | Width | Equipment | Price | Order |
| Pongs matte color | 2.2 m canvas width |
| from 250 rub. | Order |
| Pongs glossy color | 2 m canvas width |
| from 250 rub. | Order |
| Pongs glossy color | 1.43 m canvas width |
| from 250 rub. | Order |
| MSD satin color | 5.5 m canvas width |
| from 620 rub. | Order |
| MSD satin white | 5.5 m canvas width |
| from 570 rub. | Order |
| MSD satin color | 3.6 m canvas width |
| from 560 rub. | Order |
| MSD satin white | 3.6 m canvas width |
| from 510 rub. | Order |
| MSD satin white | 2 m canvas width |
| from 410 rub. | Order |
| MSD glossy color | 5.5 m canvas width |
| from 650 rub. | Order |
| MSD glossy white | 5.5 m canvas width |
| from 600 rub. | Order |
| MSD glossy color | 3.6 m canvas width |
| from 580 rub. | Order |
| MSD glossy white | 3.6 m canvas width |
| from 530 rub. | Order |
| MSD glossy white | 2 m canvas width |
| from 430 rub. | Order |
| MSD matte white | 2.2 m canvas width |
| from 450 rub. | Order |
| MSD matte color | 3.6 m canvas width |
| from 550 rub. | Order |
| MSD matte white | 3.6 m canvas width |
| from 500 rub. | Order |
| MSD matte color | 5.5 m canvas width |
| from 650 rub. | Order |
| MSD matte white | 5.5 m canvas width |
| from 550 rub. | Order |
Calculation of lamps
The number of lamps can be changed at any time, but it is better if you count them immediately and do not carry out any work subsequently. Moreover, if you change the number or location of lamps, you will have to change the wiring, which may require a lot of labor.
There is an average proportion of the number of lamps - one per 5 square meters. meters. Such a calculation can only be taken as a basis, since it operates on the principle of necessary sufficiency. When calculating the ceiling, Armstrong has to take into account not only the number, but also the location of the lamps, which may be even more important. If you are designing an office space, then the light sources should be positioned as conveniently as possible for employees; in retail areas, uniformity of lighting is important. The aesthetic component is no less important: lamps collected in one place look ridiculous.
Materials for determining illuminance values
Materials for determining illumination values (second part)
Reflectance coefficients of different surfaces
In practice, they approach the issue from the standpoint of average values, namely, they calculate the required number of lamps by area and arrange them symmetrically in such a way as to illuminate the entire area of the room as evenly as possible. This method works no worse than any other, and saves a lot of time.
An example of calculating lamps for a suspended ceiling Armstrong
Bottom line
Regardless of the method used to calculate Armstrong ceilings, each of the structural elements must be taken with a reserve. The fact is that during the construction process, errors or shortcomings are always possible, leading to damage to individual parts. It should also be understood that all of the above methods for calculating ceilings and suspended ceilings cannot provide an absolutely accurate result. They do not take into account possible errors, ongoing project adjustments and other unforeseen situations. As experienced installers recommend, the necessary component materials must be purchased with a certain reserve. This will make it possible not to be distracted during work by purchasing missing materials for the Armstrong ceiling, fully concentrating on installing the system.
Preparing tools
To install an Armstrong-type suspended ceiling you will need:
- laser level or hydraulic level;
- rule (can be replaced with a straight rod);
- roulette;
- pencil;
- painting cord;
- drill or hammer drill;
- pliers;
- hammer;
- screwdriver or screwdriver;
- metal scissors;
- square;
- construction knife;
- ladder.
Ventilation
Typically, ventilation pipes are installed in parallel with the installation of the ceiling sheathing, since later work with the finished sheathing is more difficult. Most often, ready-made ventilation grilles are used, which are inserted into the cells in the same way as decorative plates and are made to the same dimensions. Therefore, the presence of any mechanical connection between the Armstrong ceiling and the ventilation system is not required; the grilles ensure the free movement of air from the room to the interceiling space and vice versa, which guarantees the normal operation of the ventilation systems.
From the point of view of calculating the number of such grilles, one should proceed from the volume of the room and the type of ventilation ducts. If there is a supply of ventilation ducts directly to the ceiling surface, round grilles are used, the number of which corresponds to the number of ducts.
Prices for recessed lamps
recessed lamp
Ceiling ventilation grilles Armstrong
Installation technology
Installation is quite simple; even a non-professional can handle it on his own. Let us consider step by step the technology for installing Armstrong ceilings with cells of a standard size of 600x600 mm.
Marking
First of all, using a laser level, determine the lowest point of the ceiling. From it the distance to future slabs is measured (minimum offset 100 mm, recommended 200-250 mm). At this level, mark the corners and use a paint cord to connect them with a line around the perimeter of the room. This is how the mounting location for the wall molding and the installation height of the supporting profile are obtained.
Then they move on to marking the ceiling surface. The middle is found by crossing the diagonals. Perpendiculars are drawn from it to the walls and lines are marked in accordance with the diagram.
Frame assembly
Wall moldings are installed along the perimeter of the room. Fasteners are selected depending on the material of the walls. In the corners, the profile is cut with metal scissors and joined at an angle of 45 degrees. This will not affect the strength of the structure, since the wall corner does not bear the load.
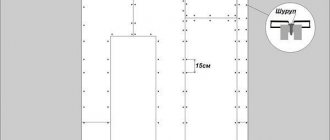
After this, hangers are installed along the lines on the ceiling according to the assembly diagram. The maximum step is 1.2 m, and the distance from the walls is 0.6 m. The suspensions are attached to the concrete ceiling through anchor bolts or dowels, having previously drilled holes. For wooden ones, use self-tapping screws.
Important! The cells where the lamps will be located need to be strengthened: additional hangers are placed in the corners.
After this, the load-bearing part of the frame is assembled. The profiles are hung on hangers by inserting the hook into the hole on the rail. The assembled frame must be located in the same plane. This is achieved using a building level or a rope stretched across the entire room. The height is adjusted by changing the length of the suspension.
The ends of the supporting rails rest against the wall molding. If the profile length is not enough, it is extended using a lock along the edges. If necessary, the slats are trimmed.
Then, in increments of 60 cm, long transverse profiles are installed, they are laid across the load-bearing ones, inserting the lock into the fastening slot. After this, short slats are attached between them, which form square frame cells.
Installation of lamps and ventilation
Electricians carry out the wiring before laying the slabs. The lamp is raised to the ceiling and connected to the network. Then they are carefully placed in the cell.
For ventilation, a split system is pre-installed (usually in an inconspicuous corner). The grid is inserted into the cell and attached to the block body.
Laying slabs
The panel is placed behind the profiles, turned diagonally. Then they are turned and placed on the guides. If the frame is mounted correctly, the slab fits easily and does not require any effort for installation.
The end slabs often have to be trimmed. This is done with a construction knife along a ruler. Cut only from the front side.
2.83Mb, pdf
Armstrong calculator: a convenient electronic program for calculating materials
Armstrong suspended ceilings were developed by an American company with the same name and quickly gained great popularity among buyers due to their presentable appearance.
The main advantage of the Armstrong ceiling is the ease of installation, a wide selection of color palettes and the ability to give the tiles any color by painting. It is characterized by excellent heat and sound insulation and a high fire safety category.
Having chosen a suspended ceiling to decorate an office, retail or other premises, it becomes necessary to calculate the number of necessary components. For this purpose, a calculation tool has been created - the Armstrong online calculator. He will calculate not only the number of selected materials, but also the final cost of the ceiling. To do this, you need to know the overall dimensions of the ceiling and select the required number of lamps.
Instructions for the Armstrong calculator:
- Enter the width and length of the room in which you plan to install the suspended ceiling;
- Select the decorative slab you need from the ceiling catalogue;
- Determine a suitable hanging system;
- Set the length of the hanger;
- Select the type and number of lamps.
By clicking the “Calculate” button, you will receive a table with the required number of components, prices for each unit and the total cost of materials for the entire scope of work.
Calculation of materials for Armstrong suspended ceiling on the website
Having chosen a suspended ceiling to decorate an office or other room, everyone is faced with a problem - how to calculate the number of required components or how to calculate the Armstrong ceiling?
Armstrong suspended ceiling calculations, as you know, are performed according to the standard formula. For your convenience, we have created a tool for calculating Armstrong suspended ceilings online on our website. To calculate materials for a suspended ceiling on our website, you need to know the area of the ceiling.
Material consumption for the construction of the Armstrong suspension system per 1 sq.m of ceiling
To calculate the Armstrong ceiling, use our calculator - it’s convenient!
The form on the website in the Services section - Calculation of the required quantity makes an approximate calculation of the ceiling without taking into account doorways and windows. For an accurate calculation, you need to contact the manager.
Calculation of the diagonal arrangement of elements
In some cases, a design solution such as a diagonal arrangement of the system is used. With this method, all hanging elements are perpendicular to each other and only positioned at an angle of 45° relative to the wall corner. The number of elements with this arrangement can only be calculated using a diagram made on a scale that allows for a more or less accurate calculation of the length of the elements. This mainly applies to guides and hangers, since the number of wall corners is calculated in the usual way.
Armstrong ceiling with diagonal arrangement of elements
Important! With any calculation method, you should have a small supply of parts in case of an error, careless cutting or damage for some other reason.
In conclusion, it should be noted that any calculation method is quite approximate, since it does not take into account possible errors, changes to the project along the way, or other accidents. Practice shows the need to purchase structural elements with some reserve, which very often helps out when any difficulties arise. Otherwise, calculating and installing the Armstrong ceiling is a completely affordable undertaking that you can do yourself.
Suspended ceiling Armstrong: technical characteristics
You can find a detailed article on this topic here!
We also recommend reading about slatted suspended ceilings in the bathroom.
Required number of hangers
Calculation of the required number of hangers is carried out using a compass. Since hanging fasteners are mounted only to 120 cm beams, it is necessary to mark 120 cm in scale on the turn of the compass and mark the fasteners with dots in a checkerboard pattern. We obtain the volume or pieces by recalculation.
The most important element of the calculation is the need to determine the number of Armstrong ceiling hangers per m2. For what? To make sure the fastening is secure. There are certain safety standards that determine the maximum load on the suspension in squares and the weight of the structure. The mere fact that the weight of m2 can vary between 2.5-8 kg imposes certain restrictions on the minimum number of suspension points.
After the total length of the profiles has been calculated, the total mass of all parts of the suspended ceiling structure is determined. It is divided by the number of suspension points. Each type of panel has its own limitations, which can be found in the Armstrong technical specifications. In fact, if you maintain a distance of 120 cm between the fastening points, you are guaranteed not to go beyond the limits.
Manufacturers, as a rule, offer several types of hangers designed for different loads, but master veneerers usually do not go into detail and simply increase the number of fastening points by a factor of 1.2.
Nuances
Of course, not all rooms are ideally suited to these formulas. The length may be different from the size of the guides and may be more than 3.7 meters. In this case, you can use connecting elements, adding the necessary pieces of parts.
However, in this case, a larger number of necessary elements will be required, since the profiles will have to be cut into shorter ones. Therefore, you need to make a reserve. To the resulting figure you can add 10–15 percent “for scraps.”
The assembly will take place without any unpleasant surprises if you thoroughly prepare for it in advance. Such preparation must necessarily include an accurate, rather than approximate, calculation of all the necessary components.