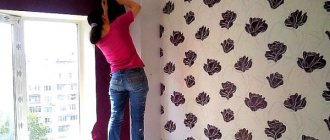
Types of skirting boards and secrets of their installation
Decorative strips can be purchased at a hardware store and are made from wood, plastic or MDF.
Wooden plinth
Wooden design is well suited to any floor finishing material, but due to its high cost, it is most often used for finishing parquet or parquet flooring. Skirting boards can be found both ordinary domestic ones made of oak, larch, alder, and those meeting European standards, with special niches for laying cables.
Skirting boards are made from various types of wood.
It is worth remembering that you should not install wooden skirting boards on uneven walls; there is a risk of getting unsightly or even poor-quality work with skirting boards that will not be able to hold on. Before installing the skirting boards, it is necessary to cut the plank to precisely measured dimensions.
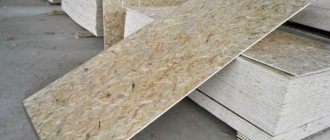
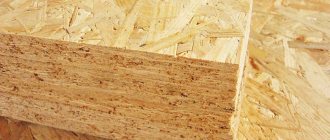
Skirting boards on MDF base
Planks with an MDF base are slats covered with foil, laminated film or veneer. In terms of aesthetic and decorative indicators, they are no worse than materials made from valuable types of wood, but their price compares favorably on the smaller side. MDF is a rather fragile material that can be easily damaged if used incorrectly. That is why MDF floor plinths are mainly attached to the walls using hook-shaped brackets, onto which the slats are then hung.
MDF skirting boards are similar to skirting boards made from valuable types of wood.
To visually design the corners and cuts of the plinth, it comes complete with corners and end caps. This move by the manufacturers allows them to easily dismantle the planks and install them again after the floor repair process.
Plastic skirting board
PVC planks have a high strength index and are not afraid of temperature changes, treatment with water and sunlight. Plastic strips are produced following the example of wooden skirting boards and are ideal for floors covered with laminate, carpet, and linoleum. But at the same time, they look tasteless when installed on parquet.
PVC skirting boards, which are produced for working with carpet and linoleum, are equipped with special grooves to securely fix the edges of the floor covering. Light slats can be attached using liquid nails, which is quite easy and does not require a lot of force. But the disadvantage of this type of fastener is that during future repairs the baseboard will have to be torn off the floor, and the material will be damaged.
Plastic has a huge selection of shades.
The advantages of plastic skirting boards include the presence of internal channels for cables, as well as the ability to use plugs to form a beautiful corner. Also, the plastic plinth does not need to be cut, and an uneven wall will not become an obstacle to installation, because the plastic is quite flexible and will not break when pressed.
Ceiling-mounted on the wall: varieties
To correctly select a suitable cornice, you should familiarize yourself with the variety of this decorative element. The modern market has a huge assortment of baguettes, both in color and size. Skirting boards are selected depending on the design decision and personal preference.
When decorating the ceiling, take into account the height of the room in order to choose the correct width of the cornice.
There are several types of ceiling plinths:
- polystyrene;
- polyvinyl chloride;
- polyurethane;
- wood;
- plaster stucco.
Polystyrene has a pronounced relief, matte, smooth surface. Thanks to him, you can bring various design fantasies to life. The advantages of this baguette include:
- low price;
- beautiful appearance;
- after painting it resembles plaster stucco.
Polyvinyl chloride baseboard is an economical option. It is made in a wide range of colors with patterns or designs. Externally they resemble natural wood or marble. Positive characteristics are considered:
- affordable price;
- huge color palette;
- hygroscopicity;
- ease of fastening.
Polyurethane baguette is durable and flexible, as it is made with the addition of rubber. It is easy to work with in a room where there are curved lines. The following advantages are noted:
- low level of absorbed moisture;
- hygroscopicity;
- resistance to temperature changes.
Used in areas such as swimming pools, showers and bathrooms.
Wooden is a traditional type that is in demand among many buyers, despite the fact that the price is high. The increased demand is due to its excellent properties:
- durability;
- environmental cleanliness;
- aesthetics;
- resistance to damage;
- strength.
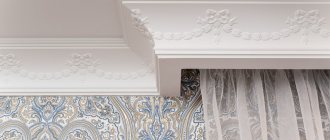
Plaster stucco molding adds individuality, elegance and luxury to the interior. Considering the plasticity of the material, you can use borders for a stretch ceiling. They can be considered works of decorative art. The advantages of gypsum plinths include:
- durability;
- environmental cleanliness;
- outer beauty;
- possibility of individual design.
Features of fastening different types of skirting boards
In general, all existing methods for attaching skirting boards can be divided into two categories - installation by fastening to the floor and installation to walls. You will have to choose depending on the type of baseboard and the design features of the living space.
Features of installing skirting boards made of MDF and wood
Installation of wooden baseboards begins with treating the products themselves with varnish or other means that will protect them from rotting as a result of moisture getting on them. Skirting boards can also be painted after installation. Due to the fact that such a plinth practically does not bend, it is recommended that the bases, that is, both floors and walls, be well leveled with putty before installing it. Wooden plinths are usually attached using self-tapping screws or nails and can be installed either to the wall or to the floor. If necessary, it will be quite difficult to dismantle them without damaging them.
Wooden plinth
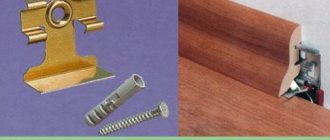
MDF plinths are usually mounted using special brackets (brackets), which are fixed to the walls. And if wooden plinths are simply sawed down for joining in the corners, then special plugs are sold for MDF material. If dismantling is necessary, such skirting boards can be easily removed and then put back in place.
MDF skirting boards
When forming the corners of such skirting boards, all cuts must be thoroughly sanded and treated with an agent that prevents rot and mold. Without certain skills, working with this type of material is quite difficult.
Features of plastic skirting boards
Plastic skirting boards can have a cable channel, or they can be produced without it. If the product has a place for laying wires, it will be covered with a plug. Thanks to this, all communications can be easily removed and repaired if necessary - you just need to remove this very plug. Once the work is completed, the bar is simply put in place and snaps into place.
Plastic skirting board
Installation of plastic plinth
The standard length of plastic skirting boards is 2.5 m, which ensures ease of transportation and installation. The cross-section of the plinth varies from 15 to 25 mm, and its height can vary - from 30 to 150 mm. Most often, products with a profile height of about 50-60 mm are used for installation in an apartment - they are called universal.
Table. Recommended baseboard height.
| Ceiling height, m | Height of plinth, mm |
| Up to 2.5 | Up to 70 |
| Until 3 | 70-90 |
| More than 3 | More than 90 |
Tools and supplies needed to install plastic skirting boards
Advantages of plastic skirting boards
Among the types of skirting boards, plastic is the most popular for many reasons. Polyvinyl chloride is famous for its durability and strength.
The service life of plastic floor planks reaches 100 years. They are resistant to fire and moisture, safe, so they can be installed in any room.
Dimensions and design of plastic skirting boards
Skirting boards are easy to install, cut with a sharp knife, and their cost is not high.
Compared to wood and plaster planks, plastic planks are flexible. They have a huge color palette, which does not limit the choice of color for the interior of the room and allows you to fit into the overall background as much as possible.
An additional advantage is that some models are equipped with a special trench into which the wires are laid.
Return to content
Mounting methods
Depending on the material from which the skirting boards are made, as well as on the type of flooring, there are several ways to install these elements.
They differ from each other both in the method of fastening and in the fasteners used.
Using dowels
In this case, you need to screw the baseboard not to the floor covering, but to the wall. This is due to the fact that many materials used for flooring can expand and contract during use, so if a baseboard is attached to them, it will become deformed.
Most often, these elements are attached to a concrete or brick wall using dowels and screws:
- work begins from the far corner, a hole is made in the wall, a dowel is inserted into it, and then, using a self-tapping screw, the corner element is screwed on;
- First, the elements are attached to the long walls of the room; on level areas, the step between the fastenings should be 50-60 cm; if the walls are uneven, then additional screws are installed in the places of bends;
- also mounted on the opposite wall;
- if it is necessary to install an outer corner, then holes are made in it on both sides;
- existing joints are covered with decorative strips.
Instead of dowels and screws, you can nail the baseboard using nails that are fixed in wooden pins.
For clips
Often plastic skirting boards and strips made of other materials are attached to special fasteners, which allows, if necessary, to quickly and easily dismantle them.
The work is performed in the following sequence:
- in increments of 30-40 cm, special clips are securely attached to the wall; if the surface is uneven, then they are installed more often;
- The bar is inserted into the clips and with a light blow with your fist, it is securely fixed in it.
On glue
Can be installed using glue or liquid nails. This can be done in the case when you do not plan to dismantle these elements, since you will no longer be able to remove them without damage.
Installing skirting boards with glue is only possible if the surface of the walls is perfectly flat, otherwise the elements will not be able to adhere tightly to it.
Glue for baseboards “Instant Grip” or “liquid nails” is applied in drops to the plank in increments of 40-50 cm, after which the element is pressed tightly against the wall, held slightly and a strong fastening is obtained.
Thus, you can attach it directly to the wallpaper, then it will be easier to dismantle it. Using glue, you can install these elements on curved walls, but before that, a leveling strip is fixed to them.
Without splice application
We looked at installation with corner elements, but you can do without them. First, the ends of the planks that are placed in the corner are cut off at an angle of 45 degrees using a miter box, after which they are mounted end-to-end, and the joints are covered with a decorative strip.
Installation of skirting boards with cable duct
In this case, fastenings can be done using one of the described methods, but before starting work, remove the strip covering the cable channel from the baseboard, install it, install the cable and close the strip.
Mounting with fasteners
Currently, when purchasing plastic fillets in a store, they offer additional purchase of mounting fasteners. They greatly simplify the installation of fillets, while the baseboard lies flat and stays firmly in the wall. The fasteners are latches made of plastic or metal, as well as clips. They should be attached to the wall in increments of 50 cm. For reliability, the distance from the corners on each side should be no more than 10 cm.
Clips will allow you to change the baseboard without dismantling the fasteners
Before fixing the baseboard, clips should be installed around the entire perimeter of the room. As a rule, they are attached to a concrete or brick surface using screws and dowels.
The hole is drilled with a hammer drill, then the dowel is driven in with a hammer, and only then the fastener itself is screwed onto the self-tapping screw. After installing all the clips, the baseboard is installed and snapped into place. For all the secrets of editing, watch this useful video:
The advantages of this method include:
- ease of installation;
- reliability of fastening;
- affordable price of clips;
- installation can be performed by anyone. More details about editing in this video:
If gaps form after installation, the cavities can be filled with silicone or transparent sealant. Nowadays, you can easily choose the color to match your floor covering.
Installation using self-tapping screws
Dowels with self-tapping screws are inserted into the drilled hole.
People often ask the question: “How to attach a baseboard to a concrete wall?” There are many proven methods for installation. But before work, you should prepare the workplace; you need to remove excess plaster, pieces of wallpaper, and protruding elements from the wall surface. If there are small differences in the plane of the wall, then it is better to fill them with putty solution. Only after this work begins on installing the plinth.
To attach skirting boards to the wall, you will need the following tools: a hammer, a hammer drill, a hacksaw, self-tapping screws, dowels, a pencil, and a tape measure. This method of fastening is the simplest; the skirting boards are screwed to the wall using self-tapping screws into pre-prepared holes.
Installation of the baseboard to the wall should begin from the corner of the doorway along the entire perimeter of the room. At the junction of adjacent walls, it is necessary to install a connecting corner into which PVC slats are inserted on both sides. If the panels need to be cut to the required size, then a hacksaw is used for this. With it you can quickly and efficiently cut the product.
The finished structure of two slats and a corner is applied to the surface. If it lies across the entire plane without gaps, then it is attached to the wall with self-tapping screws. To do this, drill holes of the required diameter in the rail. Markings are recorded on the brick surface with a pencil.
Using a hammer drill, holes of the required depth are drilled in increments of no more than 50 cm. After this, you need to place dowels in all the holes, which should be driven in with a hammer.
After this, the structure is pressed against the wall so that the holes of the baseboards and the wall coincide, and the lower edge bends slightly outward. Only after this are the screws screwed into the dowel.
Fixing the screws along the edges of the plinth, insert the plug
Before fixing the screws along the edges of the fillets, it is important to insert a plug or connector onto the rail. Place communications or wires only after securing the baseboard to the wall. Place communications or wires only after securing the plinth to the wall
Place communications or wires only after securing the baseboard to the wall.
Then the masking strip must be snapped into the baseboard itself. They begin to secure it from the edges, gradually approaching the middle.
Conclusion
Knowing how to fasten different skirting boards to a concrete wall in different ways - using self-tapping screws, glue and clips, you will be able to do this work yourself. The installation procedure of the panels is not difficult, but, as with any work, attention and skills are required.
Having different options for fastening panels, it will be easier to choose the most suitable option for the final stage of floor finishing. Only careful preparation and the correct method of fastening guarantee quick installation, and the purchase of additional material to redo the work is eliminated.
Fastening veneered and wooden products
Natural wood plinths look noble; they look natural with coverings made of any material, but due to their high cost they are more often used when decorating parquet floors.
MDF models look like wood, as they are covered with natural veneer, but are slightly cheaper. Such slats are attached to the walls using staples, because the through method is not suitable - the product can be damaged.
Marking
Work begins with preparation - applying markings to the wall
This is especially important when fixing the planks to brackets. If the marking and fastening of brackets is done incorrectly, problems will arise when snapping the skirting boards into place.
If a through fastening is performed, then a corner element is placed on the baseboard. The product is applied to the wall and, stepping back 50-70 mm from the corner, a hole is drilled through the product so that a mark remains on the wall.
You will also need to mark and cut the baseboard itself. To get the correct angles, you need to use a miter box.
Here are some tips:
- To cut straight sections, you can use a jigsaw or hacksaw.
- To form corners you need a miter box.
The cut for a right angle is 45 degrees, and for an angle of 120 degrees the cut is 60 degrees. It is necessary to take into account the location of the corner - external or internal, since the cutting method for each of them is different.
Fixation with fasteners
The design of the plinth, which is attached with dowels and self-tapping screws to a wall made of concrete or brick, consists of two elements - a load-bearing one (it is fixed to the wall) and an external decorative one (it snaps into the grooves of the load-bearing profile).
- The work begins with fixing the corner element into which the supporting profile is inserted.
- At a distance of 20–25 cm, a hole for the dowels is drilled through the supporting profile.
- Plastic dowels are placed in the holes.
- Self-tapping screws are screwed into the dowels.
- Snap the decorative strip into place. Before this, use a vacuum cleaner to remove construction dust.
Clip mounting
Installing a plinth with your own hands is not difficult. Installation of wooden or MDF products is carried out using clips. The sequence is like this.
| Illustration | Description |
| 1. First, markings are applied to the wall, marking the locations of the clips. The first is fixed at a distance of 100 mm from the corner, the next after 500 mm. | |
| 2. Holes are drilled in accordance with the markings. | |
| 3. Using a dowel and a self-tapping screw, secure the clip. | |
| 4. The rail is cut at an angle of 45 degrees. Start of installation - from the corner. | |
| 5. The clips are inserted into the grooves on the back side of the bar. | |
| 6. The joints are puttied. |
Glue method
Polyurethane products are characterized by durability and a wide variety of external designs. They can also be painted in any color, which attracts designers. The process looks like this:
- Contaminants are removed from the surface where the plank will be attached.
- The plank is cut at an angle of 45 degrees.
- Glue from a tube with a spout is applied to the back side of the plank from the bottom and top. The ends are also coated.
- The bar is placed in place and then pressed tightly.
- The joints between the planks, as well as the places in contact with the floor, are coated with glue, and the excess is removed with a spatula.
You can paint the skirting boards in the desired shade after 24 hours.
Calculation of material costs
Calculating the need for material will not be much of a problem. It is necessary to measure the perimeter of the room, subtract the dimensions of the doorways from it, divide the result by the length of one batten and round the resulting number up. It is necessary to take into account the number of trimmings. It is better to take one more profile than to assemble one side of the room from several fragments.
There is no point in closing the corner in those places where cabinet or upholstered furniture will be placed close to the wall. It is enough to cover only open areas.
There is one more little thing that should not be forgotten - components. In accordance with the layout of the room, you will need internal and external corners, connecting elements, one right and one left plug for each door.
Attaching skirting boards to drywall
When choosing a method for attaching a baseboard to drywall, an adhesive mixture is the easiest option. Its main disadvantage is that during the dismantling process you will have to tear off the wallpaper.
- We drill a hole whose depth is 5 mm greater than the length of the screw.
- Remove dust from the hole.
- Insert the dowel and screw in the self-tapping screw. In this case, the dowel petals should fold.
During the installation process, you can use additional accessories, with the help of which various bends and transitions are formed in difficult places. They are joined at an angle, and then the joint is covered with special plates. Glue is a fairly common method of fastening, since in this case the use of special skills is not required. The method is very simple:
- Hacksaw for metal;
- Roulette;
- With a knife and an awl;
- Construction corner;
- Pencil;
- Hammer;
- A drill with different attachments and drills.
back to contents Installing a plinth is the finishing touch to almost any room renovation. Without this decorative element, the decoration of the rooms will look unfinished. Any floor needs a decent frame. The choice of type of skirting board for the floor depends on the conditions of use.
For rooms with uneven floors and curved walls, it is better to choose a model made of flexible plastic. For rooms with smooth walls and floors, a wooden option is suitable. Features of the types of floor models: The choice of fasteners depends on the specific conditions and material to which the plinth is attached. In our case, the fastening material is plasterboard, which has a number of specific properties. Necessary tools for installation: a hacksaw, a tape measure, a knife, an awl, a construction angle, a pencil, a hammer drill, a drill with drills of various diameters and an attachment for tightening screws.
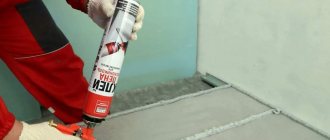
Let's try to figure out how the baseboard is attached to plasterboard, which is increasingly used to form the outer surfaces of walls. Home craftsmen face a similar problem at the final stage of renovation, when the flooring has already been laid and wallpaper has been pasted. This method is the simplest and most universal.
It applies to all types of decorative strips. It is best to use “liquid nails” as an adhesive. To do this, the internal surface of the part and its installation site are cleaned of dust and grease.
Glue is applied to the baseboard in a thin dotted line along its entire length, after which the part is pressed against the wall and floor for the time specified in the instructions. Wooden plinth is made from alder, larch and oak. There are a lot of products that are made in accordance with European standards; they have built-in devices for installing cable wiring. Such products can only be used if the wall surface is perfectly flat. MDF is a very fragile material that is very easy to damage.
They are attached to the wall using hook-shaped brackets, onto which the strips are subsequently placed.
If you are wondering how to screw a plinth to drywall, then we can say that this operation is not inferior in its simplicity to the above-described method of fastening. You can secure this part using dowels and self-tapping screws in a matter of minutes, while the choice of hardware products depends entirely on the material of the main wall.
Additional information on the topic:
- How to fix glass in a plasterboard partition
- How to build an IKEA cabinet into a plasterboard niche
- How to properly finish drywall on walls video
- How to glue plasterboard to walls using Perlfix
- How to assemble a suspended ceiling from plasterboard video
Installation of PVC fillets and its features
Ease of installation, low price, practicality and a huge range of models make PVC baguettes incredibly popular and in demand today.
It is also worth noting several more design advantages of such products:
- presence of a removable panel;
- cavity for placing wiring;
- increased flexibility;
- ease of cutting.
You should know: thanks to the ability to imitate other materials, PVC baguettes are suitable for any type of floor.
There are three options for how to properly nail a plastic baseboard. We will consider them.
Fixation with clips
This method is especially beneficial if there are several cavities for wires. Also, when using it, there are no visible marks of attachment.
No traces of attachment
Here are detailed instructions for carrying out this method of installation work:
- we adjust the fillets to the required dimensions;
- We apply the inner part to the wall and mark the places for the dowels;
- drill holes with a hammer drill;
- drive in plastic dowels;
- We apply the inner part again and this time firmly fix it with self-tapping screws;
- lay all the necessary cables;
- we install the external part of the decor.
Tip: Make sure the end caps and transition corners are the same color. For cutting, it is best to use a miter box and a hacksaw. This will help make everything smooth and neat.
Especially if you do the work yourself
This will help make everything smooth and neat. Especially if you do the work yourself
For cutting, it is best to use a miter box and a hacksaw. This will help make everything smooth and neat. Especially if you do the work yourself.
The front panel can later be removed for cleaning or work on the built-in wiring.
In the case where the product does not have cavities for wires, it may be necessary to purchase clips for fastening separately.
Advice: calculate the feasibility of purchasing additional fastening systems in monetary terms. This is not always beneficial or justified.
Installation with glue
The option using glue is easier to use. In this case, we are not interested in how to nail the baseboards, because we will be gluing them.
No additional electrical tools are required here. But you won’t be able to remove the panel either. The frieze is glued once and until new repairs.
- we cut the baguettes to the required length, creating corners if insert corners are not used;
- apply glue to the inside of the panel and the joint on the wall;
- press and hold until hardened;
- We remove the excess liquid released from under the edges with a rag prepared in advance.
Try not to stain the floor with glue during installation.
You can purchase specialized adhesive for ceiling or floor plinths at any hardware store.
Tip: for gluing the frieze, it is recommended to use glue brands such as “Dragon”, “Titan”, “Moment”.
Installation using self-tapping screws and finishing nails
The cheapest way to nail plastic skirting boards is to use self-tapping screws or finishing nails. This option will be quite reliable and practical, but not very neat. The attachment points will be visible even after they are masked.
Now, in order, how to do it yourself:
Using a drill with a diameter of a couple of millimeters, we make holes in the fillets at the same distance of 30-60 centimeters;
Advice: be sure to maintain the same spacing between the fasteners, so that even if they are noticeable, they are at least located symmetrically.
- countersink the holes with a sharpened knife so that the heads of the screws can sink into the surface of the frieze;
- We apply the panel to the installation site and, through the holes made, mark the places for subsequent drilling;
- We drill holes with a hammer drill;
- we hammer in plastic dowels if using self-tapping screws or wooden dowels for finishing nails;
- install the fillet, tightly fixing it with fasteners.
You should take into account the fragility of the material and, at the moment of final fixation, screw in self-tapping screws or drive in nails with special care so as not to press through the surface.
Screwing in a self-tapping screw with a screwdriver
Tip: screw in the self-tapping screw in the area of the panel adjacent to the wall.
Hats are usually masked with special corks or wax, the same color as the baguette.
What is the best way to attach wood, plastic or floor PVC to a concrete wall?
There are several methods for attaching skirting boards to a concrete wall:
- liquid Nails;
- strips and clips;
- dowels and screws.
Glue fastening is the easiest and fastest method.
Fixing with strips and clips involves drilling holes for dowels, then the clips are fastened with self-tapping screws. When the cable is laid, the plinth snaps onto the clips. It comes off easily.
Special slots for hidden fastening are purchased separately, so it is important to determine their exact number.
When fastening with screws, you should not overdo it when tightening, so that cracks do not appear. The fastening points themselves are covered with special decorative caps.
How to install plinth on the floor
There are several ways to attach plastic models. This work can be done using special fasteners, special “Liquid Nails” glue or self-tapping screws (dowel-nails).
Installing a skirting board without a cable duct
Installation of this type of plinth can be done using special aluminum fastening strips or using self-tapping screws.
In the first installation method, first of all, along the bottom of the wall at a distance of 40-50 cm from one another, the fastening points are marked. The distance from the corner should be no more than 10 cm. In the designated places, holes are drilled to a depth of 3-4 cm into which a plastic dowel is inserted. After this, the mounting plates are secured with screws around the entire perimeter.
An inner corner is placed on the edge of the profile. For better fixation, it can be glued with special glue. Installation begins from the inner corner of the room. The fittings must be snapped into place. To continue the strip, put on a coupling. Then the next inner or outer corner is put on the cut piece of the profile. First you need to measure and cut the required length to the connection, connect the two strips, and then snap the corner. Thus, using the fittings, they continue trimming and installing the baseboard around the perimeter of the entire room. Near the doors, the strip ends with a plug.
The procedure for installing a plastic skirting board using special aluminum fasteners
If you still plan to lay a cable or wire under such a plinth, then it is simply moved, installing it at an angle to the wall.
Installation of such a profile will not be difficult even for a novice master. There are no traces of fasteners on the finished surface, which is naturally a big plus. If necessary, such a plinth can be dismantled and moved to another location.
With the second fastening method, the results of the work do not look as aesthetically pleasing, since the screws are located on the surface of the baseboard, but this fastening is the most durable. The procedure will be similar to that described above:
On the plinth profile, holes of 2-3 mm in diameter are drilled every 50 cm. A conical recess is made into the hole. Installation starts from the corner. The plank is pressed against the wall and marks are made on it with a pencil through the prepared holes. 6-8 mm holes are drilled according to the marks in the wall and dowels are inserted into them. Place the baseboard against the wall and screw the screws into all the holes.
This plinth will look more aesthetically pleasing if the screw caps are covered with plastic round plugs, which need to be matched to the color of the main profile.
Installation of floor skirting boards with cable duct
This type of model is fastened using special dowel-nails or self-tapping screws.
The procedure for installing a floor plinth with a cable channel
First of all, carefully remove the cable channel strip. Holes are drilled in the profile every 50 cm using a 6mm drill. After this, put on the inner corner, apply the profile to the wall and mark holes for dowels through the holes. Holes are drilled in the wall. Dowels are inserted. Apply the profile and screw it with screws or hammer in dowel-nails. Gradually installing couplings and corner profiles, continue installation along the entire perimeter of the room. Lay the cable in the baseboard channel. Return the lid to its place.
Installing plastic skirting boards using liquid nails
Unlike the methods described above, this one is the least dirty and faster. Carefully measure, trim, install and glue the fittings onto the baseboard. The strip of wall under the baseboard is pre-primed. Apply a thin strip or drops of glue and press the profile to the wall.
A correctly selected and well-installed plinth acts as a decorative element
Attaching plastic skirting boards is not as difficult as it might seem at first glance. If you follow all our recommendations, you will be rewarded with a beautiful floor in your home.
Application technology
Tools
Before you start working with your own hands, you need to prepare the following set of tools:
- roulette;
- hacksaw;
- liquid nails for floor skirting boards with a gun attachment;
- hammer;
- rubber spatula.
In addition, it is advisable to have a miter box, which will simplify the process of cutting fillets for corner joints. If such a tool is not available, you can make a template in advance to quickly and accurately apply markings.
Note! The adhesive composition must match the material. For example, if you plan to attach plastic skirting boards to liquid nails, you should use glue for plastic or a universal composition that is suitable for all materials.
Example of marking
Preparation
It is necessary to begin work by performing the following preparatory work:
- first of all, you need to measure all the walls of the room, including protrusions and recesses, and then apply markings to the baseboards;
- then the edges of the planks are cut at 45 degrees for corner joints;
- the back side of the planks must be sanded with sandpaper to obtain a rough surface;
- To make sure that fillets can be attached, you should check how clean the surface of the floor and wall is. There should be no dust or other contaminants on it.
Advice! If you don’t want to bother with installing skirting boards for a long time, you can purchase self-adhesive fillets. The installation process takes even less time.
At this stage, the preparation of materials is completed, and now you can proceed directly to installation.
Applying adhesive to the plank
Fastening fillets
Instructions for attaching skirting boards look like this:
- work should begin with the longest plank, which is adjacent to the corner. At this stage, it is important to correctly apply the adhesive to the surface.
If the product is narrow, then the glue is applied in drops in increments of 5-10 centimeters. If the strip is wide, the adhesive must be applied in a zigzag manner, which will ensure maximum strength of the connection. However, there should not be too much glue so that it does not protrude to the surface;
In the photo - gluing the baseboard
- Immediately after applying the glue, the product must be pressed against the wall and held in such a position for some time so that the composition “seizes.” As a rule, after 15 minutes the plinth cannot be torn off;
- All other fillets are attached in the same way.
Note! Once the adhesive-treated skirting board has been applied to the wall, it cannot be reused, even if you remove it before the adhesive has set. Therefore, it is first necessary to outline the position of the bar.
This completes the work. As we can see, the greatest difficulty in this operation is the preparation of materials, which is performed almost the same way, regardless of the method of fastening. The installation itself takes a minimum of time and effort.