Plywood can be laid on both concrete and wooden floors. In both cases, it can be glued, fortunately, construction stores today are replete with a variety of offers of adhesives of different price categories and quality. The question of how to glue plywood can have many different solutions and buying the cheapest or, conversely, the most expensive glue for laying plywood will be fundamentally wrong - it must be chosen depending on what kind of flooring the plywood is chosen for and in what conditions it will be used be exploited.
Types of glue for fixing plywood to the floor
Water based glue
Water-based adhesives are the answer to the question of whether it is possible to glue plywood to a wooden floor without releasing strong odors and maintaining an environmentally friendly atmosphere. Therefore, it is recommended for use in residential areas.
It is best to use them to glue moisture-resistant wood.
But water-based adhesives also have disadvantages:
- they take a long time to dry;
- require additional fastening with dowels.
If communications are laid in concrete, and there is no diagram of their location, then you will have to abandon the use of nails or dowels so as not to inadvertently damage the electrical wiring. Otherwise, the floor will have to be opened with diamond cutters, the damaged wire will be corrected, and the concrete will be re-concrete.
Main types of water-based adhesives:
- polyacrylate;
- latex containing artificial rubbers;
- PVA (emulsion of polyvinyl acetate in water);
- contact compounds.
One-component adhesive
One-component adhesive for plywood floors contains a non-flammable solvent, but when using it, the screed must first be primed. Here you also need dowels for intermediate fixation.
Toxicity requires good room ventilation and the use of a respirator.
In addition to the solvent and polymer, one-component polyurethane adhesives contain a hardener - isocyanate, adhesion enhancers and other additives.
This glue has a number of advantages:
- perfectly penetrates into voids and cracks, which makes it possible to increase the solidity of the subfloor;
- after drying, the glue remains elastic, so it does not crack during use;
- used for plywood made from types of wood prone to deformation from high humidity.
Two-component adhesive
Any two-component adhesive for plywood on a concrete floor, due to its fast reaction (hence they are called reactive), sets very quickly and produces a durable and very strong seam. Buying glue from two components is much easier than gluing it, since immediately before use it is necessary to mix the resin with the hardener in the required proportions.
When working with this glue, you should wear personal protective equipment.
The price of glue for plywood on a concrete floor, consisting of two components, is significantly higher than that of one-component adhesives, but there are also plenty of advantages:
- no intermediate fastening with dowels or screws is required, which saves effort, money and time;
- after the glue has quickly hardened, you can start sanding the surface of the chipboard much earlier;
- provides the highest bond strength.
Video on how to glue plywood to a concrete floor with two-component adhesive:
Technology of fastening plywood with glue
Before laying plywood on a concrete base, we check its moisture level. Wood materials cannot be laid on a wet base. See this video for all the details of the process:
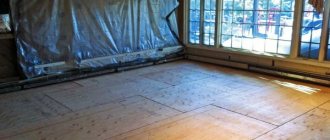
Method for determining screed dryness:
- We cover the area of the screed with polyethylene, press its edges to the surface, press down with heavy objects or fix it around the perimeter with tape.
- If after 5 days the film remains dry, you can safely proceed to laying the plywood.
If condensation forms, wait for the screed to dry; the residual humidity should be no more than 2%.
Material cutting
It is convenient to install pieces measuring 500 by 500 mm.
The material is sold in large sheets; if they are laid in one piece, this can lead to deformation of the floor during operation.
We cut the plywood sheets into 4 squares ranging in size from 500 to 750 mm in width and length.
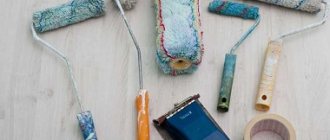
We cut the material using an electric jigsaw or grinder.
We number the squares so as not to confuse their location during installation and sketch out a diagram of their layout.
Gluing plywood
Before installation work, you need to level and clean the base from dust and debris. Primer of the base surface helps reduce glue consumption and improve adhesion to the surface. As a primer, you can purchase a special mixture or dilute glue with water.
We divide the floor into four rectangles and find the center. Without using glue, we lay out the plywood on the floor from the center with the seams staggered. We leave a compensation gap of 1 - 1.5 cm along the perimeter of the walls and between the squares of plywood.
Installation steps:
- We apply an adhesive composition 2 mm thick, which we will have time to cover with the material before the adhesive composition sets. Glue the plywood to the screed.
- We lay out the material and, if necessary, additionally fix it with self-tapping screws.
- After the glue has completely hardened, sand the surface of the plywood with sandpaper or a grinding machine. This allows you to eliminate burrs, cuts, and small differences in height.
We lay the plywood on the screed according to the diagram and numbering of the sheets. Sheets of material must lie for several days in the room in which they will be used.
If you lay the floor immediately after the material has been brought in from the street, the base may move, because... it will either pick up moisture from the room, or, conversely, dry out sharply.
Features of choosing glue
Depending on the finishing floor covering
When choosing an adhesive for gluing plywood to the base of the floor, you need to start from the material of the latter and the conditions for further use of the room:
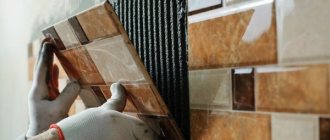
- When deciding how to glue ceramic tiles to a wooden floor, you will need tile adhesive for plywood that does not include water and is not aggressive towards wood.
- If you need parquet adhesive for plywood on a wooden floor, you should choose between epoxy-polyurethane or pure polyurethane systems containing artificial resins and solvents.
- To glue linoleum onto plywood, you need an appropriate adhesive that can provide a long-lasting, strong seam. It is affordable, safe and approved for use in residential areas.
Laminated plywood (with a film coating) cannot be glued. Therefore, before applying the epoxy compound to it, the film must be removed from the surface with sandpaper.
For unveneered plywood
After gluing to the screed, plywood can be either an independent coating or simply serve as an intermediate layer for the finishing coating.
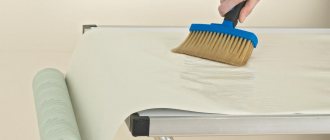
For unveneered plywood, you can use any glue. The only important thing here is that its surface is clean and dry. The adhesive can be applied evenly with a roller or brush to both surfaces to be bonded. Long-curing adhesives require preliminary fixation of plywood sheets to the screed using dowels, nails or clamps after approximately 30-40 cm. After work, excess mixture must be removed along with unnecessary nails.
Outdoors or indoors?
For indoor processing, it is better to use PVA glue, which is non-toxic, does not change the color of the material, but adds strength to it.
For external use, it is better to choose an epoxy composition with phenol, and to connect plywood to metal, it is better to use epoxy glue.
Tips for choosing glue brands
When choosing an adhesive for plywood, its type of gluing is determined. There are many brands of glue, which makes the selection process difficult.
The most popular are:
- STAUF PUK-446 is a two-component adhesive, suitable for working with wooden materials. Gluing plywood to a concrete floor is carried out without additional fastenings with dowels. Use the prepared solution within an hour. Before applying a layer of adhesive raw material to concrete, it is first primed.
- Sika Bond-54 Parquet – universal, odorless, fast hardening. Used when installing heated floors. Before applying to concrete, it is pre-primed. You can glue plywood to the screed without additional fixation.
- Euromix Wood - odorless, polyurethane based, elastic, universal, moisture resistant.
- IBOLA L12 – made of artificial resins. Without water content, which has a positive effect on use with wooden materials. The screed must be primed before applying the base.
This is not the entire list of glue brands used to attach plywood to cement floors. When buying a certain type, the composition and properties are taken into account.
Glue drying speed
It depends on the properties of the solvent:
- Adhesives with volatile solvents dry the fastest, allowing you to continue working after a few days.
- Eco-friendly water-based compositions take much longer to dry, which makes many people abandon them.
- The fastest option is a two-component adhesive for plywood on a concrete floor, which dries on average within 24 hours. In addition, you can do without dowels, and if the screed is primed with epoxy, then the plywood can be laid on a damp base.
Types of adhesives
There are several types of plywood screed glue.
Polyurethane
Such adhesives have high strength and adhesion to all materials. The compositions do not have a pungent odor, and after drying they polymerize and do not emit any harmful substances, that is, they are considered harmless.
Polyurethane glue is:
- Two-component. This means that immediately before using the composition, you need to mix the adhesive and hardener. This is the only type of glue that securely fixes plywood without the use of dowels. But at the same time, these are also the most expensive mixtures. The polymerization process begins quite quickly, so no more than 40-60 minutes are allotted for work. The finished mixture has a high viscosity and is easy to work with with a comb spatula. Also, two-component compositions are characterized by increased permeability.
Important! Before hardening, the two-component adhesive is very toxic, so when working with the compound you must use a protective mask and gloves.
- One-component. These are simpler compositions that polymerize due to moisture in the air. For this reason, they dry longer, which allows you to work calmly. It takes up to 48 hours for the composition to fully polymerize. Although one-component formulations are less toxic, they become completely safe only after 2 days.
This “layer” is distinguished by its strength, which is even higher than that of the concrete base itself. At the same time, polyurethane adhesives can withstand temperatures up to +55 degrees. There are also mixtures on sale containing epoxy resin, liquid glass and other “strengtheners”.
The consumption of polyurethane adhesive mixtures is 1.2-1.5 kg/m2. The susceptibility to ignition of the finished layer is low.
Based on artificial resin
These are universal compositions (also called alcohol), made on the basis of artificial resins or solvents, which do not require separate preparatory work. Such adhesives also have a strong odor, so you need to wear a mask when working and ventilate the room after applying the adhesive. After installing the plywood, you additionally need to secure it with dowels. One of the disadvantages of such mixtures is the very pungent odor, so work is carried out only in a respirator. Adhesives of this type have good frost resistance, are suitable for installing underfloor heating systems, and have good adhesion.
Healthy! Such compositions are most suitable for coatings made from natural materials.
Among the advantages of adhesive compositions, it is worth highlighting complete drying in 3 days. The mixture is quite elastic, which allows it to fill cracks and voids formed in the concrete screed well. Due to this, the base becomes more dense.
The consumption of resin or solvent based adhesive is 1.2-1.5 kg/m2.
Water based
Dispersion adhesive is budget-friendly and environmentally friendly, since its components do not dissolve, but are mixed in a water-dispersion medium. As the composition dries, only completely harmless water molecules without any odor can evaporate.
But the adhesion rates of such compositions are lower. Dispersion adhesive can only be used in residential, heated premises, since prolonged exposure to moisture on the adhesive may cause warping of the veneer. Therefore, only moisture-resistant plywood is suitable for such compositions.
One of the popular water-dispersion compositions is PVA glue (polyvinyl acetate). This glue is unique in that it does not change its characteristics even when laid on a damp screed. PVA creates a plastic connecting layer with a high adhesion rate. But it also dries for quite a long time - up to 7 days.
Also, water-based glue can be:
- polyacrylate;
- latex, with artificial additives (rubber);
- Koniakin.
Before use, you need to dilute the solution in water or a special primer. Glue consumption is about 1.2 kg/m2. The composition's susceptibility to ignition is also low.
Secrets of using plywood glue
The strength of the bond depends not only on the properties of the glue, but also on compliance with the gluing technology. Deviation from the latter inevitably weakens the connection.
It is also important that no voids form between the plywood and the base; to do this, the plywood must be carefully pressed against it and the glue must be distributed evenly.
Using a primer improves adhesion and saves glue.
Do you trust plywood adhesives? What glue did you use for plywood most often, and under what conditions? Share your experience in the comments.
Step-by-step instructions for gluing plywood
When you have chosen how to glue the plywood to the concrete, you can get to work. This should be done according to step-by-step instructions and not to miss important points, which may later lead to deformation of the floor covering. You need to follow the algorithm:
- Prepare the concrete base. Make sure there are no potholes or large cracks. The maximum depth of damage is 2-3 mm. Check whether the screed is damp. To do this, a plastic film is placed over the area for a day, after which the presence of condensation is checked.
- Clean the surface from debris and dust. To do this, it is better to use a powerful construction vacuum cleaner. Here you can calculate the area and buy the required amount of materials. Be sure to have a primer and a sufficient amount of glue. Typically, 10-15% of the bulk may be required for stock.
- Prime the surface. To do this, you need to pour the composition into a convenient container, generously moisten a brush or roller in it and carefully walk over the concrete base. The main thing is not to leave any voids during priming. Once the primer has dried, you need to proceed to the next step.
- Open the container with the adhesive composition, using a mixer or a special attachment on a drill, mix the contents until smooth.
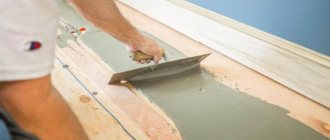
- Pour a certain amount of adhesive onto the concrete screed, level it with a comb spatula, and then carefully press down the sheet of plywood. You need to tap it a little, over the entire area, so that the part completely sticks to the base. You need to start gluing from the far corner and move towards the exit. It is important to leave 3-4 mm compensation gaps between the plywood fragments.
Installation of parquet on plywood
Installation can be done in two ways:
- Dry, without using a fixing base, only with snaps.
- For the adhesive mixture.
Let's consider the second method in detail.
- Preliminary work stage:
- Prime the concrete surface.
- Lay the plywood on the surface in a checkerboard pattern, leaving small gaps between the sheets so as not to interfere with the natural expansion and contraction of the wood as the temperature changes.
- Glue it, secure it with self-tapping screws to securely fasten it.
- Sand, remove dust, prime the plywood sheets.
- First lay out the parquet on the plywood flooring.
- Apply glue to the plywood with a notched trowel, but not immediately over the entire surface, but as the parquet or parquet board is glued. Pay attention to the working time of the glue.
- The parquet is applied to a plywood surface coated with glue and pressed tightly.
- Lay out, maintaining a gap between the wall and the parquet for the natural expansion of the wood.
- The next row of parquet is installed in the groove, hammered and pressed tightly again. Be sure to leave small gaps between joints.
Use one-component or two-component glue; dispersion glue is only suitable for oak parquet.
This method of gluing parquet is convenient, but if the floor is repaired, it will be difficult to tear off the parquet covering from the glue.
We advise you to look at the instructions for laying parquet on plywood:
Tips and nuances
Finished floor
To ensure a high-quality floor, you need to consider the following during installation:
- The plywood should not be thinner than the finish that will be placed on it;
- When laying slabs, avoid contact of 4 sheets at once;
- When working with non-moisture-resistant plywood, installation of a waterproofing layer is required;
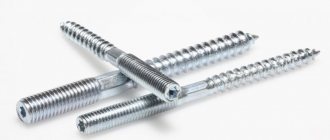
- The length of the self-tapping screw must exceed the thickness of the blade by at least 2.5-3 times;
- When installing sheets on joists, you must first lay a layer of hydro- and thermal insulation. Then the guides are laid.
Using pressed wood, you can install high-quality flooring in an apartment or private house. Laying plywood over an old wood floor creates a warm, even, durable surface. Compliance with installation rules and taking into account the characteristics of materials ensure a long service life of the floor covering.
Did the article help you? ( 6 ratings, average: 4.17 out of 5)
Leveling a wooden floor with plywood: laying plywood on a wooden floor
Modern room finishing technologies have also affected floor coverings. Residents give their preference to such materials as cork, parquet boards, and laminate. When using these materials, the requirements for the evenness of the base are not least important.
In view of this, quite often one has to face the need to level a wooden floor. There are several ways to do this process. One of them is leveling the floor with plywood.
In order to carry out this work correctly, you need to know how and with what help plywood is attached to a wooden floor and what preparatory work should be done.
Why plywood?
Plywood has the characteristics necessary for its use during construction and repair work. She has:
- relatively light weight;
- sufficient hardness of the material surface;
- resistance to loads;
- high quality grinding;
- resistance to water (for moisture-resistant varieties);
- absence of unpleasant odors;
- availability of installation technology.
Plywood is indispensable for leveling wooden floors.
Plywood is ideal for leveling wooden floors
In addition to the affordable price, it has the advantages that are necessary for such work. Namely:
- due to the perpendicular arrangement of adjacent layers, plywood sheets have high strength in all directions;
- the production of large sheets of plywood allows for accelerated installation over large areas;
- plywood sheets bend well without breaking;
- plywood sheets are convenient for transportation and unpretentious in operation.
Preparatory stage of work
Naturally, laying plywood on a wooden floor must be done correctly and using the necessary tools. It is good that the master has experience working with this equipment. To lay plywood you will need: a screwdriver; jigsaw; level; roulette; self-tapping screws with dowels.
Tools required for work
Before you begin leveling a wooden floor with plywood, it is recommended to check the substrate to ensure its suitability for use. Replace old rotten boards and repair creaking ones. It would be a good idea to check the evenness of the base. If the floor is uneven, then you need to determine the maximum surface difference.
Small deviations can be smoothed out by laying a special substrate. Differences of more than one centimeter require laying the logs exactly horizontally. They are set using a water level. The choice of plywood depends on the flooring that will be installed subsequently. If it is carpet or linoleum, you can use thin sheets.
For parquet or laminate flooring, you must choose plywood thicker than 10 mm.
Note. The thickness of plywood laid under laminate or parquet must be no less than the thickness of the floor covering.
Deciding on the brand of plywood
Before starting work, you need to decide on the brand of the product. It is determined in accordance with the moisture resistance of the material. FB and FOF grades are used for industrial construction. FK and FSF grade plywood is intended for individual construction work.
In the production of FC plywood, glue without the use of phenols is used. Therefore, it is completely harmless and can be used in bedrooms and children's rooms. It is resistant to mechanical stress and has average water resistance. It is produced both in polished form (Sh1 – polished on one side, Sh2 – on 2 sides) and in unpolished form (NSh).
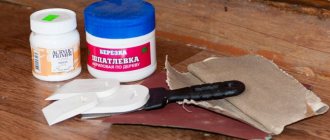
How to glue fabric to plywood
To decorate furniture or restore it, you need to glue the fabric to the plywood surface.
Use universal glue - PVA. It spreads well, is transparent, and is quickly absorbed.
Restoration experts recommend professional, expensive fabric glue, hot melt glue, or waterproof polyurethane-based glue.
They all do their job well - quickly, reliably, fasten the fabric to the plywood surface and do not leave stains.
Plywood on a wooden floor: installation methods
Plywood over wood floors in your home allows you to level the base without dismantling the old wood flooring. The backing in this case prevents squeaking and other problems that may arise. The technology allows you to do the installation yourself without any serious difficulties.
Selection of material for work
Laying plywood on a wooden floor is an excellent solution. This DIY rough coating has the following advantages:
- low cost;
- ease of transportation;
- reduction of preparatory work time;
- good leveling of small floor defects and increasing the service life of the floor covering;
- strength and wear resistance of the material;
- flexibility, which allows it not to break or crack during operation and installation;
- minimum number of joints between sheets;
- installation is carried out without serious labor costs.
Classification of plywood types
Before laying the material with your own hands, you need to choose it correctly. There are several classifications based on various criteria:
- by grade and type of raw materials used (wood);
- impregnation (its presence and method);
- variety;
- surface treatment method;
- number of layers;
- moisture resistance.
Laying plywood on a wooden floor in a house (subfloor) involves the following recommendations for choosing when doing the work yourself:
- the flooring is made from sheets of the second or third grade, the use of the first is not justified from an economic point of view;
- It is best to use moisture-resistant material in the house, this is especially important when installation is carried out in wet rooms (bathroom, toilet, kitchen);
- flooring involves the use of sheets with a minimum thickness of 10 mm, but this is only suitable for small rooms with low traffic;
- laying technology in more critical premises assumes that the substrate under the finished floor will be made of a material with a thickness of 14-22 mm, such sheets have sufficient strength;
- It is recommended to choose materials sanded on both sides (if possible).
Preparatory work
Preparing a Wooden Floor
Before laying plywood on a wood floor in your home, the flooring and surface must be prepared. Do-it-yourself activities are as follows:
- the base for installing plywood must be cleared of debris, dirt and treated with antiseptic compounds; when laying without logs, priming will need to be done;
- checking the condition of the floor, removing and replacing damaged elements;
- if you have time, it is recommended to arrange the sheets vertically and dry them for 2-3 weeks, the temperature should be at room temperature or slightly higher;
- after drying, the sheets are treated with antiseptic compounds;
- Next, it is necessary to ventilate the material;
- if there is a need to increase strength, it is worth treating the plywood with acrylic varnish; the coating is done in several layers;
- When laying it yourself, you need to bring the sheets into the room two days in advance and lay them out horizontally; this is done so that the material adapts to the temperature and humidity conditions of the room.
Source: https://domzastroika.ru/slabs/fanera-na-derevyannyj-pol.html