-In addition to universal putties for finishing work, there are a number of specialized mixtures for simulating wood. First of all, the difference between them is in the color scheme - universal putties are either white or tinted to match a specific paint. When repairing flaws in wood - chips, fallen knots, dents and nicks - it is very important not to spoil its natural appearance.
What types of wood putties are there with examples and photos, their advantages and disadvantages, application rules, an overview of leading manufacturing companies - further in the article.
Types of putties
In addition to the color scheme that imitates wood species (pine, oak, alder, ash, spruce and others), there are differences in the chemical composition of various putties. They are divided into the following types:
- putties based on synthetic solvents;
- water based;
- oil;
- polymer;
- plaster.
Conclusion
The advisability of using one or another type of putty depends on the place and purpose of its use. If this is sealing cracks and chips in a house or apartment, then any material is quite suitable here. It is only undesirable to use a solvent-based mixture because of its pungent odor.
But this composition dries quickly and can be successfully used in non-residential premises. If you need to level the surface, then it is best to use homemade mixtures, which are a less expensive option.
In conclusion, we can conclude that the putty mixture for concrete is the most versatile material, thanks to which, without much effort, you can quickly eliminate any defects that appear in the form of cracks, irregularities, and bumps.
But it is necessary to choose the right putty, based on the characteristics of the surface being treated. In Sevastopol, you can find the necessary type of putty in any department of stores intended for construction work. We also recommend that you read the article about tile adhesive Ceresit cm 11.
Putties based on synthetic solvents
These also include nitro putty. They were among the first to be developed for working with wood, and have not lost their relevance today.
They have good mechanical strength, dry quickly, but before complete drying they emit an unpleasant, pungent odor and are toxic, so you need to work with them while protecting your respiratory organs with a respirator, in a ventilated room, or better yet, outside. They are used in the restoration of floors and parquet due to their increased abrasion resistance.
Making your own putty
When carrying out repair work, you can purchase putty in the store or make it yourself. Do-it-yourself wooden floor putty can be made using the following components:
- Fine sawdust or wood dust that will serve as a filler for the composition. They are combined with drying oil or oil varnish and mixed until a thick mixture is formed. You can also use wood glue or PVA with fillers.
- A single piece of old linoleum, which is finely chopped and filled with acetone. After dissolving the fragments, an excellent putty for wooden floors is formed, which reliably protects the coating from moisture.
- Drying oil and animal glue - bone or flesh glue. Drying oil, ten percent glue, varnish kerosene and liquid drier are mixed in a certain proportion. For the solution you will also need liquid soap and dry chalk. The glue needs to be heated, add a little soap and keep on low heat, stirring constantly. Gradually add drying oil, turpentine, drier and finally chalk into the mixture. Mix the resulting mixture well and use warm for application.
- Rosin and ozokerite. The components are dissolved with the addition of yellow ocher. Everything is mixed, resulting in a paste-like mixture. Apply hot using a metal spatula. The hardened solution can always be heated and used again.
It is worth noting that do-it-yourself putty for wooden floors is practically not inferior in characteristics and quality to factory-made analogues. In this regard, many today practice making the composition at home.
Water based
Unlike synthetic solvents, water is not toxic and does not have a pungent odor; therefore, water-based putties are harmless to humans and animals at all stages of work and upon completion. It dries relatively slowly and has good adhesion, which allows it to be applied to carefully sanded and even polished wood.
Read here! Burner for heating metal
To wipe off excess from the surface, simply use a damp cloth. After complete drying and varnishing, it is not susceptible to moisture. It is elastic, has a long service life, is fireproof and is not susceptible to heat and cold.
Primary requirements
Regardless of the type of putty materials, they all must have the following qualities:
- uniformity of texture;
- good adhesion;
- quick drying;
- absence of impurities and inclusions in the composition;
- Excellent wood coating followed by light sanding.
Before starting any work, even after studying the composition parameters indicated on the packaging, it is better to first test the mixture on a piece of solid wood.
Oil based
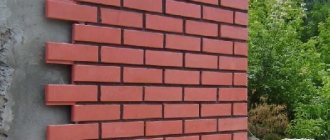
The only type of wood putty suitable for outdoor work; it can be used outdoors even without further varnishing or painting. Suitable for processing wooden facades.
It has strong water-repellent properties, is not afraid of ultraviolet radiation, exposure to open air, including sea air. Available in packaging from 500 grams to 15 kg.
How to level a wooden floor for laying laminate?
If you plan to lay laminated panels on a wooden floor, then it is necessary to inspect each board for rotting processes, unevenness and other defects. All boards must be strong, fit tightly to each other, and form a flat surface. Height differences of up to 3 mm are considered insignificant. If necessary, individual boards are replaced. Protruding nails are removed or driven into the wood. Preparation of the wooden base layer includes its treatment with antiseptic compounds. Wooden floor defects can be corrected using one of the methods suggested below.
Polymer
Polymer, also known as acrylic wood putty, is currently more common than others. This is due to its relative cheapness, durability, ease of use, good water-repellent properties, elasticity, and low shrinkage coefficient when drying.
Thanks to the modifiers it contains, it is suitable for both living rooms and rooms with high humidity (bathroom, toilets, sauna, kitchen). Also good for restoration of parquet and floor boards.
Methods for leveling floors with plywood
Floor leveling without joists
With this method of leveling a wooden floor for further laying the laminate under the plywood, no pads are used; it is laid directly on the floor. It is better to cut large sheets into several smaller ones, since it is recommended to lay the material in a checkerboard pattern.
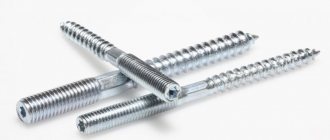
The screws need to be screwed in flush; to do this, drill holes with a screwdriver or drill, first for the screw itself, and then wider, to the depth of the head. This eliminates possible squeaking of the laminate during further use.
It is imperative to leave a gap between the plywood and the walls for possible deformation; it ranges from 10 to 20 mm. Between the sheets you also need to retreat 3-8 mm.
With belt support
In this case, a sheathing with joists and cross members (beams and slats are used) is pre-installed under the plywood in increments of 400-500 mm. You need to retreat about 300 mm from the wall on each side.
With this method, you first need to lay the plywood according to the principle of the first method. Next, circle each sheet, remove everything, lay joists and cross members, securing them with self-tapping screws.
The entire sheathing should be secured to the floor with metal corners. Then you can lay the plywood, screwing it flush to the joists with self-tapping screws.
With mini-lags
This option is quite complex and requires special knowledge and skills. It is used to level floors with differences of 8 cm. Here you need to make accurate calculations to set the joists.
Special formulas are used for this. This method is used exclusively by specialists, as it requires the use of special tools.
If the wooden floor has large differences and a one-time coating renewal is required, then it is better to remove the old one and lay a new one.
With point supports
This method is relevant when the floor difference is 2-3 cm, and only for small rooms with minimal load during operation. Linings made from leftover plywood or boards are placed under the plywood; other similar materials can be used.
The step between the pads should be from 30 to 45 cm. The height of the pads varies depending on the height of the floor drop. Laying plywood on pads is carried out similarly to the method with logs.
Regardless of the chosen method of leveling a wooden floor, before laying the laminate, it is recommended to lay a special underlay that will provide more comfortable operation: it will eliminate possible squeaking and wear of the laminate boards, and will facilitate deformation processes.
As you can see, you can update your old wooden floor to a modern new one without much effort and without having any special skills. The main thing is to carefully study the recommendations of specialists before the repair process.
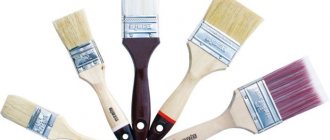
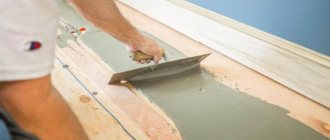
Application rules
The wood on which the putty will be applied is rough sanded, then dust is removed from it with a brush and a rag, or even better, blown off with a pneumatic gun. Next, apply a spatula with a small slide to the flaw. No matter how much manufacturers praise their product, the putty still shrinks when it dries.
Opinions differ about wood primer. The fact is that putty holds much more firmly on “bare” wood. But after removing its excess, stubborn stains of ingrained putty remain on the wood around the repaired defect.
A primer solves this problem, but the adhesion of the putty to the primed wood is noticeably worse. It is advisable to keep the spatula clean - this will simplify the work. If you need to apply a thick layer, you need to do it in several passes, allowing the intermediate layers to dry. After drying, excess putty is removed with sandpaper.
Leveling a wooden floor
Leveling a wooden floor can be done in three ways:
1) sheets of plywood; 2) OSB sheets; 3) self-leveling floor.
Leveling a wooden floor with plywood
Plywood is a dense sheet material consisting of several layers of wood veneer, perpendicularly glued together under a press.
Types of plywood
Leveling a floor with plywood is a labor-intensive and time-consuming process.
The main difficulty is to calculate everything correctly and prepare pads of the required sizes.
To do this, we take unnecessary scraps of different thicknesses from old laminate, fiberboard, chipboard, plywood, etc.
We cut them into equal squares, for example 10x10cm.
Thus, we obtain ready-made material for laying under plywood to level the floor plane.
To ensure that the edges of the plywood sheets do not remain suspended, you need to calculate and mark the entire floor area into equal squares and place the pads exactly on the cross lines.
In our case, we drew squares measuring 25x25cm, because... The plywood measured 1.5 x 1.5 m.
As a result, using a laser level and a ruler, we leveled the entire floor area with our pads, which were selected according to the required thickness.
We fasten the pads with self-tapping screws; one screw is enough for one stack of pads.
To prevent the self-tapping screw from falling into an already screwed-in self-tapping screw in the future, we fix the linings on one side of the longitudinal marking line.
And when we screw the plywood, we will screw screws into it on the other side of the longitudinal or transverse marking line.
After the entire floor area is laid out in one plane, we begin laying the plywood sheets.
The load on the floor differs in different rooms, so we choose the thickness of the plywood depending on the conditions of future use, but not less than 10mm.
Please note that we place the edges of the plywood in the middle of the pads, so that the edges of the other sheets of plywood also have a stop in the form of the same pads.
Sheets of plywood must be laid with indentations of 2-4 mm from each other, because When temperature changes, plywood can expand.
After laying one row of plywood, we make similar markings on it as on the floor for pads.
This is necessary so that the fastening of the plywood with self-tapping screws passes through the pads, and not into the voids under the plywood.
By marking we will know where the pads are located under the plywood.
This is how we secure the plywood and additionally secure the linings.
Before screwing the screws into the plywood, we recommend pre-drilling a 4mm hole, this will prevent the appearance of squeaks in the future.
Review of manufacturers
The leading manufacturers of wood putties are the following companies:
- Tikkurila, Finland;
- Belinka, Slovenia;
- Dufa, Germany;
- domestic manufacturers Tex, Extra and Rainbow.
- Technical gases. What are they?
Roofing. What are they?
- Rolled sheet metal. What it is?
How to properly putty wood floors
How to putty a wooden floor
Today there are many options for wood flooring materials. Let's look at some of them in more detail.
Acrylic putty
. This type of mixture has several good qualities, which in some cases make it irreplaceable. In particular, it can be used to remove various defects in wood coverings. This putty is capable of rubbing joints between floorboards well. Moreover, this mixture is an absolutely harmless substance; it does not emit toxic fumes at any temperature. Some of the undoubted advantages of acrylic coating are its resistance to high temperatures, durability and elasticity. After drying, the result is a very practical surface that has excellent water-repellent properties. Before applying acrylic putty to the boards, you should do a dry and wet cleaning of the room.
Solvent putty
. This type of putty contains wood dust, which makes it a good coating for parquet, timber bases and heated floors. In general, it is successfully used for wooden floors made of any type of wood. The advantages of this type of coating are also its high drying speed and ease of use.
Oil putty.
This putty consists of chalk, oil and water. It is great for covering any wooden floor. The advantages include increased strength and long service life. The disadvantage of this material is the fact that it takes a very long time to dry. When working with such mixtures, you should follow the instructions on the packaging.
Polymer putty
. This putty is based on polymers and water, i.e. made from environmentally friendly materials. Therefore, it is successfully used in areas where sanitation is required. It can be applied to almost any surface with the exception of cork floors and floorboards. The undoubted advantages are that this mixture is able to fill voids, eliminate unevenness and defects in the floor, and protect the edges of the boards from clogging. This coating also collects less dust, hardens fairly quickly and does not collapse over time.
Self-cooking
. You can save a lot by making your own floor putty mixture. To prepare such a mixture, you need to take 500 grams of drying oil, 100 grams of 10% animal glue, 125 grams of turpentine or varnish kerosene, 25 grams of liquid drier, seeded dry chalk and liquid soap. First, you need to heat the animal glue over a fire; when heating, you need to stir it constantly. Gradually you should add soap, drying oil, turpentine, sicattiv and, finally, chalk. After this, stir the mixture until it is similar in consistency to sour cream. The resulting substance should be applied only when hot. In this case, the temperature of the mixture must be maintained while work is underway.
Conditions for use
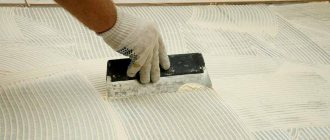
You can putty the floor both at the time of installing a new floor covering and when dismantling the old covering. Using floor putty, it is possible to eliminate cracks and abrasions that have appeared. This way you can update the condition of the floor. The material must be applied carefully using a spatula. If you need to reach hard-to-reach places, you should use the tip of the tool for this.
When applying the finishing layer to a wooden surface, you must first putty it. Using putty, you can achieve smoothness and evenness, which will be necessary for installation work.
Putty work
Today, floor putty can be bought both in cans and tubes. In any case, to make it easier to handle, it must be warmed up before starting work.
After this, you need to take the mixture in an amount sufficient to fill the holes and cracks. While working, make sure that the putty does not dry out. To ensure that there are no dents left after drying, the hole in the floor should be repaired in such a way that the mixture protrudes slightly above the floor surface.
It should be remembered that this material adheres well to wood. Therefore, you should work with it carefully so as not to leave marks that cannot be hidden even with the help of stain. In addition, contact between stain and putty will lead to stains. Then we can assume that all the work is in vain.
- In order to seal nail holes with putty, it is enough to apply only a couple of layers. For deeper and wider cavities, more layers should be applied. When one layer of the mixture is applied, you need to wait until it dries completely and only then can the next one be applied. The finishing layer must be laid so that it is flush with the coating. This is necessary because otherwise it will take much longer to dry several layers at once. There is also the possibility of cracks appearing, which will still need to be repaired, which is an unnecessary expense.
- After filling all the unevenness on the working surface, you should wait until the putty dries, and only then level the top layer using fine sandpaper. For convenience, the sandpaper can be placed on a block with a cork or felt lining.
- The color of the future floor covering largely depends on how thick the layer will be used during work. It must be taken into account that the putty layer will be visible through the paint, stain and varnish. For this reason, it is necessary to decide what topcoat will be applied and what color it will be. In addition, tint dyes should be used. You can buy them today at any building materials store.
- To obtain the desired shade, the putty is tinted. This can be done both before starting work and after drying. It is recommended to perform touch-up painting in both cases. In order to quickly select a shade, it is best to take a small piece of board that has the same coating and apply a pre-tinted mixture to it. You should also apply stain and paint to it.
Puttying plywood floor cracks
- Gaps in a wooden floor should be filled with putty using a metal or wooden spatula in a direction perpendicular to the floorboards.
- When puttingtying the floor, you need to thoroughly clean the layer of mixture applied to the surface. When the mixture is completely dry, you need to sand it well with sandpaper or pumice.
- Sometimes problems arise due to insufficient painting of the layers of putty. To prevent them, add thickly grated paint of the desired shade to the mixture at the rate of 100-150 grams of paint per 1 kilogram of mixture.
- Putty the entire floor surface. The mixture must be applied in a thin layer using a wide spatula with a slight slope in relation to the existing boards. To achieve the most even surface possible, place a stretched layer of gauze on the first layer of putty. Then you need to apply a layer of putty on top again, which should completely cover the layer of gauze.
- When the second layer of putty is completely dry, apply another layer if necessary. Then the floor surface should be thoroughly cleaned and sanded. If dust appears, it is removed with a brush or brush.
- When the putty is completely dry, you need to prime the surface with oxol or drying oil. When this layer is dry, you can lay parquet or laminate or paint the floor.
- The plywood should be puttied after it is secured to the guides. It must be primed both on the outside and on the inside. After this, you need to wait about an hour until the primer dries. Then you can apply putty.
- When choosing putty for plywood coating, you should give preference to oil or latex. Although it is possible to use ordinary putty. By choosing an oil-based one, you won’t have to rub out any unevenness with sandpaper after drying. This mixture also stretches well and absorbs less paint.
- If you choose latex putty, then after application you get a layer about one millimeter thick. This mixture is elastic and can cover all irregularities. Most often, only one layer of latex putty is applied, but if necessary, two layers can be applied. Leveling out unevenness with sandpaper on this putty is quite problematic. Therefore, you should carefully putty the cracks with this mixture. When the material dries, the coating is painted over.
- For flooring, polyester putty is often used, which is durable, elastic and has good adhesion. At the same time, it has no shrinkage. Only when applying should do no more than two thin layers.
- Polyurethane putty, which is known for its resistance to acids and gasoline, is popular.
Photo of the best wood putty
- Profiled sheet. What is it like?
- Industrial robots. What are their advantages?
Hydranautics membranes
The best penetrating waterproofing for concrete - selection criteria, application rules, storage featuresReinforced concrete columns
- Penetrating waterproofing for concrete
Varieties of putties for different types of base
| Photo | Name | Rating | Price | |||
| Putty for working with concrete | ||||||
| #1 | Gypsum mortar | ⭐ 98 / 100 | More details | |||
| #2 | Cement mortar | ⭐ 96 / 100 | More details | |||
| #3 | Acrylic mixture | ⭐ 95 / 100 | More details | |||
| #4 | Epoxy composition | ⭐ 95 / 100 | More details | |||
| #5 | Waterproofing solution | ⭐ 92 / 100 | More details | |||
| Types of putty for working with wood | ||||||
| #1 | Water-based putty | ⭐ 91 / 100 | More details | |||
| #2 | Solvent putty | ⭐ 90 / 100 | More details | |||
| #3 | Oil solution | ⭐ 93 / 100 | More details | |||
| #4 | Polymer-based composition | ⭐ 96 / 100 | More details | |||
As for processing the rough base, putty for concrete floors or other types of screed can also be made independently. The mixture in this case differs slightly in the substances used. PVA glue can be used as a tightening base. As for the filler, gypsum or cement is added as standard.
Based on the above, there are the following recommendations for preparing putty for a concrete floor:
- Making gypsum-based putty is quite simple. To do this, you need to combine plaster with chalk in a 1:2 ratio, and then knead it in PVA glue;
- An oil composition with drying oil, described in recipes for wood, is also excellent for puttying a concrete base;
- Seams in the coating can be sealed using cheap polymer varnish mixed with cement. This composition is resistant to moisture and also has a long service life.
The essence of the name and purpose of putty
Today, there is a lot of controversy about what name to use regarding the product for treating floor coverings and bases: putty or putty. The explanatory dictionary and other publications indicate that these two words are equivalent, but their origins are somewhat different.
The word “putty” comes from a working tool – a spatula, with which the product itself is applied to the surface to be treated. As for “putty,” the verb “putty” is closer in meaning. Accordingly, it is more appropriate to use the name “putty” when talking about the mixture itself, and to call the process of applying the mixture putty.
We suggest you find out which impregnation for wood in a bath is better
So, putty is a plastic mass used to eliminate surface defects, existing in the following varieties:
- starting - designed for rough processing of the base with subsequent laying of various layers of flooring or directly facing materials on it;
- finishing - a mixture used exclusively for filling small single defects and, as follows from the above, used after the starting putty. These include wood putty for floors and other variations that are primarily suitable for restoring surface finishes.
Choice depending on the type of base
Parquet putty
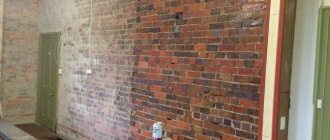
The most important stage of repair work is the creation of a flat, durable concrete surface. If there is a base with defects, putty is successfully used to eliminate them.
Concrete floors initially have high strength, but their top layer can begin to collapse in the presence of various kinds of defects that are insignificant at first glance - chips, crevices, cracks. Subsequently, expensive repairs will be required, especially if this is an industrial or public premises.
Recommended putties for working with concrete surfaces
With the help of putty, the surface of the concrete floor becomes more even and prepared for laying the finishing coating.
To putty a concrete floor, you can choose a base and finishing mixture. But according to experts, a more economical option would be to use universal compositions that work equally at both the preparatory and final stages. At the same time, the consumption of the mixture is significantly reduced.
Self-leveling mortar
Concrete putty is dry and paste-like - ready for use. The mixtures also differ in the method of application - a more liquid composition has self-leveling properties and is applied over the entire surface of the floor. Thicker compositions are suitable for local repairs of individual damaged areas.